• Training
    • Injury Prevention
    • Training Tips
  • How To
    • Bike Fit
    • Gear
  • Nutrition
    • Nutrition Tips
    • Weight Loss
  • Repair
  • Reviews
  • Stories
    • Funny Stories
    • Jokes
    • Quotes
    • Videos
    • Funny Videos

I Love Bicycling

I Love Bicycling is a website that is geared towards cycling for beginners with road cycling tips, training articles, nutrition tips, weight loss, how to’s and bike repair articles.

How To

  • Bike Fit
  • Gear

Weird Inventions for Bikes

September 20, 2015 by U.M.

Weird Inventions for BikesThe cycling industry has some crazy inventions, and some that are so useful that it’s a shame they aren’t more commonly used. Some of these inventions for bikes would be amazing for improving riders’ safety on the road, and some are just beyond unique. Here are ten of the greatest inventions for bikes.

  1. Bike Lane Lights: How great would it be if the white lines that mark the bike lane lit up in bright red at night? Turns out, that’s an actual invention! Bright red LED lights outline the bike lane, creating a high degree of visibility to oncoming traffic. These LED lights can be seen from almost a mile away! Cyclists would have a much safer environment for biking on the road if these were more widely used.
  2. Bicycle Side Car: A small sidecar that attaches to the bicycle, and can be used for transporting groceries or even your child. These are extremely useful, especially because they can be detached and reattached as needed. This is a great tool if you have a supermarket in biking distance, and decreases gas usage by eliminating the need to drive to the store.
  3. Helios Handlebars: These handlebars utilize colorful LED lights, which is great for nighttime riding. There is a powerful headlight on the front, as well as backwards facing lights. They also have a speedometer and GPS chip built-in, thus are one of the most multifunctional inventions for bikes. The cost is $199, but at least you could track the location of your bike if it got stolen!
  4. LifeBEAM’s Smart Helmet: This stylish looking helmet includes a heart rate monitor, eliminating the need to wear a monitor strap on your chest or arm. The helmet monitors your pulse and transmits the information to the device of your choice, such as your smartphone, allowing you to keep track of your progress and see the data in real time as you cycle.
  5. Wireless Bike Lock: The Lock8 bike lock operates wirelessly through transmission from your smart phone, using an app to direct the device to lock or unlock. This is a great way to prevent theft, and also includes a GPS chip for tracking. The device is built to emit a very loud alarm signal if the wire is cut, as well as notify the owner via the smart phone app.
  6. Stick and Find Stickers: These are small, coin sized stickers that allow you to locate lost or stolen items. They can be used for anything, but are a great way to find your bike if it ever gets stolen. They emit a signal that you can track right from your smart phone.
  7. Auto Inflating Tires: Adaptrac offers special tires that are attached to a bike pump. The pump automatically inflates the tires as needed, or based on the type of terrain you’re riding on.
  8. Turn Signal Jacket: Now, you can wear a black jacket that has LED lights on the back. You turn these LED lights on and off using switches by your wrists. This can be used to alert people around you of your intent to turn without taking your hands off the bike.
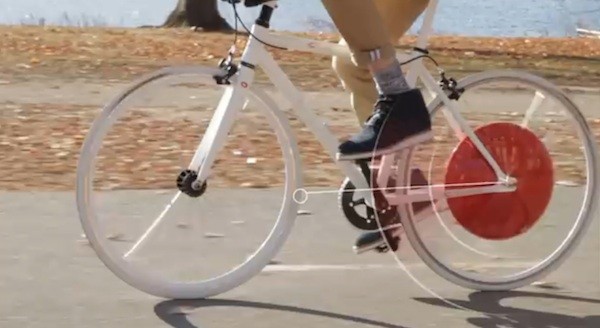
  9. The Copenhagen Wheel: This is device that sits inside the rim of your tires and is useful for energy conservation. It stores the energy that you put into the bike, such as when going downhill, and that energy is readily available to use the next time you need it, such as up the next hill!
  10. Foldable Bikes: Out traveling and want to go for a ride? Grab your foldable bike and go for a rip!

What unique gadgets do you use for your bike?

How To Start A Bike Club

September 18, 2015 by U.M.

How To Start A Bike ClubSo you want to start a bike club? Well, then there are some things you need to know and consider doing before you print out any fliers or order any custom t-shirts. Here are some handy questions to ask yourself:

1. Do You Have An Established Base For A Bike Club?

If you already ride in an unofficial group then you should try to have these group members join as the first members of your club. In the early stages of formation, a club’s best bet is word of mouth. Invite friends, family, or strangers who happen to own a bike to join in. As you build up members consider:

  • Further participation by members
  • Sponsoring an event
  • More route choices
  • Liability protection

If you don’t have an established base of members advertise an organized ride at a local bike shop. You want to do everything you can to generate interest by sponsoring rides and presenting interesting activities.

2. What Is Your Purpose?

Have a defined purpose for your club very early on. Draw up a mission statement and present it to prospective members so that everyone has a clear cut idea of what they’re working towards and what to expect. Don’t worry about by-laws at the outset of the club. You’ll have plenty of time for polishing and tweaking later.

3. Have You Planned A Regular Ride?

You want to present your members with a regularly scheduled bike ride. This ride should be the most predictable part of your club. Have a ride with the same time period and route on a regular basis. A great idea is to end this regular ride with a club meeting. Hopefully, this will keep interest in the club’s boring parts from waning.

4. Do You Have A Sponsor?

Being sponsored by local businesses is a great way to generate revenue for club necessities. However, keep in mind that most businesses won’t sponsor you without some sort of community outreach on your part. Organize carefully and speak with an accountant about how a sponsorship will affect your club’s financial structure.

5. How Does The Club Get Money?

Money is a problem for many non-profit organizations including sports clubs. In order to make sure that money doesn’t fly out the window willy-nilly, hire an experienced accountant or CPA to handle the finances of your club. Some financial aspects you’ll need to consider are:

  • Member fees
  • Budgets
  • Fundraisers
  • Audits and taxes

Starting an official bike club can be a lot of work but also extremely rewarding. With careful planning, management, and good member participation there’s no reason your club can’t be a success. Detailed information about starting a bike club can be found here: Starting a Bike Club Manual

How To Choose the Best Bike Saddle

September 18, 2015 by U.M.

How To Choose the Best Bike Saddle
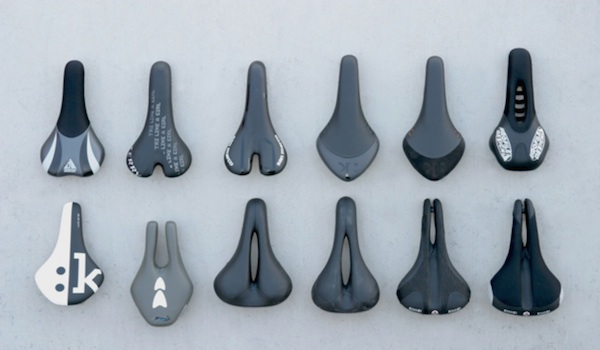
Having a good bike seat is important for people who cycle on a regular basis. A bad bike saddle can cause sores, injuries, and even make it impossible to complete the goals of your training. The best bike saddles will fit several common rules which are:

  • Sufficient width
  • Flat
  • Firmness
  • Cutout optional
  • T or pear shaped

Everyone’s behind is different but there are many brands and models out there so you will certainly be able to find a suitable saddle that matches the above requirements.

Width

A bike saddle has to be wide enough to support your sit bones. By doing so, the bike saddle conditions the muscles and fat over the sit bones to take the weight of your body. Over time the saddle will actually become more comfortable. However, you don’t want to go too wide. A bike saddle that is too wide can cause some inner thigh discomfort and pressure on the hamstrings.

Flatness

The best bike saddles also only need to have a slight curvature. A bike saddle that has a high center will cause extra pressure on the soft tissues of the pubic bone and surrounding area. In short, your genitals will start to hurt mid-ride. Avoid this by making sure the bike saddle is not extremely curved.

Firmness

Every beginning cyclist and expert-should avoid gel padded bike saddles. These bikes saddles are too squishy and pliable. The gel moves and adds pressure where you don’t want it which causes more discomfort than it solves. The best bike saddles will have little to no padding. Some people prefer a small layer of padding while others prefer no padding at all. This is a preference that you’ll need to test out on your own in order to decide what’s right for you.

The Optional Cut Out

Some bike saddles have a section cut out in the middle. This is for cyclists who are extra sensitive to added pressure on the soft tissues of the pubic bone. If your bike saddle is flat, wide, and firm enough but you are still feeling some discomfort, you may want to switch to a seat with a cut out. This will make those long bike rides much less miserable for you.

T Or Pear Shaped

A T-shaped bike saddle is a very defined looking seat. The front is long and narrow and then immediately changes into the wide back end. A pear shaped bike saddle has a gradual change from front to back. Cyclists who move around a lot while riding usually end up with a pear shaped saddle to avoid chaffing on the inner thighs. T-shaped bike saddles are usually for those who stay in one position for the entire ride. Pay attention to which one you are in order to choose the right bike saddle shape.

The best bike saddles will follow all of these guidelines and are offered in many brands, at many different prices. The easiest way to find the one that works for you is to really look at the reviews of the bike saddle to determine its characteristics and if the saddle will match your needs. Make sure you try out the saddle before you choose the best bike saddle for you!

How To Pick Indoor Cycling Stands

September 17, 2015 by U.M.

How To Pick Indoor Cycling Stands
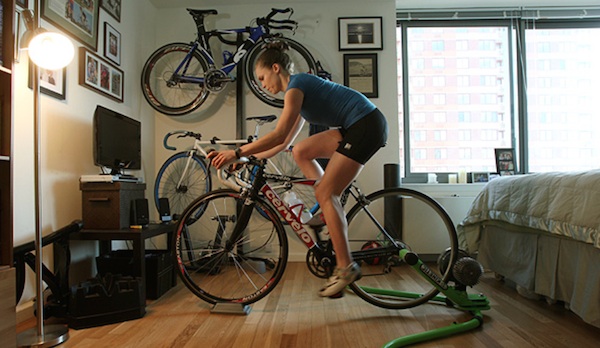
The best part of picking up biking either as a sport or as exercise is that you can bike outdoors and indoors. By buying a nice indoor cycling stand you can get in the training you need while avoiding extreme weather, tending to a child at home, watching TV, or simply enjoying the great indoors. No matter what your reasoning is there are a few things you’ll want to keep in mind when you buy an indoor cycling stand.

The Many Types

Indoor cycling stands are not all uniform. Some stands sacrifice increasing resistance for easy setup. Others are ideal for mountain bikes but not racing bikes. The most popular indoor stands are:

  • Wind trainer
  • Magnetic trainer
  • Rim trainer
  • Fluid trainer
  • Pivot trainer
  • Roller trainer
  • Virtual-reality trainer

The difference between these stands is the resistance mechanism on the stand. For example, a wind stand uses fan blades to produce resistance while a magnetic stand uses a roller-driven magnetic flywheel to generate resistance. It is not the type of resistance mechanism you should worry about so much as the kind of resistance each generates.

Resistance

If you’re only biking indoors because you have to, the cycling stand you’ll probably like best is one that offers differing resistance. For example, if you increase your cycling speed, the stand will increase the resistance it gives you. This is great for sports training and maintaining a semblance of what you’ll experience when you’re on your outside route. Stands that offer realistic resistance are:

  • Wind
  • Magnetic
  • Fluid
  • Virtual reality

Noise And Vibrations

Many people prefer a quieter stand in order to hear music, television, or other people. Also, a really noisy bike stand can be incredibly obnoxious. A stand that vibrates too much will feel unstable and probably make you nervous when you use it. This is a sign of poorly constructed stand. You want to be able go as fast as you can for as long as you can without worrying about breaking something. Good and quiet stands include magnetic, rim, and fluid stands.

Weight, Storage, Easy Setup

Most bike stands weigh anywhere from 15-35 lbs so moving your bike stand around shouldn’t be too difficult. Many bike stands usually come with the added feature of being foldable. This makes them easy to store in closets, corners, and garages. However, keep in mind that not all bike stand models are foldable.

Lastly, you’ll want an easy setup. Bike stands often have easy-to-use lock mounting gears, skewer clamps, or quick lock cam levers. However, calibrating the resistance mechanism is usually what determines an easy setup or a difficult setup. Some resistance mechanisms need fine tuning each time you use the stand and others just go without any help. The most difficult stands to set up are the virtual-reality and rim stands.

When you go to buy a bike stand keep in mind the type of resistance mechanism that would work best for you. This is the most critical part of the bike stand as it is what determines how realistic your indoor ride is, as well as how easy the stand is to set up and use.

Making the Switch from Road to Cyclocross on the Cheap

September 15, 2015 by Adam Farabaugh

With ‘cross season coming, or here depending upon where you live, there’s no better time to check it out and start racing. ‘Cross offers probably the best medium to get into racing as well as gives the most variety of riding. Races are also short enough that you don’t need hours and hours of training to do well. The two biggest barriers to ‘cross riding are having the skills to navigate the course and having a cyclocross bike. Of course you can use a mountain bike in a ‘cross race but it’s not ideal and won’t be nearly as fun.

Making the Switch from Road to Cyclocross on the Cheap

The Bike Set-Up

A ‘cross bike is essentially a road bike with a wider fork and chain and seat stays to accommodate wider tires. With the wider tires, which are fatter and knobby, there are also wider brakes. Other than that, the bikes are essentially the same so taking the parts from your road bike and switching them to your cross bike is highly doable and way cheaper than buying a full ‘cross bike.

Parts to Buy

The first thing you need to get to switch from a road set-up to a ‘cross set-up is the frame and fork. An aluminum frame is generally the best bike to start with as it’s cheaper along with being more durable and can better withstand the crashes you are going to put it through. Size wise you generally want to go one size smaller than your road frame. Once you have a frameset you have the basis to build your ‘cross rig.

Brakes

The second thing you’re going to need since they’re vastly different on a road bike is the brakes. Now-a-days there are disc brakes but that only adds complications as you need dedicated wheels for them along with added cost. They are something to grow toward if you want them in the future. The brakes to get for ‘cross are cantilever brakes which open up and allow a larger tire to slide in and out. With the brakes, you are also going to need a mount for which the brake cable is going to attach to the frame. On the front fork, typically this is a spacer that goes on the steerer tube of the fork and has a mount on the front of it for which the brake housing is inserted in to. For the back brake, typically there is a mount that attaches to the seat post collar. Your local bike shop can advise you on which one you need for both.

Tires

The next thing you are going to have to buy are tires. There are an endless amount of options so you’ll have to read up on the different styles and brands as they are made for specific conditions. First, there are two types of tire: clinchers and tubulars. Tubulars are the best for ‘cross but they are expensive and not where you want to start. Clinchers are just fine and if your wheels can accommodate tube-less tires, that is your best option. They essentially get rid of the tube and seal with a tight fitting bead to the rim along with liquid sealant. Either way, getting an all-around tire that can be ridden in the mud to dry conditions is the best starting point so you’re not limited to what you can ride in. The best width to get is 32mm to 34mm as these are big enough to roll over most obstacles but not so big as to slow you down a lot.

Shoes and Pedals

The final thing you are going to need are shoes and pedals. Cyclocross uses mountain bike shoes and pedals because of the need to get off your bike and run along with the potential muddy conditions. Getting a second hand pair can be a great option and then you can upgrade down the line as your ‘cross riding progresses.

Parts to Switch

The first place to start is with the bottom bracket and crankset. Most bikes have different kinds of bottom brackets and some you can use with different cranks but not all. Your local bike shop can again guide you to what you need and your best options. Once you have the crankset you want you need to have chain rings that are suitable to ‘cross. If you bought a new crankset you can get a cross specific one with smaller chain rings already on it. Otherwise you will want to find the number of bolts the chain ring attaches with and the BCD, or the distance between the bolts. Depending upon your strength a 34/46 is a good starting point that will give you the gearing for faster courses and dirt road riding along with a small enough gear to get up the super steep climbs. The 34 also more easily lets you keep your same road cassette.

Seat Post

The next thing you need to switch, and potentially buy a new one, is the seat post. There are a number of different sizes but if your ‘cross frame is the same diameter seat post as your road bike you’re golden. Just switch the post and leave your road saddle on it.

All the Remaining Parts

After that everything else should be a straight forward switch. Change over the derailleurs and chain (replace the chain if it’s worn as you will be putting a lot of torque on it with ‘cross). You can leave the shifters on the bars and just take the stem together with the bars off the road bike and put it on the ‘cross bike. The wheels are a simple switch over and you can leave the cassette on it as well.

With the shifters you will want to install new cables and housing for two reasons. One is that where the housing goes will probably be different from your road bike so you will need to shorten or lengthen it. Second is that ‘cross is notoriously dirty and muddy. Your shifting is going to suffer at times so starting with new cables and housing will help ensure that cable drag is minimized.

Things to Upgrade

As you race more and more you will find that you will want to upgrade parts here and there. The first thing to upgrade is tires as you will quickly find that traction means everything in ‘cross. They can be upgraded by staying with clinchers, assuming that’s what you’re riding, or you can make the leap and upgrade your wheels as well to tubulars. These are more expensive as well as require more upkeep but they are the very best for ‘cross.

Another area you may want to upgrade for a fraction of the cost of tubulars is brakes. Stopping quickly is critical in ‘cross as the quicker you can slow down the longer you can stay at speed going into a corner. After that, the only thing you would really want to upgrade is the components or the frameset.

‘Cross can be expensive as you get further and further into the sport but starting out it doesn’t have to be. With a road bike you already have most of the equipment necessary to get a ‘cross bike rolling. The few additions that you do need, namely the frameset, don’t need to be expensive and you will find that you can get second hand equipment relatively cheap and with good quality. Once you start riding a ‘cross bike and/or racing it, you will find that your investment was well worth it for the amount of fun you are going to have with the bike.

Staying Upright: Risk Averse Riding

September 14, 2015 by Adam Farabaugh

Staying Upright: Risk Averse RidingWhether you are a five year old kid learning to ride a bike or a Tour de France veteran, bike riding involves risk and how we handle that risk is what keeps us coming back for more or taking up another sport entirely. Risk, in the simplest sense, is how likely a bad outcome is to happen. Some aspects of bike riding, such as downhill mountain biking, bring a high level of risk but it’s that high level of risk that creates the thrill, rush, and fun. It can have a price though and for some, it’s a risk worth taking. For other aspects of riding, such as road riding, the level of risk can still be high but steps can be taken to lower that level of risk. Another element of risk in cycling is how comfortable you are in the same risky situation. As your riding improves, not only will you be a better bike handler but you will also be more comfortable being in those risky situations as you know you have the skills to avoid crashing.

Riding Ability

One of the biggest influences on how risky a riding situation, whether it’s a corner or avoiding a crashed cyclist in front of you, is how good you can ride your bike. The better a rider you are and the more experience you have, the less likely you are to crash. Say you enter a corner with a bit too much speed. You not only know how to handle your bike but you can do the proper things just through reaction without even really thinking about it. The less experienced cyclist is probably going to overreact and not know what to do in that small timeframe. Simply, the more you ride and practice things like cornering and bunny hopping, the less risk you will have of crashing and potentially injuring yourself.

Attention

After riding ability, how focused you are to the task at hand will influence how likely you are to having an accident. Whether it’s going down a trail, a road by yourself, or riding in a group, seeing what’s coming up to allow you ample time to react will substantially lower your risk of crashing. When riding down a trail or road you want to keep your attention on what lies ahead of you. Thinking about other things as well as looking at the sites takes your attention away from potential obstacles. You can let your attention waiver at times but make sure it’s the right time. When you’re riding on the road in a group, you must not only pay attention but also look further ahead than just in front of your front wheel. Seeing an incident a few riders ahead of you will give you added time to slow and avoid the crash or obstacle in the road.

Avoiding Risk

The thing with riding is that there is always going to be risk. Past making sure that your riding ability is up to the level of risk you’re willing to take along with paying attention, riding in a way that errors on the side of caution will lessen your risk of an incident even further.

Cornering

Crashes occur most often in corners whether riding on a trail or the road typically because of too much speed. With too much speed, traction becomes marginal and combining that with other riders in a group, wheels can easily overlap and when a rider ahead of you goes down, it’s hard to avoid piling into the back of them. The best way to stay safe in the corners is to just slow down a bit more. You will have to reaccelerate a bit more but it is worth your skin to do so.

When riding in a group, you can’t always slow as much as you would like but you can open up a little bit of a gap between you and the rider in front of you. This will allow you to not only slow more but also give you more time and space to react and avoid a rider if they do crash in front of you.

Along with opening up a small gap, staying to the inside of a corner takes away the possibility of a rider to your inside sliding out and taking you with them. And then if there is a crash, you can avoid it by turning sharper to the inside as on the outside there is going to be no place to go besides off the road or into oncoming traffic.

Overlapping Wheels

On straight stretches of road, crashes are most commonly caused by riders overlapping wheels. This is mostly caused by riders not paying close enough attention to where they’re riding and what’s in front of them. The best way to avoid this is to not overlap wheels so you don’t have to rely on the rider in front of you not wavering off of a straight line.

Other Riders Crashing

When riding in a group, other riders are going to crash. A lot of being able to avoid it is based on luck but you can increase your chances of avoiding it by always paying attention a few riders ahead of you and always having an out. This means that you are never so close to the rider ahead of you, as well as to both sides, to not have any place to go if there is a crash. You have to always be thinking if there is a crash right now, where are you going to. It will only be reaction when there is a crash but having yourself set up so there is a place to go in your reaction will help you avoid the crash.

Risk is a part of cycling but how you manage that risk is what is going to keep you safer on the bike. When you’re looking a few riders ahead of you, you should also be looking for obstacles in the road. Never position yourself so all you can see is the back of the rider in front of you. You want to be able to see around them to see what’s coming up. If you can’t see farther ahead you are just relying on luck to keep you safe. Whether on the trail or road, pay attention and practice your skills to get you out of a tight spot when the situation arises. Stay proactive at all times and you will lower your chances of crashing greatly.

The Convenience Store Stop: How to Make it the Most Efficient

September 12, 2015 by Adam Farabaugh

The Convenience Store Stop: How to Make it the Most EfficientAs rides start to get longer and longer, stops mid-way for food and water are going to become more frequent as well as important. The coffee shop is a great place to stop for a while and have great conversation over a few brews but during training rides you want to be in, out, and on your way in a timely manner. You also want to get what you need to fuel properly for the remainder of the ride. Knowing what you want to eat and drink prior to going into a store will help prevent you from milling around looking at every possibility which we’ve all done before, especially if we’re already a bit depleted from the ride.

The Drink

Hydrating properly mid-ride is super important because if you don’t, it doesn’t matter what you get to eat, you are going to be suffering the rest of the ride. Typically you are going to want more than just water. Water is good but you want it along with something with electrolytes at the very least because your body depends on them to function properly. It depends on the store but typically you don’t want to pay for water. Take one of your bottles into the store as a lot of stores have a fountain drink dispenser with an option for water. If they don’t, then buying it is the next best choice. Some people opt to fill their bottles in the bathroom but you never know the quality of the water. If you are with a few people, get a gallon jug of it and split it; way cheaper that way.

Electrolyte Drinks

For the electrolyte drink, some fountain drink dispensers have a sports drink which can be a lot cheaper than buying them individually from the refrigerators. Just remember to take it to the counter and tell the cashier what it is to pay for it. If you can’t get a sports drink from the fountain drink dispensers then getting a big bottle of Gatorade or PowerAid can be good as they also have carbohydrates and sugar to continue fueling your ride.

Again, if you are with others, many stores have a “Buy 2” price, so see what you can get for a deal by splitting it. Some sports drinks come with a zero calorie option. This is typically always a bad idea for two reasons. One, you should always fuel for your rides as otherwise you are riding in a depleted state and can’t reach your maximum riding potential. Second, because they are zero-calorie they have to make them taste good with other additives which are never good for you. If you are trying to lose weight, the place to do it is not on the bike. Fuel properly for your rides and then eat less and the right foods off the bike.

Cheapest Drink Option

The cheapest drink option a lot of the time, other than water from the fountain drinks dispenser, is the big cans or jugs of iced tea. These are not the best way to hydrate as they don’t have many electrolytes, and they have a lot of sugar, but drinking them along with a sports drink can be a good cheap option. With these however, you have to look out for high fructose corn syrup if you are trying to avoid it as a lot of them will have them listed as the second ingredient, meaning there is a lot of it in the product.

The Sodas

Soda is one other drink option that many riders swear by mid-ride. Sodas shouldn’t be looked toward to hydrate so much but rather to give you a good boost toward the end of a ride. The high sugar content as well as the potential caffeine can give you a good kick to finish off a ride strong. The trick with soda though is timing it right, because if you have it too early in a ride you can burn through all the sugar before the end of your ride and then you’re left bonked. You want to make sure you have it close enough to the end of your ride or that you have another soda ready to keep you going until the end.

The Food

After you pick out the best drinks for you to finish your ride strong, you need to find the best foods. Drinks are easy comparatively as there are endless food options. The first place to start is; what kind of a ride are you doing?

The Hard Ride

If you are riding hard, at threshold and above, you need foods that are easily digestible along with a high carbohydrate and sugar content and low protein and fat content. Simple granola bars without too many nuts can be a good healthy option. Other foods that are often thought of as bad for you can actually be a good choice mid-ride. Foods like cookies, pop-tarts, pastries, and other little sweets have a lot of carbohydrates and calories packed into a small goodie. The fire with these is that a lot of them are highly processed and contain a lot of ingredients so if you are trying to avoid all that, go with a good quality cookie or pastry that contains fewer ingredients as well as nothing that you can’t pronounce.

Other good options for the end of a hard ride are candy bars. These too are thought of as “junk food” but they contain a lot of sugar that your body pretty much burns exclusively when you are riding hard above threshold. Be careful not to get any that contain too many nuts but otherwise go with what you like. Snickers tend to be a lot of cyclist’s favorite.

The Endurance Ride

When you are training at a lower intensity you still need the carbohydrates to keep you rolling strong but you don’t need as many and the ones you do need don’t need to be from sugar. You are burning calories at a slower rate so you want longer burning fats and proteins along with the carbohydrates. Easy pocketable items include more nut based bars as well as protein bars provided you can stomach them and they don’t contain too much protein. Another option, although it’s not quite as quick, is to get a small sandwiches or wraps that many convenience stores have pre-made. This gives you some of the carbs in the bread along with the protein in the meat. Don’t eat too much at one time though as you don’t want a heavy brick in your stomach.

Depending upon where you live, there can be many options for where to stop to refuel. In most parts of the country, gas stations with convenience stores tend to be the most frequented as they are around from the big city to the only place around for miles and miles in parts of the American West. Plan ahead and know where you are going to stop mid-ride. You’ll not only get into a routine of which places you stop at, but also which food and drink you get at each place. Making good choices in the store will keep you going strong on the rest of your ride.

How to Ride in a Paceline

September 12, 2015 by Adam Farabaugh

How to Ride in a Paceline
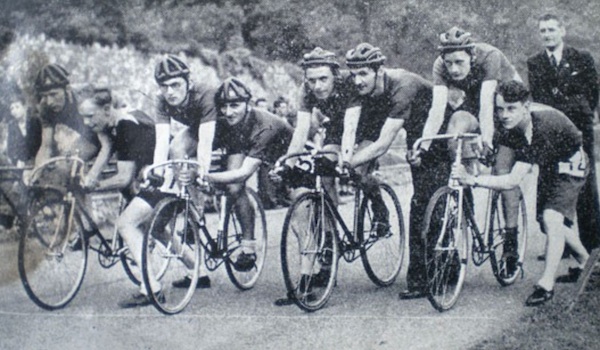
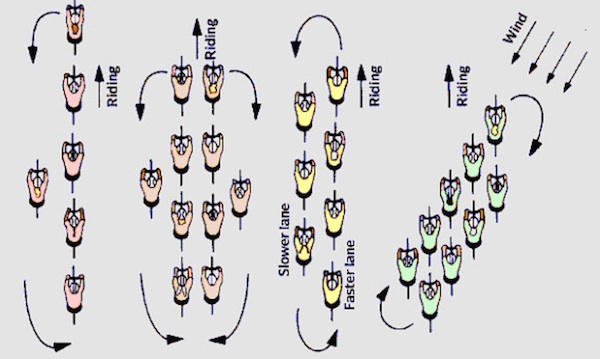
Riding in a group can bring a lot of benefits that you can’t get while riding on your own. A paceline is how a group of riders rotate through trading spots riding the front in the wind. Riding in this way is the fastest and the most efficient way down the road. However, knowing how to ride in a paceline is imperative as if you can’t, you not only pose a risk to yourself but others as well due to the possibility of crashing. Riders in the group can also give you pointers as you get the feel for how things roll.

The Rotation

A paceline starts with two lines of riders riding single file with one line moving forward while the other one moves backwards. This allows for a constant changing of the front two riders that are in the wind allowing the work to be spread over the group more evenly. The rotation is always continuous giving it the name “rotating paceline”.

When You’re at the Front

As you approach the front, the rider ahead of you will slide to the left and slow down a little. As he or she does this, you keep pedaling at the same speed. Do not accelerate. Stay the same speed and continue straight in your line. As you’re doing this look over your shoulder or under your arm to see where the rider is that just pulled off. Once you see that they are far enough back, slide over in front of them taking care to not take out their front wheel.

Once you are here, keep pedaling but take about two “soft” pedal strokes where there is not much pressure on the pedals. This will slow you a little but not so much as the rider now behind you has to slow. You are only slowing the difference in speed of the line that’s moving forward and the line moving backwards. Since the paceline is rotating, you do not need to do anything to signal the rider behind you to pull through. However, if you are taking longer turns on the front, give a slight “flick” of the elbow out as you slide to the side. This indicates that you are done pulling on the front and for them to pull through.

When You’re at the Back

As you slide backwards in the group you will eventually get to the back and have to switch lines to the one moving forward. You will probably have an idea of about how big your group is so when you are getting close, be ready to slide over. As the last rider slides over and is moving back up past the rider whose wheel they were just on, they should say something such as “last” or “last rider”. This gives the rider moving back a heads up that they are now last and that they need to slide over and reaccelerate to get on the wheel that’s now moving forward.

Always look to make sure that there is no one there otherwise you could ride straight into someone. To avoid sliding too far off the back and having to reaccelerate hard, you should start accelerating before the last rider comes past you. As you reaccelerate, you should start to slide to the side and end up having your front wheel move past the other rider’s rear just as you’re going the same speed as them. This takes practice but you’ll get the gist quick.

Clockwise or Counter-Clockwise

Pacelines don’t always rotate in the same direction due to the wind. If there is no wind then riders should rotate in a counter-clockwise direction as it’s easier with traffic. (Except if you’re in the UK or Australia, yours will be the opposite.) When there is wind however, you should always pull off into the wind. This means that if the wind is coming from the left, you ride counter-clockwise, and if the wind’s from the right, you ride clockwise. Riders will always be sliding to the side of the wheel in front of them that’s more out of the wind.

If the group is rotating in the wrong direction, as the first rider slides over, they risk taking out the front wheel of the rider that’s behind them. If the group is rotating in the wrong direction, yell that you are switching the rotation as you get to the front. When you are on the front, don’t pull off but rather keep riding to allow the riders sliding back to slide back a bit and then pull off in the other direction. If you need to make room for you to pull off, slide slightly to the opposite direction and moving the riders immediately behind you over, and then pull off.

The Double Paceline

When a group’s riding fast they will typically always ride a rotating paceline. When a group’s out for more of a training ride or relaxed ride, they will ride a double paceline. This is where the two lines ride side by side at the same speed and two riders on the front are in the wind at the same time. This allows for longer pulls of the riders on the front as well as for everyone to be able to have a conversation instead of just riding past each other. Pulls can be as short as one minute or as long as ten to twenty minutes depending upon the group and riding.

When the two riders on the front are ready to pull off, they first make sure that there is no traffic and then one slides right and the other left, moving backwards down the side of the two lines. When they get to the back, they reaccelerate and pick up the last two spots in line. Pulling off in this way can only be done when on wide enough roads. When the roads are narrow and/or there is not enough room due to traffic to ride four wide, the group rides a slowed rotating paceline essentially. When the two riders on the front are ready to pull off, one accelerates a little moving ahead of the other while the other one slows and moves back. The rider on the side that just moved up now slides forward and takes their spot on the front of the bunch. The group should rotate twice as much as when the rider is on the front, they are on the front for two turns essentially. Rotating in this way also allows you to talk to different people as the double paceline only really allows you to talk to the same person if there is an even number of people.

Some sort of paceline is typically how any group rides aside from a race or an event that has full use of the roads and where you can ride more than two abreast. Knowing the different kinds and how to ride in each of them will allow you to comfortably ride in a group along with being less sketchy and avoiding causing a crash. Also, an easy way to pick out a newer rider in a group is how they ride. If you mess up as well as ride sketchy, meaning you ride in a way that could cause a crash, you will probably be heckled as well as tried to drop. Everyone is new at some point but knowing how things work and then getting a few pointers in your first few group rides will allow you to fully enjoy and take full advantage of them.

The Echelon: Riding in the Wind with a Group

September 10, 2015 by Adam Farabaugh

The Echelon: Riding in the Wind with a Group
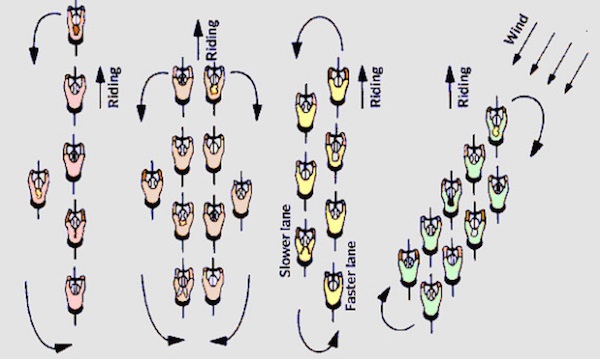
Two things that slow you down in cycling are uphill’s and wind. Some look to avoid them while others embrace them. Riding in the wind can be a drag but it’s going to happen so you should know how to get through it the most efficiently.  The wind can also have some good benefits, one being that you can ride a lot faster than you otherwise could when it’s at your back. When you are in a group riding into a headwind you can actually get more of a draft behind the other riders allowing you to pedal with much less effort. A side wind can give you a real advantage if you know how to ride in it as the other riders that you’re with will have to pedal that much harder because they are poorly positioned.  As with anything in cycling, the more you do it the better you’ll be at it.

The Headwind

On solo rides or rides with one or two others, headwinds can slow your ride dramatically while you have to pedal much harder. In a group however, the draft of a rider is magnified. The first rider still has to pedal extra hard, as they would on a solo ride, but the riders behind don’t have to pedal with nearly the same amount of effort. Since you are in a group, everyone can take shorter turns on the front in the wind keeping your speed closer to what it otherwise would have been.

The Tailwind

Tailwinds are fun whether you are solo or with a group. You can ride at speeds almost like you have a motor on your bike. The downside is when you have to turn around. The one drawback from tailwinds in a group is that you get less of a draft behind the rider ahead. Even though the first rider can go X amount faster, the riders behind are going to have to pedal at a closer effort to the rider on the front. You all are still going faster though so it’s still a benefit to all.

The Crosswind

Riding in a cross, or side-wind, in a group is really where knowing what position to ride in will benefit you. The first thing is that you obviously can’t see the wind, unless you spot a flag or something else blowing, so you have to feel it. When it’s a strong wind this is easy but when it’s only slight there is still an advantage to riding downwind of the rider in front of you. You just have to then know where that downwind is. Overtime you will get good at feeling where the wind is coming from.

Where to Ride

First we will simplify things down to two riders riding in the wind. The wind is coming from the left. Downwind, or where the best draft for the second rider, is going to be slightly behind the first rider and to the right. This will be just slightly to the right, the closer the wind is to a head or tail wind and when it’s closer to ninety degrees from the left, the draft will be further to the right of the first rider rather than being slightly behind them.

As you first start riding, you should avoid overlapping your front wheel with the rear wheel of the rider in front of you. As you get better as well as the riders you ride with, you will overlap your front wheel to get into the “sweet spot” of the draft. When you do this however you need to pay the utmost attention as the slightest movement to the right of the rider in front of you will cause them to hit your front wheel, thus crashing you. To avoid this, any movement the rider ahead of you makes you need to replicate.  When they move right, you move right keeping your front wheel in the clear.

Making the Switch

Now in our two rider scenario, the first rider took a short pull on the front and is going to move back behind the other rider. The first rider eases off the pedals slowly and moves slightly to the left and back. The second rider then slides left at the same speed filling the position the first rider was just in.  The rider pulling off then slides right passing their front wheel behind the now, first rider’s rear wheel and then slightly forward and to the right where the “sweet spot” is.

Pro Tip: When pulling into the front position it is important to keep a steady pace, one that you were holding while drafting. Many novices hammer on the pedals and force a gap behind them making the echelon less efficient and creating an accordion effect that forces people drafting to use excessive energy.

Adding it to a Group

Now taking the above scenario and adding riders to it gives an echelon.  It is the exact same thing except that behind the second rider is a third and so on. Because each rider is riding, in our scenario, slightly to the right of the rider in front of them, the echelon can only be so wide as you run out of road to the right. What then happens is a second echelon is formed with a bit of space before the first. Often times before this happens however is that a trail of riders will be riding down the extreme side of the road trying to get a draft. They can’t get as good of a draft as the riders in the rotating echelon so they will often lose ground when they tire.

In a rotating echelon no one takes a full pull on the front but rather rolls through the first position in the wind. As soon as a rider hits the first position they slide back and move gradually to the right one by one ensuring that they don’t hit their front wheel on any of the riders in the first row but no further back. This creates two lines of riders. It’s like a pace line, just tilted. When the rider moving backwards down the line reaches the last rider they accelerate forward into the last riders draft and follow them in that same position as the front row continues to slide left.

The Gutter

If you are in that situation where there is a cross-wind and no one is riding an echelon you’ll be forced to ride down the very edge of the road, often known as the gutter. The key to riding in this position well is being able to see past the rider in front of you so you can see where the exact side of the road is and if there is anything sticking out. A good trick to do here is to ride with your body slightly to the right of where you would normally sit on the bike with your head tilted even further to the right. This will give you that extra little bit to be able to see what’s coming up.  And if anything does come up, just push your bike back to the left, in our scenario.

Riding in the wind takes practice and even if you know how to, others in the group may not know how which can be frustrating. Cross-winds can be dangerous with the overlapping of wheels so just make sure you pay attention as to not cause a crash as well as to look out for others who might cause a crash. Riding in the wind isn’t always fun but at the very least it can be made a bit more enjoyable if you know how to ride it. Stay in the right position on the wheel in front of you and being a bit more aero always helps too.

How To Descend Like a Pro

September 8, 2015 by Guest Post

How to descend like a proDescending is a mysterious art form, which, if mastered can shave minutes off your times. Some riders seem to possess an innate ability to drop like a stone from the side of huge mountains without any trace of fear – others are not so blessed. Recent summit finishes in the Vuelta España have shown that, even for the best climbers, going uphill presents an opportunity to take a few seconds or a couple of minutes from your rivals. A good descender can take five minutes on the way back down. It’s a fantastic skill to have in your arsenal and believe it or not, it doesn’t take that much to master.

If you’ve ever felt the fear on a descent, suffered a nasty crash that you haven’t quite mentally recovered from, or have simply never been told how to do it right – we’ve put together some essential tips which will have you nailing it downhill with supreme confidence.

Look as Far Ahead as Possible

It sounds pretty obvious, but when riding a bike, you will go where you point yourself. So much of where you’re ‘pointing’ comes down to where you’re looking (with the exception of the odd glance back over your shoulder to check the position of the pursuing peloton). When descending, don’t just look ahead of your front wheel or the rider in front of you, instead try to set your gaze well down the track, ideally after the bend you’re currently tackling. If you do this, you’ll flow through the bends with ease and you’ll still catch small hazards like gravel in the road or someone trying to overtake on the inside with your peripheral vision.

Body Position is Everything

We’ve all seen the likes of Peter Sagan and Vicenzo Nibali heading down the slopes of Grand Tour climbs with their bodies contorted into an aero tuck. While we wouldn’t suggest you go the whole hog and start sitting on your top tube at the slightest downward incline, a good low position on the bike like the pros’ is what you should be trying to emulate. When you’re descending it makes sense to get as low as possible on the bike. Yes, it makes you nice and aerodynamic, but that’s only part of the benefit.

Being low-down to the bike also lowers your centre of gravity, making you more stable as you corner and providing better power through the pedals into the wheels. When you’re hurtling into the bends, fight your instinct to lean into the curve with your body – instead, keep your body weight above the tyres as much as possible and lean the bike instead. This’ll boost the traction you get through the turns.

Learn to Read the Road

Unless you’re blessed enough to live at the foot of an Alp and you never venture further than a few km from home, it’s likely that you won’t always know the roads you’re descending like the back of your hand. If you can get used to reading the signs along the road it’ll really help you with your descending. The more you descend, the better you’ll get at recognizing the signs. You can predict where the bends will come by looking at the profile of the hills ahead of you. In the same way, you can also use the tree-line to predict what will happen next, before it does.

Be mindful of hazards and interpret what’s at the side of the road. Shops, restaurants, bars and other businesses all mean people, so don’t be surprised that after you pass one of the aforementioned there’s a guy walking home around the next bend. Likewise, if you hear the clanking of cow bells then you’re probably going to meet something bovine at some stage of the descent. Just because you recognize these hazards, doesn’t mean immediately killing your speed, it just puts you in the right mindset to respond quicker should such an obstacle arise.

Getting Your Bike Set Up Right

Having a bike that is properly maintained and set up will do wonders for your descending, not just from a practical point of view, but from a mental one as well. Having full confidence in your brakes is a must, but having your bars correctly positioned and your seat at the right height will also play a big role in helping you drop like a stone.

Having ridden a hire bike in the Pyrenees for a couple of days I can say without doubt that I was slower on the descents on the first day than the second. At first I was wary of the unfamiliar setup, including front and back brakes that were on the opposite sides to my own bike, but as my confidence in the machine grew, my descending speeds also began to rise.

Keep Those Legs Moving

Guess what – it get’s cold at the top of very high mountains. Especially if you’ve just been labouring to get to the top for an hour and you’re dripping sweat. It can be tempting to see the descent of a climb as the break or reward after your exertions, but it’s vital that you keep your heart rate high and your moving parts moving.

Get into a low-ish gear, with enough traction that you can still pace it out of the climbs, but one that will have you spinning a high cadence. This way you can keep the blood flow to your legs going and keep your all important heart ticking over too, so when you hit the flat at the bottom you haven’t frozen up completely.

At the top of the major climbs in big races you’ll often see the pros take a jacket or (if they’re old school) a sheet of newspaper from a soigneur at the side of the road, to keep them warm as they plunge back down the other side. Unfortunately, for us mere mortals, there’s not going to be a dude handing out free jackets, so make sure to carry one with you. If you’re confident enough in your bike handling skills to put it on while moving, do. If you’re not, take a pit stop at the top and layer up.

« Previous Page
Next Page »
  • Facebook
  • Tumblr
  • Twitter

Latest Articles

JOIN Cycling: A New Training Platform for Cyclists

May 27, 2024 By Eric Lister

cold exposure

The Benefits of Cold Exposure for Cycling & Life

June 13, 2023 By Eric Lister

hill climb

The Ultimate Hill Climb Training Guide

May 31, 2023 By Eric Lister

shoulder pain cycling

How to Treat & Avoid Shoulder Pain While Cycling

April 12, 2023 By Eric Lister

psoas stretch

The Importance of the Psoas Stretch for Cyclists

April 6, 2023 By Eric Lister

cycling neck pain

The Ultimate Guide to Cycling Neck Pain: Causes and Solutions

March 21, 2023 By Eric Lister

Useful Info

  • Contact
  • Finally, A Global Cycling Club That Is Focused On Community And Love Of Cycling!
  • Privacy Policy
  • Share Your Story!
  • Terms And Conditions Of Use
  • Welcome to I Love Bicycling
  • What Happened When I Stretched Every Day For a Month

Recent Posts

  • JOIN Cycling: A New Training Platform for Cyclists
  • How to Hang Bikes in Your Garage: 4 Inexpensive Options
  • Gravel Bike Vs. Road Bike: Which One Is Better For You?
  • The 6 Types of Mountain Bikes & How to Choose the Best One for You
  • What Is a Touring Bike Good For? 5 Benefits We Know You’ll Love

Search I Love Bicycling

Connect with Us

  • Facebook
  • RSS
  • Tumblr
  • Twitter

Copyright © 2026 · Magazine Pro Theme on Genesis Framework · WordPress · Log in