• Training
    • Injury Prevention
    • Training Tips
  • How To
    • Bike Fit
    • Gear
  • Nutrition
    • Nutrition Tips
    • Weight Loss
  • Repair
  • Reviews
  • Stories
    • Funny Stories
    • Jokes
    • Quotes
    • Videos
    • Funny Videos

I Love Bicycling

I Love Bicycling is a website that is geared towards cycling for beginners with road cycling tips, training articles, nutrition tips, weight loss, how to’s and bike repair articles.

How To

  • Bike Fit
  • Gear

Cycling Etiquette

September 5, 2015 by Adam Farabaugh

cycling etiquetteWhen you are out in the middle of nowhere and have exhausted all of your tubes, traffic can be a life saver to get you home. When you’re not in the middle of nowhere and there is traffic, it can be a pain that detracts from the joy of riding. The thing with most drivers is that they are just trying to get from point A to point B. They’re not out to hit you or give you a hard time. If you give them the proper visibility and space, they will avoid you and let you go on your way safely. A smaller percentage of drivers believe that the road is for them and them only. You are in their way no matter what and they are going to give you a hard time at any chance they get. It’s not you, it’s them. Knowing how avoid conflict as well as what to do if there is a problem will allow you to keep your cool in the heat of the moment.
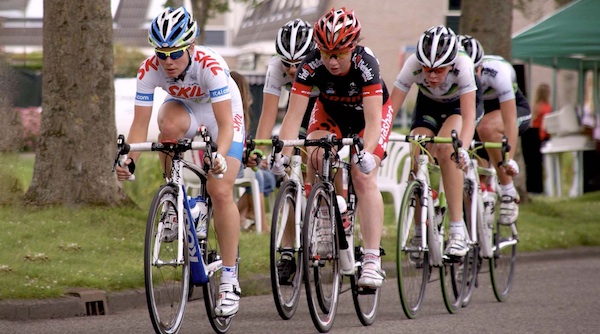
Riding Two Abreast

The biggest reason that anyone will ever have a problem with you riding is if you are riding where the driver has to slow and alter their course down the road. Of course you are allowed to be there in the road but they don’t see it this way. When riding alone, make sure you ride where you are visible. Not down the extreme side of the road where traffic can’t see you but slightly in traffic. Here cars should be able to easily slide around you without putting you in danger. If there is not much room for them to pass, then slide right. When you are riding two abreast and there is a car behind you, as long as they have room to safely pass, keep riding two abreast. If the road is narrow or curvy, have the rider further out in traffic slow and move over behind the first rider. Even if traffic still can’t pass, this at least shows that you are courteous. They will most likely wait without issue and pass when it is safe.

Blind Curves

Riding on narrow roads can already be a bit treacherous if there is traffic. If there’s no traffic they’re amazing. Narrow roads more easily create corners that can’t be seen around until the last second. Going into a blind corner, whether single file or two abreast, you should ride further into the lane to make sure that no vehicles try and pass you from behind. Make sure you are far enough right though to avoid any oncoming traffic that isn’t staying in their lane. When you are far enough into the corner and can see that there is no traffic coming, slide right and give a wave that it’s alright to come through if there is a car waiting behind you. This ensures that a car doesn’t try and squeeze past at the wrong time because if they do, they risk a head-on collision with you most likely being pushed off the road or worse.

Traffic Lights

The place that you are most likely to make verbal contact with a driver is when you are slowed or stopped at a red light. The best way to avoid confrontation is to make your lane changes clear and safe if you are turning. If you are going straight you can ride down the side of traffic on the right if there is a bike lane or ample room for you to fit. Then when you arrive at the first car, stop just to the right of it slightly in front of their bumper to make sure they see that you are there. If there is not room for you down the side, just stop at the back of traffic in the lane. Doing it these ways will minimize any time that a driver will have to say anything to you as well as give them the least amount of reasons to have something to say to you.

Encounters

Unfortunately with riding, encounters with drivers will happen. If you do have an unfortunate encounter, know that you are in the right and they are in the wrong, unless you did actually do something wrong. If you did, admit to it and apologize and be on your way. If they were in the wrong the best thing to do is just acknowledge them but keep on your way. They want a reaction from you. If you do respond back, be polite with facts and the law. Those are two things that shouldn’t be argued with. That may be enough to have them on their way but if it still isn’t, revert back to just ignoring them and being on your way. The last thing you want is to escalate things and have them get out of their vehicle. If there is a bigger issue, try and have other people stop and be around to help prevent anything bad. Then contact the police and keep a cool head. Some drivers won’t back down so you need to make sure that you don’t make things worse.

Riding should be a fun and relaxing endeavour but when drivers create unsafe and unneeded situations it becomes less enjoyable. Ride in a way that is courteous to them and nine times out of ten they should let you on your way. If they do give you a more difficult time, be polite and keep the situation minimal. Larger problems can happen but if you follow these tips they can be minimized. Stay safe and have fun by following this cycling etiquette.

Clearing Road Obstacles with Grace

September 4, 2015 by Adam Farabaugh

Clearing Road Obstacles with Grace
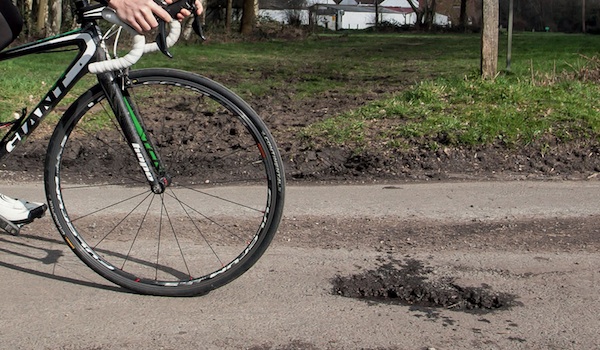
Road riding compared to mountain biking or gravel road riding can be smooth and straight forward; so much so you could practically take a nap sometimes. However, in most parts of the country, roads can take a beating and be rough and full of potholes. If they are smooth you still have to watch out for things like manhole covers and railroad tracks. Knowing what to do when you encounter these will save more than just your skin. You not only need to know what to do but also be able to react to the hazard without even thinking about it so practice is necessary.

Bumpy Roads

Bumpy roads are bumpy for a reason. They’re old and not taken care of so the likely hood of potholes and other hazards is much greater. The first thing in encountering any road hazard is to always make sure that you have a good grasp on the bars. You never know when something is going to pop up and having your hands on the bars will at least allow you to react otherwise you’ll most definitely be on the ground.

Pot Holes

There are three ways to get to the other side of a pothole. Around it, over it, and through it. If you see the pothole far enough in advance you can simply ride around it. However when you spot it late and don’t have time to gradually steer around it, you have to react at the last second. The way to do this is to steer your bike to the side of the pot hole you want to go around. This is a quick flick of the bars to that side while you keep the bike in an upright positon. As you do this you will be off balance so you need to maintain that balance by moving your body toward the opposite side you are steering to. (If you steer around the left of a pothole you move your body slightly to the right of the bike) Once you pass the pothole you immediately re-center your balance on the bike to keep from tipping over. This requires a bit of practice but once you get the idea you’ll be able to do it without even thinking about it.

The second way to getting past a pothole is to go over it with a bunny hop. This again requires some more skill but can easily be learned. Bunny hopping is often the best way to get over a hole if it’s not too big as it doesn’t put you in front of potential traffic or other riders. There are two ways to bunny hop. The first can be used for shorter pot holes where you lift the front wheel and then the back wheel as it approaches the same point. Pretend there is a log there that you are trying to get over. It’s the same idea. The second way is to bring both wheels off the ground at the same time. This is the way to get over anything that is longer as well as if you are going at a faster speed. The way to do this is to slightly bend your legs and almost jump by pushing your body up from the bike and then pulling the bike up toward you. This will require practice and the video below should get you rolling.

The third way to get past a pothole is to ride right through it. Obviously this should be avoided but sometimes it’s just too late to do anything else. If this happens, make sure you hold onto the bars tight and let the front wheel drop into the hole. If you try to hold it up and don’t make it to the other side you will slam your front tire straight into the opposing side potentially causing a flat or a crash. Then once your wheel is in the hole, lift, or take as much weight off the front wheel as possible. As the back wheel comes through try and do the same. Lifting your butt off the saddle will also help to absorb the impact with your legs rather than have all your weight go straight through the seat post into the back tire.

Road Grates

Road grates in some parts of the country can spell disaster. Some cities make sure that they are made or situated so a bike tire won’t fit through but in many places this is not the case. Riding over one can cause your front wheel to drop in sending you straight to the pavement. The best way to avoid this is to never ride over them. Even if you see that they are safe, don’t risk it. Use the pothole techniques to go over or around them.

Gravel and Loose Corners

Gravel can sneak up on you in corners anywhere, especially if winter has just broken and you live in a place with snow. The best way to avoid crashing in a loose corner is to take it gingerly but that’s not always possible particularly if you didn’t expect it to be loose. Crashing on loose surfaces happens because as you lean into the corner there is not enough traction to counteract that movement. To avoid that, you need to lean your body through the corner, not your bike. Your bike should stay more upright, as you lean your body to the inside of the corner. Think motorcycle racer. They’re further to the inside of the corner than their bike. You then steer the bike more than leaning in to it.

Manhole Covers and Other Slippery Surfaces

Slippery surfaces like manhole covers and crosswalks should be avoided like road grates if possible. When they can’t however, you should ride across them like it’s ice or a loose gravel corner. Do not lean the bike, as soon as you do your wheels will wash out from under you. Keep your weight centered over the bike and any turns you have to make you have to do so gingerly.

Railroad Tracks

Railroad tracks pose another challenge that can be treacherous particularly in the rain. Directly perpendicular tracks are relatively straight forward to cross and can be done so without too much caution. The only real issue here is when they are not smooth as you can get a flat or even break a wheel if you hit them too hard. You need to approach them like a pothole and bunny hop them if you can, otherwise unweight your wheels as they go across each bump and absorb the impact with your arms and legs.

Diagonal tracks pose another threat. They are perhaps one of the hardest road obstacles to navigate particularly if they’re wet. The best way to approach them is to make sure no traffic is coming and swing wide into the lane so you can cross them at a ninety degree angle. If you try to ride straight across wet angled tracks, you are almost guaranteed to crash. The other way of getting over them is hop each track individually with a quick double bunny hop where you lift your front wheel over and then back and as the back wheels coming down you do it again for the second track. The added space between the tracks, because it’s at an angle, gives just enough room for this to work. It takes practice but when you’re good, it’s the easiest and safest way to cross.

Road hazards come in all shapes and sizes and knowing how to get around, over, or through them will save you more times than one. All of these need practice however so when the time comes you can react and navigate your hazard gracefully and not think about it. Make sure you have a safe area with no real dangerous hazards that could injure you and give the techniques a go. You would much rather be put under pressure to do something difficult when there isn’t a car, or other riders, behind you waiting for you to get across some wet railroad tracks. Practice now, pedal past the hazard later and keep all your skin intact.

Road Bike Riding Positions

September 4, 2015 by Adam Farabaugh

Road Bike Riding Positions
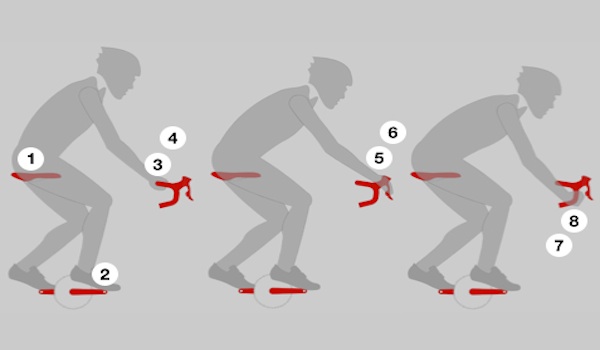
Rarely do we ride down a road that’s exactly the same the entire time. The road changes surfaces, twists, turns, climbs, descends, as well as gives us traffic and dogs to look out for. Our position on the bike changes with each of these for comfort as well as functionality. Knowing which one to be in for each scenario will help you find those positions on the bike without even having to think about it.

Road Bike Riding Positions

Hand Positions

On the road bike, changing hand positions frequently will allow you to be in the position most suitable for the terrain beneath your front wheel as well as to keep your hands from becoming sore and going numb. There are four main places to put your hands on a road bike. Some are standard and easy to know, others you might not think about.

The Everything Position – The Hoods

The majority of riding will be done on the hoods, or where the shifters and brake levers are on a road bike. This gives the greatest functionality as your hands are close to the shifters to allow for quick shifting as well as the brake levers to be able to slow and stop quickly if needed. This position also allows you to easily stand up out of the saddle to go up hills or to accelerate as well as to stretch. Having your hands on the hoods also allows you to be in a semi-aerodynamic position while not being too low where there is added strain on your back.

The Drops

While the hoods are the best all-around position, the drops are where you will find the most aggressive position. The drops bring your body slightly forward and lower allowing you to be more aerodynamic. This can put more strain on the backs of your legs into your back but if you stretch properly and ease into the amount of time you spend in the drops, it can be beneficial. The drops still give you easy access to the shifters as well as even more braking capabilities because you can now pull harder on the brakes in a more neutral position. The drops also offer better stability down descents, as you have a lower center of gravity, as well as better handling down bumpy roads, as you have a more solid grip on the bars. The drops and the hoods are also the two places you want to hold on to if you are riding in a group as you have a quick reach to the brakes if needed.

The Tops

The tops are the part of the handlebar between the stem, the part holding the bars to the bike itself, and the hoods. This position can allow you to ride a bit more upright taking more pressure off your back as well as hands. This position should only be used when you are on a straight, open stretch of road, or climb, where you most definitely won’t have to use the brakes quickly as your hands will be further from them. Also, never ride the tops in a group as again your hands are too far from the brake levers.

The Aero Position

A fourth position on the road bike that is often not thought about is the aero-position. This is where you simulate the use of aero-bars, bar extensions that bring you into a more aerodynamic position. To do this you place your fore-arms on the tops and drape your hands forward and together in front of the handle bars. This brings you further forward as well as lower giving you less frontal area to the wind. The key to this position is to make sure you have not only good open stretch of road where you won’t need to brake suddenly but also that there are no potholes or other bumps that may throw you from the bike. This position is a lot more unstable so it must be used with caution but with a little practice it can help you go faster with the same amount of effort.

Body Position

Now that you know where to put your hands you need to make sure that your body is in a good position to utilize them. While you theoretically can be in each position for each scenario of riding, being in the right one will make your riding the most effective as well as safe.

Neutral – The Everything Position

When you’re riding roads that you are generally on the hoods on, you will be in a standard position on the bike where you’re seated firmly and comfortably on the saddle. This position gives you the best all-around pedaling performance as you can generate power while lasting all day. This position also allows you to have a solid third point of contact with the bike, the other two being your hands and feet, so you can react to any pot holes or bumps that you may hit as well as any sudden turns you may have to make.

Climbing

While climbing uphill can be ridden in the neutral position, and will be if you are not going too hard, at times you will want to slide forward a bit toward the nose of the saddle to get a bit more power to the pedals. Your hand position will generally be on the hoods or on the tops as it still gives the grip to pull on the bars a bit as well as to keep your lungs opened up.

At times while going uphill, particularly on the steep parts, you will want to get out of the saddle to get more power to the pedals. Climbing out of the saddle can be a bit more inefficient as the majority of riding is done seated so that is what your muscles are used to. With training and proper form however it can be used to climb faster. You don’t want to be too far forward where your body is almost over the handlebars. Rather you want to be somewhere just ahead of the saddle so that the backs of your legs just brushing the nose of the saddle. In this position you will want your hands on the hoods as it gives the most stability as well as an upright position.

You don’t want to over swing the bike back and forth in either direction but rather small amounts to get the most out of each pedal stroke. You want to make sure you unweight and even pull up on the upstroke of the pedaling motion. A tendency climbing is to push a lower cadence. Try, both in and out of the saddle, to keep your cadence higher, closer to your normal riding cadence. This will keep your legs from building up fatigue quickly.

Descending

Going downhill requires more than just riding with your hands in the drops for stability and braking but also a bit different body position. Going downhill you want to be positioned to absorb any road bumps as well as to smoothly take any corners. To absorb bumps, you want to be slightly out of the saddle with your legs at 3 and 9 o’clock, forward and backward, and slightly bent. You then want your butt slightly off the saddle but your legs still touching both sides of it for added stability. You will bounce between this position and actually sitting on the saddle as you go down the descent and encounter varying road conditions. As it gets bumpy, take your butt off the saddle a little. When it smooths out, sit back down. When a corner is coming up, sit back down as well as it will give you more stability through corner.

Riding with your hands in different positions on the handlebars will allow your hands to not get sore in any one spot as well as to provide a solid base for your body position depending upon the road ahead. Knowing and using both the hand positions and body positions will make your riding more efficient as well as comfortable. Use them, get comfortable with them, and then you won’t even have to think about it. You’ll just find the best position for the road ahead.

Ride Pain & Injury Free For LIFE

As cyclists, we all know the importance of staying in top shape and maintaining muscle balance to avoid injury and ride pain-free. That’s why we’re excited to introduce Dynamic Cyclist, the program that offers daily stretching and strength training video routines designed specifically for cyclists. Created by industry professionals, these programs will take your cycling to the next level and help you reach your full potential. So, whether you’re a beginner or an experienced rider, Dynamic Cyclist has everything you need to improve your performance and keep riding for years to come. Experience the results for yourself, click here to try 7 days free.

Mistakes to Avoid When Buying a Bike Saddle

September 3, 2015 by U.M.

Mistakes to Avoid When Buying a Bike Saddle
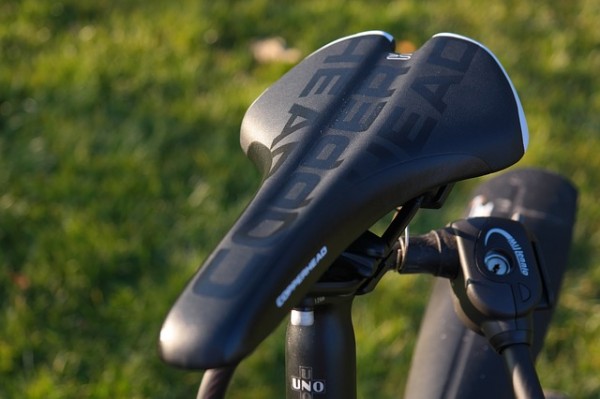
A lot of novice cyclists make the mistake of believing that their bike saddle isn’t all that important. After all, if they are just going to be on the bike for an hour or so a day, many reason that they can just get by with whatever came with the bike.

However, once the cycling bug grips you and you start wanting to spend longer on your rides, you will quickly realize that having a good bike saddle is vital to ensuring that you remain comfortable and healthy when you are really pushing yourself. This is especially true for adventure cycling and other long distance trips, where a bad saddle can cause issues in the long run. If you’re now in the market for a new saddle, there are a number of key mistakes that you need to ensure you don’t make before you spend your cash.

Not Taking It For A Test Ride

If you were buying a new car, would you just pay the money without even getting a feel for the vehicle before you did? Of course you wouldn’t, and the same should be true of your bike saddle.

You need to look at a new bike saddle as a long term investment. This is something that is going to be with you for the lifetime of your bike, and often beyond, so you need to make sure that it suits all of your requirements. A good saddle will stay with you for many years.

Soft Does Not Mean Comfortable

If you have ever sat in a particularly soft bike saddle it is easy to believe that they will be the ones that will offer the most comfort on a long ride. After all, it simply feels so good to have all of that cushioning underneath you, so how could there possibly be a better choice?

However, it is important to remember that soft does not equate to comfort in the long term. Whenever you ride your bike, your sit bones will always be looking for somewhere solid to rest. That soft saddle that seemed like such a good idea at first may actually lead to you poorly distributing your weight and leaving yourself in discomfort during your ride.

Failing To Consider Your Riding Style

Though there are obviously proper techniques that most cyclists follow, nobody’s cycling style is ever going to be exactly the same. After all, the way you ride is going to change based on the terrain you’re riding on, as well as your personal preferences.

When you are buying your bike saddle you should always make sure to speak to a professional and let them know exactly how you ride and what you use your bike for. In some cases they may be able to point you in the direction of a bike saddle that better suits your personal style and needs.

Not Sizing Properly

Bike saddles come in a wide range of shapes and sizes, so you need to ensure that you pick on that suits your particular body type. Sit bone width, in particular, is important to keep in mind as this measurement doesn’t necessarily equate to your pants size.

Make sure you have an idea of the size that you need and speak to a professional if you’re unsure. After all, your bike saddle might be the greatest in the world but if it doesn’t fit your body type it is still going to feel extremely uncomfortable when it comes time to use it.

Rushing

Always take your time and consider the options before you purchase a bike saddle. After all, in most cases it is not an absolute necessity and you can usually get by on your existing saddle long enough to allow yourself the time to find the right one.

How To Clean Water Bottles

September 2, 2015 by U.M.

How To Clean Water Bottles
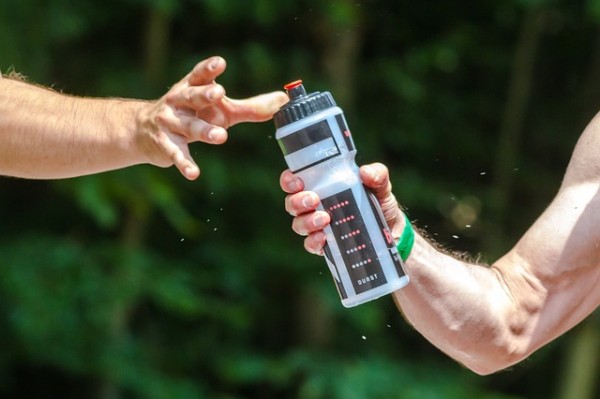
Your water bottle is going to be an ever-present fixture of your rides and thus is going to see an awful lot of use over the years. Whether you’re just filling it with water of you prefer sports drinks, it is important to make sure that it is always clean before you use it again, else it will simply become a breeding ground for bacteria and may lead to you contracting an illness that keeps you off your bike.

These tips are all designed to ensure that you keep your cycling water bottle as clean as possible, which not only keeps you safe but also allows you to keep using the bottle for a longer period of time.

Hand Washing

Just popping your cycling water bottle into a dishwasher after a ride is no guarantee that you will get it fully clean, so it is always a good idea to hand wash it instead. This will allow you to personally clean every inch of the bottle so that nothing gets missed. Do this after every ride using warm water and any decent liquid soap.

Wash The Caps

The bottle itself is the most important part of the wash, but you should never forget to give the caps a good wash as well. After all, the liquid you drink will either have to pass through them or will slosh against them as you ride, meaning the sediment that can build up inside the bottle can also build up around the cap. Get rid of it in the same way that you wash the main bottle and make sure you don’t allow any build up.

Use A Brush

A cloth is often not enough to really get into the corners that can build up in a water bottle, so don’t be afraid to take a brush to it in an effort to give it a really good clean. Furthermore, a long-handled brush will allow you to get inside longer bottles or those that have narrow openings that would otherwise prevent you from giving the bottle a proper clean.

Don’t Use Harsh Cleaners

As long as you clean your water bottle on a regular basis, you shouldn’t find yourself resorting to any cleaning agents that are stronger than your average household liquid soap. If you do find that the only way to get your bottle clean is to use stronger cleaners then it might be time to start looking into buying a new one. Besides, bleach is capable of contaminating your water and making you ill if you fail to rinse the bottle out properly, which is a risk that you never want to take.

Clean It Regularly

We briefly touched on cleaning your bottle after every single ride, but it’s an important enough point that it bears bringing up on its own. Simply put, if you don’t clean your bottle on a daily basis you are providing bacteria and sediment further time to develop and potentially contaminate whatever liquids you end up putting in there. Even if you only drink water, you will still be leaving sweat and potentially some foodstuff in the bottle, so it is worth cleaning it out regardless.

Avoid Dishwasher

Not only can you not guarantee that you are going to get a perfect wash from a dishwasher, but you also need to remember that they tend to clean using water that is at near to boiling temperatures. This can distort plastic bottles and make them completely unusable. That little timesaver you thought you had going could simply end up costing you a little bit more money in the long run, so always make sure to hand wash with warm water instead.

10 Best Cycling Routes in Canada

September 2, 2015 by U.M.


10 Best Cycling Routes in Canada
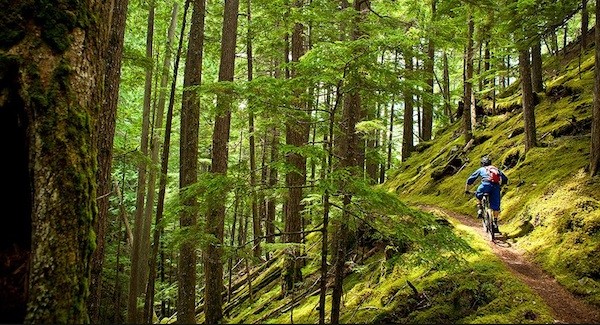
The Great White North rivals any other country in the world when it comes to areas of natural beauty. Luckily for cyclists, this also means that there are a number of cycling routes in Canada that are well worth their time.

In this list we will take a look at ten of the best, all of which are worthy of you spending a little bit of time with them if you choose to go on a cycling holiday in Canada.

  1. The Gulf Islands

Rather than being a single, dedicated cycling trail, with this option you will have your choice of the Gulf Islands, which makes the route ideal for those who like a bit of flexibility when they ride. Each island has its very own personality to explore and you could spend an entire cycling holiday getting acquainted with each one of them.

  1. Yukon’s Ridge Road Heritage Trail

This 30 kilometer trail is ideal for people who want to experience some of the history of Canada, particular for those who are interested in the Gold Rush era. You’ll get to see the gorgeous Ogilvie Mountains in addition to coming across a number of old roadhouses that were built during the Gold Rush period.

  1. Fundy Tidal Trail

Those who enjoy coastal scenery will find few better cycling routes in Canada than the Fundy Tidal Trail. Not only do you get to enjoy a bit of the seaside, but you will also encounter the Fundy National Park and Rocks Provincial Park along the way, meaning there is plenty to see and do.

  1. Nova Scotia’s South Shore

If you are just looking to enjoy the ride without having to worry about having a particular place to go, then Nova Scotia’s South Shore is the route for you. You’ll ride through a number of gorgeous villages, all while taking in the wonderful scenery around you. This route is ideal for those who just want to relax and enjoy the ride.

  1. Kettle Valley Railway

Some of the best cycling routes in Canada take in abandoned railroad tracks and the Kettle Valley Railway is probably the best of the lot. It’s a popular route, so you will likely encounter a number of fellow cyclists along the way, plus the Myra Canyon is truly a sight that has to be seen to be believed.

  1. Duck Mountain

This wonderful mountain used to be a glacial summit, so make sure you wrap up warm if you’re going to take a journey there. The mountain biking trails will take you through gorgeous forest lands, where you’ll see majestic Elk and other animals if you’re lucky.

  1. Magdalen Islands

You’ll need to take a ferry ride to get there, but this trail is one of the most interesting around and offers something a little bit different. Sand dunes and stunning beaches are the order of the day, but you’ll have to be ready to deal with some particularly strong headwinds along the way.

  1. Niagara Region

One of the best cycling routes in Canada for those who simply want a chill ride, the Niagara Region allows you to follow the river that leads up to the world famous waterfall. The terrain is ideal and you will find that you spend most of your time simply soaking in the surroundings.

  1. Toronto’s Tommy Thompson Park

This wonderful nature reserve features a purpose-built cycling trail that will allow you to take in every inch of this wonderful park. The natural views contrast beautifully with the city’s skyline, creating an experience that you won’t want to miss.

  1. Icefields Parkway

Located in the heart of the Rocky Mountains, there is simply no escaping the view of the peaks, which makes this one of the most wonderful cycling routes in Canada. A pair of difficult mountain passes await you, so be sure to bring you’re A game on this trail.

10 Best Cycling Locations in California

September 2, 2015 by U.M.

10 Best Cycling Locations in California
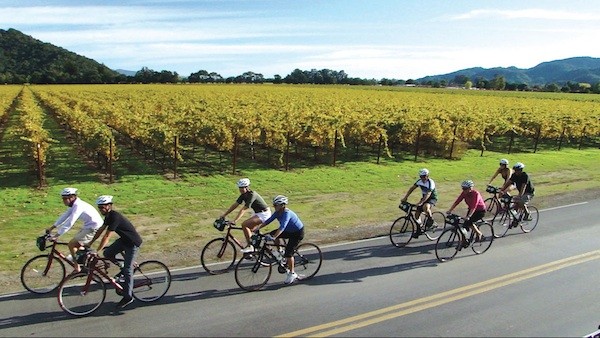
California is one of the most gorgeous states in the USA and is home to sun-kissed beaches, and other areas of natural beauty and a wine culture that is among the most interesting in the country. All of this combines to make it an area of interest for cyclists, so it is good to know that there are plenty of good cycling locations in California.

There is something for everybody, regardless of what you are looking for from your ride, so here we will look at some of the best cycling locations in California.

  1. Napa

Napa City is a wonderful area and this route takes you through it. At a little over 20 miles it is a decent ride without being too exhausting, plus you will get to see the stunning Mt Veeder Road. Best of all, the rapid descent is one of the most exhilarating experiences you will have. Couple this ride with all of the amazing wineries and you have an ideal cycling location.

Napa Routes: napavalleybiketours.com

If you’re seeking a little bit of peace and quiet during your ride than this is one of the best cycling locations in California. From a paved road in the back-end of the village, you will encounter a gorgeous wilderness that always contains something interesting to see.

Mattole Road Route: sundaymorningrides.com

  1. Aliso Creek Riding and Hiking Trail

This 18 mile stretch of asphalt makes for a really smooth ride, which is great for road cyclists who want to see a little bit of nature as well. You will get to see a number of different parks in Orange County, allowing you to really make the most out of your visit.

Aliso Creek Trail: traillink.com

  1. Pine Flat Road

Getting to the peak of Pine Flat Road is as much an achievement as it is a bike road, so make sure that you are ready for the challenge ahead. You’ll have an 11 mile climb ahead of you, which only gets steeper as you near the summit. The view from up there provides all the reward you’ll ever need for your hard work, though.

Pine Flat Road Route: bestrides.org

  1. Stewarts Point – Skaggs Springs Road

If Pine Flat Road doesn’t offer enough of a challenge than Stewarts Point Road will. It’s considered to be one of the most difficult cycling routes in California and there are plenty of hills and off-road sections for the adventurous. Amateurs should stay away though.

Stewarts Point – Skaggs Springs Road Route: twistypedia.com

  1. American River Bike Trail

This stunning trail runs for 32 miles and runs alongside the banks of the American River, meaning that you will get to see plenty of natural beauty on your ride. It’s also very easy to navigate and includes a number of places you can stop over and refuel.

American River Bike Trail Route: americanriverbiketrail.com

  1. Bannon Creek Parkway

This cycling route is short and sweet, but it is also one of the most popular cycling locations in California. You’ll have the opportunity to mix with the locals in addition to exploring the wonderful Jefferson School Park and Bannon Creek Parkway.

Bannon Creek Parkway Route: traillink.com

  1. Miners Ravine Trail

Don’t let the name fool you, as you won’t end up deep underground while riding this route. Instead, you’ll get to see the city of Roseville in all of its glory before following the course of the ravine that gives the route its name. This route offers a great mix of nature and suburban living environments.

Miners Ravine Trail Route: everytrail.com

  1. Ohlone Loop Trail

Nature lovers, and those who enjoy birds in particular, will love this location. It takes on the wetland areas of Watsonville, which is located on California’s central coast, creating a peaceful ride that is not too far from residential areas so you don’t need to worry about getting lost.

Ohlone Loop Trail Route: cityofwatsonville.org

  1. Lario Trail

The Lario trail is one of the best cycling locations in California for people who want to experience the dual nature of the state. On one hand you will get to enjoy the natural beauty of the LA River, whereas on the other you will experience the impressive industrial landscapes of the state.

Lario Trail Route: google.com/maps

Which of the 10 best cycling locations in California is your favorite?

Cycling Essentials – Must Have Equipment For Beginners

August 26, 2015 by Lee Agur

Cycling Essentials - Must Have Equipment For BeginnersGetting into cycling is not like taking up other sports, you have to get a lot of equipment before you begin and some of it is head-spinningly expensive. We decided to make a list of the actual essentials you need to get out their and enjoying your bike and highlighted a few areas where some newbies end up paying for things they don’t need.

Cycling Essentials

Helmets: How to Choose

The debate about cycle safety has raged for as long as there have been bicycles, but – whether you’re a cyclist, a driver, both or neither – there are some basics that we all agree on. One of these inarguable facts is that there are a lot of idiots out there, and just because you know your road safety, doesn’t mean everyone around you does. One of the best ways to protect yourself from the errors of others is to get yourself a cycling helmet.

There’s a huge range of variety in bike helmets, but when you’re choosing yours there’s really only one thing you have to remember – all helmets are made to a minimum safety standard and one at the bottom of the price spectrum is going to protect you just as well as one at the top end, give or take. If you’re very concerned with styling and looks then top-end helmets do tend to look a little bit sharper, but for most purposes a bargain basement one is just as good. It’s not like you’ll be posing for your family Christmas card in the thing anyway.

Top tip: absolutely nobody below semi-professional level actually needs an aero helmet! 

A Decent Hand Pump

When I got into cycling I bought a pretty poor quality hand pump. If I could go back and do one thing differently throughout my life on two wheels it would be throwing that thing away about two years earlier than I eventually did. A good hand pump can make the difference between being able to fix a flat roadside before finishing your ride and having to take a very expensive taxi/train ride back to your starting point.

Some bike snobs may look sideways at a frame with a bike pump holder attached, but realistically it’s a good practical option for those who don’t want to have their jersey or jacket pockets stuffed with miscellaneous mechanical items.

Top tip: CO2 pumps offer a nice alternative to the traditional hand pump – they’re usually comprised of a small canister of compressed air with a detachable dispenser. You throw away the canisters and keep the dispenser. Honestly, they’re more of a nice-to-have than an essential. 

Tools and Replacement Parts

Don’t worry, I’m not going to ask you to invest in the tools needed to fix a broken rear derailleur or replace the bearings in one of your wheel hubs – but a basic multi-tool and a couple of spare inner tubes could really save your life when you’re stuck on the side of the road miles from the nearest mechanic.

Most bike shops will sell at least one cycling-specific multi-tool, which will include a selection of hex keys (also known as Allen keys) and a couple of screwdriver heads. Better quality multi-tools will also come with a chain-link extractor – if you feel confident in your mechanical ability I’d recommend getting one of these and a spare chain link.

Fixing punctures and replacing inner tubes is a skill every cyclist should have, if only to avoid the exorbitant prices some less-ethical mechanics charge to fix a flat. It’s a good idea to always carry two spare tubes with you, as well as a set of tyre levers. If you’re riding solo for more than three or four hours, you might want to think about taking a third spare.

Top tip: plastic tyre levers are much better for your rims (and often cheaper) than their metal equivalents.

Recommended Read: 20 Essential Bike Repair Tools

Clothing

Cycling requires lots of different types of clothing, so when you’re beginning it’s good to go for things that are versatile. A lightweight waterproof jacket is absolutely essential – any experienced cyclist will be able to tell you at least one story where they left home in blazing sunshine without rain protection, only for the heavens to open and drench them to the bone. There are lots of cycling-specific coats and jackets, but a packable hiking or running jacket is also a good option.

Obviously, you don’t need to be dressed head-to-toe in lycra to go for a bike ride, but it’s advisable to have at least some shorts made of the lightweight material for rides longer than a couple of hours. This is to avoid discomfort and chafing created by prolonged friction between your skin and your clothes. Bib shorts (the ones with the full straps that come over the shoulders are better still, as they’ll stay in place better).

Hardened roadies will try and tell you that you have to have clip-in shoes and pedals, but this simply isn’t true. It’s fair to say that clip-in shoes are more efficient when it comes to power transfer, but for those starting out the idea of being physically attached to the bike is a little bit daunting. Over time you’ll develop confidence on the bike and may feel more happy switching to clip-in pedals, but for now focus on getting familiar with the feel of riding a bike for long periods of time.

Top tip: in winter you will need gloves – find the thickest ones you can, then ask the guy in the bike store if they have anything warmer. Then do the same with overshoes!

Lights 

I’ll never forget riding through London the first time at night on my new road bike. A pedestrian yelled the words, ‘Lights, dickhead!’ at me. I remember thinking it was such a uniquely British thing to express concern for someone’s safety and insult them at the same time. I went and bought some lights the next day.

While helmets are all pretty much the same (as mentioned above), lights are a whole different story. I’d strongly recommend skipping the first few price brackets and getting something in the middle-to-high price range. The difference in the amount of visibility and light they produce is remarkable and could very easily be the difference between a serious incident and a safe cycling experience for many years.

Good lights can also last a very long time, so over the years it’s going to save you money. Better lights also tend to be USB chargeable, rather than running off AA or AAA batteries – another cost savings right there.

Top tip: a light on the front and back of your bike are essential, but an additional helmet-mounted light will add an extra layer of visibility.

Recommended Read: Best Road Bike Lights

What type of cycling equipment do you feel is essential out there on the road? What cycling essentials did we miss?

Finding a Good Local Group to Ride With

August 24, 2015 by Adam Farabaugh

Finding a Good Local Group to Ride With
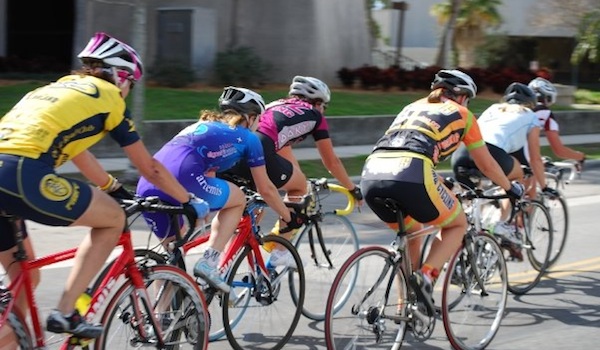
There are three types of bike riders. Those who prefer to ride by their self the majority of the time, those who ride with one or two friends, and those who seek out group rides every chance they get.  Each has their own benefits and not one is better than another.  One is only better than another to you.  Find what you enjoy most and do it. A mix of all three can give you the benefits of each.  Riding in a group can give the most uncertainty to how much fun and enjoyment you will get out of a ride. Group rides can range from Wednesday Night World Championships where nearly everyone treats it like a race and is willing to do anything to get to the finish line first to a slow easy coffee ride where everyone just mingles and no one pushes the pace. Finding the group that is best for you can be a challenge especially if you don’t know the ins and outs of the local scene.

Level of the Group

Cycling comes in all sorts of shapes and sizes and so do the groups.  In some towns you can find multiple groups riding on the same night, just at different levels of riding. You first need to assess what level you are riding at.  Most higher level group rides are categorized into “A” and “B” with “A” being for Pro to Category 3 racers or riders of similar ability.  They are fast, typically 20 to 25+mph averages.  “B” rides are a bit slower but still get a good showing of lower level racers.  These are the more “race type” group rides.

From there, there are group rides that are more dedicated to beginner cyclists often times with a few more experienced riders leading the group and giving instruction along the way.  This can be a great first riding group to start with.  Everyone is more or less on the same page and easy to talk to and learn from.

Other group rides are designed more around the social aspect; a good excuse to get together and mingle while doing something fun.  These rides are typically composed of riders who have been riding for a while and do it not for the competiveness but purely for bike riding and the social aspect.  These rides can range from short ten mile rides to one hundred mile centuries.

You will want to match your fitness and ability to the level of the group as well as to what you are looking to get out of the ride.  If you are looking for fitness and have intentions to race or already race, the “A” and “B” rides are the ones to seek out.  If you are just starting, find a beginners ride, and if you are looking more for a social ride, find one that focuses on that.

Composition of Riders

One thing that makes group rides fun and appealing to return to week after week is the riders that are there. Group rides are going to vary in ability but also in composition of riders.  Some rides are going to be very competitive with riders not necessarily looking to talk let alone give advice to the new comer. They can be a bit negative with a few riders spoiling it for everyone. These rides can be great for fitness but not so much to learn and make friends. Finding the right group that is competitive but still keeps things light hearted and fun is the making of a perfect group ride. You can use it to gain fitness, bring out your competitive spirit, as well as to get the social aspect in with what will become a great group of friends.

Another thing about bike riding is that it attracts people from all backgrounds. An average group can have a composition of the Wall Street Banker to the guy flipping burgers at McDo’s. Everyone is brought together at the same level and it no longer matters how much money you make or where you’re at in life. You’re all together out on a bike ride. That’s something you can’t get in very many places.

Routes that are Ridden

Another aspect in choosing a group to ride with is what roads, and trails, they ride on. Some larger, faster, group rides tend toward the bigger and busier roads. If you’re like most riders you prefer nice back roads that afford some nice scenery. The rides that find these roads tend to be safer as well as more enjoyable as everyone can relax and enjoy the ride as well as each other’s company and not worry about traffic, red lights, and cars pulling out in front of them. Weekend group rides often times are longer and seek out awesome roads and views in the area. If they are above par they also seek out the good stops along the way such as coffee shops and local markets.

Group rides can be a great way to meet new people into the same thing you are as well as to gain fitness and experience on the bike. A quick online search can yield local rides often times posted on the areas local cycling groups’ website. Another good resource is the local bike shop. They will know where and when rides are as well as what type of ride they are. A mix of riding by yourself, with a few friends, and with a local group can allow you to get more enjoyment and other benefits out of bike riding. We do it because it’s fun. Continue to grow that fun.

Choosing Your First Race

August 23, 2015 by Adam Farabaugh

Choosing your first race
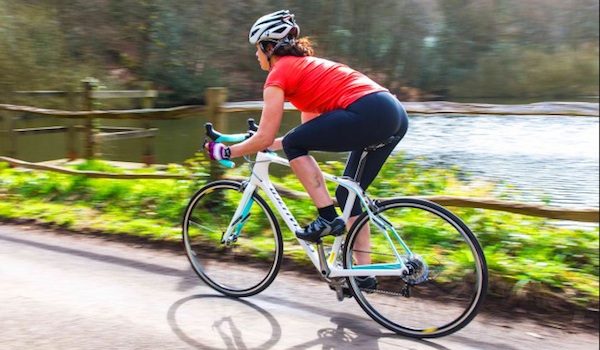
So you have been riding for a while now and have started doing some local group rides.  You now want to try your hand at racing but where do you begin?  You already have the thought in your mind about racing so you probably already have the skills to ride safely in a group, corner, as well as have a bit of fitness to keep up with those around you.  You should have these attributes before trying your hand at racing but once you do give it a go.  Being smart about choosing your first race will not only make sure that you have a good time but that you come back for more.

Choosing the Discipline

The first thing in choosing a race is what type of race you want to do.  You probably already know what type of riding you want to do whether it be road, mountain, or cyclocross, but you need to choose what type of event within those categories.  For mountain biking there are a number of different events such as short track, marathon, downhill, and enduro, but cross country is the best starting point as it is generally not too technical and not too long.  For cyclocross, there will only be one race that you can do unless you fall into a junior or master’s category in which case you can race your age group as well as your category.

For road, there are three categories in which to choose from.  They are time trials, road races, and criteriums.  Time trials are a good place to start if you are not yet comfortable riding in a group but they are harder to come by and don’t offer the same type of racing as road racing and criteriums as they are solo against the clock.  Criteriums are short, less than a mile, technical circuits that you do many laps on.  They are fast and technical and are not the best place to get your feet wet racing.  Road racing on the other hand gives you a more wide open road with longer loops and less turns allowing you to focus on the race and other riders.

The beginner races are called Category 5 races of which go up to Cat. 1 and then Professional.  These are not overly long and are against other riders in a similar boat that you are; just starting out and even if they have raced before it won’t be more than ten times.  These types of races will challenge you but also allow you to still compete and learn as you go and not be too over your head.

Which Race Close to Home to Do

Your first race should be one that is close to home and doesn’t take too much effort to get to and do.  Your challenges need to be the race itself and not the getting there. If you are lucky enough to live in an area that has weeknight races they can be the best way to learn how to race as they are generally smaller races allowing you to learn from other riders who are more willing to give you pointers.  If weekend races are the only thing available that’s okay as that’s what you are going to be building toward anyway; it will just be a bit steeper of a learning curve.

You will want to choose one of the races relatively close that has a course that somewhat suits your ability.  Some races have a lot of climbing, some a lot of technical trails, and others that are more advantageous to beginners.  This will allow you to more easily stay with other riders within your race so you don’t find yourself out the back just riding along on your own.  It’s not quite as enjoyable if you get your butt kicked and then you’re not as likely to come back.

Websites to Find the Races

The easiest way to find races and the details about them is through online websites that are dedicated to listing bike races.  It depends upon where you live for which ones are the most prevalent but some quick searching will give you a list of the races around.

–USA Cycling (https://www.usacycling.org/events/): Lists events all over the country that are USA Cycling events which is the majority unless you live in a state such as Oregon or Colorado which also has their own governing body.

–Oregon (http://obra.org/): Oregon events.

–Colorado (http://www.coloradocycling.org/): Colorado events.

–Bike Reg (https://www.bikereg.com/): One of the most popular bike race listing sites, particularly on the east coast.

Getting into bike racing can open the door to a whole new world of riding, friends, experiences, and thrill.  Part of the appeal is everything that is involved with it such as the closed circuits just for you, the speed, the equipment, and the fact that not just anyone can show up and do one.  You have to have the knowhow and skills not only to do well but just to compete.  It’s more than your local 5k.  Do your homework and know what to expect at the race and come prepared.  If you do you’ll be hooked after your first race and will be an expert in no time.

« Previous Page
Next Page »
  • Facebook
  • Tumblr
  • Twitter

Latest Articles

JOIN Cycling: A New Training Platform for Cyclists

May 27, 2024 By Eric Lister

cold exposure

The Benefits of Cold Exposure for Cycling & Life

June 13, 2023 By Eric Lister

hill climb

The Ultimate Hill Climb Training Guide

May 31, 2023 By Eric Lister

shoulder pain cycling

How to Treat & Avoid Shoulder Pain While Cycling

April 12, 2023 By Eric Lister

psoas stretch

The Importance of the Psoas Stretch for Cyclists

April 6, 2023 By Eric Lister

cycling neck pain

The Ultimate Guide to Cycling Neck Pain: Causes and Solutions

March 21, 2023 By Eric Lister

Useful Info

  • Contact
  • Finally, A Global Cycling Club That Is Focused On Community And Love Of Cycling!
  • Privacy Policy
  • Share Your Story!
  • Terms And Conditions Of Use
  • Welcome to I Love Bicycling
  • What Happened When I Stretched Every Day For a Month

Recent Posts

  • JOIN Cycling: A New Training Platform for Cyclists
  • How to Hang Bikes in Your Garage: 4 Inexpensive Options
  • Gravel Bike Vs. Road Bike: Which One Is Better For You?
  • The 6 Types of Mountain Bikes & How to Choose the Best One for You
  • What Is a Touring Bike Good For? 5 Benefits We Know You’ll Love

Search I Love Bicycling

Connect with Us

  • Facebook
  • RSS
  • Tumblr
  • Twitter

Copyright © 2026 · Magazine Pro Theme on Genesis Framework · WordPress · Log in