• Training
    • Injury Prevention
    • Training Tips
  • How To
    • Bike Fit
    • Gear
  • Nutrition
    • Nutrition Tips
    • Weight Loss
  • Repair
  • Reviews
  • Stories
    • Funny Stories
    • Jokes
    • Quotes
    • Videos
    • Funny Videos

I Love Bicycling

I Love Bicycling is a website that is geared towards cycling for beginners with road cycling tips, training articles, nutrition tips, weight loss, how to’s and bike repair articles.

Training

  • Injury Prevention
  • Training Tips
  • Training Camps

How to Breathe While Cycling – I Bet You Don’t Do it Properly

November 5, 2013 by Lee Agur

How to breathe while cycling
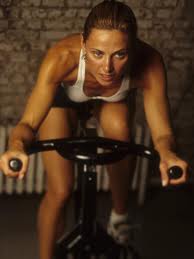
How to Breathe While Cycling – Test

Take a quick test on how to breathe while cycling. Look down and take a deep breath. Did your chest raise like superman and tummy stay relatively flat? Great. Like I said… You don’t know how to breathe properly!

Millions of breaths a year and you think we would have it down. Generally due to stress, the vast majority of us tend to breathe with our chest, as if we are the wolf in the three little pigs trying to blow the house down. This is not the most effective or efficient way to fill the lungs, nor is it the way we were designed to breathe.

How to Breathe While Cycling

Your diaphragm (a muscle below the lungs) should move downward and help expand your lungs to bring air into them. Focus on filling the bottom 1/3 of your lungs first by using your belly to breathe rather than your chest. The result should be your tummy blowing up like a balloon first, and then the rib cage expanding second. (not the other way around like superman or the big bad wolf). The exhale should be similar, you should be contracting your abdomen to expel the air in your lungs.

Why it is Important to Breathe Properly While Cycling

  1. Breathing properly while cycling will help deliver more oxygen to muscle tissue.
  2. If you are a chest breather you will tire more quickly than a deep belly breather because you are not allowing yourself to inhale enough oxygen or exhale sufficient carbon dioxide.
  3. Delivers more oxygen to the brain
  4. Helps maintain the acid/base balance in the body by increasing oxygen flow and decreasing carbon dioxide (carbon dioxide increases acidity levels and larger quantities are created during exercise)

Things that Can Prevent Proper Breathing While Cycling

The most common problem is your position on the bike. I remember wanting to get in a very aerodynamic position, and as a result, I sacrificed my breathing and comfort. In the end I sacrificed speed by not being able to breathe properly. The aggressive position lowered the oxygen getting to the muscles resulting in a lower power output. Closing your hip angle too much and not allowing space for your diaphragm to move down in order to breathe in will ultimately result in fatiguing quicker and slower cycling.

How to breathe while cyclingGreat Examples of Breathing Properly

Interestingly enough, if you would like a great example of how to breathe properly then you should watch an infant breathe. Infants use their diaphragm to breathe deeply and fully… maybe that is why they all have potbellies.

Unfortunately, adults are prone to stress which causes the diaphragm to tighten resulting in shallow chest breathing.

Another example would be to watch some pros on TV. Some look like they are growing gut! (Some are growing a tiny ponch while others are implementing this breathing technique.)

If you would like to learn more about breathing properly you can purchase: Breathe Strong Perform Better

Aerobic vs Anaerobic Exercise

November 1, 2013 by Lee Agur

Aerobic vs AnaerobicThe oversimplified, Coles Notes version… muscles use glucose as energy in two ways, aerobically with oxygen and anaerobically without oxygen. Both aerobic and anaerobic produce energy stores called ATP which is used to make your muscles contract, heart pump and other physiological process to keep us alive.

Advantages of Aerobic vs Anaerobic

Aerobic ATP and Anaerobic ATP are produced in different ways, what you need to know is that aerobic ATP is produced slower, but can be produced for much longer and results in more ATP production.

An interesting comparison of aerobic vs anaerobic is that the aerobic metabolism can use 1 unit of glucose and turn it in to 34 ATP where as the anaerobic metabolism can take that same unit of glucose and only produce 2 ATP. This means that the aerobic metabolism is 17 times more efficient than the anaerobic metabolism. That is like comparing a smart car to a semi truck in a fuel efficiency contest! This is very important during endurance events because we can only digest/refuel so much and must be as efficient as possible.

Another advantage of aerobic vs anaerobic is that the aerobic system can use carbohydrates, fats or protein as fuel where as the anaerobic system can only use carbohydrates. (Hence why carbs are so important just before exercise, during exercise and shortly after as discussed in the paleo diet for cyclists post).

Disadvantages of Aerobic vs Anaerobic

The anaerobic metabolism produces ATP at a very fast rate compared to the aerobic metabolism which means that if you need energy for a sprint you are going to go anaerobic because you need that energy QUICKLY.

Misconception about Aerobic vs Anaerobic

Everyone seems to think that you change from aerobic to anaerobic at the flip of a switch, as if there is this imaginary point of exertion that you have to hover below so you do not go anaerobic. This simply is not true. Aerobic vs Anaerobic is better thought of as a light dimmer than a light toggle switch.

What I am suggesting is that both of these energy sources are being utilized at the same time and at almost any level of effort.

Anaerobic and aerobic have an inverse relationship, if you were to go (earmuffs children) “balls to the wall” or… all out, then for the first minute your energy would be primarily from Anaerobic ATP, right at the 1 minute marker is where they would be equal and anything after that would be primarily aerobic ATP. At the 5 minute marker you are already using as much as 80% aerobic ATP.

So why do you care?

Everyone talks about the anaerobic threshold and trying to stay under it, there is a big fear that if they go over it bad things happen (in endurance events – sprinters don’t care). Going “anaerobic” results in lactate forming in your blood stream, it is that painful burn in your legs that makes you want to slow down. Your anaerobic threshold is the point where you can clear the lactate from your blood stream just as fast as you can produce it.

Aerobic vs anaerobicMore importantly, your anaerobic system can only use carbohydrates to produce ATP and your body can only store approximately 2000 carb calories. The downside here is that you are able to burn through most of that in 2 hours of hard exercise, and you are only able to digest about 400 calories an hour so… for endurance events it is essential to utilize as little of the precious carbohydrate as fuel as possible while still maintaining a high speed. By using your aerobic system you are able to burn fat as an energy source.

You have enough fat stores to go for a couple days without refueling, even if you are lean. This does not mean that you can hop on a bike and ride for a couple days, because no matter how slow you go you are still using some anaerobic energy and burning carbohydrate.

Also, I always thought that sprinting up a short steep climb was not that big of a deal during a endurance event… it turns out it is up to 17 times more inefficient! Save that precious energy. (I sometimes did this to “wake” everything up… dumb)

All the little things matter!

ATTACK Those Rollers

October 28, 2013 by Lee Agur

Cycling Rolling Hils
The key to rollers is maintaining your cadence and gearing!

Stay in the gear that you started the hill climb for as long as possible. Shift only when your cadence starts to slow below 75. A cadence between 70 to 90 is ideal. If you shift too early you will lose valuable momentum; however, if you shift too late then you might stall out.

Attack the bottom of the roller and gradually increase effort as you climb the hill until you must shift. Short rollers are like mini intervals. Just remember you are going to be able to rest on the other side. But wait… the climb is not over yet… make sure to power over the top and only stop pedaling once you have crested and the gravity has kicked in to high gear. Make sure to not lose any valuable momentum by stopping pedaling just as you crest.

An important thing to remember is when you are shifting try to “easy pedal” for a split second to allow the shift to happen. If you don’t, you run the risk of dropping your chain… or even worse breaking it! You attack rollers with a lot of intensity so there is going to be a lot of pressure on the chain if you just try and shift, it may also result in not shifting at all and again you will lose valuable momentum by slowly stalling out. If you have been cycling long enough this has inevitably happened to you… not fun! You look down as if there is something wrong with the bike… but it is usually just how you use it.

I try and stay seated as long as possible by keeping my cadence high in the beginning, but once the cadence starts to slow, I get out of the saddle and find a nice rhythm to finish off the climb powering over the top and cruising down the backside.

Cycling rolling hills is FUN! I Love it!

The complete guide to climbing – by John Summerson

Subscription

If you liked this post subscribe to my newsletter at the top right of the page to receive more like it!


You Want to Bike Faster? Then Bike Faster!

October 28, 2013 by Lee Agur

Bike FasterWhat??? Obviously… Well… not so obvious to too many.

So many people are so focused on increasing their endurance that they forget to focus on speed. People go out and continuously bike 3-4 mph under their goal race pace. Hell… I was one of those people! I just focused on increasing my distance each week…

When I first started biking I had one speed… Medium fast! I would get on my bike ride 30 miles medium fast. A few days later… 20 miles medium fast. Next ride… guess what medium fast.

I figured if I could do 60 miles at a certain speed that I could kick it up a few mph during a race due to adrenaline and pure will. It was true, I could kick it up a notch… but that was usually just in the first quarter and then it was pure survival mode from there… I usually came across the finish line looking like the grim reaper was drafting behind me and about to overtake me!

I would fall to the ground in agony from the lactic acid build up in my legs… cramping up, dehydrated and feeling awful. I just thought that meant that I left everything out there on race day and was usually quite pleased with myself. Stupid.

What I did not know at the time was that if I had trained a little faster I would have gotten my muscles used to the intensity. Your muscles and body adapt to be able to handle the stresses it is given. The best way to bike faster is to increase your speed and allow your body to adapt!

Once your body adapts to a faster speed it will be able to handle the slower pace at which you biked before much more easily. Once I discovered this all too/not so obvious fact I did speed intervals. Yes intervals! I biked faster than my goal race pace for 20 minute segments, took a bit of a rest and then did it again. It worked!

To Bike Faster You Need to Bike Slower!

Seriously? Yes seriously!

I learned that in order to bike faster you need to bike faster and once I did… gone were the days of medium fast and now I just biked fast fast! I did not learn that in order to bike faster you also need to bike slower. So I spent too much time overtrained and tired, and it actually resulted in me slowing down.Bike Faster!!!

Soo… what’s the deal? Well… You can’t bike fast all of the time, your body just cannot handle the high-intensity training. You have to allow your body to recover and adapt. When you rest and go slower this is when all the physiological changes take place and you actually get faster! All that stress that you cause your body with the high intensity training is wasted if you do not allow your body to recover and adapt. It is actually the single most important thing I have ever learned in cycling! Now it is the single most important thing you have ever learned!

Knee Pain Cycling – Causes and Solutions

October 24, 2013 by Lee Agur

Knee Pain Cycling
Knee Pain Cycling

Unfortunately, I have had a lot of experience with knee problems. What is even worse is that most of the knee injuries I had could have been prevented if I knew what I know now.

Even though cycling is prescribed for so many different injuries as a rehabilitation process due to its low impact nature, it is a very repetitive motion and so overuse injuries can occur. On average a cyclist will pedal 5000 strokes an hour, that is 1 million pedal strokes every 200 hours! Per knee!

If something is out of line, you are likely going to feel it after 1 million pedal strokes… if not before. Make sure you are set up properly.

Bike Fit

One of the first things that should be looked at is the overall bike fit. If you are able to afford a professional bike fitting I highly recommend it, not only will it save your knees but it will put you in the most comfortable and powerful cycling position. Some key areas are as follows:

Cleat Position and Cleat Float

Your cleat position and amount of cleat float have a lot to do with knee injuries. For a proper cleat position read my previous post by clicking here.

Cleat float refers to your ability to move your foot side to side while still clipped in. Suggested ranges are from 5 – 13 degrees of rotation. Many people tighten the pedal as tight as humanly possible so that they do not loose any power; however, in most cases, this does not allow your knee to track in its most natural line. It also prevents your foot from being in its most natural position. If this is you try loosening your cleats.

Saddle Height

If your saddle is too high you may develop knee pain in the back of the knee, if it is too low the knee pain will be at the front of the knee.

A quick check on proper saddle height can be done by measuring your inseam while barefoot, with your feet shoulder width apart. (Floor to crotch) Multiply this result by 0.883. This height should approximate your saddle height from the middle of the bottom bracket axle to the top of the saddle. (Measurement taken along the seat tube).

This is just an approximate height, adjust it according to your riding style i.e. if you point your toes excessively then the seat height should be slightly higher.

Saddle Fore and Aft Position

Get on a stationary trainer and rotate the cranks to the 3 and 9 o’clock position. Have someone grab a plumb line and measure from your forward tibial turberosity (the bony bump below the knee cap) to the pedal axel. Move your seat position fore or aft until the tibial tuberosity is in line with the pedal axel.

On a triathlon specific bike your knee will actually be a bit more forward than this.

Pedal Stroke

Make sure you have good pedaling technique bicycling and do not allow your knees to push outwards or pull inwards.

Too Much, Too Hard, Too Soon

When spring arrives it is nearly impossible for me to contain myself in any of these three categories… Hence all my knee injuries. Instead of cutting back when spring arrives I have beat indoor trainer boredom and prepped myself for the spring!

A general rule of thumb in cycling is not to increase these categories by more than 10% a week.

If I start to feel knee pain now, I am confident it is not my bike fit so I decrease these categories slightly (too much, too hard, too soon) and I actually switch to mountain biking more. Strangely enough, mountain biking hurts less because I am constantly changing my position, where as in road biking I am generally always in the same position doing the same repetitive motion.

Knee Pain Cycling Bonus Tips

Less likely to be the source of your knee pain cycling, but why risk it? Plus a great preventative measure.

Warm up

Let your joints, tendons and muscles warm up before committing to a hammerfest right out of the gate. Much more on this in a previous post called Cycling warm up benefits.

Spin More Mash Less

Especially on hills try to keep your cadence up, if your cadence slows then stand up out of the saddle to continue. Standing while climbing will be less strenuous on your knees if the grade is too steep to spin.

Keep Your Knees Warm

What is worse than cycling in the cold? Being cold and cycling in the cold! I wear some nice tights or bib tights, and if it gets really cold I actually wear the tights under some pants (Get it at your Local bike shop because you want to try it on first). I do not need any more excuses to not brave the cold. Dress properly and it can still be very enjoyable.

Different Leg Length

Knee pain cyclingI am hesitant to post this as I know people get shims in their shoes unnecessarily all the time.

A quick test is it to lie on floor and make a 90 degree angle with your knees while your feet are flat against the wall. If one knee sticks out more (away from the wall) then that tibia is longer. If one knee is higher up the wall (further from the ground) then the femur of the respective leg is longer. This is a quick test and is a starting point to investigate further. X-rays would be more reliable.

For most of us the left leg can be shorter one day and then the right leg shorter the next. Lie with your back on the ground and have someone pull your legs out… are they even? Good! You probably do not need shims you just need to stretch it out and have someone pull on your legs once in a while. More on this later.

Post Ride Massage – Prevention

A post ride massage on a foam roller was what saved my knees in the end. I had VERY tight IT bands and now I just spend a few minutes after a few hour ride on a roller and I am good to go. Read post ride massage – selfie for more information.

Summary

Knee pain cycling can change your world very quickly. My issue was always that I was doing too much, too soon and not allowing my body to recover. Listen to your body, it is designed to let you know something is wrong before it is a chronic problem. Act sooner rather than later. Ease up on your training and seriously consider your bike fit.

Cycling Warm Up Benefits

October 23, 2013 by Lee Agur

Cycling Warm upI used to show up to an event with just enough time to put my helmet and shoe’s on and get to the start line before the gun went off. (I Love my bed) Then I learned how important a proper cycling warm up actually was!

What are the benefits of a cycling warm up?

  1. Accelerates oxygen uptake by dilating your blood vessels
  2. Warms up the muscles
  3. Increases force and speed of contraction of muscles
  4. Increases anaerobic metabolism
  5. Increases efficiency of joints

Great, so what does this actually mean?
It means more fuel going to your body faster, and waste (like lactic acid) getting cleared from your body faster. It prevents you from going anaerobic at the start and getting out of breath early or too easily.

More benefits of warming up listed here. (Wikipedia)

How long should you warm up?

15-20 minutes! What about longer? Not for me!

A study done by Elias K. Tomaras and Brian R. MacIntosh suggest that warming up longer than this will fatigue you. I agree. Read their findings here. (It is a very short read)

I warm up by slowly increasing my effort from 50% to 80% of maximal heart rate/power/perceived effort for 10 minutes followed by 3 one minute bursts of 85%, 90% and 95% between each burst I take one minute to recover while spinning at about 50%.

The goal is to prepare your body for the start of the event, wake the legs and body up and get mentally prepared. In my own terms, it is to let your body know something AWESOME is about to happen! Try to end your warm up as close to the event start time as possible.

Here is how Team Sky does their cycling warm up:


As mentioned in the video, it does not matter if you are a professional or a beginner cyclist, the goal of the cycling warm up is the same and you should do it the same (you may not push as much power as them, but the theory does not change).

If you don’t warm up what happens?

You feel like I did at the start of your event… like crap! Gun went off and I immediately went anaerobic wasting more energy than was necessary, breathing so heavy it sounded like I was going to keel over and die. You feel sluggish and you swear your legs have been replaced with a sack of hammers!

Should I warm up before every event?

Cycling warm up benefitsNo, you actually do not need to warm up before every event.

Here is my general rule of thumb, if you have not biked that far during the year then do not warm up, no need to waste the energy. ie. century rides and granfondo’s. (The exception here is if you plan to start out fast!)

For short distances always warm up if you want to perform your best. For longer distance races it all depends on how you plan on starting the race, if you plan on easing into it at a slow gradual pace you can likely skip the warm up.

In hot temperatures you are able to warm up less because a lot of the physical characteristics you are trying to achieve are already occurring and vice versa for the cold… warm up a little longer.

There is no doubt that a warm up will enhance performance. Just find out what works the best for you.

Subscription

If you liked this post subscribe to my newsletter at the top right of the page to receive more like it! If you didn’t… subscribe anyway… It is my Birthday.

Move Your Cleat Position

October 21, 2013 by Lee Agur

bike cleat position cycling
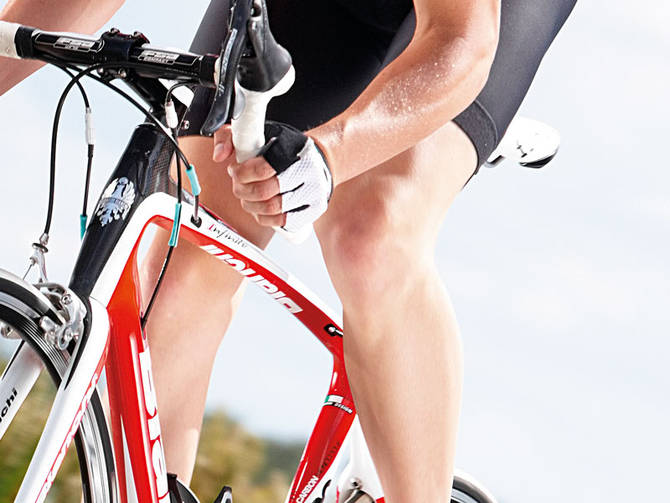
I went to a professional bike fitting and was surprised that one of the first questions that was asked was related to my cleat position:

Professional bike fitter while examining my shoes: So… why did you choose this cleat position?

My response: Because they came like that…

Embarrassing but true. I just thought the cleat should be positioned so that the ball of your foot was over the pedal axle; unfortunately, my position was a little forward of that.

What followed was a discussion of where the cleat position should actually be cycling and why. I took his advice, moved it back nearly 14mm, and found significant power and efficiency gains. Upon further reading and personal testing here is what I found.

Concept

The further forward the cleat position is, the harder your calf muscle has to work as a stabilizer muscle. The energy the calf is using does not actually go into driving the bike forward but rather is used to stabilize the foot and the ankle. However, with a forward cleat position cycling you are able to attain a higher peak torque.

The goal is to find the cleat position that gives you the torque you require without unnecessary calf fatigue.

Where to position the cleat?

cleat position
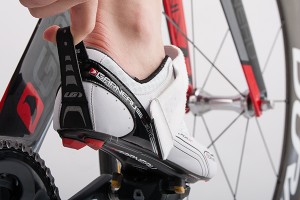
Steve Hogg, a world-renowned expert on bike fitting, recommends the following cleat positions:

Shoe size 36 – 38: Center of ball of foot 7- 9 mm in front of the centre of the pedal axel

Shoe size 39 – 41: 8-10 mm in front

Shoe size 42 – 43: 9 – 11 mm in front

Shoe size 44 – 45: 10 – 12 mm in front

Shoe size 46 – 47: 11 – 14 mm in front

Shoe size 48 – 50: 12 – 16 mm in front


Before adjusting anything you should consider the fact that the type of cycling you do should dictate your cleat position.

Sprinter

If endurance is not a factor, say for instance you are a sprinter on a track, then ignore this post, as you will not care about calf fatigue and you require high torque.

Road Rider/Mountain Biker

I assume many of you fall into this category and the suggested cleat positions above are likely going to serve you well. If you are more focused on endurance then move the cleat to the high end of the spectrum (further back) i.e. century rides and road races. However, if you are more focused on sprinting move it to low end of the spectrum (further forward) ie. crit races and cyclocross.

Time Trials/Ultra Distance Biker

Steve Hogg and other big names such as Joe Friel (The author of The Cyclist’s Training Bible and many other great training books) have gone so far as to say that midfoot cleat position is optimal for individuals purely focused on endurance. Individuals focused on time trials and ultra distance would be the beneficiaries of this advice.

I have not personally tested this out but I must say I am curious. To me it makes sense, as I always found my calves cramping up, but you have to decide what is right for you.

Moving Your Cleat Position

If you do happen to move your cleat position back remember to lower your seat and your bars. Also, if you are thinking of switching your cleat position then read this more detailed article by Steve Hogg.

One thing to watch out for if you change to midfoot is your foot striking the wheel on a slow sharp U turn because your foot overhangs so much.

Make a conscious informed decision about the bike cleat position because it does make a difference!

The Perfect Pedaling Technique

October 19, 2013 by Lee Agur

Pedaling technique
Pedaling the bicycle is what cycling is all about! Why would you not want to be the most efficient at this one thing? It is what I have focused on the most this year! Testing what works and what does not work.

Quiet Upper Body

I believe one of the most important things (that is not stressed enough in the proper pedal stroke) is keeping a quiet upper body. You may have heard “keep a quiet upper body” but why?

Keeping a quiet upper body sets the rest of the pedal stroke up for success. I started by pedaling up a hill and as soon as I started to get sloppy (head moving back and forth – happened very quickly as explained in my previous post about hill climbing) I either turned around and went down or got out of the saddle to continue to climb. No sloppiness allowed!

After keeping a quiet upper body it all runs down from there…

Alignment

Have your hip, knee and ankle in a line, this is your most efficient and powerful position! Unfortunately, not all of us do this. It is a good idea to set yourself up on a trainer and either use a mirror or a spotter to watch your natural pedal stroke.

I think we have all seen the bow-legged cyclists heading down the highway; don’t let that person be you! This type of pedaling technique is inefficient and can even lead to knee injuries… trust me! (I used to be “that” guy!)

Pedal in a circle!

pedal stroke
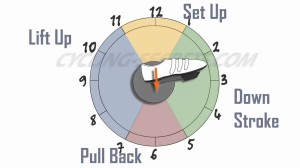
Doesn’t everyone pedal in a circle? No, they actually do not!

It is easier said than done! Your goal is to accomplish a smooth circle that applies force all around the pedal stroke. Let’s break it down…

Down stroke

Your down stroke happens between 1 and 5 o’clock, if we were comparing your pedal stroke to a clock.

This is where most of the power happens. Most of us do not struggle here, we all know how to push down. Your heel should be even to the ground or even slightly below your toe by as much as 20 degrees.

Pull Back

The pull back happens between 5 and 7 o’clock.

This motion should feel as if you are scraping mud off of your shoes. You will be engaging your calf here and pointing your toe down approximately 10 degrees.

Lift up

The lift up happens between 7 and 11 o’clock.

Your goal here is to lift the pedal up and start pulling toward the sky and later the bar top. Have your ankle at approximately 20 degrees. This is where your knee is going to want to push to the outside (bow legged). Do not let this happen, keep a strong core.

It feels as if you will be lifting the pedal up here and generating a lot more power than you actually are! What you actually are doing is lifting the weight of your leg and making it so your opposing leg is not lifting it up with the down stroke.

At a slower cadence you actually are generating power on the upstroke.

Set up

The set up happens between 11 and 1 o’clock.

Drive your foot forward. Your ankle should be transitioning from 20 degrees to 0 degrees here. It is a good idea to have someone film your natural pedaling technique.

Train Each Phase Then Integrate

Each of these phases mentioned above should be focused on separately and then integrated. It is very difficult to combine them all at once.

I have been focusing on perfecting my pedaling technique for an entire year and I am still not where I want to be. It is difficult! For me it is very quantifiable as I have a computrainer that rates me on efficiency. (If you do not know what this is do not worry I will explain it in a future post).

Improve Your Pedaling Technique

perfect pedaling techniqueThere are several ways to improve your pedaling technique.

  1. Spin on your way downhill – Try to achieve a high cadence in a small gear downhill without bouncing on your saddle. Again focus on a quiet upper body and a strong core.
  2. One leg drills – Pedal with one foot. This will force you to pedal all the way through and develop your “smooth pedal stroke” muscles.
  3. Rollers – When you feel like you have good balance try out some trainer rollers and this will do wonders for your pedaling technique. It will force you to pedal smoothly or you will fall! I do not suggest rollers for the beginner cyclist. They are difficult and frustrating and you should start on trainer.
  4. Fixed gear – Kid style! Fixed gear bikes force you to pedal in circles or you will get bounced around.

Focus

If you were to focus on one thing in the next few months this would be it! Your greatest efficiency gains are in your pedal stroke! In average human standings… I went from 0 to pretty awesome just by improving my pedaling technique.

I still focus on my cycling technique nearly every ride. When I began I could hold a good technique for 15 to 30 seconds before I started to get sloppy and my hip flexors were screaming. It takes time and focus to build up, but it is worth it! Your muscles develop faster than you would think and in no time you will be flying up hills and along the flats efficiently and with a quiet upper body.

Striving to achieve the perfect pedaling technique is worth the time and energy, I promise!

Subscription

If you liked this post subscribe to my newsletter at the top right of the page to receive more like it!

Proper Cadence Cycling!

October 16, 2013 by Lee Agur

Criterium Race Cadence - proper cadence cycling
A higher cadence during a criterium race is preferable to accelerate out of corners and respond to attacks (90 – 100rpm)

Finding your ideal cycling cadence can give you free speed! Yes… I said free speed! Who does not like to go faster with the same amount of effort?

What is Cadence?

Cadence is the amount of times your foot completes a full pedal stroke in one minute (also known as rpm). You can measure this by counting each revolution or you can buy a cycle computer. I personally love all things garmin.

Efficiency

From the month I started cycling I compared myself to a car. You may think that odd… but here is why….

In my car I have a gauge that measures current and average fuel consumption. Every time I drive, my goal is to see how little fuel I can consume. In order to do this, I have to find the “sweet spot” or the speed at which my vehicle travels the most efficiently.

Over thousands of miles I have discovered that my most efficient speed is 42mph in 5th gear at 1700rpm. So… how does this translate to cadence?

At your ideal cadence you will use less energy to travel the same distance at a certain speed. It can be broken down into simple science… Imagine you have to lift 1000 pounds over your head. If you try and do it all at once you will not be able to do it, if you lift it in one pound increments you are likely wasting energy just doing the motion. If you lift the 1000 pounds in 20 pound increments, that might be just right. Cadence is similar, you just have to find what is just right for you.

How do I find my ideal cadence?

It may be a bit obsessive, but you can test yourself with a heart rate monitor (that hopefully came with your cycle computer). I suggest you find a flat stretch of road that takes approximately 10 – 15 minutes to complete. Do a 20 minute warm up and then start one lap at 80rpm, on a different day do one at 85 under the same conditions then again at 90 and so on… try to maintain approximately the same speed and then compare your heart rates. The lap with the lowest heart rate is your ideal cadence.

When I began cycling I was quite obsessed with cadence, it was one of the only things I had showing on my cycle computer. As I continued to cycle and increase my fitness I focused on this less and less. If you listen to your body it will know what your ideal cadence is. I now know within a couple of rpms when I should shift up or down.

As you continue to cycle more and more your cadence will likely increase along with your fitness, so just because your ideal cadence was 85 two months ago does not mean it is your ideal now. Try to listen to your body.

TT Cadence - proper cadence cyclingWhat is the suggested cadence?

There is no hard set and fast rule on ideal cadence, and it actually depends on what kind of cycling you are doing, body type and fitness level.

In a criterium race you want to have a higher cadence (90-100rpm) than in a time trial (80-90rpm). A higher cadence in a criterium allows you to accelerate faster out of a corner or respond to an attack, where as in a time trial you are focused on power and not on attacks. In mountain biking you want a low cadence because a high cadence causes you to get bounced around on rocky and uneven terrain.

Endurance Rides

If you plan on endurance cycling the suggested cadence is between 85 to 100. My first attempt at an endurance ride my cadence was an average of 78 for the entire ride… (actually… I didn’t finish… I got off my bike deflated my front tire and called my sister to come pick me up due to the “mechanical difficulties” I was having).

My cadence was low due to my fitness level and my dumb testosterone male thinking of: slower cadence = more power = faster. In reality the equation looked more like: slower cadence = using more energy and cooking the legs = bonking.

My last endurance ride of 112 miles was at an average cadence of 97. (This is on the high end of recommended cadence… but it is my ideal cadence) You will continue to adapt so do not feel discouraged if your cadence is low, as you can see, it will progress.

Find some free speed by finding your ideal cadence cycling and save energy!


Hill Climbing Technique – Get Fast!

October 7, 2013 by Lee Agur

Hill climbing technique cycling

Hill Climbing Technique – Get Fast!

Hill climbs make cycling challenging… and worth it! Some people love them, some people hate them. I choose to love them, or at least that is what I tell myself and so should you!

Effort

The most important aspect of hill climbing is maintaining a steady effort from the bottom all the way to the top. [Read more…]

« Previous Page
Next Page »
  • Facebook
  • Tumblr
  • Twitter

Latest Articles

JOIN Cycling: A New Training Platform for Cyclists

May 27, 2024 By Eric Lister

cold exposure

The Benefits of Cold Exposure for Cycling & Life

June 13, 2023 By Eric Lister

hill climb

The Ultimate Hill Climb Training Guide

May 31, 2023 By Eric Lister

shoulder pain cycling

How to Treat & Avoid Shoulder Pain While Cycling

April 12, 2023 By Eric Lister

psoas stretch

The Importance of the Psoas Stretch for Cyclists

April 6, 2023 By Eric Lister

cycling neck pain

The Ultimate Guide to Cycling Neck Pain: Causes and Solutions

March 21, 2023 By Eric Lister

Useful Info

  • Contact
  • Finally, A Global Cycling Club That Is Focused On Community And Love Of Cycling!
  • Privacy Policy
  • Share Your Story!
  • Terms And Conditions Of Use
  • Welcome to I Love Bicycling
  • What Happened When I Stretched Every Day For a Month

Recent Posts

  • JOIN Cycling: A New Training Platform for Cyclists
  • How to Hang Bikes in Your Garage: 4 Inexpensive Options
  • Gravel Bike Vs. Road Bike: Which One Is Better For You?
  • The 6 Types of Mountain Bikes & How to Choose the Best One for You
  • What Is a Touring Bike Good For? 5 Benefits We Know You’ll Love

Search I Love Bicycling

Connect with Us

  • Facebook
  • RSS
  • Tumblr
  • Twitter

Copyright © 2025 · Magazine Pro Theme on Genesis Framework · WordPress · Log in