• Training
    • Injury Prevention
    • Training Tips
  • How To
    • Bike Fit
    • Gear
  • Nutrition
    • Nutrition Tips
    • Weight Loss
  • Repair
  • Reviews
  • Stories
    • Funny Stories
    • Jokes
    • Quotes
    • Videos
    • Funny Videos

I Love Bicycling

I Love Bicycling is a website that is geared towards cycling for beginners with road cycling tips, training articles, nutrition tips, weight loss, how to’s and bike repair articles.

Training

  • Injury Prevention
  • Training Tips
  • Training Camps

Top 4 Yoga Poses for Cyclists

November 26, 2018 by Sarah Lauzé

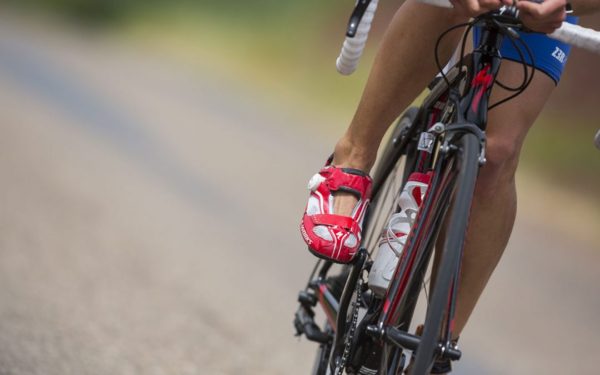
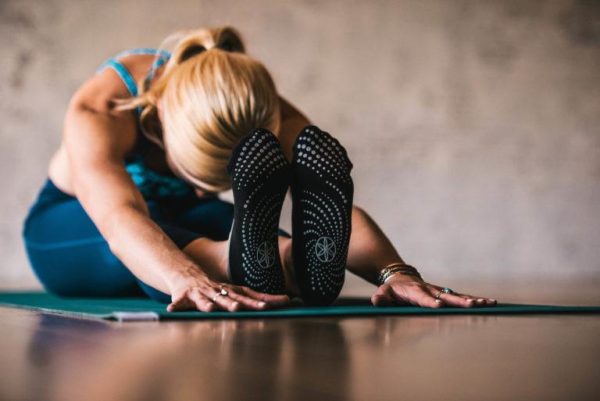
After putting miles in on your bike, it’s important to give your body some relief. Not only does this mean adequate rest days to give your body time to recover, but yoga poses for cyclists can help those muscles out a little. Luckily, yoga has your back (and hamstrings and hips).

The key to yoga is to give yourself the adequate amount of time to relax into each pose. Whether you’re a yogi or not, taking time to reach those deep stretch targets and work on your breathing can help you become a more efficient cyclist. Anything less than 30 seconds won’t make a significant difference in lengthening the muscle fibers and tissue, but holding too long too soon can put you at risk of injury.

Ideally you should try to stretch for 5-10 minutes everyday, but start with 5 days a week. Hold each pose for about 30 seconds, working up to longer times as you become more comfortable. Never push your body further than what is comfortable for you.

Yoga Poses for Cyclists

Kneeling Lunge

The kneeling lunge is great for stretching out tight quads and slowly opening up the hips.

Yoga Poses for Cyclists

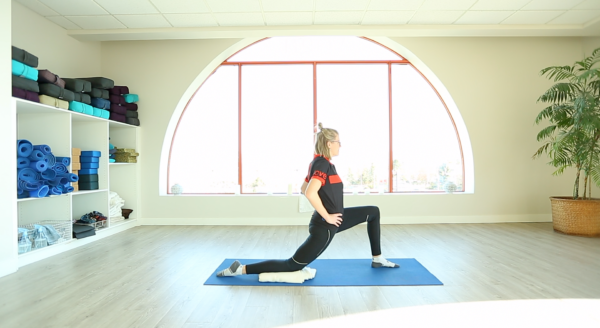
Start by kneeling down on all floors on a mat. Place a blanket or a pillow under your right knee before moving into the stretch if you find it uncomfortable.

Slowly bring the left leg up, placing your foot flat on the floor. Your right leg should be out behind you, with your foot pointing backwards. Place your hands on your hips as you press the hips forward. You should feel the stretch all down your hip flexor. As your body begins to relax, you can squeeze your glutes to increase the stretch. Hold for 30 seconds before switching sides.

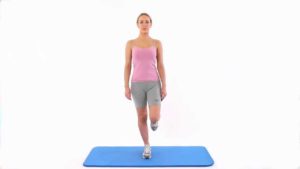
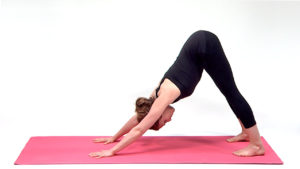
Standing Forward Bend (Uttanasana)

This pose will help release tension along the back of your body, stretching the hamstrings and lengthening the spine.

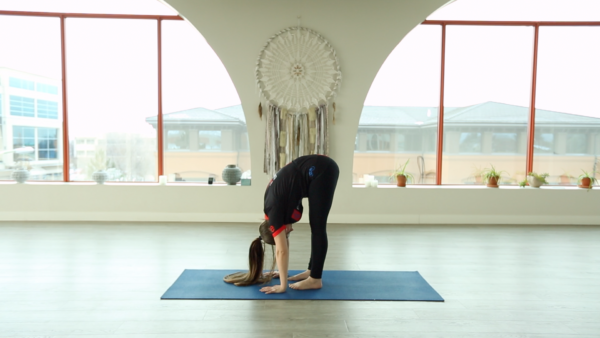
Stand with your feet about hip distance apart and place your hands on your hips. Tuck your chin slightly toward your chest and bend forward at the hips. Relax your head, neck and shoulders and let your arms hang loosely. Place your palms or fingertips on the floor beside or slightly in front of your feet. If you can’t touch the floor, cross your forearms and grab your elbows. Hold for 30 seconds.

Cat-Cow Position

The cat-cow position will increase circulation to the spine, and gently stretch the chest, abdomen, and back.

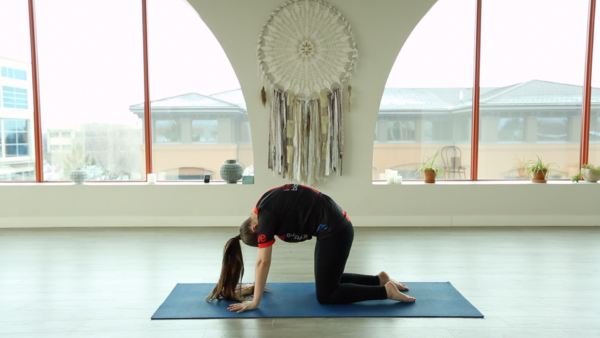
Get down on all fours on your hands and knees (put a mat or cushion under your knees). Start with a straight back, then slowly lower your head and arch your back up towards the ceiling (cat position). Try to to get the greatest amount of curvature as possible for you. You may not feel the stretch in your spinal muscles, but that doesn’t mean it’s not there.

Next, lift your head and tailbone upwards, curving your spine down towards the floor (cow position). Switch between the two for 1 minute.

Pigeon Pose

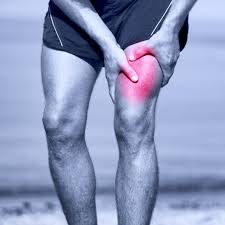
Cyclists are known for having tight hips, so no routine would be complete without the ultimate hip opener.

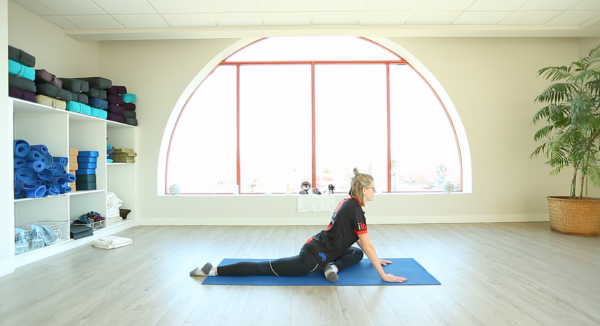
Come onto all fours with your hands shoulder-distance apart. Bring your left leg forward so the left ankle comes to your right hand, then slide your right leg back, keeping your hips square.

Depending on your flexibility, your knee may be inline with your ankle, or tucked closer into your body as shown here. As you relax into the stretch, gently push your body back on that right leg, opening your hips. Hold for 30 seconds before switching sides.

There are a lot of different types of yoga, so you could try different classes until you find on that fits. For those that struggle with having the discipline to stretch at home, it can be a great way to ensure you are giving your body what it needs to recover. Even switching out just one of you rides a week for a yoga session can help your overall strength and power on your bike.

Train Your Core for Better Cycling

November 12, 2018 by Gareth Eckley

Cycling may seem to be all about the legs, but cyclists also need to have a strong and stable core. The core muscles include the stomach, lower back and trunk muscles. These are the abdominal muscles (your 6 pack ): the Obliques, Quadratus Lumborum, Lattismus Dorsi, the Erector Spinae and the deeper muscles in this area.

These muscles act to stabilize your body and help you control your bike. A strong core allows you to pedal with a smooth and powerful action, and maintain a strong upper body position. A strong core can also help treat or prevent lower back pain from cycling.

Strengthen your Core Muscles in the Pool

The best way I have found to strengthen the core muscles is to head to the swimming pool. Buy or borrow some swim fins and learn how to do a dolphin kick. This technique looks like swimming like a mermaid, keeping your knees and ankles together, pointing your toes and moving forward and back.

Try to keep your legs as long and straight as possible, this will recruit your stomach and lower back muscles. If you are doing it right, you will feel these muscles working. A common mistake is to kick from the knees down, which will not engage the core muscles.

Vertical Dolphin Kick

Start this while standing vertically in the water in the deep end of the pool, as you will need at least 0.5 m or 2′ between your fins and the pool floor-you don’t want to hurt your toes! Kick for 30 seconds, rest and try again.

Horizontal Dolphin Kick

Alternate with swimming a length or two of your new dolphin kick. Keep your arms straight in front of your head, in a streamline position, face in the water, lifting up when you want to breathe. The video below shows how to do this.

I do this kicking on my front, sides and on my back. There is also a cool drill where you rotate in all four positions. I call this a “3d kick.” Try three kicks in each position, rotating every third with a non-stop dolphin kick.

Dryland Core Training

If the pool isn’t for you, there are a ton of dryland exercises that can work to strengthen that core. Check out Strengthening your core-Improving Back Pain or 10 Core Exercises for Cyclists for more information.

Best of Both Worlds: The Best Hybrid Bikes

October 1, 2018 by Sarah Lauzé

A hybrid bike is just what it sounds like – a cross between a road and a mountain bike. Versatile in nature, the best hybrid bikes can be used over a variety of terrain and are popular with commuters and casual cyclists. The flat handlebars on a hybrid bike offer a more upright position that can minimize the strain that can come from the more aerodynamic position on a road bike.

Not all hybrid bikes are created equal, and there is a lot of variety within the hybrid category. Some are designed more as a road / cruiser hybrid, whereas other are mountain / touring hybrids. So, you need to define what kind of riding you’re looking to do, and decide the best hybrid for your needs from there.

The Best Hybrid Bikes

The Benefits of a Hybrid Bike

  • More terrain – Most hybrids are suited to go off or on road, so this gives you more options for your weekend adventure or daily commute.
  • Wide tires – A hybrid can have a selection of fairly wide tires, which aids comfort and allows for various levels of off-road riding.
  • Comfortable fit – A hybrid’s horizontal bars provide a more relaxed, upright, and comfortable riding posture.
  • More gears – Hybrids typically have gears similar to a mountain bike, so riding hills shouldn’t be a struggle.
  • Easy to customize for commuters – Most standard hybrids are fitted for racks and mudguards, making it a popular choice for commuters.
  • Overall flexibility – Hybrids package quality and a variety of features at an affordable price. For a cyclist who rides slightly rough trails, flat city roads, bike paths, and the occasional sidewalk, the hybrid meets most purposes halfway.

The Best Hybrid Bikes


Mountain / Touring Hybrid

Specialized – CrossTrail Elite Alloy

The Best Hybrid Bikes

Price: $1000

The CrossTrail features an aluminum frame, plenty of tire clearance, a 60mm travel suspension fork, hydraulic disk brakes, and wheels and tires that are on the heavy-duty end of the road spectrum. It’s a perfect fit for commuting, light touring, urban and rural riding, and even light trail riding. Although the fork may not be on par with the average mountain bike, it certainly takes the edge off on rough terrain.

Cannondale Quick CX 3

The Best Hybrid Bikes

Price: $870

Built for pavement one day and dirt the next, the Cannondale Quick series features tough frames and quality components. The CX 3 is the middle of the road option, with a 50mm fork with lockout. Overall it handles well and is durable, but is quite heavy for the commuter or urban adventurer.

Diamondback Haanjo

The Best Hybrid Bikes

Price: $899

Part mountain bike, part road bike, the Haanjo is designed to leave to choice up to you. Although it may not be ready to hit any technical trails, the Gravel Disc alloy fork will have you easily tackling gravel roads and dirt paths. The Haanjo features butted and formed aluminum tubing to bring together a combination of light weight, strength, and durability. The mechanical disc brakes offer some serious stopping power, and the big tires will have you rolling through the rough patches.

Road / Commuter Hybrid

Bianchi Strada

The Best Hybrid Bikes

Price: $800

Based off the popular steel frame cyclocross bike, The Volpe, the Bianchi Strada is one of the smoothest hybrids out there. With a classic design and all steel frame, there is tire clearance for a up to a 38c tire (a great option for bad weather riding). The Strada has cantilever brakes which are less powerful than disc brakes, but are much easier to maintain. Like most hybrids, there are mounts for racks and fenders, but there are also mounts for front panniers.

Trek FX 3

The Best Hybrid Bikes

Price: $819

The Trek FX brings together the speed of a road bike with the comfort of a city commuter. Also known as a fitness bike, the FX is lightweight, fast, fun, and agile. The aluminum frame comes rack and fender ready, with the added DuoTrap S, which integrates a Bluetooth sensor into the frame. You can easily log routes and track your progress with a computer or smartphone, with no external sensor.

Diamondback Insight 1

The Best Hybrid Bikes

Price: $449

Uncomplicated comfort and easy on the budget, the Insight series is a perfect entry in the hybrid world. The aluminum frame is lightweight and durable, and will hold up on winding urban streets and rougher roads alike.

Carbon Hybrids

Felt Verza

The Best Hybrid Bikes

Price: $1599

With a lightweight carbon frame inspired by Felt’s line of road racing bikes, the Verza Speed 3 comes complete with Shimano’s Metrea group for smooth shifting and modern aesthetics. It is capable as a commuter, a weekend cruiser, or a workhorse for group rides, giving you the freedom to define what kind of rider you want to be.

Fuji Absolute Carbon

The Best Hybrid Bikes

Price: $1699

This C5 carbon frame provides incredible light weight and efficiency with VRTech built in to reduce road vibration. Its full-carbon fork keeps you on locked on track and includes hidden fender mounts, while the aluminum wheels keep the rolling weight low and easily handle rough roads. You pay the price for the carbon frame, but it could be worth it if you are a serious cyclist looking for something a bit more flexible than your road racing bike.

Common Stretching Mistakes Most People Make

September 13, 2018 by Sarah Lauzé

Stretching is an important routine for almost everyone to get into, and especially for cyclists. The repetitive motion of cycling, as well as the position on the bike, can cause something called “adaptive muscle shortening” over time. Stretching is the most effective way to combat muscle shortening and maintain a healthy range of motion. However, if you’re stretching wrong, not only are you wasting your time, but you can even cause injury. Here are some of the most common stretching mistakes most people make.

8 Common Stretching Mistakes

Too Much Too Soon

Flexibility training is much like strength training. It’s temping to go all in right from the get-go, but you’re going to want to take it slow. Pushing your muscles and joints too far will do nothing but harm. Stretching should be a relaxing practice, and you should never push your muscles to the point of pain. Pain is the body’s defence mechanism, so listen to it! You should stretch to the point of tension, but you’ll want to stop there.

Stretching an Injury

Although stretching can do wonders to both prevent and treat injury, you don’t want to directly stretch an injured muscle or joint, especially within a few days after the initial injury. Ease into gentle static stretches after resting the area for 2-3 days.

Bouncing

NEVER bounce while holding a stretch. This is known as ballistic stretching, and it can stretch your muscles too far and too fast resulting in a pulled muscle. Slow and steady always wins, and never stretch to the point of feeling pain.

Not Holding the Stretch Long Enough

Perhaps the most common of the stretching mistakes is not holding the stretch long enough. 15 seconds is hardly enough time for the muscle to relax, let alone begin to lengthen. For any real improvement and change in flexibility, each stretch should be held for at least 45-60 seconds.

Doing the Same Stretch Over and Over

Have you been doing the same five stretches since high school? While it’s better than nothing, doing the same limited number of stretches day after day can cause muscle imbalances. If you focus too much on one area, it will loosen and become more flexible over time, but that muscle’s “antagonist” can become shortened as the other lengthens. Practicing a large variety of stretches, and switching through different routines each day will keep you muscles balanced and strong.

Using Stretching as a Warm Up

Research has shown the stretching before exercise can actually decrease the firing power of the muscles. Although for most casual riders this doesn’t necessarily matter, you should never stretch cold muscles. Stretching cold muscles is like trying to stretch old rubber bands. Either stretch after you ride, or do a quick five minute warm up (walk around the block or do some jumping jacks) before you move into your stretching routine.

Forgetting to Breathe

Okay this sounds kind of silly, but many people unconsciously hold their breath when they’re stretching. This is one of the reasons yoga is so great, because it focuses on the breathing almost as much as the stretching. Holding your breath causes tension in the muscles, which is the exact opposite of what you’re trying to do. Taking deep, slow breaths will relax the muscles, promote blood flow, and increase oxygen flow to the muscles.

Expecting Immediate Results

We all know there is no quick way to get rich, lose weight, or become fit– and stretching is no different. If you’re looking for a quick fix with immediate results, then you will most likely stop stretching before you give your body the chance to experience any of the benefits. If you want to see improvement in your flexibility and range of motion, there are no shortcuts.

To make the most of your time stretching, check out Dynamic Cyclist‘s stretching program. Made specifically for cyclists with easy to follow video stretching sequences, you can maintain a healthy range of motion and increase flexibility, so you can feel your best both on and off the bike.

The Ultimate Core Workout for Cyclists

August 5, 2018 by Sarah Lauzé

Strengthening your core is the single most important movement you can do off the bike for injury prevention. The great news is– you don’t have to do crunches on repeat. Strengthening your core can actually be easy and quick. This core workout for cyclists can be done in just 10 minutes, and can improve both your power and endurance on the bike.

Why Core Strength Is Important For Cyclists

Cycling may seem to be all about the legs, but cyclists also need to have a strong and stable core. These muscles act to stabilize your body and help you control your bike. A strong core allows you to pedal with a smooth and powerful action, and maintain a strong upper body position. A weak core could lead to instability in bike handling, negative compensation patterns, and low back pain.

By incorporating core exercises in your strengthening program you can improve riding efficiency. Additionally, it can help avoid overcompensation by the hip and leg muscles that could eventually lead to injuries. All factors when combined with a proper training regimen, could allow for improvements in overall speed and smoother pedal stroke.

The Ultimate Core Workout for Cyclists

This 10 minute routine can be done before or after a ride, or whenever you have time to spare. You can do each exercise one after the other, with 12 reps of each one. Core exercises are a great thing to work into your stretching routine, so it works great if you can set aside half an hour 3-4 days a week to stretch and do your core exercises.

Reach and Rotate Side Plank

This exercise works the muscles on the side of your abdomen and hips so it is about movement and not a static hold. Starting on your left side, move into a side plank position. Prop your upper body up on your left elbow and forearm, tightening your core to stabilize yourself. Place your right foot on top your left, resting on the edges of your feet. Raise your hips until your body is a straight line from your ankles to your shoulders. Raise your right arm straight out your right side towards the ceiling. Hold for 5 seconds before rolling to centre on both your forearms. Rotate to the right side and repeat the movement, that is one rep.

Cobra Lift

The Cobra pose is a simple maneuver that can help to stretch your abdominal muscles and strengthen your lower back muscles. Start by laying face down, legs extended and arms pointed down towards your hips. With your palms facing down, bring the arms to a 45 degree angle. Contract the glutes, squeezing your shoulder blades together and lifting your torso up off the ground. Rotate your arms off the ground so your thumbs are pointed up at the ceiling. Your neck should be straight and your feet remaining on the ground. Hold for 5 seconds then return to the starting position, that is one rep.

Basic Glute Bridges

Since the glutes are an accessory muscle to the core it is important to strengthen them as well. Lie on your back, with your hands at your sides, digging your heels into the ground , and squeezing your glute muscles (butt) as you pop up. Raise your right leg up, fully extended, holding for 5 seconds. Come back down and repeat the motion while raising the left leg. That is one rep.

Dead Bug

Lie on your back with your arms extended in front of your shoulders. Bend your hips and knees to a 90-degree angle. Tighten your abs and press your lower back into the floor. Slowly extend your left arm and right leg out so they are parallel to the floor. Keep your abs tight and don’t let your lower back come off the floor. Return how arm and leg to the starting position and repeat with your right arm and left leg. That is one rep.

Strong legs will only take you so far, but a strong core will bear you to the finish line and beyond. If you do 12 reps of each of these exercises 3-4 days a week, you’ll notice a difference in the saddle and in keeping proper posture on the bike.

Foot and Ankle Exercises to Improve Cycling Performance

August 1, 2018 by Sarah Lauzé

As you push up a hill, it’s normal to feel some discomfort from exertion. Climbing demands a lot from the body, and sometimes this can show up as pain or a lagging in your feet and ankles. If you’ve ever experienced that sloppy feeling as you pedal, the uncoordination that comes with fatigue, then you know the toll it takes on your power output. It can also disrupt your cycling posture, putting your knees at risk. The best way to prevent this is to do some foot and ankle exercises off the bike to correct form and activate dormant muscles. You are essentially unlocking muscles that will then kick in on your next ride and pick up some of the slack.

Foot and Ankle Exercises for Cyclists

A combination of stretching and compound exercises can help correct imbalances that are created in the cycling motion. They will help strengthen and create stability in the ankle by activating multiple muscles and joints that will in turn step in and help the ankle out.

Single-Leg Balance

Sounds simple, but balancing on one leg works to improve your balance and ankle stability. Simply raise one foot off the ground, bending it at a 90 degree angle at the knee. Hold your arms out for balance if need be. The key here is to focus on activating your ankle to stabilize your body. Hold each side for 30 seconds, doing 5 reps in total.

Ankle Rotation

The ankle rotation will help increase your range of motion in the ankle. Sit with one leg up on your other knee, fingers locking into your toes. Then rotate your foot around with your hand, stretching out the ankle joint and getting the blood flowing. Start with small circles and slowly increase to larger circles.

Calf Raises

Not only do calf raises help strengthen your ankle muscles, but they target your calves as well. Although the calves take a bit of a back seat when you’re on your bike, they are important for the downstroke on the pedal. They are also connected to your ankle and heel bone, so they are important to the overall stability of your ankle. Stand up straight with your feet shoulder distance apart. Slowly raise up onto your toes and the balls of your feet, holding onto the back of a chair or countertop for stability if needed. Hold for 30 seconds then relax back down onto your heels. Repeat 10 times. You can also opt to do one leg at a time to make it more challenging.

Calf Stretches

Everything in the body is connected. So, although most your power comes from your quads, your calf muscles also play a major role. Muscle tightness and strain can be a direct result of keeping your foot and ankle stable while pedaling. Improper bike fit, in particular cleat position, may be a contributing factor, but it is a very normal issue to have. Regular and targeted stretching can not only help keep your calves from tightening up, but also help them keep the foot and ankle stable.

Lunge

Stand with your feet shoulder width apart. Step your right foot forward, placing your hands on your hips. Gently push your hips forward, bending your right knee. You should feel the stretch in your left calf. Hold for 45 seconds. Repeat with the right leg.

Wall Stretch

Stand facing a wall, about one foot away. Place your hands on the wall and step one foot to the wall, digging your heel into the floor while resting your toes on the wall. Hold for 30 seconds an then alternate calves.

Downward Dog

The downward dog, focused on your shoulders, calves, and hamstrings. From a standing position, kneel down onto all fours on your mat. Plant your toes and straighten your legs, pushing your body up. Slowly drive your heels toward the floor, bringing your head in between your arms. Focus on driving you hips towards the ceiling, planting the heels on the floor.

How To Remove Bike Grease From Your Clothes

July 4, 2018 by Sarah Lauzé

It may be one of life’s mysteries, but no matter how careful you are, bike grease somehow seems to make it onto your clothes. Whether it’s your prized lycra or commuting attire, finding that little dark smudge can be a bummer. The truth is, it’s tough to remove bike grease from clothes, but luckily it’s not impossible!

Changing a flat or performing mid-ride drivetrain surgery can leave your hands a grimy mess. If you don’t have anything with you to take care of it, that grease is going to end up all over your bar tape or grips, and most likely make it onto your clothes. It also feels nasty on your hands. To avoid this, and in turn save your clothes, be sure to head out on every ride or commute prepared for the worst.

Step 1: Degreaser Wipes

You may not think of bringing degreaser wipes with you on every ride, but they definitely come in handy! They are an easy way to quickly clean grease off your bike and hands if you’ve had to do any roadside fixes, but they can also be the first stage of attack on grease spots on your clothes. Simply give the grease spot a quick wipe, as the longer it sits on the material the harder it will be to get out. You can then tackle it full force once you get home. You can get single serve packs that you can easily fit in your saddlebag, or use a ziplock bag to bring a couple from a larger container.

Step 2: Wash the Spot(s)

Option 1 – Use Dishwashing Liquid

Remove Bike Grease From Clothes

Once you get home, you can further remove bike grease from clothes with dishwashing liquid. This works best on recent stains on synthetic fabrics and cotton. Dish soap is great at fighting grease and breaking down oil, so it’s naturally up for the task. Put a small amount directly on the spot and rub it into the fabric with your fingers or an old toothbrush. For tougher stains, combine dish soap and a little of baking soda and stir it into a paste, then apply.

Once you’ve let this sit for a minute or two, rinse the area with cold water. Place the fabric under the tap, with the stain side down so the water is running through to the front of the stain. Hang it to dry, keeping an eye on the stain. If it’s gone, then you can wash and dry the garment as usual. If it reappears, repeat the process above. Make sure you never tumble dry an item of clothing with bike grease on it, as it well set the stain and make it almost impossible to remove.

Option 2 – Use Baking Soda

If you happen to ride your bike in your finest silk, wool, or another delicate cloth, then you’ll want to give these item a little extra love when the grease hits it. Cover the stain with dry baking soda and leave overnight. The powder should absorb the grease, making it easy to brush off in the morning. Wash as usual and hang to dry to ensure the stain does not reappear.

Best Road Bike Pedals

July 2, 2018 by Sarah Lauzé

When you’re riding your bike, you make contact with it at three main points: the handlebars, the saddle, and the pedals. As your legs are working to drive the bike forward, the road bike pedals are arguably one of the most important components on a bicycle.

When we talk about road bike pedals, we are generally talking about the clipless cleat and shoe system. There are over the toe straps that can work great for some, but for the purposes of this article we are referring to the clipless (or strapless) system.

What are Clipless Pedals

Clipless pedals have a spindle just like a normal platform pedal, but the plastic or metal platform is shaped in a way to allow the second part of the system, a matching cleat, to snap into it. A spring-loaded mechanism then secures the cleat in place so it doesn’t slide around or release. A cleat is then attached to the cycling shoe, made specifically for these cleats to be attached to the bottom via bolts.

How they work

On the pedal there is a spring mechanism that holds the cleat to the pedal. To clip in, line the cleat up with the pedal and then push down, just like a ski binding. To release the shoe from the pedal, a simple twist of the heal outward releases the cleat.

Why go clipless?

Why go clipless? Clipless pedals with cycling shoes is the most efficient and comfortable system out there when it comes to road biking. The stiff sole of the cycling shoe provides a rigid platform to transfer power from your legs to the drivetrain and propel the bike forward. Softer shoes lose some of that power as the flexible sole deforms around the pedal (and also makes your feet sore).

As well as having stiff soles, being clipped in encourages proper pedalling technique, using power through every part of the pedal stroke. Not only are you pushing down, but you are also pulling up to complete the 360 degree motion, making the switch to clipless pedals well worth it.

What to look for when buying pedals

  • Cleats – The majority of  road cycling cleats are three bolt (SPD-L), with two bolt (SPD) being more appealing for commuting, touring, and mountain biking. Some cleats are a compatible with both.
  • Tension Adjustment – When you’re first switching to clipless pedals, the most intimidating thing is not being able to get unclipped quickly when you need to stop. The slow motion topple over is almost a right of passage, but it can be lessened by decreasing the tension. Be sure to get pedals that allow you to adjust this tension, starting low and increasing the tension as you become more confident.
  • Float – Float refers to the wiggle room you have while clipped into the pedal to get into the most comfortable position for your legs. Most pedals have about 3-9° of float, but keep in mind the more float you have the more you will have to twist your foot to release. Some pedals are zero float, but you will want to make sure you’ve had a detailed bike fitting before locking in with zero wiggle room.
  • Stack height – Stack height is the measurement from the middle of the pedal axle to the bottom surface of the shoe. The smaller the stack height, the more efficient your pedaling will be as your foot is closer to the axle.

The Best Road Bike Pedals

Best All-Round Pedal: Shimano Ultegra PD-R8000 SPD-SL Pedals

Price: $120

Before going into any of the features that make this pedal great, the ease of use is its greatest selling point. They require little to no maintenance, are durable,  and remain easy to clip in and out of even when mud and snow is involved. They also hang well when unclipped to make for a quick and easy clip in.

With a carbon composite body, these pedals are a great choice for competitive and casual cyclists alike. Evolved from the Pd-6800, the R-8000 has a 0.7mm lower stack height and a lighter weight at just 248g.

Most Adjustable Pedal: Speedplay Zero Pedals

Price: $189

If you struggle with knee pain, then these are the pedals for you. The twisting motion to release the pedal can be painful on the knee joint, so the Speedplay Zero allows the widest range of tension adjustment to ensure this isn’t a problem. All three foot-axis adjustments can be set independently of each other for a precise and comfortable fit. The locking mechanism does not rely on spring tension for security, so entering and exiting Zero pedals is easy, and they are dual-sided entry to allow for an easy clip in.

Most Budget-Friendly Pedal: Shimano PD-R550

Price: $56

The Shimano PD-R550 are the perfect pedal for cyclists looking to transition to the clipless system. Not only are they extremely affordable, but that have a wide platform that feels more like a traditional platform pedal while giving you the efficiency of being clipped in. There is a wide range of tension adjustments so you can start with a lower tension and build up your confidence. Made from a resin body with a stainless steel cover, they are durable and have a large entry point to keep from struggling to get your foot in just the right position.

How To Get The Best Morning Ride In

June 20, 2018 by Josh Friedman

A great way to start your day is with a morning ride. It could change your perspective for the rest of the day and you will feel great while everyone else is slowly waking up at their jobs.

morning ride

Benefits of the Morning Ride

Starting your day with exercise is a great practice. The easiest reason is that you get your ride in before you start the rest of your day. There will not be anything to sidetrack you from your ride later in the day: low energy, extra work, lack of motivation, enticing last minute plans. Life throws all sorts of roadblocks at you as your day progresses. It benefits you to get a jump on the day and avoid the roadblocks altogether.

Waking up early to exercise helps you sleep at night. Early morning exercise, when there is a rush of hormones from waking, lowers blood pressure. The lower blood pressure carries throughout the day, in turn resulting in better sleep (lower blood pressure and better sleep are linked). Once you get this cycle going, you will feel great.

Getting out before rush hour is the easiest way to have the roads mostly to yourself. Most people are still sleeping or getting ready for their day while you are in the thick of yours, doing something immensely enjoyable.

You will benefit longer from the release of hormones related to exercise. The “runner’s high” feeling will jump start your day. Even after the hormones have subsided, your mind will already be used to the good feelings that started your day, continuing on that trajectory. This, along with knowing that you are more in shape already is a great way to start a day.

Plan Ahead

Riding first thing requires planning. You have to have everything ready to go so you can maximize your time on the bike and minimize your time searching in the dark for everything you need while trying to stay quiet so you don’t wake anyone else up.

Lay Out Your Gear

Do this the night before you ride. You do not want to scramble in the dark, post sleep haze and forget something. Put all of the riding clothes you think you might need in one place. The bathroom is convenient so you can do your business, get dressed and brush your teeth all in one fell swoop. Have your food ready to go. Bottles should be full and on the bike. Make sure your bike is dialed and functioning perfectly with a fully charged light if you’re leaving in the dark.

Food

Figure out what you can stomach quickly and comfortably. On rides of an hour or less, you probably do not need anything unless your ride will be very intense. Another possibility is to prepare food that you can bring on the ride and eat it during the beginning of the ride. Some people need coffee to wake up. If that is the case, then have some coffee ready to go. An even better plan is to ween yourself off of coffee so your body can wake up naturally, removing another step in your wake up routine.

If one of your goals is to lose weight, then exercising before eating is most effective. This study shows that even with a terrible diet, participants gained no weight when they fasted before exercise. The other two groups gained significant weight and developed insulin resistance.

If you are looking to boost performance in your ride as opposed to losing weight, then eating is best. You will get the most out of each pedal stroke.

Sleep!

Ensure that you get enough sleep the night before. It is not worth compromising a good night’s sleep to get up early and ride. You will not feel great and it may dissuade you from trying more morning rides. A good tip to ensure good sleep is to turn off electronics about an hour before bed. The blue wavelength that their screens emit cause an alert state in the brain by suppressing melatonin production, a hormone that induces sleep.

Wake Up!

People have different amounts of time they need between waking up and being functional humans. Some can jump out of bed and straight onto the bike. Others need lots of time. Figure out what works for you so you can be fully awake and pedal effectively. You want to feel good on the bike so you can get used to getting the morning ride in.

Standardize Routes

Settle on a route before going to bed. The routes you choose should be familiar; limited duration morning rides are generally not for exploring. You should also know how long you will be out on each one. If you have an hour to ride on a given morning, you take your hour long route. An additional thought is to have a route that has a few escape paths in case you have a flat or other mechanical. It will allow you to fix the mechanical and still get to your first morning destination on time.

Morning Rides are the Best

There are a few challenges to getting out for a morning ride, but they are easy to overcome. A little planning and preparation goes a long way to starting a successful morning ride routine. Once you get the ball rolling it becomes easy, sometimes even necessary when your body is accustomed to the the morning ride.

Cycling Hand Signals

May 16, 2018 by Sarah Lauzé

Whether you’re riding solo or in a group, you need to alert those around you of your intended movements. Like when you’re driving a car and use lights to communicate, cycling hand signals serve as your turn indicators and brake lights. It’s important to know the proper hand signals to ensure both cars and other riders can understand what it is you’re going to do.

Many accidents occur from misunderstandings between cyclists and drivers, and either side can be quick to point a finger of blame. However, it is up to both to know and understand cycling hand signals and the overarching rules of cycling.

Cycling Hand Signals

Stop

The most common hand signal to indicate you are slowing to a stop is to extend your left arm out to the left and angle the forearm vertically down from the elbow. There is some controversy around this, as if you are coming to a sudden stop, it means taking one hand off your brake and handlebar, which could actually prove more dangerous. If you are riding in a group and don’t feel comfortable taking your hand off your bike, yell a courteous “stopping” over your shoulder to warn those riding behind you.

Left Turn

Almost intuitive, to signal a left turn simply extend your left arm out horizontally. Be sure to do to the signal in advance to the turn (like you would in a car), not just when you are actively making the turn.

Right Turn

Cycling Hand Signals

Historically, to signal a right turn you would extend the left arm out, and then up at the elbow. This practice is no longer in use to cyclists, and has been replaced with the simpler right arm straight out horizontally. The Uniform Vehicle Code in the U.S. recognizes both, although it recommends the right arm out approach. State traffic laws generally conform to the UVC, but exceptions may exist.

Passing on the Right

Quite often cyclists will be moving fast than traffic in dense areas, so be sure to stay about a meter from the curb or well within the bike lane where applicable. Although you do not signal passing on the right, always be alert. This is an issue that can still come to debate in court. Look out for cars backing out of parking spots and driveways, turning left across the road toward you, or turning right into you. The truth is, they probably don’t see you. Never ride on the left side of the road or on sidewalks, as this is both illegal and increases the risk of a collision.

Take a lane

If you are moving a similar speed to traffic, or need to make a left turn in the near future, then be sure to signal and get into a lane. This will put you in the position to properly navigate the intersection with the rest of traffic. Always remember, the same rules apply to cyclists as cars.

Commuting can be the best part of your work day, but make sure you get there and back safely by using these hand signals and staying alert. Never listen to headphones in traffic, and give plenty of warning for each action. For more information on riding safely in a group, check out “Group Ride Etiquette.”

« Previous Page
Next Page »
  • Facebook
  • Tumblr
  • Twitter

Latest Articles

JOIN Cycling: A New Training Platform for Cyclists

May 27, 2024 By Eric Lister

cold exposure

The Benefits of Cold Exposure for Cycling & Life

June 13, 2023 By Eric Lister

hill climb

The Ultimate Hill Climb Training Guide

May 31, 2023 By Eric Lister

shoulder pain cycling

How to Treat & Avoid Shoulder Pain While Cycling

April 12, 2023 By Eric Lister

psoas stretch

The Importance of the Psoas Stretch for Cyclists

April 6, 2023 By Eric Lister

cycling neck pain

The Ultimate Guide to Cycling Neck Pain: Causes and Solutions

March 21, 2023 By Eric Lister

Useful Info

  • Contact
  • Finally, A Global Cycling Club That Is Focused On Community And Love Of Cycling!
  • Privacy Policy
  • Share Your Story!
  • Terms And Conditions Of Use
  • Welcome to I Love Bicycling
  • What Happened When I Stretched Every Day For a Month

Recent Posts

  • JOIN Cycling: A New Training Platform for Cyclists
  • How to Hang Bikes in Your Garage: 4 Inexpensive Options
  • Gravel Bike Vs. Road Bike: Which One Is Better For You?
  • The 6 Types of Mountain Bikes & How to Choose the Best One for You
  • What Is a Touring Bike Good For? 5 Benefits We Know You’ll Love

Search I Love Bicycling

Connect with Us

  • Facebook
  • RSS
  • Tumblr
  • Twitter

Copyright © 2026 · Magazine Pro Theme on Genesis Framework · WordPress · Log in