• Training
    • Injury Prevention
    • Training Tips
  • How To
    • Bike Fit
    • Gear
  • Nutrition
    • Nutrition Tips
    • Weight Loss
  • Repair
  • Reviews
  • Stories
    • Funny Stories
    • Jokes
    • Quotes
    • Videos
    • Funny Videos

I Love Bicycling

I Love Bicycling is a website that is geared towards cycling for beginners with road cycling tips, training articles, nutrition tips, weight loss, how to’s and bike repair articles.

Getting your Legs Ready for Cyclocross

September 17, 2015 by Adam Farabaugh

Getting your Legs Ready for CyclocrossThe endless number of accelerations, steep ride up’s and run up’s, barriers, as well as the intensity of cyclocross racing all add up to create a sport within cycling that is very demanding on your legs. Road or mountain bike fitness is great for coming into a season of cyclocross but adding in a variety of workouts will help you to better adapt to the racing as well as to set you up to do well. Cyclocross races are short so the training for it doesn’t have to be long either. You can do a variety of workouts which are hard and intense but also fun in a short amount of time a few times a week.

Accelerations

Cyclocross consists of a lot of turns which require you to slow and then reaccelerate out of each one of them. If you are only used to riding at a steady effort and accelerating a couple of times each ride, then after a few laps of a ‘cross race, your legs are going to ache. The best way to prepare for this is simply doing a lot of accelerations. If you are not yet on your ‘cross bike you can still do these on a road bike.

There are a number of intervalshttps://www.ilovebicycling.com/cyclocross-tips/ you could do but the easiest is to do 30 second intervals. Accelerate in the saddle for five to ten seconds alternating in and out of the saddle and then spinning easy for the remainder of the thirty seconds. Then when thirty seconds is up, do it again. Start with five minutes of this and build to twenty minutes. If you are on a ‘cross bike you can set up a mini-course that requires you to accelerate every thirty seconds.

Running

There is not a lot of running in ‘cross but the little bit that there is can really hurt you if your legs aren’t ready for it. The only real times that you’re running are when you have to get over barriers or up a steep hill, both of which put a lot of stress on your legs. The best way to start getting that stress is to do a short five to ten minute run where you run easily for thirty seconds and then walk for a minute. Build to one minute on, one minute off, and after about a week of doing this every day you can do the whole ten minutes. Once you can do this your legs are ready to practice the harder stuff.

Barriers

Assuming you already know how to dismount and mount your bike properly, set up two barriers about two meters apart and about 40cm high. Ride into it, dismount, run over it, remount and loop around and do it again. When you first start, do it slowly making sure your technique is good and then gradually increase your speed. Once you are up to speed, do five to ten of them with about thirty seconds between each one.
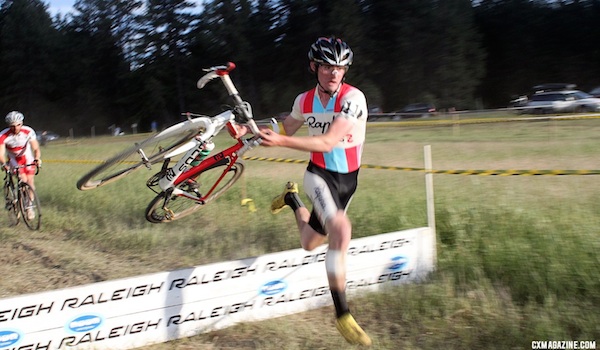
Run-Ups

Next are the dreaded run-ups where the hill is too steep and/or technical to ride up. Find a steep hill that is too steep to ride up and takes about ten to twenty seconds to run up. In most races you probably won’t encounter run-ups quite this long but simulating them longer will ensure your legs are ready. Ride into the hill, dismount, shoulder the bike, run up the hill as hard as you can and then remount your bike at the top. Ride around easy for a couple of minutes and then do it again. Build from three to eight.

Ride-Ups

Some steep sections that some run up can actually be ridden but doing so requires practice. Riding a super steep climb necessitates a lot of strength that needs to be built. Even if you can do it once your legs are going to feel it after during the rest of the race. Like the run-ups you want to get your legs used to doing the effort over and over again.

Find a steep climb that you can barely ride up but you can still ride it without having to unclip. Sprint into and up it. Technique along with power is going to be what gets you up it efficiently. You will need to practice a lot to be able to do it in a race but once you’re good it can save you a lot of time each lap. Like the run-ups, start with three and build to eight, riding around easy in between each.

Overall Fitness

Along with needing specific fitness for ‘cross, having a solid base of fitness is essential. Ideally you come into ‘cross season with a bit of road or mountain fitness. If not, build your riding into longer and longer rides incorporating some intensity and then do these workouts to get ‘cross specific fitness. When you do come into the ‘cross season from a road or mountain season, it’s important to take a little bit of rest before you dive right in.

You will be tempted to keep racing with your fitness but if you do, after a weekend or two you will burnout and not have the intensity and drive to continue the ‘cross season in most cases. Instead, take a week or two easy and recover. You will start the ‘cross season fresh with these workouts which will have you feeling good in your races and most importantly, lessen the likelihood of injury.

Making the Switch from Road to Cyclocross on the Cheap

September 15, 2015 by Adam Farabaugh

With ‘cross season coming, or here depending upon where you live, there’s no better time to check it out and start racing. ‘Cross offers probably the best medium to get into racing as well as gives the most variety of riding. Races are also short enough that you don’t need hours and hours of training to do well. The two biggest barriers to ‘cross riding are having the skills to navigate the course and having a cyclocross bike. Of course you can use a mountain bike in a ‘cross race but it’s not ideal and won’t be nearly as fun.

Making the Switch from Road to Cyclocross on the Cheap

The Bike Set-Up

A ‘cross bike is essentially a road bike with a wider fork and chain and seat stays to accommodate wider tires. With the wider tires, which are fatter and knobby, there are also wider brakes. Other than that, the bikes are essentially the same so taking the parts from your road bike and switching them to your cross bike is highly doable and way cheaper than buying a full ‘cross bike.

Parts to Buy

The first thing you need to get to switch from a road set-up to a ‘cross set-up is the frame and fork. An aluminum frame is generally the best bike to start with as it’s cheaper along with being more durable and can better withstand the crashes you are going to put it through. Size wise you generally want to go one size smaller than your road frame. Once you have a frameset you have the basis to build your ‘cross rig.

Brakes

The second thing you’re going to need since they’re vastly different on a road bike is the brakes. Now-a-days there are disc brakes but that only adds complications as you need dedicated wheels for them along with added cost. They are something to grow toward if you want them in the future. The brakes to get for ‘cross are cantilever brakes which open up and allow a larger tire to slide in and out. With the brakes, you are also going to need a mount for which the brake cable is going to attach to the frame. On the front fork, typically this is a spacer that goes on the steerer tube of the fork and has a mount on the front of it for which the brake housing is inserted in to. For the back brake, typically there is a mount that attaches to the seat post collar. Your local bike shop can advise you on which one you need for both.

Tires

The next thing you are going to have to buy are tires. There are an endless amount of options so you’ll have to read up on the different styles and brands as they are made for specific conditions. First, there are two types of tire: clinchers and tubulars. Tubulars are the best for ‘cross but they are expensive and not where you want to start. Clinchers are just fine and if your wheels can accommodate tube-less tires, that is your best option. They essentially get rid of the tube and seal with a tight fitting bead to the rim along with liquid sealant. Either way, getting an all-around tire that can be ridden in the mud to dry conditions is the best starting point so you’re not limited to what you can ride in. The best width to get is 32mm to 34mm as these are big enough to roll over most obstacles but not so big as to slow you down a lot.

Shoes and Pedals

The final thing you are going to need are shoes and pedals. Cyclocross uses mountain bike shoes and pedals because of the need to get off your bike and run along with the potential muddy conditions. Getting a second hand pair can be a great option and then you can upgrade down the line as your ‘cross riding progresses.

Parts to Switch

The first place to start is with the bottom bracket and crankset. Most bikes have different kinds of bottom brackets and some you can use with different cranks but not all. Your local bike shop can again guide you to what you need and your best options. Once you have the crankset you want you need to have chain rings that are suitable to ‘cross. If you bought a new crankset you can get a cross specific one with smaller chain rings already on it. Otherwise you will want to find the number of bolts the chain ring attaches with and the BCD, or the distance between the bolts. Depending upon your strength a 34/46 is a good starting point that will give you the gearing for faster courses and dirt road riding along with a small enough gear to get up the super steep climbs. The 34 also more easily lets you keep your same road cassette.

Seat Post

The next thing you need to switch, and potentially buy a new one, is the seat post. There are a number of different sizes but if your ‘cross frame is the same diameter seat post as your road bike you’re golden. Just switch the post and leave your road saddle on it.

All the Remaining Parts

After that everything else should be a straight forward switch. Change over the derailleurs and chain (replace the chain if it’s worn as you will be putting a lot of torque on it with ‘cross). You can leave the shifters on the bars and just take the stem together with the bars off the road bike and put it on the ‘cross bike. The wheels are a simple switch over and you can leave the cassette on it as well.

With the shifters you will want to install new cables and housing for two reasons. One is that where the housing goes will probably be different from your road bike so you will need to shorten or lengthen it. Second is that ‘cross is notoriously dirty and muddy. Your shifting is going to suffer at times so starting with new cables and housing will help ensure that cable drag is minimized.

Things to Upgrade

As you race more and more you will find that you will want to upgrade parts here and there. The first thing to upgrade is tires as you will quickly find that traction means everything in ‘cross. They can be upgraded by staying with clinchers, assuming that’s what you’re riding, or you can make the leap and upgrade your wheels as well to tubulars. These are more expensive as well as require more upkeep but they are the very best for ‘cross.

Another area you may want to upgrade for a fraction of the cost of tubulars is brakes. Stopping quickly is critical in ‘cross as the quicker you can slow down the longer you can stay at speed going into a corner. After that, the only thing you would really want to upgrade is the components or the frameset.

‘Cross can be expensive as you get further and further into the sport but starting out it doesn’t have to be. With a road bike you already have most of the equipment necessary to get a ‘cross bike rolling. The few additions that you do need, namely the frameset, don’t need to be expensive and you will find that you can get second hand equipment relatively cheap and with good quality. Once you start riding a ‘cross bike and/or racing it, you will find that your investment was well worth it for the amount of fun you are going to have with the bike.

Staying Upright: Risk Averse Riding

September 14, 2015 by Adam Farabaugh

Staying Upright: Risk Averse Riding
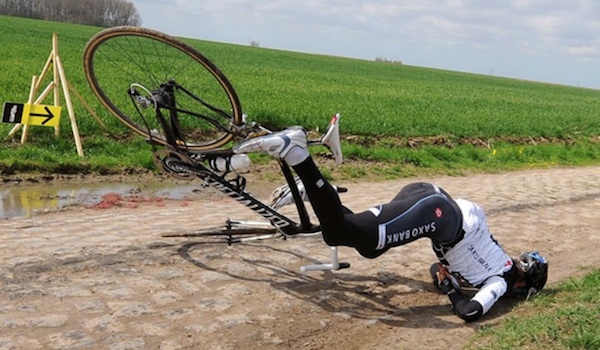
Whether you are a five year old kid learning to ride a bike or a Tour de France veteran, bike riding involves risk and how we handle that risk is what keeps us coming back for more or taking up another sport entirely. Risk, in the simplest sense, is how likely a bad outcome is to happen. Some aspects of bike riding, such as downhill mountain biking, bring a high level of risk but it’s that high level of risk that creates the thrill, rush, and fun. It can have a price though and for some, it’s a risk worth taking. For other aspects of riding, such as road riding, the level of risk can still be high but steps can be taken to lower that level of risk. Another element of risk in cycling is how comfortable you are in the same risky situation. As your riding improves, not only will you be a better bike handler but you will also be more comfortable being in those risky situations as you know you have the skills to avoid crashing.

Riding Ability

One of the biggest influences on how risky a riding situation, whether it’s a corner or avoiding a crashed cyclist in front of you, is how good you can ride your bike. The better a rider you are and the more experience you have, the less likely you are to crash. Say you enter a corner with a bit too much speed. You not only know how to handle your bike but you can do the proper things just through reaction without even really thinking about it. The less experienced cyclist is probably going to overreact and not know what to do in that small timeframe. Simply, the more you ride and practice things like cornering and bunny hopping, the less risk you will have of crashing and potentially injuring yourself.

Attention

After riding ability, how focused you are to the task at hand will influence how likely you are to having an accident. Whether it’s going down a trail, a road by yourself, or riding in a group, seeing what’s coming up to allow you ample time to react will substantially lower your risk of crashing. When riding down a trail or road you want to keep your attention on what lies ahead of you. Thinking about other things as well as looking at the sites takes your attention away from potential obstacles. You can let your attention waiver at times but make sure it’s the right time. When you’re riding on the road in a group, you must not only pay attention but also look further ahead than just in front of your front wheel. Seeing an incident a few riders ahead of you will give you added time to slow and avoid the crash or obstacle in the road.

Avoiding Risk

The thing with riding is that there is always going to be risk. Past making sure that your riding ability is up to the level of risk you’re willing to take along with paying attention, riding in a way that errors on the side of caution will lessen your risk of an incident even further.

Cornering

Crashes occur most often in corners whether riding on a trail or the road typically because of too much speed. With too much speed, traction becomes marginal and combining that with other riders in a group, wheels can easily overlap and when a rider ahead of you goes down, it’s hard to avoid piling into the back of them. The best way to stay safe in the corners is to just slow down a bit more. You will have to reaccelerate a bit more but it is worth your skin to do so.

When riding in a group, you can’t always slow as much as you would like but you can open up a little bit of a gap between you and the rider in front of you. This will allow you to not only slow more but also give you more time and space to react and avoid a rider if they do crash in front of you.

Along with opening up a small gap, staying to the inside of a corner takes away the possibility of a rider to your inside sliding out and taking you with them. And then if there is a crash, you can avoid it by turning sharper to the inside as on the outside there is going to be no place to go besides off the road or into oncoming traffic.

Overlapping Wheels

On straight stretches of road, crashes are most commonly caused by riders overlapping wheels. This is mostly caused by riders not paying close enough attention to where they’re riding and what’s in front of them. The best way to avoid this is to not overlap wheels so you don’t have to rely on the rider in front of you not wavering off of a straight line.

Other Riders Crashing

When riding in a group, other riders are going to crash. A lot of being able to avoid it is based on luck but you can increase your chances of avoiding it by always paying attention a few riders ahead of you and always having an out. This means that you are never so close to the rider ahead of you, as well as to both sides, to not have any place to go if there is a crash. You have to always be thinking if there is a crash right now, where are you going to. It will only be reaction when there is a crash but having yourself set up so there is a place to go in your reaction will help you avoid the crash.

Risk is a part of cycling but how you manage that risk is what is going to keep you safer on the bike. When you’re looking a few riders ahead of you, you should also be looking for obstacles in the road. Never position yourself so all you can see is the back of the rider in front of you. You want to be able to see around them to see what’s coming up. If you can’t see farther ahead you are just relying on luck to keep you safe. Whether on the trail or road, pay attention and practice your skills to get you out of a tight spot when the situation arises. Stay proactive at all times and you will lower your chances of crashing greatly.

The Convenience Store Stop: How to Make it the Most Efficient

September 12, 2015 by Adam Farabaugh

The Convenience Store Stop: How to Make it the Most EfficientAs rides start to get longer and longer, stops mid-way for food and water are going to become more frequent as well as important. The coffee shop is a great place to stop for a while and have great conversation over a few brews but during training rides you want to be in, out, and on your way in a timely manner. You also want to get what you need to fuel properly for the remainder of the ride. Knowing what you want to eat and drink prior to going into a store will help prevent you from milling around looking at every possibility which we’ve all done before, especially if we’re already a bit depleted from the ride.

The Drink

Hydrating properly mid-ride is super important because if you don’t, it doesn’t matter what you get to eat, you are going to be suffering the rest of the ride. Typically you are going to want more than just water. Water is good but you want it along with something with electrolytes at the very least because your body depends on them to function properly. It depends on the store but typically you don’t want to pay for water. Take one of your bottles into the store as a lot of stores have a fountain drink dispenser with an option for water. If they don’t, then buying it is the next best choice. Some people opt to fill their bottles in the bathroom but you never know the quality of the water. If you are with a few people, get a gallon jug of it and split it; way cheaper that way.

Electrolyte Drinks

For the electrolyte drink, some fountain drink dispensers have a sports drink which can be a lot cheaper than buying them individually from the refrigerators. Just remember to take it to the counter and tell the cashier what it is to pay for it. If you can’t get a sports drink from the fountain drink dispensers then getting a big bottle of Gatorade or PowerAid can be good as they also have carbohydrates and sugar to continue fueling your ride.

Again, if you are with others, many stores have a “Buy 2” price, so see what you can get for a deal by splitting it. Some sports drinks come with a zero calorie option. This is typically always a bad idea for two reasons. One, you should always fuel for your rides as otherwise you are riding in a depleted state and can’t reach your maximum riding potential. Second, because they are zero-calorie they have to make them taste good with other additives which are never good for you. If you are trying to lose weight, the place to do it is not on the bike. Fuel properly for your rides and then eat less and the right foods off the bike.

Cheapest Drink Option

The cheapest drink option a lot of the time, other than water from the fountain drinks dispenser, is the big cans or jugs of iced tea. These are not the best way to hydrate as they don’t have many electrolytes, and they have a lot of sugar, but drinking them along with a sports drink can be a good cheap option. With these however, you have to look out for high fructose corn syrup if you are trying to avoid it as a lot of them will have them listed as the second ingredient, meaning there is a lot of it in the product.

The Sodas

Soda is one other drink option that many riders swear by mid-ride. Sodas shouldn’t be looked toward to hydrate so much but rather to give you a good boost toward the end of a ride. The high sugar content as well as the potential caffeine can give you a good kick to finish off a ride strong. The trick with soda though is timing it right, because if you have it too early in a ride you can burn through all the sugar before the end of your ride and then you’re left bonked. You want to make sure you have it close enough to the end of your ride or that you have another soda ready to keep you going until the end.

The Food

After you pick out the best drinks for you to finish your ride strong, you need to find the best foods. Drinks are easy comparatively as there are endless food options. The first place to start is; what kind of a ride are you doing?

The Hard Ride

If you are riding hard, at threshold and above, you need foods that are easily digestible along with a high carbohydrate and sugar content and low protein and fat content. Simple granola bars without too many nuts can be a good healthy option. Other foods that are often thought of as bad for you can actually be a good choice mid-ride. Foods like cookies, pop-tarts, pastries, and other little sweets have a lot of carbohydrates and calories packed into a small goodie. The fire with these is that a lot of them are highly processed and contain a lot of ingredients so if you are trying to avoid all that, go with a good quality cookie or pastry that contains fewer ingredients as well as nothing that you can’t pronounce.

Other good options for the end of a hard ride are candy bars. These too are thought of as “junk food” but they contain a lot of sugar that your body pretty much burns exclusively when you are riding hard above threshold. Be careful not to get any that contain too many nuts but otherwise go with what you like. Snickers tend to be a lot of cyclist’s favorite.

The Endurance Ride

When you are training at a lower intensity you still need the carbohydrates to keep you rolling strong but you don’t need as many and the ones you do need don’t need to be from sugar. You are burning calories at a slower rate so you want longer burning fats and proteins along with the carbohydrates. Easy pocketable items include more nut based bars as well as protein bars provided you can stomach them and they don’t contain too much protein. Another option, although it’s not quite as quick, is to get a small sandwiches or wraps that many convenience stores have pre-made. This gives you some of the carbs in the bread along with the protein in the meat. Don’t eat too much at one time though as you don’t want a heavy brick in your stomach.

Depending upon where you live, there can be many options for where to stop to refuel. In most parts of the country, gas stations with convenience stores tend to be the most frequented as they are around from the big city to the only place around for miles and miles in parts of the American West. Plan ahead and know where you are going to stop mid-ride. You’ll not only get into a routine of which places you stop at, but also which food and drink you get at each place. Making good choices in the store will keep you going strong on the rest of your ride.

How to Ride in a Paceline

September 12, 2015 by Adam Farabaugh

How to Ride in a PacelineRiding in a group can bring a lot of benefits that you can’t get while riding on your own. A paceline is how a group of riders rotate through trading spots riding the front in the wind. Riding in this way is the fastest and the most efficient way down the road. However, knowing how to ride in a paceline is imperative as if you can’t, you not only pose a risk to yourself but others as well due to the possibility of crashing. Riders in the group can also give you pointers as you get the feel for how things roll.

The Rotation

A paceline starts with two lines of riders riding single file with one line moving forward while the other one moves backwards. This allows for a constant changing of the front two riders that are in the wind allowing the work to be spread over the group more evenly. The rotation is always continuous giving it the name “rotating paceline”.

When You’re at the Front

As you approach the front, the rider ahead of you will slide to the left and slow down a little. As he or she does this, you keep pedaling at the same speed. Do not accelerate. Stay the same speed and continue straight in your line. As you’re doing this look over your shoulder or under your arm to see where the rider is that just pulled off. Once you see that they are far enough back, slide over in front of them taking care to not take out their front wheel.

Once you are here, keep pedaling but take about two “soft” pedal strokes where there is not much pressure on the pedals. This will slow you a little but not so much as the rider now behind you has to slow. You are only slowing the difference in speed of the line that’s moving forward and the line moving backwards. Since the paceline is rotating, you do not need to do anything to signal the rider behind you to pull through. However, if you are taking longer turns on the front, give a slight “flick” of the elbow out as you slide to the side. This indicates that you are done pulling on the front and for them to pull through.

When You’re at the Back

As you slide backwards in the group you will eventually get to the back and have to switch lines to the one moving forward. You will probably have an idea of about how big your group is so when you are getting close, be ready to slide over. As the last rider slides over and is moving back up past the rider whose wheel they were just on, they should say something such as “last” or “last rider”. This gives the rider moving back a heads up that they are now last and that they need to slide over and reaccelerate to get on the wheel that’s now moving forward.

Always look to make sure that there is no one there otherwise you could ride straight into someone. To avoid sliding too far off the back and having to reaccelerate hard, you should start accelerating before the last rider comes past you. As you reaccelerate, you should start to slide to the side and end up having your front wheel move past the other rider’s rear just as you’re going the same speed as them. This takes practice but you’ll get the gist quick.

Clockwise or Counter-Clockwise

Pacelines don’t always rotate in the same direction due to the wind. If there is no wind then riders should rotate in a counter-clockwise direction as it’s easier with traffic. (Except if you’re in the UK or Australia, yours will be the opposite.) When there is wind however, you should always pull off into the wind. This means that if the wind is coming from the left, you ride counter-clockwise, and if the wind’s from the right, you ride clockwise. Riders will always be sliding to the side of the wheel in front of them that’s more out of the wind.

If the group is rotating in the wrong direction, as the first rider slides over, they risk taking out the front wheel of the rider that’s behind them. If the group is rotating in the wrong direction, yell that you are switching the rotation as you get to the front. When you are on the front, don’t pull off but rather keep riding to allow the riders sliding back to slide back a bit and then pull off in the other direction. If you need to make room for you to pull off, slide slightly to the opposite direction and moving the riders immediately behind you over, and then pull off.

The Double Paceline

When a group’s riding fast they will typically always ride a rotating paceline. When a group’s out for more of a training ride or relaxed ride, they will ride a double paceline. This is where the two lines ride side by side at the same speed and two riders on the front are in the wind at the same time. This allows for longer pulls of the riders on the front as well as for everyone to be able to have a conversation instead of just riding past each other. Pulls can be as short as one minute or as long as ten to twenty minutes depending upon the group and riding.

When the two riders on the front are ready to pull off, they first make sure that there is no traffic and then one slides right and the other left, moving backwards down the side of the two lines. When they get to the back, they reaccelerate and pick up the last two spots in line. Pulling off in this way can only be done when on wide enough roads. When the roads are narrow and/or there is not enough room due to traffic to ride four wide, the group rides a slowed rotating paceline essentially. When the two riders on the front are ready to pull off, one accelerates a little moving ahead of the other while the other one slows and moves back. The rider on the side that just moved up now slides forward and takes their spot on the front of the bunch. The group should rotate twice as much as when the rider is on the front, they are on the front for two turns essentially. Rotating in this way also allows you to talk to different people as the double paceline only really allows you to talk to the same person if there is an even number of people.

Some sort of paceline is typically how any group rides aside from a race or an event that has full use of the roads and where you can ride more than two abreast. Knowing the different kinds and how to ride in each of them will allow you to comfortably ride in a group along with being less sketchy and avoiding causing a crash. Also, an easy way to pick out a newer rider in a group is how they ride. If you mess up as well as ride sketchy, meaning you ride in a way that could cause a crash, you will probably be heckled as well as tried to drop. Everyone is new at some point but knowing how things work and then getting a few pointers in your first few group rides will allow you to fully enjoy and take full advantage of them.

The Echelon: Riding in the Wind with a Group

September 10, 2015 by Adam Farabaugh

The Echelon: Riding in the Wind with a GroupTwo things that slow you down in cycling are uphill’s and wind. Some look to avoid them while others embrace them. Riding in the wind can be a drag but it’s going to happen so you should know how to get through it the most efficiently.  The wind can also have some good benefits, one being that you can ride a lot faster than you otherwise could when it’s at your back. When you are in a group riding into a headwind you can actually get more of a draft behind the other riders allowing you to pedal with much less effort. A side wind can give you a real advantage if you know how to ride in it as the other riders that you’re with will have to pedal that much harder because they are poorly positioned.  As with anything in cycling, the more you do it the better you’ll be at it.

The Headwind

On solo rides or rides with one or two others, headwinds can slow your ride dramatically while you have to pedal much harder. In a group however, the draft of a rider is magnified. The first rider still has to pedal extra hard, as they would on a solo ride, but the riders behind don’t have to pedal with nearly the same amount of effort. Since you are in a group, everyone can take shorter turns on the front in the wind keeping your speed closer to what it otherwise would have been.

The Tailwind

Tailwinds are fun whether you are solo or with a group. You can ride at speeds almost like you have a motor on your bike. The downside is when you have to turn around. The one drawback from tailwinds in a group is that you get less of a draft behind the rider ahead. Even though the first rider can go X amount faster, the riders behind are going to have to pedal at a closer effort to the rider on the front. You all are still going faster though so it’s still a benefit to all.

The Crosswind

Riding in a cross, or side-wind, in a group is really where knowing what position to ride in will benefit you. The first thing is that you obviously can’t see the wind, unless you spot a flag or something else blowing, so you have to feel it. When it’s a strong wind this is easy but when it’s only slight there is still an advantage to riding downwind of the rider in front of you. You just have to then know where that downwind is. Overtime you will get good at feeling where the wind is coming from.

Where to Ride

First we will simplify things down to two riders riding in the wind. The wind is coming from the left. Downwind, or where the best draft for the second rider, is going to be slightly behind the first rider and to the right. This will be just slightly to the right, the closer the wind is to a head or tail wind and when it’s closer to ninety degrees from the left, the draft will be further to the right of the first rider rather than being slightly behind them.

As you first start riding, you should avoid overlapping your front wheel with the rear wheel of the rider in front of you. As you get better as well as the riders you ride with, you will overlap your front wheel to get into the “sweet spot” of the draft. When you do this however you need to pay the utmost attention as the slightest movement to the right of the rider in front of you will cause them to hit your front wheel, thus crashing you. To avoid this, any movement the rider ahead of you makes you need to replicate.  When they move right, you move right keeping your front wheel in the clear.

Making the Switch

Now in our two rider scenario, the first rider took a short pull on the front and is going to move back behind the other rider. The first rider eases off the pedals slowly and moves slightly to the left and back. The second rider then slides left at the same speed filling the position the first rider was just in.  The rider pulling off then slides right passing their front wheel behind the now, first rider’s rear wheel and then slightly forward and to the right where the “sweet spot” is.

Pro Tip: When pulling into the front position it is important to keep a steady pace, one that you were holding while drafting. Many novices hammer on the pedals and force a gap behind them making the echelon less efficient and creating an accordion effect that forces people drafting to use excessive energy.

Adding it to a Group

Now taking the above scenario and adding riders to it gives an echelon.  It is the exact same thing except that behind the second rider is a third and so on. Because each rider is riding, in our scenario, slightly to the right of the rider in front of them, the echelon can only be so wide as you run out of road to the right. What then happens is a second echelon is formed with a bit of space before the first. Often times before this happens however is that a trail of riders will be riding down the extreme side of the road trying to get a draft. They can’t get as good of a draft as the riders in the rotating echelon so they will often lose ground when they tire.

In a rotating echelon no one takes a full pull on the front but rather rolls through the first position in the wind. As soon as a rider hits the first position they slide back and move gradually to the right one by one ensuring that they don’t hit their front wheel on any of the riders in the first row but no further back. This creates two lines of riders. It’s like a pace line, just tilted. When the rider moving backwards down the line reaches the last rider they accelerate forward into the last riders draft and follow them in that same position as the front row continues to slide left.

The Gutter

If you are in that situation where there is a cross-wind and no one is riding an echelon you’ll be forced to ride down the very edge of the road, often known as the gutter. The key to riding in this position well is being able to see past the rider in front of you so you can see where the exact side of the road is and if there is anything sticking out. A good trick to do here is to ride with your body slightly to the right of where you would normally sit on the bike with your head tilted even further to the right. This will give you that extra little bit to be able to see what’s coming up.  And if anything does come up, just push your bike back to the left, in our scenario.

Riding in the wind takes practice and even if you know how to, others in the group may not know how which can be frustrating. Cross-winds can be dangerous with the overlapping of wheels so just make sure you pay attention as to not cause a crash as well as to look out for others who might cause a crash. Riding in the wind isn’t always fun but at the very least it can be made a bit more enjoyable if you know how to ride it. Stay in the right position on the wheel in front of you and being a bit more aero always helps too.

How To Descend Like a Pro

September 8, 2015 by Guest Post

How to descend like a proDescending is a mysterious art form, which, if mastered can shave minutes off your times. Some riders seem to possess an innate ability to drop like a stone from the side of huge mountains without any trace of fear – others are not so blessed. Recent summit finishes in the Vuelta España have shown that, even for the best climbers, going uphill presents an opportunity to take a few seconds or a couple of minutes from your rivals. A good descender can take five minutes on the way back down. It’s a fantastic skill to have in your arsenal and believe it or not, it doesn’t take that much to master.

If you’ve ever felt the fear on a descent, suffered a nasty crash that you haven’t quite mentally recovered from, or have simply never been told how to do it right – we’ve put together some essential tips which will have you nailing it downhill with supreme confidence.

Look as Far Ahead as Possible

It sounds pretty obvious, but when riding a bike, you will go where you point yourself. So much of where you’re ‘pointing’ comes down to where you’re looking (with the exception of the odd glance back over your shoulder to check the position of the pursuing peloton). When descending, don’t just look ahead of your front wheel or the rider in front of you, instead try to set your gaze well down the track, ideally after the bend you’re currently tackling. If you do this, you’ll flow through the bends with ease and you’ll still catch small hazards like gravel in the road or someone trying to overtake on the inside with your peripheral vision.

Body Position is Everything

We’ve all seen the likes of Peter Sagan and Vicenzo Nibali heading down the slopes of Grand Tour climbs with their bodies contorted into an aero tuck. While we wouldn’t suggest you go the whole hog and start sitting on your top tube at the slightest downward incline, a good low position on the bike like the pros’ is what you should be trying to emulate. When you’re descending it makes sense to get as low as possible on the bike. Yes, it makes you nice and aerodynamic, but that’s only part of the benefit.

Being low-down to the bike also lowers your centre of gravity, making you more stable as you corner and providing better power through the pedals into the wheels. When you’re hurtling into the bends, fight your instinct to lean into the curve with your body – instead, keep your body weight above the tyres as much as possible and lean the bike instead. This’ll boost the traction you get through the turns.

Learn to Read the Road

Unless you’re blessed enough to live at the foot of an Alp and you never venture further than a few km from home, it’s likely that you won’t always know the roads you’re descending like the back of your hand. If you can get used to reading the signs along the road it’ll really help you with your descending. The more you descend, the better you’ll get at recognizing the signs. You can predict where the bends will come by looking at the profile of the hills ahead of you. In the same way, you can also use the tree-line to predict what will happen next, before it does.

Be mindful of hazards and interpret what’s at the side of the road. Shops, restaurants, bars and other businesses all mean people, so don’t be surprised that after you pass one of the aforementioned there’s a guy walking home around the next bend. Likewise, if you hear the clanking of cow bells then you’re probably going to meet something bovine at some stage of the descent. Just because you recognize these hazards, doesn’t mean immediately killing your speed, it just puts you in the right mindset to respond quicker should such an obstacle arise.

Getting Your Bike Set Up Right

Having a bike that is properly maintained and set up will do wonders for your descending, not just from a practical point of view, but from a mental one as well. Having full confidence in your brakes is a must, but having your bars correctly positioned and your seat at the right height will also play a big role in helping you drop like a stone.

Having ridden a hire bike in the Pyrenees for a couple of days I can say without doubt that I was slower on the descents on the first day than the second. At first I was wary of the unfamiliar setup, including front and back brakes that were on the opposite sides to my own bike, but as my confidence in the machine grew, my descending speeds also began to rise.

Keep Those Legs Moving

Guess what – it get’s cold at the top of very high mountains. Especially if you’ve just been labouring to get to the top for an hour and you’re dripping sweat. It can be tempting to see the descent of a climb as the break or reward after your exertions, but it’s vital that you keep your heart rate high and your moving parts moving.

Get into a low-ish gear, with enough traction that you can still pace it out of the climbs, but one that will have you spinning a high cadence. This way you can keep the blood flow to your legs going and keep your all important heart ticking over too, so when you hit the flat at the bottom you haven’t frozen up completely.

At the top of the major climbs in big races you’ll often see the pros take a jacket or (if they’re old school) a sheet of newspaper from a soigneur at the side of the road, to keep them warm as they plunge back down the other side. Unfortunately, for us mere mortals, there’s not going to be a dude handing out free jackets, so make sure to carry one with you. If you’re confident enough in your bike handling skills to put it on while moving, do. If you’re not, take a pit stop at the top and layer up.

Cycling Etiquette

September 5, 2015 by Adam Farabaugh

cycling etiquette
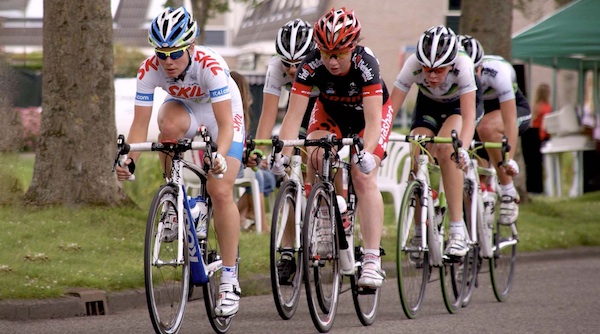
When you are out in the middle of nowhere and have exhausted all of your tubes, traffic can be a life saver to get you home. When you’re not in the middle of nowhere and there is traffic, it can be a pain that detracts from the joy of riding. The thing with most drivers is that they are just trying to get from point A to point B. They’re not out to hit you or give you a hard time. If you give them the proper visibility and space, they will avoid you and let you go on your way safely. A smaller percentage of drivers believe that the road is for them and them only. You are in their way no matter what and they are going to give you a hard time at any chance they get. It’s not you, it’s them. Knowing how avoid conflict as well as what to do if there is a problem will allow you to keep your cool in the heat of the moment.

Riding Two Abreast

The biggest reason that anyone will ever have a problem with you riding is if you are riding where the driver has to slow and alter their course down the road. Of course you are allowed to be there in the road but they don’t see it this way. When riding alone, make sure you ride where you are visible. Not down the extreme side of the road where traffic can’t see you but slightly in traffic. Here cars should be able to easily slide around you without putting you in danger. If there is not much room for them to pass, then slide right. When you are riding two abreast and there is a car behind you, as long as they have room to safely pass, keep riding two abreast. If the road is narrow or curvy, have the rider further out in traffic slow and move over behind the first rider. Even if traffic still can’t pass, this at least shows that you are courteous. They will most likely wait without issue and pass when it is safe.

Blind Curves

Riding on narrow roads can already be a bit treacherous if there is traffic. If there’s no traffic they’re amazing. Narrow roads more easily create corners that can’t be seen around until the last second. Going into a blind corner, whether single file or two abreast, you should ride further into the lane to make sure that no vehicles try and pass you from behind. Make sure you are far enough right though to avoid any oncoming traffic that isn’t staying in their lane. When you are far enough into the corner and can see that there is no traffic coming, slide right and give a wave that it’s alright to come through if there is a car waiting behind you. This ensures that a car doesn’t try and squeeze past at the wrong time because if they do, they risk a head-on collision with you most likely being pushed off the road or worse.

Traffic Lights

The place that you are most likely to make verbal contact with a driver is when you are slowed or stopped at a red light. The best way to avoid confrontation is to make your lane changes clear and safe if you are turning. If you are going straight you can ride down the side of traffic on the right if there is a bike lane or ample room for you to fit. Then when you arrive at the first car, stop just to the right of it slightly in front of their bumper to make sure they see that you are there. If there is not room for you down the side, just stop at the back of traffic in the lane. Doing it these ways will minimize any time that a driver will have to say anything to you as well as give them the least amount of reasons to have something to say to you.

Encounters

Unfortunately with riding, encounters with drivers will happen. If you do have an unfortunate encounter, know that you are in the right and they are in the wrong, unless you did actually do something wrong. If you did, admit to it and apologize and be on your way. If they were in the wrong the best thing to do is just acknowledge them but keep on your way. They want a reaction from you. If you do respond back, be polite with facts and the law. Those are two things that shouldn’t be argued with. That may be enough to have them on their way but if it still isn’t, revert back to just ignoring them and being on your way. The last thing you want is to escalate things and have them get out of their vehicle. If there is a bigger issue, try and have other people stop and be around to help prevent anything bad. Then contact the police and keep a cool head. Some drivers won’t back down so you need to make sure that you don’t make things worse.

Riding should be a fun and relaxing endeavour but when drivers create unsafe and unneeded situations it becomes less enjoyable. Ride in a way that is courteous to them and nine times out of ten they should let you on your way. If they do give you a more difficult time, be polite and keep the situation minimal. Larger problems can happen but if you follow these tips they can be minimized. Stay safe and have fun by following this cycling etiquette.

Clearing Road Obstacles with Grace

September 4, 2015 by Adam Farabaugh

Clearing Road Obstacles with Grace
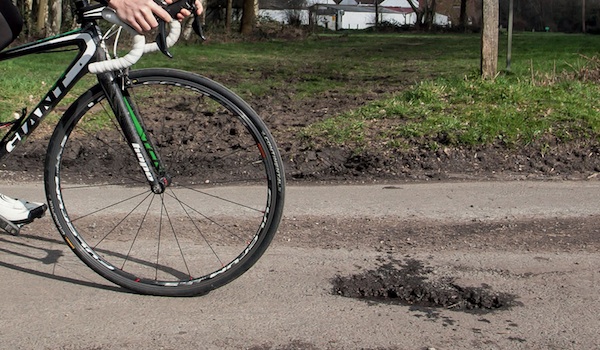
Road riding compared to mountain biking or gravel road riding can be smooth and straight forward; so much so you could practically take a nap sometimes. However, in most parts of the country, roads can take a beating and be rough and full of potholes. If they are smooth you still have to watch out for things like manhole covers and railroad tracks. Knowing what to do when you encounter these will save more than just your skin. You not only need to know what to do but also be able to react to the hazard without even thinking about it so practice is necessary.

Bumpy Roads

Bumpy roads are bumpy for a reason. They’re old and not taken care of so the likely hood of potholes and other hazards is much greater. The first thing in encountering any road hazard is to always make sure that you have a good grasp on the bars. You never know when something is going to pop up and having your hands on the bars will at least allow you to react otherwise you’ll most definitely be on the ground.

Pot Holes

There are three ways to get to the other side of a pothole. Around it, over it, and through it. If you see the pothole far enough in advance you can simply ride around it. However when you spot it late and don’t have time to gradually steer around it, you have to react at the last second. The way to do this is to steer your bike to the side of the pot hole you want to go around. This is a quick flick of the bars to that side while you keep the bike in an upright positon. As you do this you will be off balance so you need to maintain that balance by moving your body toward the opposite side you are steering to. (If you steer around the left of a pothole you move your body slightly to the right of the bike) Once you pass the pothole you immediately re-center your balance on the bike to keep from tipping over. This requires a bit of practice but once you get the idea you’ll be able to do it without even thinking about it.

The second way to getting past a pothole is to go over it with a bunny hop. This again requires some more skill but can easily be learned. Bunny hopping is often the best way to get over a hole if it’s not too big as it doesn’t put you in front of potential traffic or other riders. There are two ways to bunny hop. The first can be used for shorter pot holes where you lift the front wheel and then the back wheel as it approaches the same point. Pretend there is a log there that you are trying to get over. It’s the same idea. The second way is to bring both wheels off the ground at the same time. This is the way to get over anything that is longer as well as if you are going at a faster speed. The way to do this is to slightly bend your legs and almost jump by pushing your body up from the bike and then pulling the bike up toward you. This will require practice and the video below should get you rolling.

The third way to get past a pothole is to ride right through it. Obviously this should be avoided but sometimes it’s just too late to do anything else. If this happens, make sure you hold onto the bars tight and let the front wheel drop into the hole. If you try to hold it up and don’t make it to the other side you will slam your front tire straight into the opposing side potentially causing a flat or a crash. Then once your wheel is in the hole, lift, or take as much weight off the front wheel as possible. As the back wheel comes through try and do the same. Lifting your butt off the saddle will also help to absorb the impact with your legs rather than have all your weight go straight through the seat post into the back tire.

Road Grates

Road grates in some parts of the country can spell disaster. Some cities make sure that they are made or situated so a bike tire won’t fit through but in many places this is not the case. Riding over one can cause your front wheel to drop in sending you straight to the pavement. The best way to avoid this is to never ride over them. Even if you see that they are safe, don’t risk it. Use the pothole techniques to go over or around them.

Gravel and Loose Corners

Gravel can sneak up on you in corners anywhere, especially if winter has just broken and you live in a place with snow. The best way to avoid crashing in a loose corner is to take it gingerly but that’s not always possible particularly if you didn’t expect it to be loose. Crashing on loose surfaces happens because as you lean into the corner there is not enough traction to counteract that movement. To avoid that, you need to lean your body through the corner, not your bike. Your bike should stay more upright, as you lean your body to the inside of the corner. Think motorcycle racer. They’re further to the inside of the corner than their bike. You then steer the bike more than leaning in to it.

Manhole Covers and Other Slippery Surfaces

Slippery surfaces like manhole covers and crosswalks should be avoided like road grates if possible. When they can’t however, you should ride across them like it’s ice or a loose gravel corner. Do not lean the bike, as soon as you do your wheels will wash out from under you. Keep your weight centered over the bike and any turns you have to make you have to do so gingerly.

Railroad Tracks

Railroad tracks pose another challenge that can be treacherous particularly in the rain. Directly perpendicular tracks are relatively straight forward to cross and can be done so without too much caution. The only real issue here is when they are not smooth as you can get a flat or even break a wheel if you hit them too hard. You need to approach them like a pothole and bunny hop them if you can, otherwise unweight your wheels as they go across each bump and absorb the impact with your arms and legs.

Diagonal tracks pose another threat. They are perhaps one of the hardest road obstacles to navigate particularly if they’re wet. The best way to approach them is to make sure no traffic is coming and swing wide into the lane so you can cross them at a ninety degree angle. If you try to ride straight across wet angled tracks, you are almost guaranteed to crash. The other way of getting over them is hop each track individually with a quick double bunny hop where you lift your front wheel over and then back and as the back wheels coming down you do it again for the second track. The added space between the tracks, because it’s at an angle, gives just enough room for this to work. It takes practice but when you’re good, it’s the easiest and safest way to cross.

Road hazards come in all shapes and sizes and knowing how to get around, over, or through them will save you more times than one. All of these need practice however so when the time comes you can react and navigate your hazard gracefully and not think about it. Make sure you have a safe area with no real dangerous hazards that could injure you and give the techniques a go. You would much rather be put under pressure to do something difficult when there isn’t a car, or other riders, behind you waiting for you to get across some wet railroad tracks. Practice now, pedal past the hazard later and keep all your skin intact.

How To Clean Water Bottles

September 2, 2015 by U.M.

How To Clean Water BottlesYour water bottle is going to be an ever-present fixture of your rides and thus is going to see an awful lot of use over the years. Whether you’re just filling it with water of you prefer sports drinks, it is important to make sure that it is always clean before you use it again, else it will simply become a breeding ground for bacteria and may lead to you contracting an illness that keeps you off your bike.

These tips are all designed to ensure that you keep your cycling water bottle as clean as possible, which not only keeps you safe but also allows you to keep using the bottle for a longer period of time.

Hand Washing

Just popping your cycling water bottle into a dishwasher after a ride is no guarantee that you will get it fully clean, so it is always a good idea to hand wash it instead. This will allow you to personally clean every inch of the bottle so that nothing gets missed. Do this after every ride using warm water and any decent liquid soap.

Wash The Caps

The bottle itself is the most important part of the wash, but you should never forget to give the caps a good wash as well. After all, the liquid you drink will either have to pass through them or will slosh against them as you ride, meaning the sediment that can build up inside the bottle can also build up around the cap. Get rid of it in the same way that you wash the main bottle and make sure you don’t allow any build up.

Use A Brush

A cloth is often not enough to really get into the corners that can build up in a water bottle, so don’t be afraid to take a brush to it in an effort to give it a really good clean. Furthermore, a long-handled brush will allow you to get inside longer bottles or those that have narrow openings that would otherwise prevent you from giving the bottle a proper clean.

Don’t Use Harsh Cleaners

As long as you clean your water bottle on a regular basis, you shouldn’t find yourself resorting to any cleaning agents that are stronger than your average household liquid soap. If you do find that the only way to get your bottle clean is to use stronger cleaners then it might be time to start looking into buying a new one. Besides, bleach is capable of contaminating your water and making you ill if you fail to rinse the bottle out properly, which is a risk that you never want to take.

Clean It Regularly

We briefly touched on cleaning your bottle after every single ride, but it’s an important enough point that it bears bringing up on its own. Simply put, if you don’t clean your bottle on a daily basis you are providing bacteria and sediment further time to develop and potentially contaminate whatever liquids you end up putting in there. Even if you only drink water, you will still be leaving sweat and potentially some foodstuff in the bottle, so it is worth cleaning it out regardless.

Avoid Dishwasher

Not only can you not guarantee that you are going to get a perfect wash from a dishwasher, but you also need to remember that they tend to clean using water that is at near to boiling temperatures. This can distort plastic bottles and make them completely unusable. That little timesaver you thought you had going could simply end up costing you a little bit more money in the long run, so always make sure to hand wash with warm water instead.

« Previous Page
Next Page »
  • Facebook
  • Tumblr
  • Twitter

Latest Articles

JOIN Cycling: A New Training Platform for Cyclists

May 27, 2024 By Eric Lister

cold exposure

The Benefits of Cold Exposure for Cycling & Life

June 13, 2023 By Eric Lister

hill climb

The Ultimate Hill Climb Training Guide

May 31, 2023 By Eric Lister

shoulder pain cycling

How to Treat & Avoid Shoulder Pain While Cycling

April 12, 2023 By Eric Lister

psoas stretch

The Importance of the Psoas Stretch for Cyclists

April 6, 2023 By Eric Lister

cycling neck pain

The Ultimate Guide to Cycling Neck Pain: Causes and Solutions

March 21, 2023 By Eric Lister

Useful Info

  • Contact
  • Finally, A Global Cycling Club That Is Focused On Community And Love Of Cycling!
  • Privacy Policy
  • Share Your Story!
  • Terms And Conditions Of Use
  • Welcome to I Love Bicycling
  • What Happened When I Stretched Every Day For a Month

Recent Posts

  • JOIN Cycling: A New Training Platform for Cyclists
  • How to Hang Bikes in Your Garage: 4 Inexpensive Options
  • Gravel Bike Vs. Road Bike: Which One Is Better For You?
  • The 6 Types of Mountain Bikes & How to Choose the Best One for You
  • What Is a Touring Bike Good For? 5 Benefits We Know You’ll Love

Search I Love Bicycling

Connect with Us

  • Facebook
  • RSS
  • Tumblr
  • Twitter

Copyright © 2025 · Magazine Pro Theme on Genesis Framework · WordPress · Log in