• Training
    • Injury Prevention
    • Training Tips
  • How To
    • Bike Fit
    • Gear
  • Nutrition
    • Nutrition Tips
    • Weight Loss
  • Repair
  • Reviews
  • Stories
    • Funny Stories
    • Jokes
    • Quotes
    • Videos
    • Funny Videos

I Love Bicycling

I Love Bicycling is a website that is geared towards cycling for beginners with road cycling tips, training articles, nutrition tips, weight loss, how to’s and bike repair articles.

Training

  • Injury Prevention
  • Training Tips
  • Training Camps

Best Bike Split: App Review

November 10, 2017 by Sarah Lauzé

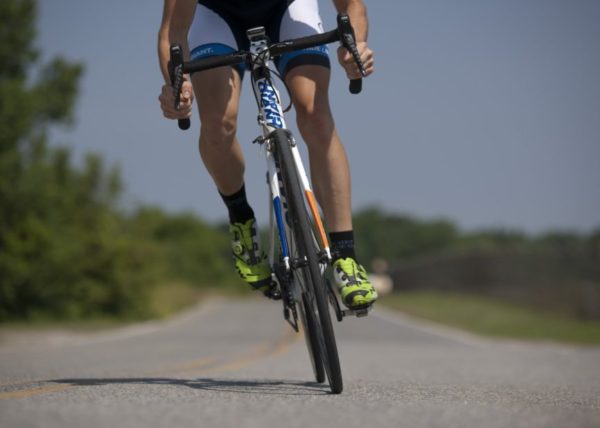
There are so many apps available that can help you record your progress and improve your riding. Best Bike Split (BBS) is a new tool from Training Peaks that can help predict your cycling future. Sound crazy? Give it a try before you knock it.

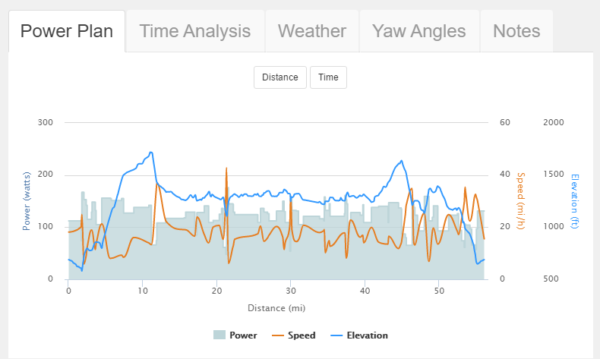
Most cycling apps out there focus on analysis, comparing your time, power, heart rate and so on. It crunches these numbers to give you a snapshot of where you’re at right now, and how far you’ve come. Best Bike Split, however, uses mathematical equations to predict what power a cyclist needs to reach a certain time goal for a specific route or course, and will formulate a pacing strategy accordingly.

The Best Bike Split: App Review

The Inspiration

BBS founder Ryan Cooper first had the idea during the 2013 Tour de France, when he designed a model to predict the times of some of the top racers. During the Stage 11 time trial his model with within just a few seconds of Alberto Contador, Chris Froome, and Tony Martin’s final times. From there he developed the app to help riders of any ability to predict, train, and plan for race days more accurately and to more success.

How Best Bike Split Works

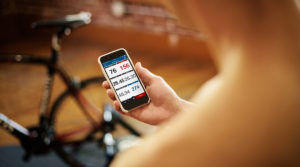
  1. Input your data – Set up your profile on your desktop computer with as much data as you can, including weight, height, functional threshold power (FTP), max heart rate, bike model, and wheel type.
  2. Course mapping – Select the course you want to analyze, or upload your own. As more and more people are using the app, the more courses are available. You can also upload a recorded ride in GPX format from your Garmin or smartphone.
  3. Create a race profile – From your course selection, Best Bike Split will calculate all the variables specific to that course like rolling resistance, mechanical loss, altitude changes, wind direction, and many more.
  4. Get your best bike split – Using their math and physics engine, Best Bike Split will output the best possible power based plan given the course conditions. You can then download the app on the Garmin Connect IQ store. There is a free version, but for more advanced calculations including weather predictions, gradient chart, and TSS score you will need to purchase the premium membership.
The Best Bike Split: App Review
A prediction chart showing powering, speed, and elevation on a sample course.

Who’s Using It?

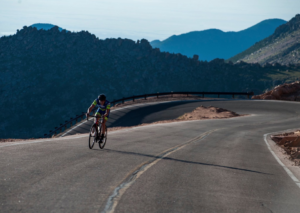
Best Bike split is great for anyone wanting to take their racing to the next level, and is a valuable tool for coaches. Or, if you’re a techie and love trying this kind of new technology, it’s a lot of fun. You can download other people’s power plans and see how long you can ride at their level. (Check out this plan for TJ Tollakson if you want to be humbled).

BBS is designed for athletes who race and train with power meters, and can help determine a number offactors such as:

  • Predict future race times.The Best Bike Split: App Review
  • Plan optimal power targets.
  • Pre-train a race indoors with Zwift, TrainerRoad, Computrainer, etc.
  • Determine what equipment to use for a race.
  • Compare race plans and finish times for various scenarios.
  • See how weather impacts your race day strategy.
  • Determine ideal places to attack or sit in during events.

The wealth of information that comes with the app can be overwhelming and completely unnecessary for the majority of riders. However, it can be a great tool for motivation and can help you reach those time goals sooner than later.

Where can I get it?

BBS is available in the Garmin Connect iQ store, and can also sync with Wahoo Elemnt and use the full web version with premium for $19/month. For more information check out the Best Bike Split website.

The Best Cycling Shoes By Type

November 6, 2017 by Sarah Lauzé

Going clipless is great way to quickly and easily improve your riding and become more efficient. Finding the right shoes can be tough as there’s no “one size fits all” solution, and there are a variety of features to look for.

Are you doing a lot of racing, or are you a commuter? Do you ride over the winter? Are you headed out bike touring? Each of these situations require a different type of cycling shoe, and you’ll want to think about what you’re looking for in a cycling shoe before investing in a pair.

The Best Cycling Shoes

Why go clipless?

Clipless pedals with cycling shoes is the most efficient and comfortable system out there when it comes to road biking. The stiff sole of the cycling shoe provides a rigid platform to transfer power from your legs to the drivetrain and propel the bike forward. Softer shoes lose some of that power as the flexible sole deforms around the pedal (and also makes your feet sore)

As well as having stiff soles, being clipped in encourages proper pedalling technique, using power through every part of the pedal stroke. Not only are you pushing down, but you are also pulling up to complete the 360 degree motion.

The clipless system is not just for racers, but can make cycling more enjoyable as you spend the same amount of energy, but get more return! So, if you’re a recreational rider who has always made fun of cyclists hobbling around in their cycling shoes, it may be time to give them a try. It can be intimidating to be locked in to your bike at first, but you will get used to the twist out motion in no time.

Types of road cycling shoes

The Best Cycling Shoes

There are two general types of road cycling shoes:

  1. Performance – Performance cycling shoes are as light and as stiff as possible, with the cleat attaching entirely on the outside of the shoe via a two or three bolt system. These shoes are not meant for walking, and will get you out to your bike, but that’s about it. They are not shoes that you would want to get stuck walking home in
  2. Leisure / Touring – For commuters, casual riders, and touring you may want something a little more versatile and easy to walk around in. These shoes will often have a much smaller cleat that is embedded into the sole, making it flat with the bottom of the shoe.

Key variables

  • Fit – You always want to try cycling shoes before you buy, as not all brands size the same. They’re awkward to walk around in, so The Best Cycling Shoes
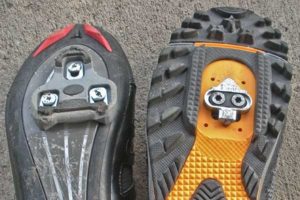
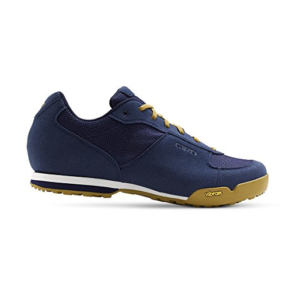
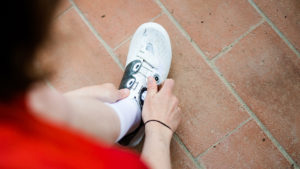
trying them out on your bike would be ideal. You want your feet to feel comfortable, but snug in the shoe. They shouldn’t be moving around within the shoe at all, as that will become very uncomfortable over a long ride.
  • Fastening system – The number one thing you want from the fastening system is to keep your foot firmly in place. This can be done with dials, ratchets, velcro, or laces.
  • Soles – Generally speaking, the stiffer the sole, the more efficient the shoe will be. More expensive shoe soles will be made from carbon to remain as lightweight as possible, whereas cheaper options will be plastic, and some are combination of the two.
  • Cleat style – The majority of  road cycling cleats are three bolt (SPD-L), with two bolt (SPD) being more appealing for commuting, touring, and mountain biking. Some cleats are a compatible with both.
  • Breathability / Water resistance – If you’re doing the majority of your cycling on hot summer days, then you’ll want to ensure the shoes you get are synthetic or leather and allow your feet to breath. There are specific winter cycling shoes for cold and wet riding, and it may be worth having two pairs if you are riding outside during all seasons.

Some of the Best Cycling Shoes

Performance Cycling Shoe

Shimano RP9

The RP9 road performance shoes are the quality and fit of a pro-level shoes, but at a much more affordable price point. They are designed for performance and speed, but with the heat moldable Custom-Fit, they are also comfortable enough for those long rides while giving you the ultimate power transfer. With a weaved carbon composite sole and a one piece synthetic leather upper, they are lightweight, breathable, and secure.

These shoes come in both men’s and women’s models.

Mid-Range Cycling Shoe

Men’s – Giro Treble II

The Treble II is exactly what you think of when you picture a cycling shoe. It’s simple, functional, and is compatible with both SPD and SPD-L cleats. The classic 3-strap closure makes for easy adjustments, but isn’t quite as durable or secure as it’s lace, ratchet, or dial counterparts. However, these are great entry level shoes that will having you set for a PR on your favourite climb with amazing efficiency and comfort.

Women’s – Shimano RP2

The entry level show in Shimano’s lineup, the RP2 is compatible with both SPD and SPD-L. The lightweight fibreglass soles increase power output, with the classic three strap upper keeping your foot firmly in place. The women’s model features a narrower fit, reduced volume, and added support in the instep to maximize comfort.

Leisure / Commuter cycling shoe

Women’s – Giro Whynd Womens Road Cycling Shoes

The best of both worlds. The sole of the Whynd is rigid enough to prevent the loss of power while remaining comfortable enough to walk in, featuring rubber “walking zones” to provide grip. The recessed cleat area accommodates two-bolt cleats, and the large strap across the top provides security and keeps the laces out of the way. These are perfect for weekend touring or running errands on your bike.

Men’s – Giro Rumble VR Cycling Shoes

The Giro Rumble features vibram soles for the ultimate support and casual look while out at the pub, with an injected inner shank to transfer power and have you feeling strong when you hop back on your bike. The mesh/microfiber upper upper will keep your feet from sweating and the non-slip laces will keep you nice and secure- no matter what the day brings.

Cycling Heart Rate Zones

October 30, 2017 by Sarah Lauzé

Heart rate training is a valuable tool for all athletes, as it helps bypass your brain to listen directly to what your body is telling you. It varies from sport to sport, so keep in mind this article is about cycling heart rate zones in particular.

So, what’s is the big deal with heart rate zones? The zones may not mean much in themselves, but their value comes with understanding how to use them within your training. Heart rate training can be specified to your goals, and can make you stronger, fitter, and faster all the while preventing overtraining and burnout.

Cycling Heart Rate Zones

What is heart rate?

Your heart rate is measured in the number of times your heart beats per minute (BPM). It is the body’s direct response to what you are doing, whether it’s sitting on your couch or pumping up a hill at full speed.

Your heart rate is measured using two baseline numbers:

  1. Resting heart rate – Your heart rate when your body is completely relaxed (essentially your minimum heart rate).
  2. Max heart rate – The highest number your heart beats in the course of one minute. Again, this is for cycling in particular, as your max heart rate for running would be a higher number.

Determine your resting heart rate

Cycling Heart Rate Zones

You’ll want to measure your resting heart rate first thing in the morning for at a least a week. When you first wake up, and are completely relaxed (avoid testing when you are sick or stressed) measure the number of heartbeats over the course of a minute. This can be done easily with a heart rate monitor or even most smartphones. If you don’t have either of these, then find your pulse on your wrist or neck, set a timer for one minute, and count the number of beats.

Once you have done this once a day for a week, add up each day and divide by 7. This will give you your average resting heart rate. Keep in mind, the more fit you become, the lower your resting heart rate will be as your body becomes more efficient.

Determine your maximum heart rate

There are a variety of ways to determine your maximum heart rate, with the most accurate being a visit to your Cycling Heart Rate Zones doctor for a stress test. However, you can also do a simple test yourself.

First, find a hill climb that takes you at least 10 minutes on your bike and is not so steep that you have to stand up out of the saddle at all. Before heading up the hill, warm up for a minimum of 15 minutes, then take to the hill working up to sprinting as fast as you can for roughly 10 minutes. When you can’t go any faster, stand up in the saddle and sprint for a further 45 seconds. Take your heart rate immediately after, or use the highest heart rate recorded on your monitor – this will be your max heart rate.

Heart rate zone training

Once you have these two parameter numbers, you will then be able to breakdown your heart rate into zones. There are 5 basic zones when it comes to cycling:

Zone 1 – Recovery (50 – 64% of max HR)

Known as ‘active recovery,’ this zone can be used between cycling intervals, or for rest days when training. This zone will flush lactic acid from your body and help you loosen up sore muscles.

Zone 2 – Aerobic Endurance (65 – 74% of max HR)

Think if this is as your base pace, especially if you’re a beginner cyclist. This is the zone where you should spend a lot of your time, and is the foundation for building endurance and burning fat. You will be working hard enough to feel it, but able to maintain over long distances and remain able to carry on a conversation.

Zone 3 –  Aerobic Threshold (75 – 84% of max HR)

This zone can be described as your push pace, or comfortably hard. You are building strength and muscle, but you’ll want to be careful about just how much time you spend in this zone. At the end of a ride you will feel tired, but not have pushed yourself hard enough to see real progress (can reach a plateau in your fitness).

Zone 4 – Lactate Threshold (85 – 91% of max HR)

The lactate threshold is the zone in which lactic acid starts to accumulate in the bloodstream, as lactate clearance is no longer able to keep up with lactate production. This will be used most commonly in interval training as it is challenging and cannot be sustained for extended period of time. Within this zone you are bettering your maximum performance, improving lung capacity, and improving high-intensity endurance.

Zone 5 – VO2 (92 – 100% of max HR)

The VO2 zone can be described as the numerical measurement of the body’s ability to consume oxygen during intense exercise, in other words respiratory endurance. Most cannot maintain this zone for more than 5 minutes. Your lungs will be burning and you will be breathing (or gasping) heavily. Although difficult, this type of training will make your body more efficient.

How much time you should be spending in each of these zones has a lot to do with your goals and current training plan. Check out “Heart Rate Zone Training for Cyclists” for some examples to get started with your own heart rate zone training.

How to Treat Road Rash

August 31, 2017 by Sarah Lauzé

You know that split second right before a wipe out, when everything slows down and you do all you can to postpone the inevitable? Unfortunately, there’s just not much that can be done in that moment other than hope for the best.

Crashes happen to the best of us, and the accompanying road rash is almost a rite of passage for many cyclists. Just think of that patch of missing skin as a symbol of your commitment to the sport and as painful as it can be, there’s no reason for it to deter you from getting back out there as soon as possible.

How should you treat road rash?

Although there has been some debate over the years as to what method of treatment is best, we’ve put together a list of tested and true steps to ensure a fast and relatively painless recovery.

Assess whole body injury

Although road rash may be the most obvious injury after a crash, it may not be the most serious. Take time to assess the whole body, including your head, spine and internal organs. If all seems to be okay, then you can assess the degree of the road rash.

If part of the wound is deep enough to need stitches, or if you can see any fat globules (white looking substance), then a trip to the hostpital is a must. If the skin is broken and bleeding, but the deep layer of skin is intact, then you should be able to treat it on your own.

Clean the wound

Halfway through a long ride, you may not have all the supplies needed to properly clean the wound if you don’t carry a first aid kit with you. First things first, gently rinse the affected area with drinking water until you can more thoroughly attend to it. Squirting the water directly from a water bottle works great to rinse away any dirt or pebbles that may be embedded in the road rash.

Once you get home, it’s time for a proper cleaning. Although scrubbing has been suggested by some cyclists, the less you aggravate the area the easier it will heal. Simply use some antibacterial soap, water and a washcloth to gently wipe the area clean before patting it dry.

Dress the wound

As a kid you may have left road rash to dry out and quickly scab over. Although this may seem like the fastest way to recovery, it often leads to scarring, an itchy or splitting scab phase and can make wearing clothes really uncomfortable. Instead, you’re going to want to keep the area nice and moist to promote healing and prevent infection.

First, apply a thin layer of antibiotic ointment to the area before covering with some sort of bandage. For mild cases of road rash, some non-stick gauze attached with tape will work just fine. For more severe cases, or for treating road rash on joints, a Tegaderm patch will be more effective as it bends and breathes like a second skin, all the while maintaining that moist environment you want for the healing process. Either way, ensure you are rinsing the wound and changing bandages daily.

Look out for infection and avoid scarring

Be sure to keep an eye on the healing process, but it is normal for road rash to take about three weeks to heal up depending on the severity. Even then, the skin will appear pink and may have a bumpy texture. We all know not to pick at the scab once it forms, so no matter how tempting it is, try keep your hands away! Keeping the area covered up and out of the sun will help avoid scarring, as well as moisturizing the area for the months following.

How to know if road rash is infected

A certain amount of bleeding and oozing is normal in the first few days after injury, but any sudden change in color or swelling may be a sign of infection. This can happen even if you were diligent with cleaning and dressing the wound, and can only be treated through doctor prescribed oral antibiotics.

Signs of infection:

  • Increased pain after the first couple days
  • Increase in swelling
  • Red colour around the wound
  • Puss or fluid drainage from the wound
  • The area feels warm

Most cases of road rash are nothing to worry about, and are more of a nuisance than anything. We hope you won’t be needing this advice, but if you do take a tumble off you bike, check out “What to do after a bike crash” for more helpful information.

A Secret Weapon for the Hills-an Extra Gear

August 14, 2017 by Gareth Eckley

climbing-steep-hill-3-bikes

Recently I completed my first road race, the Armstrong Century Ride, held early in the season, May 28th.

I was riding up Knob hill, which averages 4% with some steep 9-11% sections and is 3km long with 112 metres vertical. This hill destroyed many of the riders and was the area they were most fearful of.

I found it fairly easy as I had a secret weapon, I literally had an extra gear. I run an 11-32 rear cassette, while most bikes have 11-25, 11-26 or 11-28 cassettes. I changed my cassette last year.

This extra gear allows me to get up a hill with less effort than before and to keep a higher cadence for climbs. I then have more energy to go fast on the flat sections.

Another benefit of the extra gear is that you can keep your heart rate fairly steady and avoid spiking into the max heart rate zone too often. Here is more detail on heart rate training.

Do I need an extra gear ?

pushing-bike-steep-hillConsider this if you are older, heavier or less fit than most cyclists. You can also start the season with an 11-32. When you have built up your leg muscles and are powering up most hills, swap a lower range cassette, such as an 11-28, back in.

You don’t need to do this if you are a frequent cyclist, young, with strong legs, fitter than average, or if you live in a flat place with no hills.

I live in hilly Kelowna, Okanagan, BC. We have many category 4 climbs and hills with 10-12% sections, so I take the easy way out. I feel that an 11-30 cassette will actually suit me better. The gear steps are smoother, and I intend to replace my 11-32 with the 11-30 soon.

rear-cassette-moots-450Top cyclists will point out the negative to the extra gear, you will be slower than a rider with an 11-28, or 11-26 who has the power and strength to drive the lower gear up the hill.

Stronger cyclists may well be standing up for most of the hill. If you have that ability, then great, you don’t need this advice. More on when to sit or stand up for hill climbs.

However, if you’re not quite as strong and you try standing up for a long time, odds are that you will blow up on the hill, spike your heart rate to the maximum and have nothing left after the top.

I find that the extra gear gives me an option that I can use if I need to. If I am feeling strong or the gradient is not too steep, I can ignore it.

My experience is that giving up 2 -3 mins on a climb to arrive with energy to spare for the rest of the event may give you a faster overall time when you cross the finish line.

Select Your Chainsetbike-chainrings-wide

The chain-rings on the front of my bike are a compact 50-40. This is designed for average areas with a mix of hills and flat roads.

Many pros and experienced riders use a standard 53-39 chainset. They have the power to drive the bigger gears and can achieve higher overall speeds.

Your choice of front chain rings has an impact on your rear cassette gear ratios. A rear casette of 11-28 combined with a standard 53-39 chainring is similar to an 11-25 with a compact 50-34 chainset.

How to do this

You can purchase a replacement cassette for your bike very easily. but buy an inexpensive model first as you experiment. You can purchase a more expensive higher grade cassette later. This will be lighter and may perform better.

In my opinion, this change can be the most effective upgrade for your bike and have a huge effect on your riding and overall average speed.

Your local bike shop can change your cassette for you. If you have a home workshop it is not too difficult to change a cassette yourself. You will need a few tools like a chain whip to do this.

Even the Pros at the Tour de France are using larger cassettes

There is a belief amongst many cyclists that the best cyclists don’t need or use easier gears for the mountains. There is a lot of truth to this, better riders and pro cyclists do generate more power. They can drive bigger gears than normal riders.

Pros can use smaller cassettes for riding up hills but they also face bigger challenges. The mountains that they climb are huge and often very steep.

Many pro riders at the Tour de France use an 11-28 cassette, some are even using an 11-30 cassette. The reason is to help to control their effort and their cadence so they don’t blow up on a steep climb.

Geeky Section – Explanation of gear ratios

There are many guides to gear ratios that can go into deep mathematical detail, which can become very complex. Here is one link that explains the basics very well – Gear Ratios explained

What is your opinion?

  • Have you changed your cassette to make hill climbs easier ?
  • Do you swap mid season after gaining power through training ?
  • What gears do you ride with ?
  • Do you ride a Compact or Standard Crankset ?
  • Do your friends comment on your choice – negatively or positively ?

Please leave comments in your review.

Many thanks,

Gareth

How Your Family Vacation Can Prevent Overtraining

July 10, 2017 by Andrew Funamoto

If you’ve been putting in the time, diligently doing your intervals and pushing yourself further than ever before, then it can be tough to take a break. When you’re finally getting faster than your buddies, your upcoming vacation may have you stressing that you’re going to lose everything you’ve worked to hard for.

Take a deep breath, and enjoy your family vacation. The break will help you prevent overtraining.

how your family vacation will save you from overtraining
ILB contributor, Morgan, knows how to take it easy on vacation. Photo by Dave Gillam @djgillam (instagram)

Cyclists Need a Pitstop

What if we approached rest during a season of training like F1 drivers approach pit stops? F1 drivers know that they will need to stop for fuel and a change of tires a couple of times throughout a race. Teams and drivers strategically plan for this. Reassure yourself that when you are taking a week off the bike, it is not necessarily a week of training lost.Your competitors will also have to take a week off at some point or another.

Think of a rest week as reducing your risk of injury instead of lost fitness.

If you get hit with a bad cold, you could easily be out two weeks. The bonus of taking a week off, is that your body will have had time to rest, recover and adapt to the previous week’s training load.

Routine Maintenance Off the Bike Mitigates Overtraining

Maintaining your body off the bike is extremely important both physically and mentally. Adding strength, mobility and stability through cross training mitigates the potential injuries that you might sustain if you are otherwise not committed on doing so.

ILB contributor Jem suggests that cross-training and time logged off the bike does not contribute to fitness on the bike– You will not find many people disputing this claim, but what is the cost to your fitness if you end up sick, injured or burnt-out as a result of neglecting other parts of your health and wellness?

Plan Your Mid-Season Breaks

If you plan for these breaks and are strategic about it, pitstops can win the race. Most of us have family, friends and obligations. Use vacations, weddings and other times that you may be forced off your bike as a mid-season pitstop. Try and slowly build intensity and duration of your training up until you go on vacation. That way when you are visiting museums, broadway shows or sitting on the beach enjoying an afternoon snooze you won’t feel so guilty.

Training is like money in the bank. Everyone is saving, and everyone is constantly banking fitness so taking time off the bike is hard. Follow these four easy steps to avoid burnout and enjoy your vacations:
Step 1: Maintain your body throughout the season
Step 2: Listen to yourself and your body
Step 3: Plan your training around specific events during the year
Step 4: Stick to the plan or make small adjustments to avoid burnout

How To Stop Cramping Now!

June 28, 2017 by Jem Arnold

Cramping Myths and Hydration Truths

Cramping and fatigue in general are still relatively poorly understood physiological phenomena, but every cyclist has experienced Exercise Induced Cramping, and knows exactly how uncomfortable they can be! There are plenty of myths, anecdotes, and magic cures peddled by companies and fellow riders alike, but what can the Science tell us about cramping?

Stop Cramping Now Cramping Myths and Hydration Truths

What Causes Cramping?

Cramping is not necessarily a sign of poor hydration or electrolyte imbalance. Cramping is not necessarily a sign of poor nutrition, poor warm-up, or poor preparation for race day. Cramping is not necessarily even a sign of poor fitness… but all of those factors may contribute to fatigue and cramping.

Exercise Induced Cramping occurs when you push yourself harder and for longer than your body is used to: ie. a combination of greater volume/duration and greater intensity than your body has adapted for.

The current best theory for Exercise Induced Cramping is related to neuromotor fatigue. Basically, the nerves that carry signals to and from your muscles and your brain get tired just the same as your working muscles. Those nerve signals begin to misfire This neuromotor fatigue can send overlapping, uncontrolled signals to your muscles. This can result in twitching, cramping, complete locking up of your working muscles or the feeling of ‘dead-legs’ and an inability to produce power.


Hydration and Electrolytes

When you sweat you lose both fluid and ‘electrolytes’, which refer to a variety of minerals dissolved in the body’s fluids and tissues, and are essential to overall function. Sodium is the most abundant electrolyte lost in sweat, and so ‘salts’ are occasionally used synonymously when talking about replenishing electrolyte balance.

Sweat is hypotonic, that is: the electrolyte concentration of sweat is lower than the electrolyte concentration of your blood. This means that when you sweat you lose more fluid than you lose electrolytes, and therefore fluid loss will be the limiting factor to performance and is more important to replenish during exertion. During activities longer than 90min, and especially endurance events longer than 4 hrs you will lose both fluids and electrolytes to sweat, and both will need to be replenished.

Studies have shown that performance is negatively affected when total body weight loss approaches -2% via fluid loss (although even this finding has conflicting evidence). You should aim to replenish fluids during activity to avoid this extent of fluid loss. A general guideline is to drink at least one bottle – 500-750 ml – of fluid per hour.


Can you Drink Too Much?

You may have heard horror stories about athletes over-hydrating during endurance events and suffering from hyponatremia, or severely low electrolyte imbalance. These instances are an extremely low percentage occurrence and most often only seen in extreme ultra-endurance events. Studies found only 0.1-4% of an ultra-endurance population exhibited signs of hyponatremia, compared with 80% occurrence of basic dehydration.

Under-hydration can affect your performance during even short-duration activities and should be a far more significant consideration than over-hydrating. You have to try really hard to give yourself hyponatremia, but dehydration takes effort to avoid.


Fluid and Nutrition

Drinking an electrolyte-fluid mix can be effective to maintain performance and avoid cramping and fatigue, but the fluid is certainly more important than the electrolytes in that bottle of mix. Mix offers a more obvious advantage to performance, of course: as a nutritional source of carbohydrates (sugar/glucose). Some electrolyte supplements can be low or zero calorie, but more common is for drink mix to contain both carbohydrates and electrolytes.

Briefly: nutrition is a completely different topic which I won’t tackle here, but suffice it to say that calories from carbohydrates, protein & fats are significantly more important to performance over a multi-hour endurance event than electrolytes. You don’t have to choose one or the other!: carbohydrate + electrolyte mixtures can be a great way to replenish both on the bike! For optimal performance, you probably need to be eating more than you think!

I would suggest that if you find that drinking a carbohydrate/electrolyte mix helps you avoid cramping and boosts your performance, this is more than good enough reason to continue what works! This may be in order of importance; 1) the fluid; 2) the nutritional calories, and finally; 3) the electrolytes.


So What Should You Do?

The first thing that needs to be said is don’t worry about changing anything if you know what works best your you! Your body is very good at regulating itself: It will take in whatever you give it with very little fuss. The science indicates it should be unnecessary to supplement salts or electrolytes as long as you eat properly leading into your cycling event. You should get all the salts, minerals and electrolytes you need from a nutritious diet, not to mentioned ensuring optimal performance on the bike. Longer events will require fluid, electrolyte, and calorie replacement and you can get that from any combination of solid foods, gels, or drink mixes.


How to Prevent Cramping?

  • Nothing magical, just expose your body to greater duration and intensity of training stimuli. ie. go harder for longer, and next time you won’t cramp as early into your event! Training in the heat will assist acclimatization to the heat, and training in the cold, to the cold. You can experience cramping in any conditions to which your body is poorly acclimatized to.
  • Take care of the low-hanging fruit as part of your pre-event preparation: Ensure you are fresh, well-rested, with sufficient nutrition and hydration in the days leading up to a particularly hard event. Come prepared with sufficient nutrition and hydration for the length & intensity of the event and for the expected conditions on the day. TrainingPeaks has a fantastic guideline for basic pre-, during, and post- race nutrition & hydration planning.
  • There is also a potential genetic predisposition to cramping. so… get different parents? 🙂

How to Relieve Cramps Once They Start?

  • The fastest & most reliable method of temporarily easing cramps is passive stretching. Trying to stretch a cramping hamstring while on the bike is a good way to come to grief, but if you can slow up or even dismount and stretch the affected muscle it can provide much needed relief.
  • Continuing to hydrate remains important when you begin to cramp. Cooling via fluid intake will also help. However by the time cramping is occurring, hydrating and cooling probably won’t have a quick enough effect. You’ll be forced to slow down first, which probably has a more direct benefit.
  • Speaking of slowing down, an obvious (and often unavoidable) way to reduce cramping is simply to reduce your effort. This eases the demand on your working muscles, your heart & lungs, and also your neuromotor system by reducing the amount of voluntary nerve signalling to your muscles. This allows your entire neuromotor system to relax and recover.
  • Finally, recent headlines have highlighted using pickle juice, capsaicin (spicy pepper, chili powder, etc.), vinegar, or mustard as cramp cures. I haven’t explored the evidence in-depth, but the proposed mechanism is not actually the salt in those foods, but rather that the spice/acidity of these foods overpowers the rest of the neurological system and reduces nerve firing activity globally through your body. Similar to how biting your tongue “distracts” you from the pain of your stubbed toe.

Are Cycling Shoes Worth The Leap?

June 13, 2017 by Andrew Funamoto

If you are thinking about buying cycling shoes, you may find yourself in the following circumstances:

  • Thinking of buying a bike and cycling shoes for exercise
  • Currently commuting to work
  • Riding on weekends with friends
  • Exploring the city & countryside

Seeing cyclists hobble around in cycling shoes is not pretty, so there must be a reason why people insist on wearing them.

What Do Cycling Shoes Do?

The first and most obvious aspect of a cycling shoe is that they clip into the pedals. With a distinctive “click,” cycling shoes with clipless pedals will encourage power through all portions of the pedal stroke. Think of a clock and how the second hand moves through all 360 degrees.

Secondly, cycling shoes provide a rigid platform that allow power to be transferred into the drivetrain with greater efficiency than running shoes, sneakers or high heels. When you apply power into the pedal with sneakers, the flexible sole that offers comfort when walking, deforms around the pedal. This means energy lost and sore feet.

Cycling in running shoes is like cutting veggies on a plate with a butter knife. Switch to cycling specific shoes and you’ll be cutting veggies with a proper chef’s knife on a wood cutting board. The combination of clipless pedal with cycling shoes will have you slicing and dicing your morning commute.

Types of Cycling Shoes

Mountain Bike Shoes

There are two main types of cycling shoes. For someone looking for an all-round cycling shoe, a mountain bike shoe will be a good primary option. Mountain bike shoes have thick tread that allow mountain bikers to navigate tricky terrain. It sounds counter-intuitive at first, but that same tread helps commuters and new cyclists navigate slippery tile floors and the stairs up to the office.

Contributor Morgan and her MTB shoes. They are more versatile than road shoes. (Photo by: David Gillam)

Road Bike Shoes

Road bike shoes are typically lighter and more breathable. But the weight comes at the expense of functionality. Road shoes don’t have robust tread like mountain bike shoes and they will often be completely smooth; this is by design. Road cyclists will sometimes ride hundreds of kilometers before un-clipping for a stop light or an esspresso. Hauling around a few extra grams is not efficient (yes roadies are that Type A)! The speed and efficiency comes at the expense of being awkward. The cleats that clip into the pedals protrude, and you’re left quacking around the supermarket during a quick grocery shop on the way home from your ride.

Even Blondie knows these road shoes are awkward to walk in!

So What Type of Cycling Shoe Should You Buy?

Are you doing a quick rip to the farmers market? Mountain bike shoes will likely be a good choice. The tread will be good for navigating mixed surfaces and the added strength of the nylon sole compared to your runners will make the ride home a lot less uncomfortable.

Are you doing a long commute to work and riding on the weekends? Road shoes might be a good option here! Check out these Shimano touring shoes. They can almost pass as your work shoes!

Are you riding a shorter distance but looking for more support? Brands like Chrome manufacture a happy medium between cycling shoes and runners. They add a stiff base plate in the heel and mid-shoe to help with power transfer, but still offer lots of comfort while walking around. These shoes last for years, they are extremely tough.

Taking the Leap: Cycling Shoes

New Bike Day

OK, so you’ve decided you want to give cycling shoes a go, now what? If you are new to riding and have just bought a brand new road bike, wait a few weeks before stepping into a pair of cycling shoes and clipless pedal. It takes a few weeks to get used to the handling of a new bike, and cycling shoes with clipless pedals can be one too many items for your brain to process. You might end up tumbling over at a stop sign– or maybe in your driveway. Take your new bike out a few times with flat pedals before leaping into clipless pedals.

Commitment

Now it’s time to commit to new shoes and clipless pedals in the parking lot. Practice clipping in and out with both feet.

Tip 1: When coming to a full stop, clip out one foot well before you know you need to and coast into the corner. Clipping out before you need to put your foot down sounds obvious, but tipping over happens to all of us!

Tip 2: When stopping, pick a side that you are more comfortable clipping out on, and stick to that side. Then, when you arrive at the stop gently lean you bike in that direction, using your un-clipped foot is your anchor. If you keep your bike verticle, a gust of wind can tip you over onto the side that you are still clipped in on! It’s happened before, and it will happen again!

Smash It With Cycling Shoes

Now get out there and start smashing your way commute back from the office, farmer’s market or apple orchard!

Pain in the Ass: Why You Shouldn’t Ignore Your Glutes

May 3, 2017 by Bria Edwards

The glutes are one of the largest and strongest muscles in your body. They are also sometimes the most ignored.

It’s easy to hop on your bike and head out for 20-50 miles and not give much thought to your pedal stroke, but maybe it is time you should. During each pedal stroke, your glutes should be the largest muscle group producing power in your legs. Some cyclists over time will become more quadricep dominant and lose power as well as glute activation.

Don’t Ignore Your Glutes!

Neglecting your butt is costing you power!

Pain in the Ass: Why You Shouldn't Ignore Your Glutes

Glute Deactivation Leads to Aches and Pains

Losing “power” may be the least of your concerns if you let your glutes go unnoticed for too long. Below is a list of muscles and structures affected when you lose glute strength:

  • Overactive hamstrings (can lead to tendinitis)
  • Knee pain
  • Pain in right shoulder/thoracic region
  • Overused quads
  • Overused hip flexors/adductors

Glute Deactivation Impacts Your Hamstrings

If you ride at a rate of 90 revolutions per minute and you ride for 2 hours, that’s 10,800 pedal strokes you take for just one ride. If your glutes aren’t properly functioning that means your hamstrings have to work in overdrive in order to extend your legs during the pedal stroke.

Glute Deactivation Impacts Your Quads and Hip Flexors

Inactive glutes also places added stress to the quadricep muscles and hip flexors assisting in the downstroke of your pedal stroke. Overused quads can lead to tightness, which can ultimately lead to knee pain.

Glute Deactivation and Your Sore Back

Finally, glute inactivity can lead to back pain and soreness. Your glutes also aid in stability. If one side of your body has glute inactivity then the opposite side of your body needs to overcompensate to assist in stability. This instability triggers your opposite side of your upper body to take over the work, thus leading to shoulder discomfort.

Your glutes are connected to your whole body and influence proper muscle mechanics. Now comes the time to learn how to engage your glutes and get them firing on all cylinders!

Setting the Foundation: Pelvic Posture

First things first, proper pelvic posture is key. If your front side (anterior side of your hips/hip flexors) are tight you won’t be able to access your glutes completely. Work on keeping your pelvis in a neutral position and remember to keep your core engaged when practicing all glute exercises. 

If this positioning is hard to achieve, adding in some hip flexor stretches may be beneficial.

These stretches can include a half kneeling lunge: To perform this stretch, place one knee down into a kneeling position and the opposite leg will be placed in front with the foot on the ground as shown below. While in this position, activate the glute of the leg which is kneeling (squeeze your butt!) and begin to slowly press forward. By activating the glutes, you allow the hip flexors to release. This release will allow you to access more range in the hip flexors in order to be stretched. 

Another stretch to incorporate is the deep lunge. To perform this stretch you will begin by positioning yourself into the half kneeling lunge we just performed. From this position, begin by activating the glutes of the leg that is on the ground and slowly begin to lunge forward. From here, you will place both hands inside the leg that is forward as shown below. To vary the intensity of the stretch you can either keep your arms straight or work your way to your elbows. 


Again, never force yourself into a position that is painful. Always listen to your body and ease your way into a stretch.

Now that we have the front side open, time to activate those glutes! You’ll only need one piece of equipment for this and that is an exercise band. You can find these at your local exercise equipment stores or Amazon.com

Below is a series of activation drills you can do prior to riding that will be sure to wake up your sleeping glutes!

Fire Hydrants: Target Muscle: Glute Max

Skates: Target Muscle: Glute Max

Monster Walks: Target Muscle: Glute Med

Bridges: Double and Side Leg, Target Muscle: Glute Max

As with any exercise, the number of repetitions and length of holds can vary based upon each individual. As always: you should consult with your doctor prior to starting any exercise program.
“It’s as easy as riding a bike.” This famous quote is true, riding your bike should be easy and most importantly; pain free. Incorporating a few simple exercises a day can save you discomfort and can reduce time taken away from riding, and that is a pain in the ass.

Stretching, Mobility & Strength Training for Cyclists

Looking for a program that will help you address muscle imbalances, such as weak glutes, that are likely causing you pain? Dynamic Cyclist is an online training platform designed to help cyclists become stronger and faster while riding pain free for years to come. Complete your regimen with an all-inclusive program that addresses mobility, flexibility, strength and injury prevention, all for a fraction of the cost of one physiotherapy appointment. Try out our 2 Week Burner Strength Program and experience the results for yourself. Click here to try 7 days free!

How To Ride Long Climbs Faster

April 30, 2017 by Andrew Funamoto


In part two of his climbing series, Travis explains how to ride long climbs. From reaping the rewards of endorphin highs on the top of the hill, to the best pacing strategy, Travis gives us some tips on how to tackle long climbs. If you missed his previous video on gearing and cadence, check it out here.


Why Do We Ride Long Climbs

  • Uninterrupted riding
  • Sustaining heart rate
  • Reward of accomplishing something huge!

How To Ride Long Climbs

  • Pace yourself (don’t go too hard in the first five minutes)
  • Vary your position by standing every once in awhile
  • Relax. Relaxing will allow you to breathe properly on the bike

We would like to thank Jody, one of our readers who inspired us to get this video online. Jody just turned 50 and asked us if we had any tips on tackling Mauna Kea, so if you are in the same boat of ambition stay tuned for more videos. Also, check out Joe Friel’s book Cycling Past 50.


« Previous Page
Next Page »
  • Facebook
  • Tumblr
  • Twitter

Latest Articles

JOIN Cycling: A New Training Platform for Cyclists

May 27, 2024 By Eric Lister

cold exposure

The Benefits of Cold Exposure for Cycling & Life

June 13, 2023 By Eric Lister

hill climb

The Ultimate Hill Climb Training Guide

May 31, 2023 By Eric Lister

shoulder pain cycling

How to Treat & Avoid Shoulder Pain While Cycling

April 12, 2023 By Eric Lister

psoas stretch

The Importance of the Psoas Stretch for Cyclists

April 6, 2023 By Eric Lister

cycling neck pain

The Ultimate Guide to Cycling Neck Pain: Causes and Solutions

March 21, 2023 By Eric Lister

Useful Info

  • Contact
  • Finally, A Global Cycling Club That Is Focused On Community And Love Of Cycling!
  • Privacy Policy
  • Share Your Story!
  • Terms And Conditions Of Use
  • Welcome to I Love Bicycling
  • What Happened When I Stretched Every Day For a Month

Recent Posts

  • JOIN Cycling: A New Training Platform for Cyclists
  • How to Hang Bikes in Your Garage: 4 Inexpensive Options
  • Gravel Bike Vs. Road Bike: Which One Is Better For You?
  • The 6 Types of Mountain Bikes & How to Choose the Best One for You
  • What Is a Touring Bike Good For? 5 Benefits We Know You’ll Love

Search I Love Bicycling

Connect with Us

  • Facebook
  • RSS
  • Tumblr
  • Twitter

Copyright © 2026 · Magazine Pro Theme on Genesis Framework · WordPress · Log in