• Training
    • Injury Prevention
    • Training Tips
  • How To
    • Bike Fit
    • Gear
  • Nutrition
    • Nutrition Tips
    • Weight Loss
  • Repair
  • Reviews
  • Stories
    • Funny Stories
    • Jokes
    • Quotes
    • Videos
    • Funny Videos

I Love Bicycling

I Love Bicycling is a website that is geared towards cycling for beginners with road cycling tips, training articles, nutrition tips, weight loss, how to’s and bike repair articles.

How To

  • Bike Fit
  • Gear

How to Hang Bikes in Your Garage: 4 Inexpensive Options

October 25, 2023 by Eric Lister

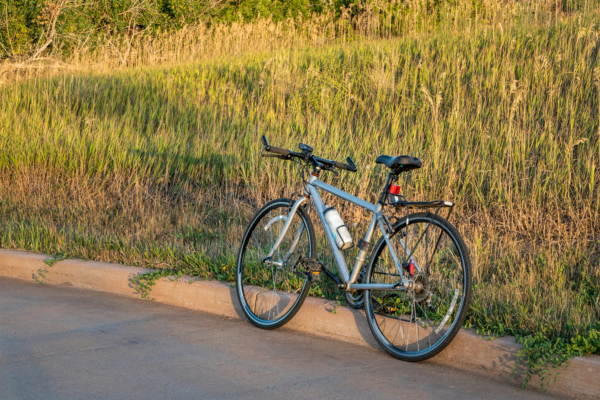
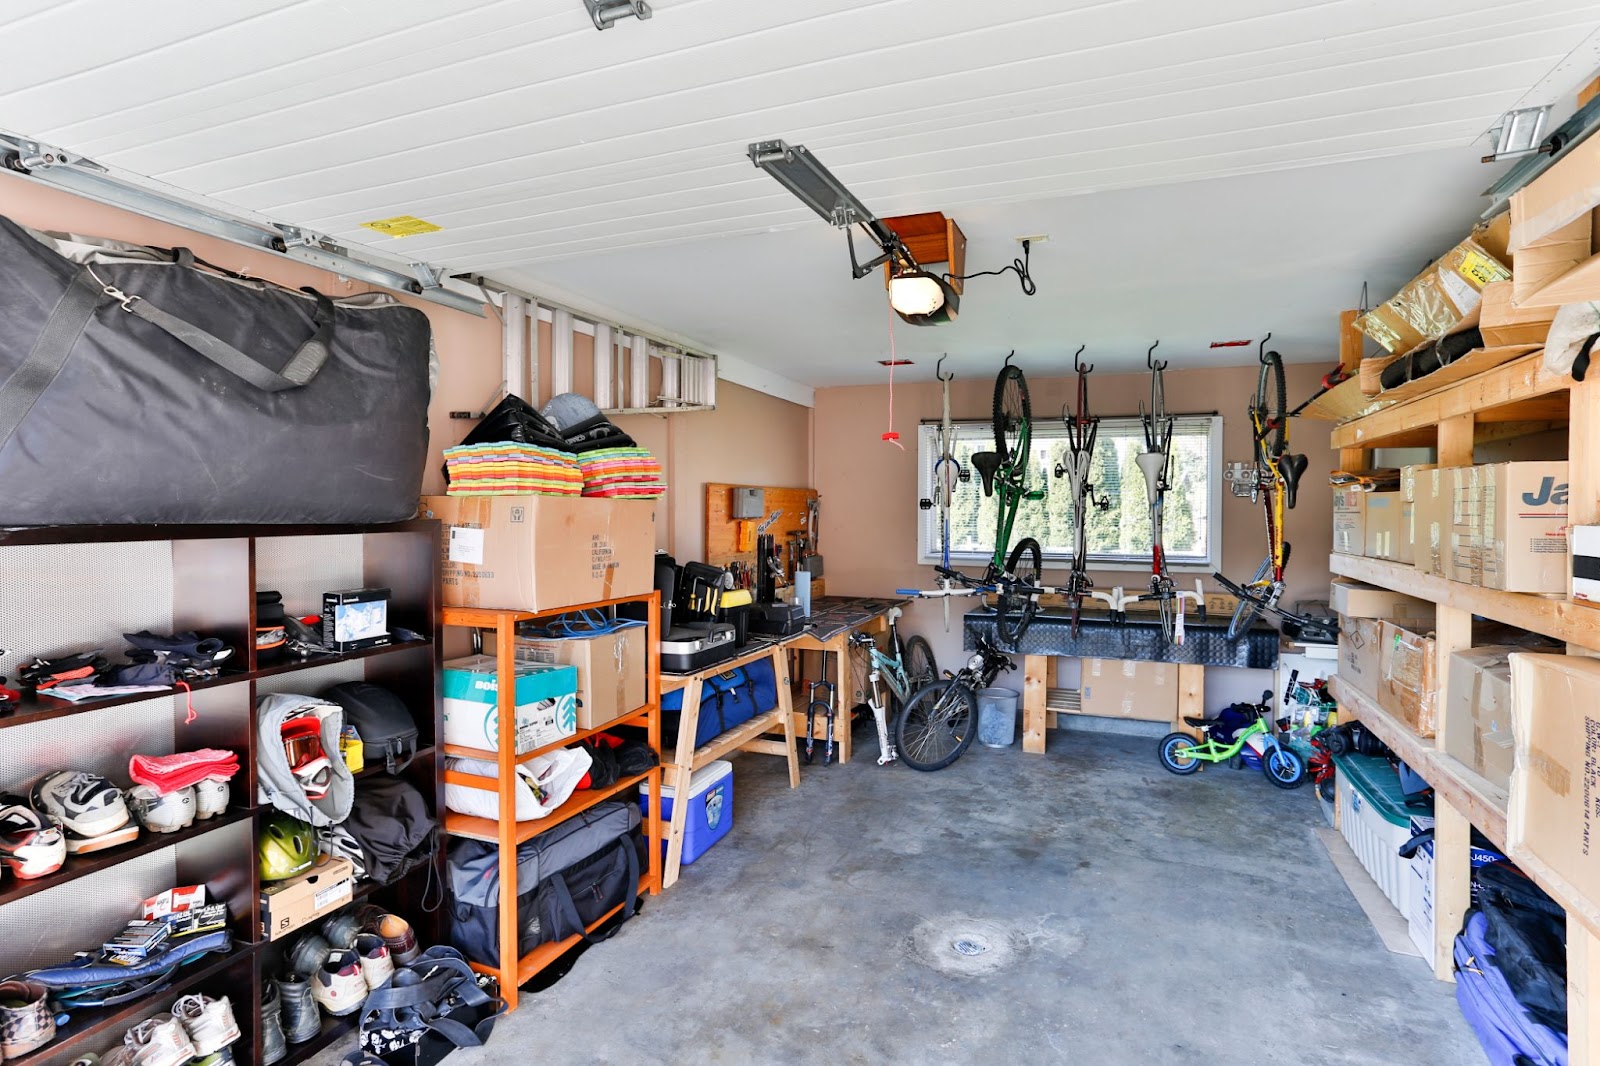
We all love cycling, but figuring out where and how to store your bikes can be a cumbersome task to say the least. They’re quite an elegant piece of hardware when you look at them, but trying to stack multiple rigs side by side is just a huge waste of space. This article will teach you how to hang bikes in your garage with a few inexpensive and easy to use hanging systems.

how to hang bikes in garage

(Credit: Adobe Stock)

How To Install Bike Hangers & Hooks

Most bike hanging systems are similar in the way that they’re installed. You will need a few simple household tools:

  • Drill or screwdriver
  • Drill bit
  • Screws (often included with the hanger/hook)
  • Stud finder
  • Pencil
  • Tape measure

Step 1: Find your studs

Use the stud finder by holding down the button and gliding it along the wall. When it starts to beep, it means you’re getting closer to a stud. A solid tone indicates that you’re over a stud – make a mark. If you’re having trouble finding studs, or they’re inconveniently placed, you can put a long 2 x 4 piece of lumber across multiple studs, and install your hangers onto that.

Step 2: Measure your spot

Ensure there is enough clearance for your bike whether you’re installing a vertical, horizontal or overhead mounting system. This is a common step that people skip, creating a headache that is easily avoidable. Once you have your spot, hold the hanging system up and mark where the screws will have to go with your pencil.

Step 3: Drill your holes

Using a drill bit slightly smaller than the actual screws, drill holes in your marks where the screws will have to be installed. If you’re not used to installing hardware, this step makes it much easier than trying to go straight into the wall with the screw. If you’re installing on your own, this is definitely a step you do not want to skip.

Step 4: Install hanging system/hook

Align your mounting system with your pre-drilled holes (let’s hope they line up!). Screw the hanger/hook firmly into the wall, but be sure not to overtighten. Especially if you’re using hardware that was included with your hook, the screws may be of a lower quality and liable to break or strip if you stress them too much.

Step 5: Hang your bike

Once your system is attached, the last step is to hang your bike! Get it up there and admire your hard work. You’re basically Tim Allen on Home Improvement, so give yourself a pat on the back!

(Credit: Hallmark Channel)

Bike Hooks & Hanging Systems

Now that you know how to install them, you need to actually pick a hanger out for yourself! Below you’ll find 4 different options, all for less than $30, that each provide a different way of hanging bikes in your garage. Enjoy!

SMARTOLOGY Bike Hooks – 8 Pack ($12.56)

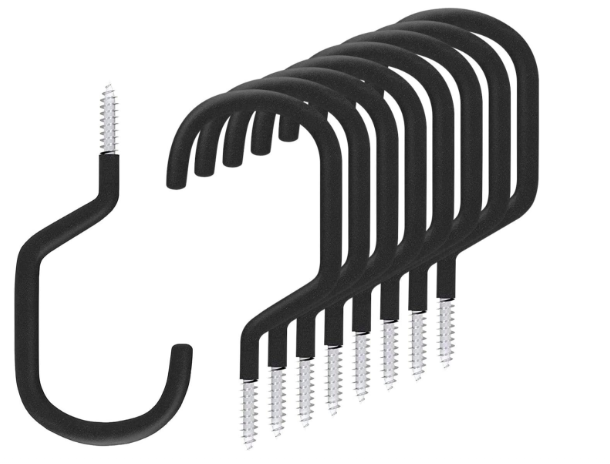
By far the simplest (and least expensive) option, these handy little hooks don’t require any extra hardware. Just pre-drill a hole or work one right into a stud, and in no time you have a sturdy, lifelong hook that goes right through the spokes for an easy vertical hang.

Laxama Vertical Bike Hooks – 4 Pack ($24.99)

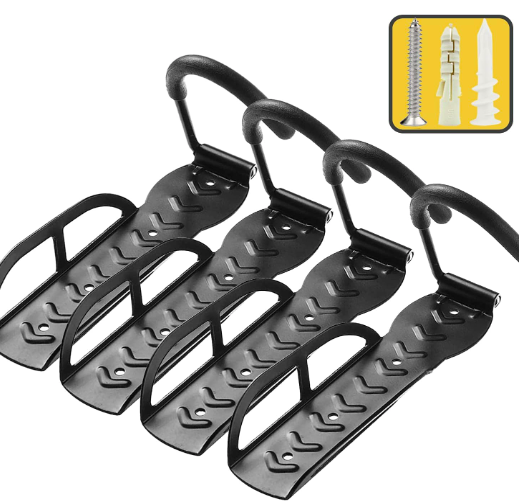
With just a little extra effort and slightly more money, you can get these Laxama vertical hooks that include a wall protecting plate and guard rail to help separate one bike from another. Includes screws and drywall plugs for an easy, hassle-free setup!

Gootus Horizontal Foldable Bike Rack ($23.99)

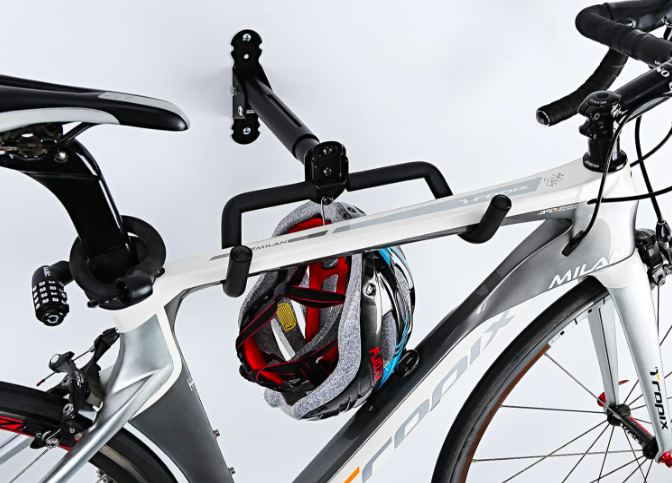
This rack takes us away from the vertical mounts and offers a horizontal option for those with the wall space. If you have a more expensive rider mixed in with kids bikes and other daily rigs, this can be a good option to separate the premium model and give it its own dedicated space!

Rad Cycle Bike Hoist ($20.29)

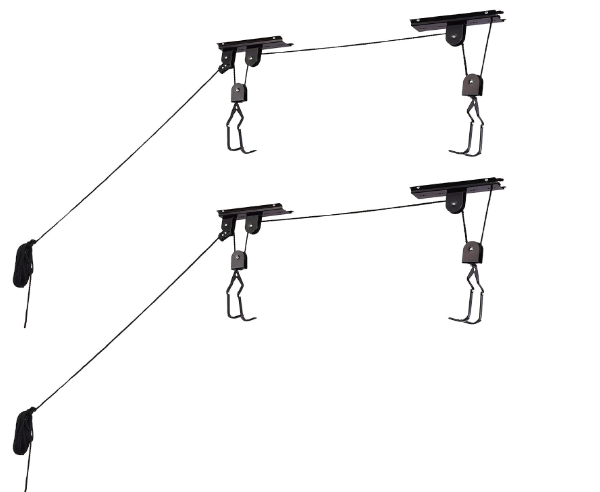
Now we’re getting fancy! While this overhead pulley system looks intimidating, it is actually well-reviewed for being easy to use and install. It exploits hard to use ceiling space and mounts the bikes overhead. Plus, it has the capacity to carry various other items like canoes and kayaks.

Do You Have Pain From Cycling?

Now that your bikes are hung up, let’s make sure they don’t stay there too long! Biking with an injury is one of the most discouraging things for anyone who loves to ride. That’s one of the reasons why we created Dynamic Cyclist – an online training platform used by thousands of cyclists worldwide. Try us out on a 7-day FREE trial by clicking here!


Gravel Bike Vs. Road Bike: Which One Is Better For You?

October 11, 2023 by Eric Lister

Have you ever wondered what the differences are between a gravel bike vs. road bike? While they’re more alike than different (they’re both bikes, after all), there are unique aspects to both that help them to thrive in their given environments and designed-for purposes. This article will give you the low down on which one might be the best option for you.

gravel bike vs road bike

(Credit: Adobe Stock)

Differences: Road Bike vs. Gravel Bike

Road bikes are primarily designed for speed and efficiency, while gravel bikes are more robust, and provide a convenient bridge between the road and mountain bike for riders who enjoy (or simply require) the versatility of both. While similar enough to be in a conversation together, they have unique differences that set them apart into their own categories.

Road Bikes

Road bikes are typically lighter in weight and less padded in material than gravel bikes. This is a result of their limited off-road capacity, with more emphasis on getting the rider from point A to point B as fast as possible. They’re designed to reduce wind and road resistance through aerodynamic features like a more aggressive riding profile, reduced wheelbase, and thinner tires.

5 Unique Characteristics of Road Bikes

  • Constructed of lightweight materials like carbon fiber, high-quality steel or aluminum
  • Thin, narrow, high-pressure tires that reduce road resistance; more speed with less effort
  • Drop handlebars to emphasize low-profile, aerodynamic riding positions
  • Engineered to be stiff in key areas to increase power transfer from the pedals
  • Typically have a horizontal top tube and shorter wheelbase to reduce wind drag
road bike

(Credit: Adobe Stock)

Gravel Bikes

Gravel bikes are built with a little more grit. They’re designed to handle the scrappier elements of an off-road trail without worrying too much about things like speed. They are still lightweight, but are often a little more robust to handle the shocks and vibrations of trail riding. A more upright riding posture and wider tires are other features that put these bikes into a separate class.

5 Unique Characteristics of Gravel Bikes

  • Frames that range in stiffness and are more durable than road bikes
  • Equipped with multiple mounting points for racks, bags, bottles, etc.
  • Wider tires for stability and traction on uneven and/or rough terrain
  • Lower bottom bracket which lowers the centre of gravity for more stability
  • Typically come with a wider range of gears to accommodate technical trails and hills
gravel bike

(Credit: Adobe Stock)

Which One Is Right For You?

The chief separator between these two classes of bikes is their function. Costs are similar across the different tiers of performance available on the market based on brand, component/material quality, etc. So it really comes down to what you’re going to use the bike for and where. Consider these three questions when making your decision.

  • What will you use the bike for immediately and in the future?
    • A gravel bike can survive on the road, but a road bike will have a hard time holding up on the trails. Any desire to be off-road might have you leaning more towards a gravel bike.
  • Are you focused on training for a cycling race or triathlon?
    • If your racing aspirations are serious, you need to start specializing in equipment at some point. A gravel bike simply won’t cut it when it comes to racing, and it won’t give you an honest representation of where you sit in the field.
  • What is your preferred riding style and comfort level?
    • Road bikes are designed for a more aggressive riding position, which can be uncomfortable. Gravel bikes often have a more relaxed and upright geometry, which can be more comfortable for full-day adventures or less competitive riding.

Road & Gravel Bike Accessories

No matter which one you decide to go with, you’re going to want to supe it up and make it your own! Convenience, style, protection…that’s what you’ll find with the hand selected accessories for both road and gravel bikes we have listed below. 

Road Bike Accessories

BV Bicycle Strap-On Saddle Bag

Benefits: Carry your phone, keys, and wallet without feeling bogged down. Attaches under your seat for easy to access and discreet convenience.

SY Bicycle Computer

Benefits: Have your speed and distance calculated automatically and in real time. Good for those who are taking their training seriously.

Gravel Bike Accessories

ROCKBROS Top Tube Bag

Benefits: Sturdy, waterproof bag that can handle everything you throw at it. Easy access to your valuables without even getting off your bike.

All Mountain Style High-Impact Frame Protection Kit

Benefits: When you invest in a nice bike, you want to protect it as best you can. This easy to apply frame kit is a cheap option that allows you to prolong the life of your frame.

The 6 Types of Mountain Bikes & How to Choose the Best One for You

September 19, 2023 by Eric Lister

Whether you’re an experienced trail enthusiast or a beginner looking to get started, choosing the right mountain bike is crucial. There are various types of mountain bikes, each designed to excel in specific terrains and riding styles. In this article, we’ll delve into the diverse world of mountain bikes, and help you make an informed decision about which one will best suit your needs.

(Credit: Adobe Stock)

What Makes A Mountain Bike Different?

Mountain bikes stand out in the world of cycling due to their unique design and purpose-built features, which distinguish them from other types of bikes. One key factor that sets mountain bikes apart is their robust and durable construction. These bikes are engineered to withstand the rugged and often unforgiving terrains encountered on off-road trails. 

Unlike road or city bikes, mountain bikes feature reinforced frames, heavy-duty components, and rugged tires that can handle rocky, muddy, or root-laden paths. This durability not only contributes to the bike’s longevity, but also promotes rider safety when navigating more technical and challenging landscapes.

Another defining characteristic of mountain bikes is their specialized suspension systems. Most mountain bikes are equipped with suspension forks in the front and, in some cases, rear suspension as well. These suspension systems absorb shock and impacts from uneven terrain, providing riders with greater control, comfort, and traction. 

Mountain bikes are purpose-built machines designed to conquer the diverse and demanding landscapes of off-road trails. They’re the preferred choice for adventurous cyclists seeking a thrilling and challenging riding experience. With that in mind, there are many types of mountain bikes available on the market today. Let’s take a look at which one might be right for you.

(Credit: Adobe Stock)

Types of Mountain Bikes

Cross-Country (XC) Bikes

Cross-country mountain bikes are designed for efficiency and speed on less technical terrain. They are characterized by their lightweight frames, narrow tires, and minimal suspension. XC bikes are perfect for long-distance rides, endurance races, and climbing steep hills. Riders who enjoy smooth trails and covering long distances at a fast pace often opt for cross-country bikes.

Best Accessory: Maxxis Tubeless Folding MTB Tire

Tubeless tires reduce the risk of flats and allow you to run lower tire pressures for better traction.

Trail Bikes

Trail bikes are one of the most versatile categories of mountain bikes. They strike a balance between climbing efficiency and descent capabilities. These bikes typically feature suspension travel ranging from 120mm to 150mm and are ideal for tackling a wide range of trails, from mild to moderately technical. Trail bikes are excellent if you’re looking for a well-rounded bike.

Best Accessory: Cascade Dropper Post

A dropper seatpost allows you to quickly lower your saddle’s height with the push of a button for smoother descents and improved maneuverability.

All-Mountain/Enduro Bikes

All-mountain (also known as enduro) bikes are designed for aggressive downhill riding while still offering efficient pedaling capabilities for climbing. Heavier suspension allows these bikes to handle rough, technical descents with ease. They often come with features like dropper posts and wider tires to provide stability and control on challenging terrain.

Best Accessory: Demon Podium Full Face Bike Helmet

A full-face helmet provides maximum protection for your head, face, and chin. It’s crucial for safety when riding aggressive trails.

Downhill Bikes

Downhill mountain bikes are built for one purpose: descending steep and technical trails at high speeds. These bikes have long-travel suspension (usually 200mm or more), robust frames, and massive brakes to provide maximum stability and control during descents. Due to their specialized nature, downhill bikes are not as suitable for riders with more versatile needs.

Best Accessory: Gute MTB Racing Full Body Armor

Comprehensive body armor should be combined with a full face helmet, gloves, and pads. It helps provide protection against high speed impacts and crashes.

Fat Bikes

Fat bikes are designed to conquer snow, sand, mud, and other more difficult terrains. They are recognized for their oversized tires (around 4+ inches) which provide exceptional traction and floatation. Fat bikes have minimal suspension and are often used for exploration and adventure riding as opposed to high performance jumping and climbing.

Best Accessory: MOHEGIA Studded Fat Tire Replacement

Studded fat bike tires are indispensable. They enhance grip on slippery surfaces, helping individuals to ride confidently in harsh and challenging conditions.

Electric Mountain Bikes (e-MTBs)

Electric mountain bikes, or e-MTBs, are gaining popularity due to their pedal-assist electric motors. These bikes come in various styles, including cross-country, trail, and enduro. E-MTBs provide an extra boost to the rider’s pedaling efforts, making it easier to conquer steep climbs and explore more terrain without as much physical exertion.

Best Accessory: QWW Electric Bike Lithium Ion Battery

Having a spare battery allows you to extend your ride without worrying about running out of power, and can be the difference when you get stuck in a sticky situation.

Become a Better Mountain Biker With Dynamic Cyclist

Now that you have a better idea of the equipment you need, let’s work on the most important piece of equipment you already have – your body! Dynamic Cyclist is our online training platform designed to help you ride pain-free and to the best of your abilities. Join thousands of cyclists worldwide by clicking here and starting a 7-day free trial!

What Is a Touring Bike Good For? 5 Benefits We Know You’ll Love

September 6, 2023 by Eric Lister

Deciding what kind of bike to invest in can be a tricky decision. Many get caught up in the bells and whistles of each year’s road and mountain models, as they are often the ones most prominently on display. But if adventure is your style, commute your objective, practicality your goal, and/or exploration your passion – you may want to consider getting a touring bike, instead. 

touring bike

(Credit: Adobe Stock)

What Is a Touring Bike?

Touring bikes are a specialized type of bicycle designed for long-distance travel and carrying heavy loads, making them ideal for extended journeys and bike touring adventures. These bikes are known for their durability, comfort, and load-carrying capacity. Several components set them apart when it comes to design and material when compared to other bike styles.

Design

Touring bikes have a unique design that has been engineered for comfort, durability, and function. Multiple mounting points allow riders to attach accessories like racks, mudguards, and panniers to make sure their rig is equipped for anything a trip might throw at them. That could be hauling home groceries from the store or bringing your gear along for a multi-day trip.

Wider tires help to accommodate varying terrain types, from paved to gravel and anything in between. This feature is commonly complimented by a bulkier braking system that can easily control the extra weight on the bike and its momentum, which can be harder for a lighter setup to slow down.

All of this is accentuated by a more upright and comfortable riding posture that reduces fatigue on the lower back and neck. Spending hours on a bicycle can be uncomfortable to say the least, but touring bikes generally keep the journey in mind, and sacrifice things like frame weight and wind resistance to prioritize comfort.

Design Highlights

  • Wide tires
  • Multiple mounting points
  • Powerful brakes
  • Durable Frame
  • Upright riding position

Material

The material with which touring bikes are constructed is typically a metal such as steel or aluminum alloy. This provides the benefit of being both durable and easily repairable. Especially when traveling long distances, you have to be prepared for hiccups and breakdowns with your equipment. The touring bike keeps this in mind, and is designed to take a beating.

A skilled welding or machine shop can often help repair your frame in the event that it starts to wear. We all know that cycling can result in falls and accidents, too, and less durable frames can be easily contorted by such events. Appreciation for the touring bike’s easily workable and widely available materials becomes noticeable when times get tough and resources are limited.

It should also be known that higher-end touring bikes are also available. These models are often constructed out of titanium, which is an exceptionally strong, lightweight, and rust-resistant metal. They’re a top choice for quality and longevity, but you will pay a higher price up front, with less repair options available down the road.

Material Highlights

  • Typically steel or aluminum alloy for weather/rust resistance and durability
  • Widely available and universal materials
  • Economical, low-cost
  • Easily repairable
  • Premium titanium options are also available on the market
touring bike

(Credit: Adobe Stock)

Top 5 Benefits of the Touring Bike

Now that we’ve given you a more global view of touring bikes in general, let’s nail down the top five benefits of having one of these rigs in your inventory.

1. Versatility

The ability of these bikes to ride on different types of terrain means your options are endless when it comes to travel. Whether you’re staying on main roads or taking detours through mountain trails, these bikes are up for the task. It’s ready to take you where your competition road bike can’t, at speeds that your mountain bike wouldn’t be able to compete with.

2. Comfortable Riding Position

Prolonged riding on the bike can wreak havoc on your hip flexors, neck, lower back, and knees. The touring bike has a less aggressive geometry, however, which allows for a more upright and comfortable riding posture. It’s designed with not hours, but days of riding in mind – giving up some speed to help prioritize comfort and minimize fatigue on your body.

3. Load-Carrying Capabilities

Carrying your gear has never been easier. With multiple mounting points for your rack, pannier, mudguards and more, there’s a place for everything from your tent and repair equipment to your food and clothing essentials. The longer wheelbase typically found on touring bikes helps evenly distribute the load while at the same time leaving enough room for an efficient pedal stroke.

4. Durable & Easily Fixable Materials

Commonly constructed of steel or aluminum alloy, touring bikes have strong, durable frames that can withstand the test of time. Designed to endure thousands of miles through varying terrain and inclement weather, you’re sure to be in good hands while out there on the road. Best of all, they’re easily fixable, and your local welder can likely help fix any major damage that occurs.

5. See the World on Two Wheels

touring bike

(Credit: Adobe Stock)

By far the biggest benefits of these bikes is what it allows you to do; see the world at ground level, powered by your own body, outside in the air immersed in every single second of it. A touring bike is a cheap ticket to the rest of the world – it just might take you a bit longer to get there! 

Prepare Your Body for Adventure

Looking to increase your strength, flexibility, and injury resistance as a cyclist? Join a community of thousands of bikers worldwide and train for pain-free riding with us at Dynamic Cyclist. We have a huge library of professionally designed, follow-along routines to get you started. Try us 7-days FREE by clicking here!

Cycling Through Life: How to Enjoy Family Biking

May 9, 2023 by Eric Lister

As cyclists, we are huge advocates for family biking as a way to improve the physical and mental health of children, adolescents, adults, and seniors. No matter your age or current level of fitness, cycling is a sport that is low-impact, accessible, and brings people together through the exploration of surroundings, breathing of fresh air, and enjoyment of physical exercise.

family biking

(Image credit: Adobe Stock)

With society still lingering in the fog of the COVID-19 pandemic, and a resultant 25% and 20% of youth, respectively, experiencing clinically elevated levels of depression and anxiety, we are all now more than ever overdue for some quality time together outside. Cycling provides a sense of adventure for everyone involved, and can indeed take you to places you’ve never been before.

Benefits of Family Biking

Aerobic exercise like cycling has been shown to have an incredibly positive effect on a child’s brain. From executive functions like planning, organizing, and memory to having improved concentration, a longer attention span, and better academic performance at school. The elusive elixir that calms our kids and keeps them occupied doesn’t have to be a phone, why not a bike?

For adults, regular cycling will contribute to weight loss, better modulation of stress levels, reduction in anxiety and depression, and so many more positive outcomes. We often use the excuse and blame poor health on the fact that we’re getting old, when the truth is more likely that we’ve just stopped doing the things that were keeping us healthy.

family biking

(Image credit: Adobe Stock)

Senior citizens are not exempt from the benefits of cycling. In fact, for older adults, cycling has been shown to improve inhibition (control of impulsive or automatic responses), keeping track of changes in the environment, cognitive processing speed, and engagement with the outdoors. All important parts of maintaining a high quality of life as we age.

Whether its parents and kids, grandparents and grandchildren, or any other mix of relatives, partners, or siblings, cycling is a generational sport that we can all enjoy, be a part of, and benefit from. Teaching kids to exercise early has prolonged effects throughout childhood, and cycling as a form of transportation has massive cost-saving and environmental benefits to society at large.

How to Start Biking as a Family

Getting everyone to go riding together can be challenging, especially if each person has a varying level of biking experience or different attitudes towards cycling. However, that shouldn’t discourage you from enjoying the benefits of family biking we’ve just talked about. Below are some helpful tips that will make it easier to integrate biking into your regular routine.

family biking

(Image credit: Adobe Stock)

Plan Your Gear

Safety is always the first thing you want to check off your list. Especially for the younger kids and beginner riders of all ages, getting a properly fitted helmet is key to mitigating the repercussions (and concussions) that can happen as a result of a fall. Gloves, knee pads, and elbow pads too are all great pieces of equipment that should be considered.

Plan Your Route

If you’re heading out as a group for the first time, try planning your ride in leisurely areas that are comfortable and spacious for people of all skill levels. Paved community paths, parks, or even laid-back trails are perfect for learning to safely explore the outdoors on a bicycle without the risk of traffic and crowded areas that can intimidate beginners and kids.

Pack Food & Supplies

It’s always good to be ready for falls, scrapes, cuts, flat tires, and other likely scenarios that are all just a part of cycling. Bring along some basic first-aid items like band-aids, as well as a tire patch kit and even a mini pump to get you through should somebody get a flat. Remember too to pack lots of water to stay hydrated and snacks in case someone starts to get tired or cranky!

Split Responsibilities

If you have people of varying skill, age, or fitness levels, it can sometimes be good to have one parent with one group and another parent with another group. This way you can travel and explore at different speeds or even along similar but different routes to keep everyone stimulated, challenged, and excited to be out riding together. Reconvene at a checkpoint for water and food!

Embrace the Opportunity

Being outside as a family is a great time to bond over each other’s interests, personalities, and the exploration of surroundings. Nature and exercise are healing powers that bring out emotions, foster ideas, and nurture relationships. When you’re out riding together, you’ll share an experience with so much more sustenance than just sitting around watching TV, embrace it!

Looking for Fun Workouts the Whole Family Can Do?

Get in shape as a family! To complement your newfound cycling adventures, why not exercise the whole body with the versatile programming we’ve created over at Dynamic Cyclist! We have hundreds of scalable workouts that anyone can do and benefit from. High-quality follow-along instructional routines. Try us out for 7-days FREE by clicking here!

How to Fix a Flat Bike Tire: Steps & Procedures

March 29, 2023 by Eric Lister

Seldom will you come across a more frustrating and annoying problem than the sudden deflation of your bicycle tire while out on a ride. A sure way to mitigate the stress of this inevitable situation is by familiarizing yourself with your bike and learning how to fix a flat all on your own. 

While it may be intimidating at first, a few practice run-throughs of the steps involved can make all the difference when you have to do it in an unfamiliar environment, perhaps tired from the journey, or even after a resultant spill or injury. 

A saying, attributed commonly to the Greek poet Archilochus, could be most appropriately referred to in our preparation:

“We don’t rise to the level of our expectations, we fall to the level of our training.”

So let us train properly! And learn one of the most fundamental skills any cyclist should know, one with the potential to get you home in any variety of sticky situations anytime out there on the road or trails.

fix a flat

(Image credit: Andrei/Adobe Stock)

Things to Carry With You

The following items should be carried with you so you’re prepared to fix a flat on your bicycle at any time in any place:

  • Spare inner tube (same size as your tire)
  • Patch repair kit
  • Tire levers
  • Pump

Once you have these items, the next step is learning where and how to use them. Here is how to fix a flat, step-by-step, using the tools above.

Step 1: Remove the Wheel

Depending on whether it is your front or rear wheel with the flat will vary this step a little bit. Regardless of which one, it will be easier to place the bike upside down resting on the saddle and handlebars so you don’t have to worry about balancing it while working.

Front Wheel

On modern bikes, the front wheel usually has a quick release lever that can simply be opened to free the front tire from the forks it sits in. It can also be helpful to release the brakes by looking for a caliper lever up near the top of the forks and opening it. This allows more room between the tire and the brake pads, making it easier to remove the tire.

Rear Wheel

A little more tricky, but easy to master with just a bit of practice. 

  1. Start by putting your gears to the smallest cog (gets the chain out of the way) 
  2. Then, as with the front wheel, open up the brake pads by using the release lever
  3. Many wheels today have a quick release axle system, if this is present on your bike, you’ll have to open the lever to release the wheel
  4. Pull the derailleur gently backwards to free the wheel
  5. Remove the wheel and be sure it is free from the chain

These processes can vary depending on your style of bike, so be sure to refer to specific instructions or follow-along videos, and practice the procedure(s) prior to going out on the road.

(Image credit: Novak/Adobe Stock)

Step 2: Deflate & Remove the Inner Tube

To do this, first deflate the tire by locating the valve. Depending on whether you have a Schrader or Presta valve, the instructions to do this are slightly different:

  • To deflate a Schrader valve, simply press the small pin in the center of the valve.
  • To deflate a Presta valve, unscrew the top cap on the valve and then press down.

It’s not necessary to completely deflate the tire, we just want to create separation and provide room to help remove the tube. 

This is where your tire levers will come in handy. Start directly opposite of your tire valve to avoid damaging the stem, and proceed to use the long end of one lever to pry the tire bead overtop of the rim. You can then anchor it to a spoke while you insert another lever two to three spokes down, and work the remainder of the tire out of the rim.

Pull the valve stem out of the rim, and remove the tube.

(Image credit: Maxky/Adobe Stock)

Step 3: Find the Problem

If you just plan to replace the tube with a new one, you can skip to step five, otherwise, we need to locate the problem so we can fix it. It may be obvious like a protruding object, or more minute like a pinhole rupture. Remove any visible insults to the tube, and if you can’t find where it’s leaking, you’ll have to do some more thorough investigation.

Two of the simplest methods to find the opening are as follows: Inflate the tube so it holds some shape, then cycle it slowly through water while looking for bubbles. You can also squeeze the tube gently as you rotate it near your ear, listening for any air that is escaping. Once you find the culprit, be sure to mark it so you don’t lose it while you prepare your patch.

(Image credit: Bulent/Adobe Stock)

Step 4: Patching

As mentioned in step three, determine whether it’s better to replace the old tube entirely. If there are multiple patches or the tube seems to be deteriorating because of age and frailty, more repairs may only further decrease its integrity. However, sometimes you don’t have a tube and don’t have a choice! Here’s how to patch your leaking one:

  1. Patch kits will often contain a small piece of sandpaper, use this to rough up the leaking area for better adhesion of the patch. 
  2. Apply the glue generously to the affected area, give it a moment to set.
  3. Place the patch firmly over the puncture, press down to help with adhesion.

(Image credit: Ole/Adobe Stock)

Step 5: Replace the Inner Tube

Inflate the tube to the point where it holds its shape but is still flexible and easy to maneuver, make sure it holds its air. Insert the valve stem into the valve hole on the rim. Starting from the valve, tuck the tube completely inside the tire all the way around. 

Once the tube is inside, begin tucking the tire bead back over the rim. Use your hands to work around the whole perimeter, you may need to use the tire levers for the last bit. Be sure not to snag the inner tube with levers or by pinching it against the rim throughout this step. After you have the tire together, inflate it to the appropriate pressure.

(Image credit: Tatonka/Adobe Stock)

Step 6: Reinstall the Wheel

For the front tire, simply set it back into the forks and securely tighten the quick release lever. If it’s the rear wheel:

  1. Position the top part of the chain over the smallest sprocket on the cassette. 
  2. Lower the wheel axle into the dropouts while moving the derailleur out of the way. 
  3. Securely tighten the quick release and close the brake caliper lever/reconnect the brakes if necessary.

It’s best to watch a video of this being done on your specific model of bike to get a better idea of how to do this part. 

Step 7: Final Checks & Go!

Go over all the parts that have been manipulated to ensure everything is snug and back where it’s supposed to be. Double check that your tire pressure is good, check that your brakes are working, and make sure all levers are closed and tucked away into their riding positions. After that, you’re ready to go!

(Image credit: Clement C/Adobe Stock)

Again, be sure to practice this procedure several times at home so you can build the confidence to do it when the situation occurs. Fixing a bicycle flat is one of the most essential skills for any cyclist, and you’re well on your way to knowing how to do it yourself! 

Thank you for taking the time to learn with us, and we wish you safe travels!

Everything You Need to Know About Bike Tire Valve Types & Which One to Choose

March 13, 2023 by Eric Lister

Replacing a tube, changing your tires, buying a pump…these are all routine tasks for any road cyclist or mountain biker. And if you’re new to cycling, working on your rig for the first time, trying out a new brand, or switching disciplines within the sport, you’re bound to be introduced at one point or another to the different types of bike tire valves.

Today’s article will teach you about the differences between the three most common types of bike tire valves. They’ve evolved over the years and each have their own benefits, drawbacks, and specific purposes.

Bike Tire Valve Types

Knowing what valve(s) you’re working with will help you be prepared for repairs, maintenance, and helping out a buddy midway through a troublesome ride. You’ll be able to identify each valve and ensure you have the proper equipment to tackle the job. Let’s jump in.

Schrader Valve

bike tire valve

Schrader valve. (Credit: todja/Adobe Stock)

The Schrader valve is the most common valve type, also known as the American valve, named after its inventor, August Schrader. It was designed in 1891 and patented in the United States in 1893.

It is a sturdy valve type found on almost all cars and motorcycles. It has a wider diameter and can hold higher air pressures than other valves, making it easy to fill up at gas stations and suitable for mountain bikes or other heavy-duty suspension systems. The Schrader valve has a spring-loaded pin that closes the valve when the pump is removed, ensuring a secure seal.

Schrader valves are common in agriculture, hospitals, firefighting, and a wide range of other industries. In cycling, apart from road bikes, the Schrader valve can be found on most kid’s bikes, cruisers, hybrids, and mountain bikes.

Presta Valve


Presta valve. (Credit: Narayan/Adobe Stock)

The Presta valve is a narrower and lighter valve type. It was invented by Frenchman Etienne Sclaverand, and was initially known as the Sclaverand valve. Today, it is also known as the French valve or a high-pressure valve. 

It is commonly found on road bikes and high-performance bikes, including some mountain bikes. It is designed for high-pressure tires and can hold up to 120 PSI. The Presta valve has a threaded stem that screws into the rim, creating an airtight seal. It also has a lock nut that secures the valve stem to prevent air from leaking.

The hole on a bike tire valve is usually the weakest point on the rim. But because the Presta valve has a smaller opening, it can maintain strength in the wheel and support the razor thin tires fitted onto top-of-the-line racing bikes.

Woods (Dunlop) Valve


Woods (Dunlop) valve. (Credit: rdnzl/Adobe Stock)

The Dunlop valve was originally invented by a Scottish inventor by the name of John Boyd Dunlop in the late 1800’s. It was however quickly improved upon by a man named C.H. Woods, who made it easier to inflate and maintain than the original. This is why the Dunlop valve is now often referred to as the Woods valve.

Originally, this valve type used a tight rubber sleeve to regulate airflow. This sleeve unfortunately would break down overtime and took substantial air pressure to be forced open when pumping. Modern Woods valves use an internal ball bearing or spring-loaded rubber plug that is easily unsaddled with pumping.

Woods valves are not often seen in North America, and are more common in Europe, across Asia, and developing countries around the world. Their durable stem and easy to perform maintenance make them popular where resources are more scarce.

Bike Tire Pumps & Valve Adapters

Knowing what valves you’re dealing with or may come across is one thing, the next step is ensuring you have the right equipment to service them if and when the time comes. 

Bike Tire Pumps

There are four main types of pumps that are commonly used in the sport of cycling, they are: 

  • Floor Pumps
  • Mini Pumps
  • Frame Pumps
  • CO2 Inflators

Each of these have their own unique advantages and disadvantages. 

Cyclist using a mini pump

Cyclist using a mini pump. (Credit: Odua Images/Adobe Stock)

Floor pumps are the most durable and one of the fastest ways to inflate your tires, but are often too large and cumbersome to carry while riding.

Mini pumps take longer to inflate your tires and can have some pressure limitations, but are small enough to carry in your jersey pocket or hydration pack. 

Frame pumps attach easily to your frame and come in different sizes that offer varying inflation speeds, however some don’t like having the extra hardware hanging off their bike.

CO2 inflators are compact and extremely efficient when it comes to inflating your tires. The biggest drawback is their limited use and disposability.

Depending on the brand and model, each of these pump types can be found to accommodate both Schrader and Presta valves, the two most common bike tire valve types. Some will come equipped to serve both, while others you may need to fit with a valve extender/reducer or adapter.

Bike Tire Valve Adapters

Bike tire valve adapters are small, but essential, components that allow you to use one type of valve with another. Especially if you ride with others, they’re good to have on hand should you or your partners need help on the side of the road.

Presta to Schrader Adapter

Converts a Presta valve to a Schrader valve, allowing you to inflate a tire with a Presta valve using only a Schrader pump.

Schrader to Presta Adapter

Ideal when using a Presta pump to inflate a tire with a Schrader valve.

Presta Valve Extender

Attach a small metal or plastic tube to a Presta valve with a Presta valve extender, lengthening the valve above the rim for easy access with a pump head.

Schrader Valve Extender

When a Schrader valve is too short to reach the pump head or buried deep in the rim, you can use this extender to enhance the valve beyond the rim’s surface.

Valve Reducers

For those with a Schrader pump and a tire with a smaller Presta valve, valve reducers can convert the Schrader pump head to fit the smaller valve diameter.


Left to right: Presta, Dunlop/Woods, Schrader.  (Credit: NilsZ/Adobe Stock)

Being prepared for those inevitable roadside flats starts with knowing what kind of tire you’re riding and how to service it. Having the right equipment and fittings on hand can turn a would-be-day-wrecker into a quick and simple fix! 

Understanding the different bike tire valve types will help you get to know your bike better, and make you more confident going out on long rides where the ability to be self-sufficient becomes ever more important. 

We hope this article has been helpful on your journey to better, stronger, pain (and headache) free cycling!

How To Lubricate Your Mountain Bike (A Step By Step Guide)

February 16, 2023 by Eric Lister

Mountain biking is an exciting and challenging outdoor activity that combines fitness, adventure, and nature in one. It’s a sport that requires a high level of skill, endurance, and physical strength, and is enjoyed by millions of people around the world. Whether you’re riding through challenging terrain, crossing streams, or soaring down steep descents, mountain biking is a sport that offers a unique and exciting experience.

However, with all the demands of the sport, it’s essential to maintain your mountain bike properly to ensure it lasts a long time and performs at its best. One of the most critical aspects of mountain bike maintenance is lubrication. By keeping your bike well-lubricated, you can reduce friction, prevent wear and tear, and ensure that all the components work properly.

Today we’re going to guide you through the steps on how to lubricate your mountain bike, including the benefits of lubrication and the difference between grease and lube. Whether you’re a seasoned mountain biker or just starting out, this article will help you keep your bike in top condition.

how to lubricate your mountain bike

Esther Pueyo/Adobe Stock

Lube Vs. Grease: Which is Better?

When it comes to lubricating your mountain bike, there are two main options: lube and grease. Both have their own benefits and disadvantages, and choosing the right one can be confusing.

Lube is a thin liquid that is applied to the bike’s components to reduce friction and prevent wear. It is specifically designed for bikes and is formulated to withstand the demands of cycling. Lube is easy to apply and spreads evenly over the surface, making it ideal for lubricating chains and other moving parts.

Grease, on the other hand, is a thicker substance that is designed to provide a long-lasting barrier between metal surfaces. It can be used for lubricating pivot points and other high-stress areas where erosion between heavy parts is likely to occur. Grease is also resistant to water, making it a good option for lubricating in wet conditions.

Both lube and grease have their own unique benefits, and are useful in different situations. By understanding the differences between the two, you can choose the best option for your mountain bike to help create an effortless and hassle-free riding experience.

Parts of a mountain bike (how to lubricate your mountain bike)

Parts of a mountain bike. Credit: www.schoolworkerhelper.net

Reference the above diagram as we now delve into the steps required to make sure your mountain bike stays lubricated, increasing the chances that it will perform at a high level for years to come!

1. Preparing the Bike for Lubrication: Cleaning

Before lubricating, it’s essential to clean the bike to remove any dirt, grime, or debris that may have accumulated on its parts. Use a degreaser to clean the chain, derailleurs, and cassette. A simple mixture of warm water and dish soap will do the trick for the rest of the bike. Make sure to dry the components thoroughly before moving on to the next step (water and lubricant don’t mix!).

2. Lubricating the Critical Component: The Chain

The chain is the most integral component to lubricate on your mountain bike. Apply a few drops of bike-specific lubricant to each link and work the chain back and forth to spread it evenly. Wipe off any excess lubricant to prevent attracting dirt and grime.

3. Smooth Shifting and Pedaling: Derailleurs and Cassette

The derailleurs and cassette can also benefit from a drop or two of lubricant. Apply the lubricant to the moving parts and pivot points, being careful not to get any lubricant on the brake rotors or rubber components where traction is necessary.

4. Reducing Friction at Pivot Points

Pivot points, such as the suspension pivots, can benefit from lubricant as well. These points see a lot of movement, so it’s essential to keep them transitioning smoothly to reduce friction and prolong the life of your bike.

5. Ensuring Optimal Operation: Lubricating Dry Spots

Check the rest of your bike for any dry spots that may need lubrication, such as the brake and shifter cables. Adding lubricant to these areas can contribute to the efficient and long-lasting use of your bicycle. 


Tim Foster/Unsplash

It’s recommended to lubricate your mountain bike every few rides, or at least once every three months, depending on the frequency and intensity of your use. In wet and muddy conditions, it’s a good idea to lubricate after each ride to prevent corrosion.

Lubricating your mountain bike is a simple and effective way to prolong its lifespan and get the most out of its performance capabilities. As part of a regular maintenance schedule, you can mitigate costly part repairs and service fees, and focus more on the sport you’ve invested in and grown to love.

How To Choose a SUV Bike Rack

January 26, 2023 by Guest Post

As cyclists, we love the sport. Apart from providing freedom, the simple two-wheel bicycle offers physical and mental health benefits such as relieving stress and maintaining a healthy weight. 

Cycling can be an expensive sport, and with bikes costing thousands of dollars, cyclists need to ensure their bikes are secure. Enter the SUV bike rack. Fortunately, these bike racks won’t break the bank like many other cycling accessories. Moreover, choosing the best bike rack for an SUV is critical not only to the safety of your bike but also to the size of the hole in your wallet.

So how exactly do you choose an SUV bike rack? And are there different types of bike racks for SUVs? You bet there are. When choosing the best SUV bike rack, you need to consider a few factors.

So without further adieu, let’s take a look at the different types of bike racks and some of the important factors to consider.

Man loading a SUV bike rack

Important Factors To Consider When Purchasing A SUV Bike Rack

Generally speaking, the two most frequently asked questions that pop up are how often and how far do you intend to travel with your bikes? Next up, you need to tackle the question of the type of bikes you have and how many bikes your SUV bike rack will have to carry.

Are these questions really necessary to answer? YES. Taking the time to answer these fundamental questions will not only save you money but a big headache later on.

Other factors to consider:

  • Does your bike have thru-axles?
  • Do you own heavy mountain bikes?
  • Do you own light road bikes?
  • Are they expensive bikes made from carbon?

As you’ll see, there are several types of bike racks for SUVs, so it’s essential to consider how you want to carry your valuable bikes. Do you prefer to carry them on an SUV bike roof rack or a no hitch bike rack for an SUV? 

One additional factor that many cyclists don’t consider is the simple fact that most bikes are entirely different in terms of weight, style, dimensions and price. Because of this, you need to do plenty of thorough research on the many SUV bike rack brands on the market. 

Simply put, you’ll probably want to invest in a quality SUV bike rack that doesn’t cost a third of one of your Pirelli P-Zeros. 

Types Of SUV Bike Racks 

Before we look at the best bike racks for SUVs, let’s look at the types of racks available. Each rack serves a different purpose, so it’s important to know which rack serves what purpose.

Roof Bike Racks

SUV roof racks are remarkably adaptable and offer some of the best safety for your pricey bikes. That being said, they tend to be a bit more costly than other SUV bike racks.

Hitch Bike Racks

As the name suggests, the hitch mount bike rack fits directly into your trailer hitch. These bike racks are pretty common among bike enthusiasts as they are generally cheaper and still provide a decent amount of safety compared to a no hitch bike rack for SUV’s.

Trunk Bike Racks

Trunk bike racks attach to the trunk of your car via a series of unsightly straps and hooks. These SUV bike racks are cheap but tend to move around during travel, damaging your bikes.

Truck-Bed Bike Racks

These types of bike racks are perfect for SUVs and are incredibly versatile. They are easy to install and can also carry boats, mini-bikes and ride-on mowers.

The Top Five Bikes Racks For SUVs

Saris Bike Rack

Price: $215.93

Boasting one of the lightest yet strongest frames, the Saris Bike rack utilizes an “arc design,” enabling bikes to be transported without hitting each other. Made in the USA, this bike rack is perfect for your SUV and can carry two bicycles. Amazingly this SUV bike rack suits 90% of the most popular cars on the market.

Things We Liked

  • Sleek and stylish design
  • Rust resistant
  • Lightweight 
  • Robust and durable

Things To Consider

  • Only comes in black

Young 2-Bike Rack Hitch Mount Platform Style

Price: $249.99

The Young 2 bike rack is safe and secure, comes with a 1-year warranty and can hold up to 200lbs. Not only does the Young 2 SUV bike rack use a tilt-back design, but it also folds away easily, saving you plenty of space. The padded hooks are an excellent feature that secures your bike without scratching it.

Things We Liked

  • One-year warranty
  • 200lbs carrying capacity
  • Tilt-back design
  • Folds away 

Things To Consider

  • Not the best-looking SUV bike rack; that said, it does a great job

KAC K2 2” Hitch Mounted Rack 2-Bike Platform Style Carrier

Price: $359.99

The KAC K2 is a platform-type, hitch-mounted SUV bike rack that allows you to transport  2 bikes. The KAC K2 simply attaches to your 2-inch trailer hitch for a secure ride. With a total carrying capacity of 120 lbs, it provides more than enough durability to give you peace of mind on the highway. 

Things We Liked

  • Limited lifetime warranty 
  • Tilt-action to access your trunk easily 
  • Easy-to-follow assembly instructions
  • Supports even the widest E-Bikes

Things To Consider

  • Slightly on the pricey side but well worth the money 

Thule EasyFold XT 2 Hitch Bike Rack

Price: $999.95

Undoubtedly the cream of the crop in the SUV bike rack category, the Thule EasyFold is the premium option for cyclists who want a safe and secure rack with all the bells and whistles. Thule is one of the industry’s most reputable brands and has built quality bike racks since 1962. 

With easy trunk access via a smart foot pedal and a fully foldable design, the Thule bike rack screams style while remaining functional. Best of all, it requires no tools to assemble.

Things We Liked

  • Reputable brand
  • Quality build materials
  • Rust resistant
  • Sleek design
  • Functional
  • No tools needed to assemble

Things To Consider

  • Price; but as they say, if you want the best, sometimes you’ve got to pay

ROCKBROS Suction Cup Bike Rack

Price: $238.18

The ROCKBROS Suction rack takes a unique approach when it comes to securing your bikes. As the name suggests, the rack uses suction cups and attaches easily to your roof. The cups are made of soft yet highly-durable rubber, so they won’t damage your car paint.

The ROCKBROS suction rack comes with an easy-to-install video that guides users through an easy 5-step installation process. All ROCKBROS bike racks come with a one-year guarantee. 

Things We Liked

  • Easy-to-install
  • Super lightweight
  • Sleek design
  • Affordable
  • Fits all types of vehicles

Things To Consider

  • Can be a bit fiddly

That’s A Wrap

So there you have it, everything you need to know before purchasing an SUV bike rack. Remember, several factors should be considered before you pull the trigger and spend your hard-earned cash. 

Factors such as: 

  • How often you’ll be using the bike rack?
  • What type of bikes do you own?
  • How many bikes do you have?
  • Do your bikes have thru-axels? And, of course,
  • Your budget

Take your time, explore all the bike rack options, and I’m sure you’ll find the right SUV bike rack for you and your beloved bikes.

Happy biking!!

What Is a Hybrid Bike? (A Beginners Guide)

January 18, 2023 by Eric Lister

You may be a road cyclist, mountain biker, non-participant or somebody just getting into the sport of cycling. But whoever you are, it’s not at all uncommon to have posed the question upon visiting your local sporting goods store, “What is a hybrid bike?”

You may have had the experience of being one of those poor souls entering into a bike shop for the first time. It is then that you were encountered by an enthusiastic young salesman asking what kind of rig you might be in the market for.

Road? 

Mountain? 

Commuter? 

Touring? 

City? 

Hybrid? 

It can be a bit overwhelming…

Hearing the word hybrid no doubt implies the combination of some such things…all of which you know absolutely nothing about!

Well, we’ve today endeavoured to mitigate this experience to the best of our ability, by teaching you a little bit about what this style of bicycle entails, its uses, and who it might be best suited for out there in the vast landscape of buying possibilities. We hope that by the end you’re able to approach the matter in a way that makes you a little more comfortable, especially for those out there getting into cycling for the first time.

Sales associate helps a woman pick out a bike at a bike shop.

torwaiphoto/Adobe Stock

What Does “Hybrid Bike” Mean?

Hybrids are basically a blend of the two major cycling disciplines, road biking and mountain biking. They are a composite that seeks to address some of the major components of both types of bike in one, so as to create a machine that is versatile enough to accommodate activity performed on the road and on the trails.

Some of these components include the following:

Handlebars –  Hybrids typically have flat handlebars, like those of a mountain bike, as opposed to dropped handlebars like you would see on a road bike. This contributes to a more upright riding position.

Tires – Modern hybrid bikes can be fitted with several sizes and types of tires that you’ll find on both road and mountain bikes. 26” used to be the standard, but it is now common to see 27.5” and 29” as well.

Suspension – Typically hybrid bikes are limited in suspension, and some don’t have any at all. It’s not uncommon though to see front suspension forks that offer some relief if you were to head out on some light-medium duty trails.

Gears – Some hybrid bikes have only one speed (and are aptly named “single speed bikes”). Others can have a wide range of gears, which is something you’ll want to pay attention to. Less gears means less variability in intensity, which for a beginner rider can be overwhelming.

The term hybrid bikes can mean a lot of things. In general, yes, it means the combination of a road and mountain bike in one. But depending on the brand, style, etc. that hybrid bike could lean more towards a road bike or more towards a mountain bike. Let’s look at the pros and cons of this bike category to better determine if it’s going to be the right choice for you.

Hybrid bike on a trail

MarekPhotoDesign/Adobe Stock

Pros of Hybrid Bikes

If you’re someone who is just getting into bike riding (or haven’t done it in a long time), a hybrid bike is a good way to start acclimatizing your body to the sport. The more specialized you get with a bike into a particular discipline, the more aggressive the positions you’re going to be in on the bike. Different parts of your body are going to be subject to more load and intensity, and it’s going to vary depending on the specialty of your machine. 

A hybrid bike keeps you in a more upright position, which lessens the load on your hands, wrists, shoulders and lower back. Your body needs time to adapt to spending time on the bicycle, and if you eventually decide to get into road cycling, for example, your body will appreciate the time it had to strengthen itself on a hybrid before dropping into a more loaded, aerodynamic position.

The cost of a hybrid bike is another excellent benefit, and is reflective of its more generalized nature. If you were looking for the tip of the spear in terms of performance, parts and quality…you wouldn’t be buying a hybrid bike. That’s not to say they aren’t well-built and dependable pieces of technology. But it is to say that they will only take you so far in any such direction…

…which takes us to the cons.

Cons of Hybrid Bikes

By far the biggest con of a hybrid bike is going to be its limited performance. If you start to become more serious about a particular type of biking, a hybrid bike is going to quickly fail you as soon as the demands exceed its capabilities. A hybrid bike rapidly becomes just a bad road or mountain bike as soon as you venture further into one discipline or the other.

If you want to become a competitive triathlete, you better be able to ride a road bike – fast – and maybe for hours on end. If you want to rip down gnarly mountain terrain – tackling tight turns, huge drops and acute changes in speed – you better be able to harness the unique feel and frame of a high-end mountain bike. A hybrid bike just won’t cut it either way.

This can also have a troubling psychological effect, particularly on people who are getting further and further into mountain biking (which is what hybrids are often marketed for). Not knowing the potential performance metrics of your bike can be catastrophic when trying out new terrain that is more difficult than you’re used to. These types of bikes have to be treated with caution, and the trails you’re on have to always be respected for their level of difficulty.

Is a Hybrid Bike Right for You?

Hybrid bikes are perfect for people who want to cycle recreationally and on different types of terrain. They’re great for commuting and weekend rides with the family. They allow you to get into the sport at perhaps a slightly lower price point, and at the same time experience all the diversity of the outdoors, which is a major part of what makes cycling so engaging and attractive to its participants.

They help your body mold to the bike without putting it into positions that can lead to injury. This helps prepare the body for more aggressive postures that might need to be sustained in things like road racing somewhere down the line. But being more upright and taking things slow is always a good approach. The hybrid bike allows for that.

As soon as you start to become more specialized, it’s time to start looking at more specialized bikes. Not only will a more specific rig be more functional, efficient and durable for the tasks it is designed to do – it will be safer and more dependable as well. 


vit/Adobe Stock

Become a Better Cyclist!

Dynamic Cyclist is a training platform for cyclists that offers interactive, follow-along videos and programming that addresses mobility, strength, injury prevention and more! No matter what type of bike you’re riding, it’s always good to make sure your body is in check, healthy and prepared for the demands you’re about to place on it. Sign up for a 7-day free trial HERE!

Next Page »
  • Facebook
  • Tumblr
  • Twitter

Latest Articles

JOIN Cycling: A New Training Platform for Cyclists

May 27, 2024 By Eric Lister

cold exposure

The Benefits of Cold Exposure for Cycling & Life

June 13, 2023 By Eric Lister

hill climb

The Ultimate Hill Climb Training Guide

May 31, 2023 By Eric Lister

shoulder pain cycling

How to Treat & Avoid Shoulder Pain While Cycling

April 12, 2023 By Eric Lister

psoas stretch

The Importance of the Psoas Stretch for Cyclists

April 6, 2023 By Eric Lister

cycling neck pain

The Ultimate Guide to Cycling Neck Pain: Causes and Solutions

March 21, 2023 By Eric Lister

Useful Info

  • Contact
  • Finally, A Global Cycling Club That Is Focused On Community And Love Of Cycling!
  • Privacy Policy
  • Share Your Story!
  • Terms And Conditions Of Use
  • Welcome to I Love Bicycling
  • What Happened When I Stretched Every Day For a Month

Recent Posts

  • JOIN Cycling: A New Training Platform for Cyclists
  • How to Hang Bikes in Your Garage: 4 Inexpensive Options
  • Gravel Bike Vs. Road Bike: Which One Is Better For You?
  • The 6 Types of Mountain Bikes & How to Choose the Best One for You
  • What Is a Touring Bike Good For? 5 Benefits We Know You’ll Love

Search I Love Bicycling

Connect with Us

  • Facebook
  • RSS
  • Tumblr
  • Twitter

Copyright © 2025 · Magazine Pro Theme on Genesis Framework · WordPress · Log in