• Training
    • Injury Prevention
    • Training Tips
  • How To
    • Bike Fit
    • Gear
  • Nutrition
    • Nutrition Tips
    • Weight Loss
  • Repair
  • Reviews
  • Stories
    • Funny Stories
    • Jokes
    • Quotes
    • Videos
    • Funny Videos

I Love Bicycling

I Love Bicycling is a website that is geared towards cycling for beginners with road cycling tips, training articles, nutrition tips, weight loss, how to’s and bike repair articles.

Training Tips

  • Injury Prevention
  • Training Camps

Cycling Uphill: Common Climbing Mistakes

April 17, 2020 by Sarah Lauzé

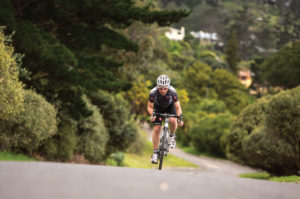
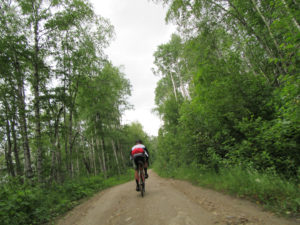
Love them or hate them, cycling uphill is an inevitable part of cycling (unless you somehow map out perfectly flat routes). So, when you’re sitting at the bottom of a daunting climb what is your go-to game plan? When you’re pushing your muscles to edge of their ability, you can only tell them to “shut up” so many times – no matter how tough you are they are going to win that conversation.

A common inner monologue when approaching a hill is to start telling yourself to “Attack the hill!” Although this mantra may be effective in keeping your mental toughness up, the overall technique doesn’t work. Here are some of the most common mistakes cyclists make on climbs, and how to hit those hills with confidence.
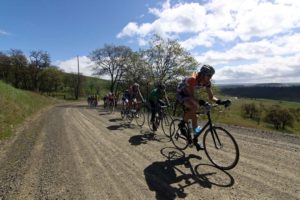
Pacing

Attacking the hill may work if it is small climb with the crest in view from the bottom. However, if you go in too aggressively, sure you’ll feel strong at the bottom, but once you hit a certain point it’s easy to hit a wall. You overexert your muscles and skyrocket your heart rate rather than pacing yourself for the long game. If you find yourself often slowing to a crawl halfway through a climb, think about gearing down earlier and keep those legs spinning. You will then have the energy to “attack the hill” when you reach the final push over the top.

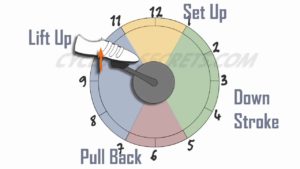
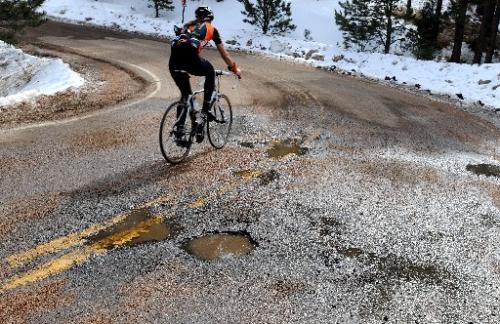
Using Too High A Gear

It may sound obvious, but many cyclists are guilty of heading into hills in a high gear because of that fresh leg feeling. As mentioned above, it may feel great at the start of the hill, but soon you’ll be grinding that gear and giving your all just to stay upright. Gear down before hitting the hill, keeping your legs spinning at 70 rpm or more. If you find your legs slowing down, gear down to keep your rpm in that range.

Stress and Improper Breathing

Not everyone is a natural climber, and looking up at a tough climb can be stressful mentally. If you find yourself gripping your handlebars with a vice grip, it’s a sign that you need to work on relaxing your body. Instead of wondering if you’re going to make it and letting the panic settle in, break the hill into segments in your mind. Starting easy, keep your body relaxed and breathing as deep and slow as possible.

As it starts to get tougher, think about engaging your core, flattening your back and powering each pedal stroke through your core. Pick a landmark up ahead and ‘real it in.’ Once you’ve reached it, pick another. Giving yourself these small victories can help keep you positive and focused, no matter what your legs are saying.

Standing Up

Standing up can cause you to blow up sooner as it puts more load on your legs resulting in an increased need in oxygen to be delivered. Contrarily, staying in the saddle keeps your heart rate down. Of course, if you are a lighter rider and have practiced standing and climbing, then there’s nothing wrong with using it as a time to stretch your legs and put down some extra power, just use it sparingly.

Under Fueling

If you’re approaching a tough climb, you want to be well-fueled. This doesn’t mean chowing down an energy bar right before hitting a hill, that will sit like a rock in your stomach. Instead, work on having a bite and some sips of water every 20 minutes or so on a ride with a lot of climbing. If you start feeling lightheaded and weak, this could be a sign that you haven’t fueled your body properly.

Not Riding Enough Hills!

You’re not going to get better at anything by wishing it into reality. Climbing is tough, and it’s never going to get easier, but the more you challenge yourself the stronger you’ll get. Half the battle is finding your rhythm with climbing. Once you do, you may find yourself even looking forward to the hills!

What Muscles Do You Use When Cycling?

April 15, 2020 by Josh Friedman

With cycling’s focus on aerobic capacity, metabolic capabilities, and ability to suffer, it can be easy to forget that all of these important aspects are what drive your muscles that power the bike. Boiled down, that is all pedaling a bike is – recruiting your body to produce energy to move muscles to move the bike forward. What muscles do you you use when cycling though? And in which part of the pedal stroke do you use each one? Read on and you’ll know.

what muscles do you use when cycling

What Muscles Do You Use When Cycling?

The short answer is a lot. Many of your leg muscles drive the pedals, but you also use core muscles to push those legs muscles off of and hold you semi-upright on the bike (for the sake of this article, hip flexors are part of your core). You use your arms in a supporting role. But mostly, it is your legs that do the work. The other muscles only need enough conditioning and strengthening to allow your legs to do their work without distraction. Do not be fooled; enough conditioning and strengthening for core and arms is more than just riding.

The Cyclist’s Main Attraction

Looking at a group of cyclists standing around, their most prominent feature is their calves – the gastrocnemius. They are chiseled and defined and often quite a bit larger than the average person’s calves. What role do they play in the pedal stroke and power production? The answer is that they only transmit the force of power produced in the quadraceps for most of pedal stroke.

In the dead spot of the pedal stroke, from six to nine o’clock, the calves provide a little force to get over the top of the pedal stroke. The front side of the lower leg, the tibialis anterior, for a moment becomes a star in that six to nine o’clock range when it is the only muscle working to get that leg over the dead spot.

The lower leg can be impressive in appearance, but in reality, it provides little of the force from a cyclist’s legs. The size and shape is not an indicator of a rider’s strength. At a given level, most of those factors are genetic. Calves will tell you nothing of a rider’s ability. No need to be intimidated by chiseled calves.

The Meat and Potatoes

Between the knees and the hips is the seat of a cyclist’s power. That seat of power is most productive on the down stroke of the pedal stroke – from twelve to six o’clock. This is when your knee is extending and larger muscles put their effort into the pedals. This is different from six to twelve o’clock, when smaller muscles bring the pedals back up and around, providing little else other than reloading the crank for another go-around.

The muscles that keep you moving (in order of power produced) are the quadraceps at the front of your thighs, gluteals in your behind and hamstrings at the backs of your thighs. The quadraceps and gluteals extend your knee from its most bent to about four o’clock. Once the pedals get there, hamstrings take of the bulk of the workload bringing your pedals back towards six o’clock.

Implications for Your Pedal Stroke

Lots of people say you should have a round pedal stroke. Knowing what you know now of the muscles involved, you know that it is impossible to produce even power throughout the pedal stroke from one leg. The muscles you recruit between six and twelve o’clock are not powerful enough to make an impact on overall force. Almost all of your forward motion on a bicycle comes from pressing down on the pedals.

This is different from having a smooth pedal stroke, which is probably what most people mean but have not articulated properly. Smoothly transitioning from each phase of the pedal stroke will avoid jerky motions and add to efficiency. Pro cyclists look like they have round pedal strokes, but that comes from smoothness and hours upon hours of perfecting muscle memory. Guaranteed they are producing far more power in the front end of their pedaling.

Follow the Pain

Now that you know what muscles you use when cycling, you can use that to understand proper seat height and use it to help diagnose knee pain. Hamstrings pull on the knee and quadraceps push on the knee. If the outside or back of your knee hurts, it could be the hamstrings pulling too much on your knee. Try lowering your saddle to lessen the strain on your hamstrings. If your knee hurts on the inside or front, your quadraceps are pushing on your knee too much. Try raising your saddle to lessen the strain on your quadraceps.

Change your seat height in small increments. Big changes pull other variables into the mix and are harder to get used to.

Muscles Make the Pedals Go Around

Having a well-rounded understanding of “what muscles do you use when cycling” can help you focus on a better pedal stroke, strengthen comparatively weak muscles and diagnose problems. A little foundational knowledge can make you a better cyclist because you know what your body is doing and how it makes your bike go. That’s why we’re excited to introduce Dynamic Cyclist, the program that offers daily stretching and strength training video routines designed specifically for cyclists. Created by industry professionals, these programs will take your cycling to the next level and help you reach your full potential. So, whether you’re a beginner or an experienced rider, Dynamic Cyclist has everything you need to improve your performance and keep riding for years to come. Experience the results for yourself, click here to try 7 days free.

10 Reasons to Start Early Morning Cycling Right Now!

April 11, 2020 by Sarah Lauzé

Picture this: open roads, golden light, just you and your bike conquering a climb or ripping down a descent. Sounds pretty great, right? Early morning rides may seem daunting, especially if you tend to wake up with a snarl on your face, head foggy, reaching for the nearest cup of coffee. Mornings may not come naturally to all of us, but there are a lot of things that make grinning and bearing the early morning alarm worth it. Here are just 10 reasons to start early morning cycling.

10 Reasons to Start Early Morning Cycling RIGHT NOW!

You’re a morning person.

If you are a shiny-eyed unicorn of a person that feels alive at 5am, then why aren’t you already doing this? If morning is your prime time, then get on your bike and make the most of it. It’ll be easier for you then it will be for the rest of us.

You’re NOT a morning person.

Seems counterintuitive, but here we are. Mornings may hit some of us like a brick to the head, but that’s actually a great reason to embrace the early morning ride. There’s no better way to make mornings suck less then doing what you love to do most: ride your bike. The first few weeks may be rough, but stick to a schedule and you may just find yourself starting to look forward to those early mornings.

Replace your coffee habit 

You’ve probably heard of magical endorphins. These little guys make us feel all sorts of great, and early morning workouts are known to get them going and give you that natural high (which is way better than coffee). Rather than relying on caffeine to do the trick, you will naturally get the blood pumping, waking you up and boosting your energy levels. Another bonus? You won’t experience the same crash that comes after caffeine, but you’ll find your mood and energy remain at higher levels for hours after your ride.

Quiet Roads

Less traffic means less stress out on your ride. The sense of isolation will allow you to enter a meditative state without the constant traffic noise or honking horns. You’ll also feel a lot safer with less cars on the road.

Cooler Temperatures

During the summer, riding in the heat can become almost unbearable. Early mornings are a great way to avoid the baking sun and heat stroke. Even if it’s still pretty warm, the sun will be less intense than it is later in the day.

Consistency

Over 90% of people that exercise consistently get it done in the morning. It makes sense, as it’s the one time of day that will remain largely untouched by other scheduled events and obligations (it’s not likely you’ll have a meeting scheduled for 5am). If you put it off until later, there’s a large chance it simply won’t happen.

Better Sleep

When you get out there and expose your body to those first few glimmers of morning sunshine, it can have an effect on your circadian rhythm (the internal cycle that governs sleep). Exercise combined with morning light can actually help you kick sleeping disorders such as insomnia. Getting up early will also help you reset your internal clock, making you more ready for sleep earlier at night.

Lose Weight

If you’re cycling to lose weight, the morning should be your time. Get out there before having breakfast, and you will have the added benefit of fasted cycling, which helps your body burn more of its fat stores. It also elevates your metabolism rate for the rest of the day, helping you continue to burn calories through the rest of the day. Keep in mind these should be shorter rides, as your body will not have the fuel for a long jaunt.

Sunrises are pretty

Sunsets are one thing, but sunrises are arguably more beautiful. Those first few rays of golden light are a sight to behold, and will do wonders for your mood for the rest of the day.

Set the tone for your day 

Have you ever noticed that if you start your day off with good decisions, those carry through into the rest of your day? We won’t go into the science, but making those first few disciplined decisions can make the rest of the decisions throughout your day easier. Getting your exercise done first thing can make eating healthy easier for the rest of the day, because the hardest part is already done. It’s a domino effect, and pretty soon you’ll feel like you can conquer just about anything!

Are you convinced to give it a try? Check out “How to get the best morning ride in” on how to plan for those first few early mornings!

How To Brake Efficiently on a Road Bike

April 10, 2020 by Sarah Lauzé

When you’re starting out cycling, the first thing you need to do is master the basics. You may watch pro riders that make everything look effortless, but unfortunately there’s a lot more to it than may meet the eye. Once you’ve got the basics down, then it’s time to start getting specific. Although your fitness level will remain your most powerful weapon, don’t underestimate the gains from focusing and developing aspects of your bike handling skills. Learning how to brake efficiently on a road bike can not only make you faster, but it will make you feel more comfortable and confident on your bike.

Brake Efficiently

How To Brake Efficiently on a Road Bike

Step 1: Beware of the Front Brake!

Tip: Don’t do this.

You’re front brake may be there to stop you, but your back brake is there to shave off speed. Roughly 70% of your stopping power comes from the front, which is why you never want to slam on just the front brake (pitching you over the handlebars). The best way to get the hang of how much to use each break is to go to a quiet section of road and practice. If you are skidding out, then you are putting too much pressure on the back brake. However, if you’re back wheel is lifting off the ground altogether, then you need to ease of that front brake.

Step 2: Get the Timing Right

When you’re wanting to come to a stop on your bike, you want to start slowing you speed by pulling the back brake. Look up at the spot you want to stop at rather than your front wheel. Slowly start to ease the front brake to further reduce your speed. Keep your shoulders relaxed and arms slightly bend, while focusing on that same stopping spot. Release the front break once you’re going slow enough and use the back brake to bring yourself to a complete stop.

Step 3: Master the Weight Shift

One of the most common beginner mistakes is distributing body weight incorrectly. This will not only effect your braking efficiency, but also your bike response and handling. If you’re on the drops, your center of gravity will be lower than if you’re on the hoods. The hoods feel safer, as you can brake harder with your weight shifting towards the rear of the back.

Being able to pedal through corners may be the most efficient, but it will also take some time and practice to master. You want to do all of you slowing down BEFORE the corner, and you should be able to to leave your brakes untouched through the corner. If you find yourself skidding, shift your weight as far back on the bike as you can.

Step 4: Adapt to the Road Conditions

If the roads are wet and slick, you’ll want to reduce the amount of pressure you put on the breaks. Your technique should be a lot softer then it is on dry roads, and you need to remain especially aware of obstacles. Road markings and manhole covers become very slippery, and you won’t be able to stop as quickly.

Step 5: Give Your Brakes a Little Love

Before heading out on a ride, make sure your brakes are clean, dry and well adjusted. If your brakes are too loose, and you have to squeeze the levers all the way to the handlebar to get any kind of stopping power, you’ll want to loosen your barrel adjusters a few turns. This actually tightens the brake cables and therefore tightens the brakes. If your brakes are so tight that they don’t let your wheels turn, then you can tighten the barrel adjusters back down and make some room.

Step 6: Practice, Practice, Practice

Mastering certain techniques will take time, and braking is no different. Find a quiet area or section of road that you can use to practice your braking technique. Start by building up speed, then stop yourself with the brakes. See how long it takes you to stop, and pay attention to the feedback from the tires. Are they skidding? Are you loosing grip? You will have to experiment to find what works best for you, and to get a feel for how your bike handles when braking.

Recovery for Cyclists: The Importance of Rest Days

April 7, 2020 by Sarah Lauzé

Exercise can be addictive, whether it’s training for a race or an outlet to clear your head. Once you get into a training schedule and it becomes a part of your everyday routine, it can be hard to take a day off. However, rest days are just as important as training days, and need to be part of recovery for cyclists.

You can come to crave the rush of feel-good endorphins that the brain releases during exercise. That combined with feeling the physical benefits of exercise can make you feel like a day off would be a step backwards, but that’s not the case. Giving your body time to recover will make you stronger in the long run, and overtraining does nothing but harm.

Why you need recovery days

When you’re training on a consistent basis, you actually put stress on your body and breakdown your muscles. Over time, and through combination of training and rest (periodization), your muscles are repaired to be stronger than before. This is when you begin to feel more fit and you can produce more power for longer on your bike.

Without adequate rest, you can experience burnout, a lack of energy, and decreased motivation. Scheduling rest days, and ensuring you take them, is equally as important as time on your bike.

How much is enough

How much rest needed will be different for everyone, so you have to learn what your body needs. A general rule is to ensure that at least one day a week is a rest day. However, this doesn’t mean you have to spend the day on the couch. All it means is you need to give your body time to recover and rebuild for the next week.

What you can do to aid your recovery

Fuel

No, this doesn’t mean carb loading. Of course you want to ensure you have enough carbohydrates to replace glycogen stores from training, but there’s more to it than that. Make sure you have protein to repair damaged muscles as well as fruits and vegetables to get a dose of vitamins and minerals. This isn’t just true of rest days, but recovery should start right after your rides with plenty of water and a recovery drink.

Stretch & Roll

Although it’s not typically a recovery technique, stretching and rolling your muscles on rest days is one of the most effective ways to prevent injury. Be sure to focus on the muscles that are shortened by the posture on a bike, like the hamstrings. For more information, check out the “10 Best Stretches for Cyclists.”

Sleep

Sleep is important for even the most basic functions of the body. It’s also the prime time to undergo protein synthesis, which is the process that makes your muscles stronger. Eight hours is widely recognized as the magic number, but if get a little more it won’t be a bad thing. If you simply can’t get eight hours at once, then a nap is a great way to make up for lost time.

Active Recovery

As mentioned previously rest days don’t have to be days spent on the couch. In fact, active recovery can be a great way to get the mental release you need, while not taking a toll on your body. A walk, swim, or other easy activity will get your body moving and your muscles loosened up, but won’t be too strenuous on your tired muscles.

There can be recovery rides as well, but you have to be disciplined not to push yourself too hard or go for too long. You should remain in zone 1 or 2 for the duration of the ride, and focus on just spinning your legs.

When you’re on a training schedule, it can be discouraging to miss a few days when life gets crazy, or you get sick. Let’s just say right now, it’s going to happen. Life gets chaotic, and when it does, just make the most of the recovery time, both physically and mentally.

Balance Your Training With A Stretching & Mobility Program

Are you tired of suffering from pain and discomfort while cycling? Look no further than Dynamic Cyclist This comprehensive resource addresses the most common muscle imbalances and adaptive muscle shortening that lead to pain and reduced performance on the bike. With just 15 minutes a day, you can follow along with the video programs to alleviate tension and improve posture, so you can ride pain free and reach your full potential on the bike. Don’t let muscle imbalances hold you back – click here to try 7 days free! 

Why Strength Training is Important for Cyclists

April 5, 2020 by Sarah Lauzé

You may think strength training is meant for bodybuilders and gym buffs, but it is now almost universally accepted as a vital training component for all athletes. Not only that, but as we age, resistance training becomes increasingly important for overall health and quality of life. So why do so many cyclists avoid it? It may be the thought of spending time at the gym when you could be out on your bike. Here’s why strength training for cyclists is important.


Why Strength Training is Important for Cyclists

We all know that leading an active life is the best thing you can do for your long-term health. As cyclists, we may be more active than most, but it is a mistake to just focus on cardiovascular exercise and exclude everything else. Cycling is a low impact activity, which means it’s great for your joints, but not so great for supporting your bone density and postural deficits. Strength training can help fill the gaps left by pure cardio exercise and build stronger bones, improve coordination, prevent injury, and give you more power on the bike.

Retain Muscle Mass & Correct Imbalances

Depending on where you live, you may have to take a few months off cycling during the dead of winter. Whether you take your training indoors or not, this is a great time to incorporate a strength training circuit into your routine. You don’t have to lose the muscle mass you’ve working so hard for over the cycling season, and you can work opposing muscle groups to bring muscle balance. Cycling is a repetitive motion, often overdeveloping the quads and glutes while the hamstrings and hip flexors lag behind. A good strength training program will take this into account and work on creating muscle balance.

Enhance Balance & Coordination

There is no doubt that cycling itself requires coordination and balance, but through the years it can become so second nature that it no longer challenges our intramuscular systems. Strength training with things like free weights, bosu balls, and resistance bands can help improve your balance and coordination. Again, this is particularly important as we age as it keeps the connections within the nervous system strong.

Improve Bone Density

As mentioned previously, this one is especially important for cyclists. Past studies have shown that the bone density of some competitive riders is lower than their sedentary controls. Unlike running or walking, cycling is a non-weight bearing activity, which is why it is so great for people with orthopedic injuries. However, this means you have to be doing something else, like strength training, to maintain healthy bone density and combat things like osteoporosis.

More Power on the Bike

Who doesn’t want more power on the bike? This is a bit of a no brainer, as the stronger your muscles are, the more power you’ll be able to exert within the cycling motion. It can be a difficult thing to develop on your bike, so using strength training is actually one of the best ways to become a stronger climber and overall rider.

Injury Prevention

Some of the most common injuries for cyclists include ITB syndrome, neck pain, low back pain, and knee pain. Some of these may be unavoidable, but most are caused by muscle imbalances. A combination of strength training and routine stretching can  strengthen your muscles and connective tissues to help prevent these injuries.

Although strength training my not make your faster in a direct sense, there are plenty of reasons to get into a strength training plan, whether it be in a gym or your living room. Check out “4 Of The Best Strength Training Exercises for Cyclists” for some exercises to get you started.

Riding Alone: Make the Most of Cycling Solo

April 3, 2020 by Sarah Lauzé

With half of humanity now on some sort of lock down, social isolation and otherwise, more and more of us are riding alone. Of course, we’re lucky to live in an area where we can still ride at all, but for those more social types, taking to the roads solo can seem daunting.

Once you get used to the thought, riding alone can actually be a great chance to get in touch with with where you’re at with your cycling fitness. Although riding with a partner or group is a great way to push yourself, often you’ll end up taking more breaks and sticking to the same routes that everyone knows and is comfortable with. Take this opportunity to try out some new routes, work on your mental toughness and focus, and just let your mind wander as you ride.

Make the Most of Cycling Solo

Be Prepared

You should always be properly prepared for a ride, but even more so when going alone. Check the weather forecast ahead of time, and especially with spring weather, ensure you have proper layers in case of rain. Make sure your phone is fully charged, and carry a battery pack if you’re going for a long ride. If there’s a chance of heading home at dusk, ensure you have proper reflective gear and lights for your bike. Always carry ID and some cash just in case, and take plenty of water and snacks!

Plan Your Route – but stay flexible

Having a rough estimate of where you’re going is always the best plan, and letting someone know the area you’re going. That being said, riding alone can be a great chance to explore a new area, adapt to the weather or change course depending on how you’re feeling. So feel free to check out some new roads, just make sure you let someone know whereabouts your going, or if your plans change on the fly.

Make Sure Your Bike Is Ready

A well packed saddle bag, and the knowledge on how to use those tools, can be the difference between a slight hiccup on your ride, and having to phone for a ride. If you usually rely on your riding partners for help with a flat tire, now might be the time to learn. Practice changing out a tube at home until you are confident you could do it on the road.

Make the Most of It

I know I’m not alone in finding solo exercise, especially cycling, somewhat therapeutic. You can let your mind wander, you don’t have to worry about keeping pace or making group decision. I quite often find I even talk to myself, working through problems, coming up with creative solutions, I am my most inspired while on my own on the road. So, don’t let the idea of solo riding keep you inside, get out on your bike and you may just find you like it more than you think.

6 Ways to Boost Your Spring Training

March 28, 2020 by Sarah Lauzé

Cycling season can seem a long way off when you’re in the depths of winter, making it easy to postpone those goals. If you’re not emerging from winter in as good of shape as you may of hoped, don’t let it discourage you. What you do or don’t do at the beginning of the season will set the tone for the rest of the year. Here are some of the best ways to boost your spring training.

Spring Training

Stay Healthy

The last thing you want is to come down with a cold just as the sun is emerging and the roads are clearing. However, as frustrating as it is, the end of winter is quite often when people get colds or coughs. Take preventative measures by washing your hands frequently, and giving your diet an extra boost of nutrients. Don’t go too hard too soon, as you’ll deplete your immune system and make yourself vulnerable to whatever illness is going around the office.

You also want to avoid injury in the beginning of the season, as it can really set you back in your training. This means avoding overuse injuries, as well as watching for rough spring road conditions.

Clean up your diet

The days of Netflix and comfort food are coming to an end, so it’s time to clean up your diet. Over the winter it’s easy to fall into some bad habits, but now is the time to break them. Trade in the sugary carbohydrate dense foods for fresh fruit and vegetables. Simply cutting out as much of the processed food from your diet as you can will go a long way. Give meal prepping a try, or stock your kitchen with some energizing foods.

Get your bike ready

No judgements here, we know it’s tough to be diligent to clean your bike after winter rides. It’s cold, wet, and all out you want is a warm bath. Even if you didn’t ride over the winter, your bike will still need a little TLC. If you trust your abilities, carefully examine your bike and fix any issues well ahead of your first ride. Check your chain, cassette, cables or any other areas that might need attention. You don’t want to be doing a rushed job before meeting your cycling buddies. Better yet, take it to your local bike shop and have a mechanic do a tune up to ensure you’re ready for the season.

Get your body ready

Once you’re finally back on your bike, it can be easy to overdo it. You want to be fit right away, or start off right where you left off in the fall, but you have to ease your body into it. Take some time to build up your base before pushing yourself too hard. If you start to get nagging frontal knee pain, it’s almost always caused be too much too soon. Take time to rest up and do plenty of stretching and walking before heading out on the bike again.

Start Stretching

Hopping on the bike after a long winter feels great, but it can also come as a shock to your body. Your muscles and joints aren’t used to the cycling position anymore, and things may have tightened up over the past months. Taking just 10 minutes a day to do some targeted stretched will have you feeling more comfortable and stronger on your bike in no time. Here are 10 of the best stretches for cyclists to get you started.

Set Some Goals

When it comes to cycling, what do you want from yourself this year? Make a list of things, both large and small, that you want to achieve. Then go through and get specific. If you want to ride more, great, now define what that looks like. Be realistic and honest with yourself, and only plan for what you know you can logistically fit into your life and schedule. Sign up for your first race, or join a cycling group, whatever you need to do to break out of your comfort zone and challenge yourself!

Everything You Need To Know When Riding Gravel

March 26, 2020 by Adam Farabaugh

Riding gravel can be one of the best ways to have fun on the bike. It can also be one of the worst experiences on the bike if you don’t know how to ride a dirt or gravel road with grace. Riding down a paved road is relatively simple and straight forward whereas riding a gravel road requires a bit of preparation and know-how. Some stuff is common sense, like riding the smoothest line on the road, but is not always employed in the heat of the moment for one reason or another. We give you the tools you need below to not only have the skills to successfully ride a gravel road but to ride them excellently and seek them out every chance you get.

riding gravel

Equipment Setup for Riding Gravel

You could go down a mountain bike trail on a road bike but just because you can doesn’t mean you should. If you know ahead of time that you are going to be hitting a gravel road or twenty there are few things you should do prior to leaving home. One large consideration also is what the condition of the road is in. Is it going to be a farm country road that ranges from hard packed dirt to small, loose gravel? Or is it more of a jeep road that will be full of large rocks and other obstacles? For the former, a standard road bike will do but as you approach the later, a full cyclocross bike or gravel bike is a necessity.

Being Prepared For Flats

Regardless of the condition of the dirt road you must be prepared to flat. The best preventative is riding tubeless where there’s no risk of pinch flatting and the sealant inside the tire quickly fills any small punctures. And then if you flat you simply install a traditional tube. If you are running a tube, make sure you put an extra five or so psi in the tire to help prevent pinch flats. This will make your ride a bit more rough; another advantage to tubeless as you can run a lower, more comfortable pressure. With riding gravel you should also bring two tubes as well as a patch kit. If you are really going to be out there you can even strap an extra tire onto your saddlebag.

Securing Your Bottlesriding gravel

One thing that is not often thought about when riding gravel is that it is much more likely for your water bottles to eject from your cages. If you haven’t planned ahead, take a big swig out of both bottles so they are not full as well as leaving the pop-up top open. This will cause the bottle to become slightly less rigid and have a lower chance of flying out. If you plan on riding dirt on a regular basis, invest in a few water bottles that are softer and easier to squeeze. The cheap, hard bottles are easily ejected. If you have standard metal cages you should bend them in slightly. You will have to pull a bit harder to get the bottle out when you want a drink but it will keep your bottles firmly secure.

If you have carbon or composite cages there are a few different approaches. The first is to wrap a few layers of electrical tape around the tab of the cage that juts out into the indent of the bottle. Once you have a few layers, twist the roll of tape so the sticky side is out and keep wrapping for the last outer layer. The stickyness along with the increased depth will help secure your bottles. The second approach is to get grip tape much like you would find for a skateboard. Place this on the inside contact points of the bottle cage.

Lubing Your Chain

Depending on the road chances are good that dirt is going to fly up and get on your chain. Using a stickier wet lube will cause the dirt to stick to your chain and thus take it’s toll on your drive train. Use a lighter lube and make sure you wipe the chain clean after applying.

Hand Position And How To Absorb the Bumps

There are three main hand positions on standard road or cyclocross bars. They are the hoods, the drops, and the tops (the flat part of the bars closer to the stem). Each one is ideal for different scenarios. In each position you should be holding the bars tight enough for them not to bounce out of your hands but not so tight that your clenching. You want your body to be loose and absorb the bumps as you ride. One of the largest mistakes for new gravel riders is riding too rigidly. This is often because they are nervous and scared of crashing. The bike should be bouncing around underneath you while your body stays relatively stable with your arms and legs doing the majority of the shock absorbing. Although it’s on cobbles the premise is the same in the video below. You can see just how bumpy it is with their arms shaking.

The Tops

The tops are great for straight, flat roads as you can sit more upright and can easily absorb all the bumps. The tops are also great for going uphill as long as it’s not too steep.

The Hoods

The hoods are good where the tops are but when you might need to brake more quickly whether for curves or other riders. The hoods are also good for when you have to get out of the saddle as well as for going down relatively mellow descents.

The Drops

The drops should only really be used on dirt when you are going super fast on a flat section or down a descent. This position gives you the best access to braking quickly and forcefully as well as positions you to handle whatever a descent throws at you be it corners, rocks to bunny hop, or potholes to absorb.

The Physics of Gravel

The physics of gravel you might ask? Yeah. The key characteristic of a gravel road is that it is essentially a surface on top of a surface. The interaction with your tire to the top loose surface and how it adheres to the surface beneath it is what makes it different and challenging. Say you were to have a small rock on a table in front of you. If you push straight down on it with one finger, it’s not going to go anywhere. If you push down from an angle, any angle, front, back, the sides, it’s going to slide across the table. The same premise applies with your tires contacting the loose gravel surface. This means you always want to keep your bike as upright as possible.

Riding Through Corners

So now that you know why you would slide out in a gravel corner if you approached it the same way you did on a paved road, you need to know what that alternative approach is aside from just not leaning your bike. First you want to steer your bike through the gravel corner, not lean it through. This means keeping it upright but still keeping some extra weight on that outside pedal. You will want to equally balance your weight between your front and rear tire as if you over weight the front tire, like you do on a paved surface, it will likely slide out. You have to finesse the bike through the corner. As you get better and better both of your wheels will be sliding slightly laterally but this is just that first surface sliding over the underlying. You kept the bike upright and under you so it doesn’t slide out from underneath you.

Additionally when riding gravel, choosing the best line through the corner is key. This is a combination of starting wide, cutting to the apex, and finishing wide making a graceful arc along with seeing where the most stable surface resides. This will depend on the road but a lot of the time it is in the vehicle tire tracks as the loose rocks are kicked up out of it. You may have to just stay in the tire track through the turn or if you’re good, you can straighten it out on the loose parts and then cut tighter on the more stable parts to hit the apex.

riding gravel

Riding Up Steep Climbs

Going uphill on dirt can be challenging for a number of reasons. The first is that simply, it’s hard. The rough road slows you down so you have to overcome that as well as gravity. As the climb steepens, particularly on looser surfaces, your rear wheel will begin to spin out. This will happen even easier if you try and get out of the saddle. The trick here is to keep your rear wheel weighted by staying in the saddle and even sliding back on it slightly if you can’t get grip. If you are on a super steep gravel climb and have to get out of the saddle, the only way to do it is to drive the rear wheel into the ground almost like you’re trying to ride a wheelie. Even then your wheel still may slip out so it’s best just to stay seated and grind it out.

Riding Descents

Aside from going through corners, described above, there are a few other elements descending on gravel throws at you. The first and probably most important, is that you can’t stop as quick. This means that you have to approach corners with a bit less speed as you would on a paved road. Also, on descents you are going to be bounced around a bit more simply because you are hitting that many more rocks and bumps per second. You will float over more of them but your bike will bounce underneath you at a higher frequency. It’s important that you stay in the drops as you are least likely to have the bars bounced out of your hands here. You also can brake as needed. Also, when going downhill, especially on rougher roads, take your butt slightly off the saddle. This will allow the rear wheel to bounce up over a rock as it hits instead of forcing the tire to absorb the impact, which has a much higher likelihood of causing a flat.

Riding Muddy Roads

Muddy roads can be a ton of fun to ride. It’s like you’re a little kid again out getting dirty in the rain. They do have to be approached with more caution however as on top of the gravel already being a loose surface, the moisture can make them even more slick. Additionally, when descending, your rims are going to be covered in mud so it will take a bit longer for your brakes to engage and when they do, expect a longer stopping time.

Riding With Others on Gravel Roadsriding gravel

Riding with others on gravel roads can be a lot of fun but it means you not only have to watch out for yourself but everyone else too. When riding through corners or down descents, leave a little bit of extra space just in case they crash. You don’t want to be plowing into the back of them. It will depend on the road but sometimes you will be looking for a wheel to follow out of the wind. Dirt will likely fly up into your face especially if it’s wet. You will want a good pair of sunglasses to keep debris out of your eyes. Additionally, you can ride slightly to the left or right of the wheel in front of you and can cock your head a bit further to get even more out of the debris spray. Doing this also is advised when riding on someones wheel so you can see what’s coming up. You never know when there’s going to be a pothole or rock that comes up.

Finding the Good Line

It will depend on the road but normally there is one or a few good lines compared to the rest of the road. This is part of the fun of riding gravel because it’s not just ride straight ahead. Sometimes the tire track on the right will be the smoothest, sometimes it will be the center of the road, while yet other times it will be closer to the ditch. Don’t be afraid to change lines but when doing so, ride lightly over the rougher parts to avoid flatting or sliding out. And also if riding with others, make sure no one is to the side or just behind you that you will take out.

Keeping It Safe

Riding gravel roads can be a lot of fun but at the same time they can also be more dangerous. There’s an increased risk of crashing, especially when descending. Keep your speed within you skill set and as you get better and more comfortable, you can ride faster and faster. Seek out the gravel roads in your area and even take a weekend trip to someplace that has exceptional gravel roads. And if you’re up for it, check out a gravel event. There are more and more of them popping up all over the country and world.

How To Tackle Tough Road Conditions and Start Spring Cycling

March 12, 2020 by Sarah Lauzé

If you live somewhere snow has plagued the roads for the past eternity (months), then you may be getting excited to get out for some spring rides. There’s nothing better then hopping on your bike and making the most of the longer, brighter, warmer days. However, road conditions are a huge problem with spring cycling.

During the winter, a ton of grit and salt gets dumped on roads to keep them grippy and snow-free. Come spring time, all of that stuff ends up in one place – the shoulder where you want to ride. Spring is also pothole season, as water seeps into cracks in the road and freezes overnight, threatening to open up holes the size of the Grand Canyon on your favourite roads. There are a few easy things you can do to beat these obstacles, and stay safe during the spring cycling season.

Spring Cycling

Making the Most of Spring Cycling

Avoid Flats with Tough Tires

Nobody likes to change a flat tire, and the side of a road in a spring downpour is about the worst time to have to do it. It doesn’t help that this time of year seems to produce an abnormal number of frustrating flats. The culprit? Road grit. As it builds up on the side of the road, it collects all the little bits of stuff that would normally get blown off into the ditch – pieces of glass, metal shards, nails, etc. Normal, lightweight road tires get torn up in these conditions.

To keep you riding, a durable, puncture-resistant tire is essential. These tires have Kevlar fabric, or something like it integrated into the casing of the tire to strengthen it. Most major tire manufacturers offer at least one model like this. They won’t be the lightest, or the smoothest rolling tires, but they will take a beating. Check out Continental Gatorskins for a nice balance of performance and protection. The same company also makes even more durable (and heavier) tires – the GatorHardShell and the Grand Prix 4-Season. Other options include the Specialized Armadillo and Schwalbe Marathon Plus.

Look Out for Potholes

Weaving your way through the obstacle course that some spring roads tend to turn into can be a daunting task, but there are a couple of tricks that will help you out. The simplest is to look where you want to go, rather than looking at all the things you want to avoid. If you have ever managed to hit the only rock or hole on a nice smooth stretch of road, it’s probably because you were staring straight at it. Look ahead, pick your path through the debris, and then follow that path with your eyes. Your body will guide your bike there without you having to think about it.

As skillful a bike slalomer as you might be, occasionally there will be times that you can’t go around something. Maybe you are on a shoulder with cars to your right, or you might be in a group with other riders. Whatever the situation, you need to take alternative action. Enter the bunny hop. If you haven’t heard the term before, the general idea is to ‘jump’ your bike with both wheels leave the ground for an instant. This isn’t something that you want to try out for the first time at 25 mph on pavement, so find a grass field to practice on. Make sure you have mastered the movement before trying it on out on the road, especially when adding speed to the equation. Thankfully, with clipless pedals, the task is considerably easier. There are countless YouTube tutorials out there, but in short, you are going to ‘hop off’ your pedals (not literally, since your feet are clipped in) and then bring the bike up along with you.

Wear Layers

Spring can be a time of quick weather changes, so while you may head out on a ride in the sunshine, it’s always a good idea to be prepared for rain and wind. As far as clothing goes, that means layers, layers, and more layers. You want a warm base layer as well as a waterproof shell, gloves, and even waterproof pants if necessary.

Embrace the Fender

Grit and water aren’t much fun to ride through, and they are even less fun when it’s spraying up into your face as you’re riding. For this reason, fenders are your best friend for spring riding. They keep you (relatively) dry, grit-free as well as keeping all that same junk from getting into your drivetrain. This can reduce maintenance and keep your bike running smoothly. The type of bike you have will determine what your fender options are. For full-fledged race bikes, choices are limited since attachment points and tire clearance are minimal. In this case, the SKS Race Blade fender is one of the best options.

With lower-end road bikes, touring and commuter bikes you have many more options. Some people like clip-on fenders, since you can take them off at the end of the season to keep your bike looking slick. The downside to these are they won’t offer the same coverage and performance as a dedicated bolt-on fender set. Whatever you choose, it will be much better than going without fenders!

Clean Your Bike

Although fenders can help a ton to keep some of the dirt and grime off you and your bike, you should still give your bike a quick clean after every spring ride. It’s inevitable that it will cause wear and tear to your bike, which is why many cyclists have spring specific “beater” bikes, but this isn’t always an option. Check out this quick guide to a bike cleaning to keep your bike running smoothly.

Ensuring you are prepared both technically and mentally will have you jumping into the cycling season in no time. Spring riding can be some of the best rides, so don’t let the conditions deter you from getting out there!

« Previous Page
Next Page »
  • Facebook
  • Tumblr
  • Twitter

Latest Articles

JOIN Cycling: A New Training Platform for Cyclists

May 27, 2024 By Eric Lister

cold exposure

The Benefits of Cold Exposure for Cycling & Life

June 13, 2023 By Eric Lister

hill climb

The Ultimate Hill Climb Training Guide

May 31, 2023 By Eric Lister

shoulder pain cycling

How to Treat & Avoid Shoulder Pain While Cycling

April 12, 2023 By Eric Lister

psoas stretch

The Importance of the Psoas Stretch for Cyclists

April 6, 2023 By Eric Lister

cycling neck pain

The Ultimate Guide to Cycling Neck Pain: Causes and Solutions

March 21, 2023 By Eric Lister

Useful Info

  • Contact
  • Finally, A Global Cycling Club That Is Focused On Community And Love Of Cycling!
  • Privacy Policy
  • Share Your Story!
  • Terms And Conditions Of Use
  • Welcome to I Love Bicycling
  • What Happened When I Stretched Every Day For a Month

Recent Posts

  • JOIN Cycling: A New Training Platform for Cyclists
  • How to Hang Bikes in Your Garage: 4 Inexpensive Options
  • Gravel Bike Vs. Road Bike: Which One Is Better For You?
  • The 6 Types of Mountain Bikes & How to Choose the Best One for You
  • What Is a Touring Bike Good For? 5 Benefits We Know You’ll Love

Search I Love Bicycling

Connect with Us

  • Facebook
  • RSS
  • Tumblr
  • Twitter

Copyright © 2025 · Magazine Pro Theme on Genesis Framework · WordPress · Log in