• Training
    • Injury Prevention
    • Training Tips
  • How To
    • Bike Fit
    • Gear
  • Nutrition
    • Nutrition Tips
    • Weight Loss
  • Repair
  • Reviews
  • Stories
    • Funny Stories
    • Jokes
    • Quotes
    • Videos
    • Funny Videos

I Love Bicycling

I Love Bicycling is a website that is geared towards cycling for beginners with road cycling tips, training articles, nutrition tips, weight loss, how to’s and bike repair articles.

Training

  • Injury Prevention
  • Training Tips
  • Training Camps

Cycling With Your Partner: Why you should ride together

February 14, 2020 by Sarah Lauzé

You may think of cycling as a solitary sport with the occasional group or club ride. However, there are a ton of couples that use cycling as way to spent time together, for better or worse. Cycling with your partner can strengthen your relationship (when done right), and it can become something that brings the two of you together. Exercise has been proven to benefit your own health and mental well-being, so why not bring you relationship into it!?

For some couples, it can become a running joke that the bike always comes first. Or, if one is a stronger cyclist than the other, it can become a source of tension.  You’ll want to make sure you’re on the same page before heading out on a ride together, so that it can be enjoyable for both of you. Once you figure out what works best for the two of you, the benefits will far outweigh the downsides.

Cycling With Your Partner

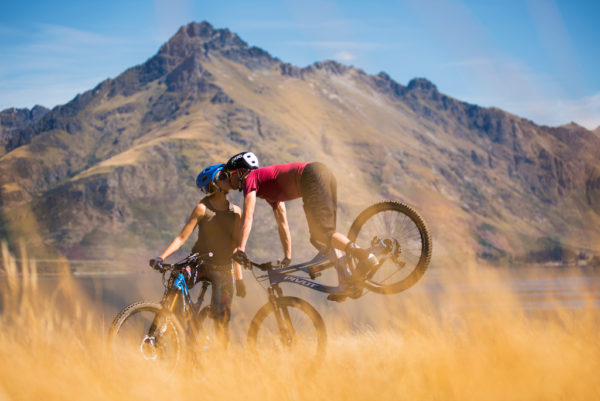
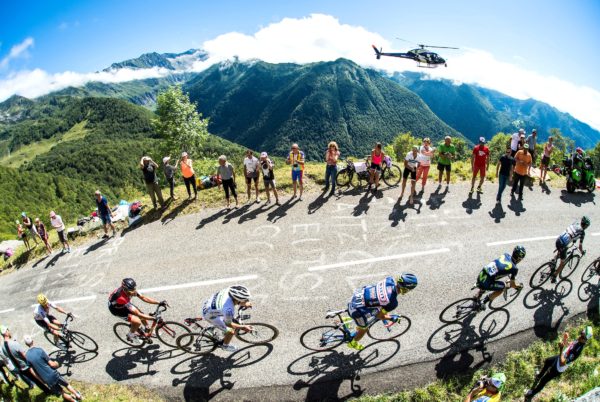
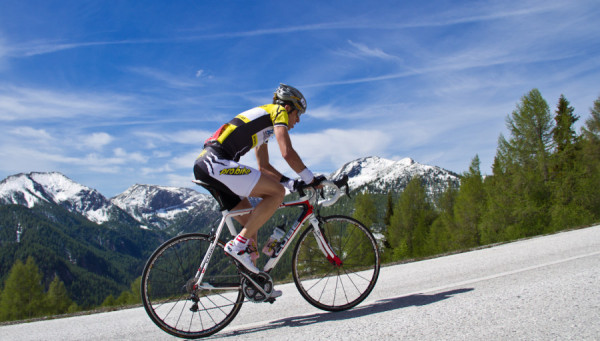
Cycling With Your Partner: Couples that ride together, stay together.

Shared Interest & Goals

Regular rides with your partner will result in shared experiences. When your interests and goals begin to align, it can remove tension and stress. When the weekend rolls around one of you won’t be trying to sneak in a ride while leaving the other at home, but instead it can be something you plan to do together. Sign up for a race or choose a goal that would be achievable for both of you, and start working towards it. Once you get there, you’ll be side-by-side and all the better for it.

Quality Time Together

Between work, family time, and everything in between, it can be tough to find time to spend together. Combining your hobby or exercise routine with time spent with your significant is not only efficient, but it can increase your emotional bond. When you ride together, you are in a way coordinating your actions. You’re moving in the same direction, with the same movements, and matching your pace can create a connection that goes beyond you time spent in the saddle.

Gifts made easy

It’s easy to buy gift for someone that you share interests with, because you can get something that you would like! If you’re riding together regularly, you’ll know just what they’ll want for that birthday or anniversary present, making your life a whole lot easier.

Accountability and Better Rides!

When you care about each other’s fitness, it’s a whole lot easier to keep each other motivated. Not only will you be more likely to get out riding, but once you’re out there you have accountability in the form of your partner. You can cheer each other on to push to the top of that hill or keep those legs spinning when all you want to do is quit. If you know each other’s goals, then you can not only have mutual support, but respect as well.

Knee Pads & Roses – A Singletrack Valentine from Pivot Cycles on Vimeo.

If your partner doesn’t cycle, but has expressed interest, then now is your chance to cash in on all these benefits. Cycling with your partner can be a great way to spend time together, maintain fitness, and even challenge each other. If you’re not sure how to get your partner into cycling, check out “How To Get Your Spouse Into Cycling,” for some tips.

How to Choose Your First Road Bike

February 11, 2020 by Sarah Lauzé

Are you ready to take the leap and buy your first road bike? You won’t regret it. Cycling is not just a sport, but a lifestyle as well. However, the idea of getting a bike, finding all the right gear, and riding for the first time can be intimidating. With the rise of cycling has come endless options when it comes to manufacturers and components, making it overwhelming the first time you walk into a bike shop.

Don’t be discouraged! Having a ton of options is actually a great thing, as it increases your chances of finding just the right bike for you. You just have to know a little about what you’re looking for.

How to Choose Your First Road Bike


Where to start

Rather than walking into a bike shop with no idea what you’re looking for, let’s start with you. Sit down and make a list beforehand: What features are important to you? What type of riding will you be doing most? Are you looking for a commuter bike? Could you use this bike for a race one day? Are you interested in bike touring? What is your price range?

It’s important to get the right bike as it has the potential to determine whether your fall in love with cycling, or deter you from it altogether. That being said, you also need to be honest with yourself. You may regret investing thousands into a bike that you only ride once a week, so map out how many miles you think you’ll be putting in, and also what your destination is at the end of those miles.

The Bike Frame

Material

The frame should be the first part of the bike you look at. There are four main materials from which frames are constructed: carbon fiber, aluminum, steel, or titanium. For a beginner bike, aluminum is the best bang for your buck because of its lightness as well as durability without the fragility and added cost of carbon fiber.

Steel bikes can give a good ride, as they’re not too stiff, but they can be heavy and are a bit dated. Carbon bikes are becoming much cheaper, but for a beginner bike they are a bit overkill as you don’t need the performance advantages of weight nor the detailed feel of how it rides. It’s easy to spot which frame types are which with a little practice and if you don’t know, ask.

Frame Size

How to Choose Your First Road Bike

Just because you are a certain height does not mean you can look at a chart and determine your ideal frame size. There are a lot of variables when selecting the proper frame, the most important being your reach which is affected by the length of the top tube. Your reach can only be adjusted slightly by different stem lengths so there is generally only a few centimetres of adjustability, whereas there is several inches of adjustability in the seat height or seat tube. For more information, check out “What size bike do I need.”

Components

After finding the frame that suits you, you will want to look at the components it comes with.

Chainrings and Cogs

How to Choose Your First Road Bike
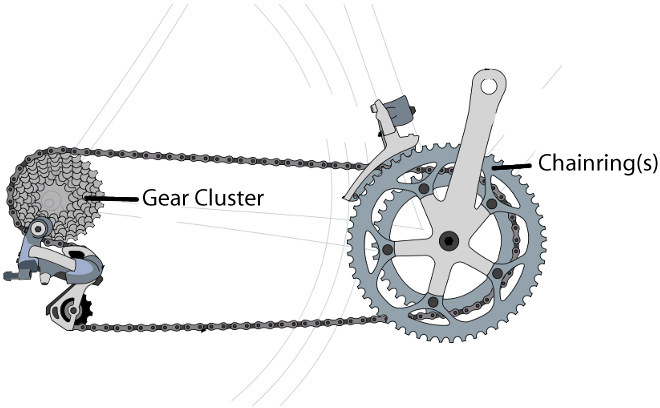
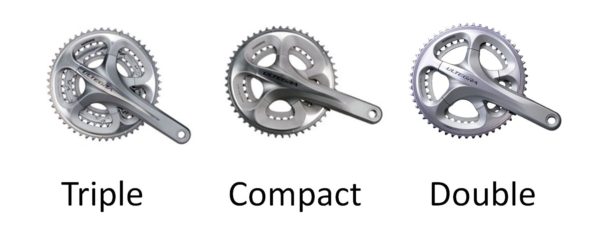
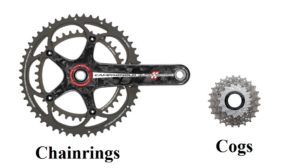
There are two sets of sprockets on a bike, one at the front and one at the back. The front sprockets are called chainrings, and they’re located at the front on the crankset (the part that the pedals attach to). Typically, an entry level road bike will have a triple crankset (three chainrings), but some may have a double (two chainrings).

The sprockets at the rear of the bike are called cogs individually, or a cassette when referring to the whole cluster of gears. Most bikes will have 8-10 gears.

Now, don’t let the numbers scare you, but the key thing is to understand how gearing works. Chainrings and cogs are referred to by the number of teeth they have, which you can either count or look for the manufacturer’s number. For chain rings, the higher the number the easier it will be to pedal, but for cogs it’s just the opposite – the larger the number the easier it will be to pedal. So, for example, a 30/42/52 triple crankset and a 12-30 cassette will offer an easier gear than a 39/53 double crankset with a 12-23 cassette. Starting out you will want those easier climbing gears to build up strength and endurance.

The Best Brands

The two main brands of components that are descent, even at their lower end, are Shimano and Sram. Both of these then have upgrade capabilities which gives you a variety of options down the line. The best way to see how each level feels is to test ride them and then compare them to a model both up and down from it.

Wheels

With a beginner road bike, the wheels that come with the bike are typically going to be what you take home as it’s difficult to swap out wheelsets at a shop or on an online distributor. Things to look for are the spoke count in both the front and back, as well as the weight of the wheel. Depending on your weight and your use of the bike, the wheels will most likely have a spoke count of 32. They may be a little heavier than racing wheel, but they are also a lot more durable.

TiresHow to Choose Your First Road Bike

There are three main types of road bike tire setups: clincher, tubular, or tubeless. The most practical choice will be the classic clincher tire setup for its simplicity and ease of use. This does make you susceptible to pinch flats, but changing out a tube on the road is simple once you’ve done it a few times, it can even be done without tools!

This is just the base of what you’ll need to think about before buying your first road bike, and you will also have to consider the essentials (other than the bike) that you will need. For more information, check out our “Complete Guide to Cycling for Beginners.”

Waterproof Cycling Gear: The Best Gear for Rainy Rides

February 2, 2020 by Sarah Lauzé

As we slowly inch closer to spring, you may be itching to get back out on the road. This time of year weather is unpredictable, and when it rains it pours. One of the best things you can do to make your spring rides a success is to be prepared with the proper waterproof cycling gear. Having the right gear for rainy rides can actually make pedaling through the downpours a lot of fun.

One of the tough things about finding the right waterproof cycling gear is that it needs to keep you dry, but also breath enough to allow sweat vapor to escape so you’re not getting soaked from the inside out. Here are some of the necessities, from your head to your toes.

Things to Look for in Waterproof Cycling Gear

Look at the seams

Seams are the weak point in most garments, as the stitching holes in the fabric can let water in. Check to see if there is waterproof rubber backing to seal these holes, or if the seams are glued rather than stitched, eliminating the holes altogether. This will be the lightweight option, and more expensive, but may be worth it if you find yourself out in the rain a lot.

Water Proof vs Water Resistant

Water resistant clothing is a great option for light showers and to keep the chill at bay, but will not hold up in a full downpour. These are made from less advanced fabric with no waterproof membrane, making them the cheaper option (and more versatile).

Waterproof garments will  be cut from a fabric with multiple layers, including a waterproof membrane, and will have sealed seams and a waterproof zipper. These will keep your dry from the outside, but need to have proper ventilation to allow sweat to escape. Look for vents under the arms, in pockets or on the back. These will also be treated with a Durable Water Repellent (DWR) coating, which will cause the water to bead and roll off rather than soak into the fabric. This coating will degrade over time naturally, but you can always retreat it to renew it’s waterproof life.

The Best Waterproof Cycling Gear

GORE WEAR Men’s  C5 GORE-TEX Jacket

$194

Perhaps the top of the line, GORE-Tex Active fabric is waterproof, windproof, and extremely breathable. This jacket will both keep you warm during breaks, and cool enough when you’re pushing up a climb. This jacket offers a tighter fit than most to keep the fabric close to the skin, and avoid any flapping when you’re on your bike.

Showers Pass Storm Pant

$65

Great for slipping on over shorts or bib tights, the Showers Pass Storm Pant is waterproof and rugged, made with a 3-layer waterproof breathable Artex material. A generous helping of reflective trim keeps you visible during low light hours. Ankle zippers help these rain pants slide on and off over shoes easily. Includes a mesh stuff sack for commuters looking for something easy to carry with them.

For more waterproof pant options, click here.

Fi’zi:k Shoe Cover

Fi’zi:k Shoe Covers  are designed in collaboration with professional cyclists and offer the highest performance in whatever conditions you find yourself in. Tackle the wet and cold without getting frozen toes and soggy feet! Whatever the weather, Fi’zi:k shoe covers provide you with professional grade coverage so you can focus on what really matters; performance.

Showers Pass Crosspoint Knit Gloves

$45

Great for more than just cycling, these gloves are lightweight, breathable and waterproof. They’re made of 3 bonded layers: a wear resistant knit exterior that feels like a regular knit glove, a waterproof-breathable Artex membrane, and a Coolmax moisture-wicking antibacterial knit lining. Silicone print on the palm offers a better grip in wet conditions.


Energizing Food for Cyclists: Top 10

February 1, 2020 by Sarah Lauzé

Whether it’s the time of year or your diet, sometimes you’ll find that your energy is just zapped. If all you want to do is crawl into bed and binge watch the latest Netflix show, then you may want to take a look at this list of energizing food for cyclists. Not only can they help you shake that ‘blah’ feeling, but they will have you feeling strong both on and off the bike.

1. Celery

We all know an apple a day keeps the doctor away, and you may be on board the kale train as a nutrient dense food, but what about celery? It may just be the unsung hero you’ve been waiting for, without the bitter taste! Celery contains apigenin, which is powerful in its anti-inflammatory action and can help with recovery. It is also packed full of nitrate (which also made beetroot juice so popular), which can help reduce the energy cost of exercise, positively affect muscle contraction, and up your overall energy.

2. FishFood for Cyclists

Low levels of omega-3 fatty acids has been linked to low moods and energy levels, so getting your fill of fatty fish can help give you a boost. Many of us get plenty of the unhealthy fats, but are lacking the healthy ones in our diets. Try wild salmon, herring, sardines, or anchovies as a means to get your brain functioning to its fullest potential, and aid in the absorption of vitamin D.

3. Oatmeal

If you are craving some comfort carbs, try some oatmeal before you reach for the pastas and potatoes. Carbohydrates trigger the feel-good emotion of serotonin (which is why they can be dangerous), but you can use this to your advantage. Real oatmeal, not the instant kind, can act as a slow release carb, sustaining you over time rather than spiking your energy. Plus, you can load it up with things like nuts, fruit, and even maple syrup if you’re in need of some sweetness.

Food for Cyclists4. Hemp Seeds

Rich in iron and magnesium, hemp seeds can aid in the transportation of oxygen and muscle contractions. They are also packed with protein and those fatty acids your body needs, so can make a great addition to your smoothies, salads, or stir frys.

5. Lentils

Lentils are your ultimate pre-ride fuel, but can also be a great addition to your everyday diet. Used by vegetarians as a healthy and hearty source of protein, lentils also provide slow burning calories. Relatively speaking they are low in calories and high in mineral content (especially iron), which can help your muscular endurance. Lentils can be used in place of pasta, replace meat in soup, or even be cooked into your morning omelette.

6. MilkFood for Cyclists

Milk can be a good source of “the sunshine vitamin D,” which effects hormone balance and immune regulation in the body. With the lack of sunlight over the winter in a lot of areas, energy levels drop and many people have depleted immune systems. Raw milk can be a great source of vitamin D, but you can also get it in supplement form.

7. Coconut Oil

Coconut is calorie dense, and can work as a fast-acting source of energy. Coconut oil specifically is rich in fatty acids that can help your endurance reduce blood lactate levels, as well as including a hit of vitamin C and electrolytes. You can put it in smoothies, or use it to cook with in just about anything!

8. Green Tea

If you’re on your third cup of coffee and it’s just not cutting it, green tea can help stimulate those brain waves. High in an amino acid called L-theanine, it can increase your alertness while also giving you a hit of caffeine.

9. BananasFood for Cyclists

We all know bananas are packed full of potassium and magnesium, making them a go-to choice for athletes. They can help prevent muscle cramps, and they’re great for digestion. You really can’t lose, so grab a banana for the perfect snack.

10. Dark Chocolate

If you’re craving a hit of sugar, then curb that feeling with some dark chocolate. Not only does it release that feel good serotonin, but is also causes a release of endorphins that can pick up your spirits on a dreary day. Everything in moderation though, and keep it to just a few squares rather than the whole bar.

How To Make Your Bike Gravel Ready

January 29, 2020 by Josh Friedman

Gravel riding is exploding in popularity. Is your bike gravel ready so it will not explode when you hit the first section of dirt on the ride? Taking a few steps to prepare your bike appropriately for the conditions you face will keep you pedaling and not waiting for the broom wagon or calling home for a ride.

gravel riding

Dirt Roads

Dirt roads come in a variety of forms, from smooth, packed dirt to roads covered in loose baseball-sized rocks. Your approach will differ for each that you encounter, although you should prepare for the worst road you will see on the ride. If you have an overbuilt bike on smoother roads, you are sacrificing speed, and if you have an underbuilt bike on harsh roads, you sacrifice durability and maybe even your ability to ride the bike. Get it right and you will optimize your ride.

For each of these types of rides, double check that your bottle cages can handle the bumps and vibrations. What may work on asphalt may not work on a gravel road. There are a couple of tricks to adapting your current cages. One is putting grip tape on the surfaces that contact the bottle. It may mar your bottles, but it is better than being two hours from home with no bottles. The other is to girth hitch a wide rubber band or two on the front edge of the bottle cage. It could provide that extra friction your cage needs to do its job with an item you have lying around the house. If you have a metal cage, you can also bend in slightly to hold the bottle more secure.

Your bike should be in pristine working order before an adventurous gravel ride. Make sure the chain is lubed, the derailleur hanger is straight, the cables and bearings are clean and the tires are free from ruptures in the casing. These are easy maintenance tasks that, if you skip, will make a great day a miserable day.

Smooth to Medium Dirt

Despite what many people think, you can ride a road bike on smooth dirt roads. There is not much you need to do different to prepare your bike. The same rules apply to riding on the road – take good lines and stay out of potholes. Once it gets a little wet or the surface gets a little loose, drop your tire pressure a bit for better grip, but only if you are comfortable with avoiding said potholes or other debris on the road. Lower pressure will increase your likelihood of pinch flats.

Medium Dirt to Rough

This is where you need to start adjusting your equipment. Ideally you switch to a cyclocross bike with thirty-two or thirty-three millimeter tires that have less aggressive tread, maybe a file tread, unless you foresee loose dirt and gravel, and you could use all arounders. Mud tires will have too much rolling resistance. To have less rolling resistance, pump your tires higher than you would if it was a regular cyclocross ride. It will also help resist pinch flats. You will ride at a bit higher speed on a road like this than a standard cyclocross ride with fewer hazards, although the hazards may be more dramatic – a loose rock or deep pothole.

The Roughest

The roughest roads require the most volume in your tires. If your cyclocross bike can handle it, get forty millimeter tires. Again, the tread does not need to be super aggressive, but file treads probably are not ideal here. If your cyclocross bike is not up to forty millimeter tires, riding a mountain bike with less aggressive tires is a fine choice. There have been plenty of winners of gnarly gravel races that have used mountain bikes. Another benefit of a mountain bike is suspension. While your legs and arms are the best suspension tools you have, a little help is nice. There are a few gravel or cyclocross bikes with light suspension to take the edge off; this is an ideal application for such a bike.

Additional Considerations

Tubeless tires excel in the aforementioned conditions. There is a far lower risk of pinch flatting, and if you do flat, you can repair the flat with a tube. And depending on the conditions you may come across and duration of your ride, you may want to carry a spare tire too. You definitely want to carry a multi-tool that can fit all of the bolts and screws on your bike, two tubes, a patch kit, a few dollar bills to boot a tire and a real pump (not just CO2). It sounds like a lot, but a reasonable seat pack should fit it all, except for the pump, which should go somewhere on your frame. You want patches and a real pump so you can handle more flats than your two spare tubes can repair.

Get Gravel Ready

You can be gravel ready with most of the equipment you already have. A few tweaks to your setup can make gravel riding a more enjoyable and successful experience. Go get dirty! And if you’re looking for other tips on gravel riding, check out another one of our gravel articles: “Everything You Need To Know When Riding Gravel.”


Heart Rate Zone Training for Cyclists

January 28, 2020 by Sarah Lauzé

Heart Rate Zone Training for CyclistsHeart rate zone training is one of the most effective ways to get to know your body and what you’re capable of. It’s easy to stop doing something when it’s hard, especially if you don’t have a tangible goal. Using your heart rate zones, you can push yourself further than you may think possible, while also ensuring you aren’t overtraining.

As a cyclist, you always want to be improving. Whether you’re aiming for a 100 mile race or want to keep up on group rides, making the most of your time in the saddle will get you there. Here are some sample training sessions, using heart rate zones, to increase your efficiency and get you flying up those hills.

If you are unfamiliar with the heart rate zones, please first go read this article on how to determine your perimeter beats per minutes and define your zones from there.

The long slow distance

3-4 hours in Zones 1-2

Breakdown: This one is pretty self explanatory. Plan out a long distance ride with moderate climbing, and be sure to stay in HR zones 1-2, even if this means getting into your climbing gear earlier than you usually would.

Everybody loves LSD! And no, I’m talking about the drug. The long slow distance ride is your entry into heart rate (HR) training, and the perhaps the most overlooked because let’s be real, it can seem slow and boring. It’s hard to be disciplined enough to stay in these lower zones, but it will pay off in the long run. It seems counterintuitive, but these relaxed rides build up your endurance and overall fitness, and will make your faster.

It may be a good idea to ride alone for these ones to avoid your more competitive side getting in the way. Sit back, enjoy the scenery, and spin those legs!

The high intensity intervals

40 minutes in zones 1-7

Breakdown: 10 minute warmup (zones 1-2)

3 sets of 4 x 30 second sprints (zone 5) with 40 second recovery (zone 1-2)

5 minute cool down (zone 1-2)

No pain no gain, right? This ride is short, but it will burn fat, improve endurance, and increase your overall fitness. Intervals may not be a whole lot of fun, but if you mentally prepare yourself, the pain really doesn’t last that long. Take it one interval at a time, and make the most of the rests in between!

A little bit of both

2 hours in zones 2-3 with zone 4 intervals

Breakdown: 50 minutes (zone 1-2)

10 minute sprint (zone 4)

40 minutes (zones 1-2)

10 minutes (zone 4)

10 minute cool down (zone 1-2)

Heart Rate Zone Training for Cyclists

It’s all about endurance. This ride will build both your strength and endurance over time, and the ten minute sprints are actually a whole lot of fun. Don’t cheat yourself, but stay focused and within the zones if possible. If you’re just starting out, try two hours in zone 3 instead, and work up to this ride.

Keep in mind, the more riding you do, the better you’re going to get. Even if you do the same ride twice, it may take you more effort to get into the different zones than it did before as your body becomes more efficient. Once you reach a certain level of fitness, many cyclists tend to plateau, but using HR zone training you can avoid this and keep pushing yourself each and every ride.

The Types of Knee Pain from Cycling

January 22, 2020 by Sarah Lauzé

The knee is one of the most complex joints in the body, so it makes sense that it is often the first place we experience pain. Although it’s not a muscle, stretches for cyclists are key to ensuring everything connected to the knee remains flexible and in place.

Many cyclists think knee pain means taking time away from the bike and resting up, but that’s not necessarily true. It could be caused by something as simple as a saddle adjustment or new cleats. So, if you’re experiencing knee pain, figure out what it may be stemming from and adjust your training accordingly.

The Types of Knee Pain from Cycling

Main Types of Knee Pain

Knee pain can show up in a variety of forms and for different reasons. These are some of the main types and common causes:

1. Anterior Knee Pain

Anterior knee pain is at the front of the knee, on and around the kneecap (patella). It is most commonly caused by overuse. The quads are attached to the shin via the kneecap so each time you pedal, forces are transmitted across the joint, essentially squishing it against the thigh bone. The part of the tendon attached to the kneecap can become inflamed and sore to the touch. Often referred to as ‘runner’s knee,’ it can happen to cyclists as well.

2. Posterior Knee Pain

The fair less common posterior knee pain shows up behind the knee and is usually a more simple diagnosis. Overextending the knee, with a saddle that is too high or too far back, causes posterior knee pain in most cases, so make sure your saddle is the proper height and adjustment for you.

3. Medial & Lateral Knee Pain

Pain located at the sides of knee in the collateral ligaments is most commonly caused by the feet. In cycling, this would come down to your cycling shoes or the position of the cleat. How far apart your feet are positioned can stress one of the collaterals, causing medial or lateral knee pain during or after a ride.

4. Iliotibial Band (IT Band) Syndrome

The IT band, running along the outside of the thigh from the pelvis to just below the knee, is a thick strap of tissue that can often become tight or inflamed. This is usually caused by over use, weakness of the gluteus medius muscle, or cleat placement. If the IT band has become inflamed, then rest and ice are in order. If it is tight and sore, then regular stretching and rolling will be your best course of action.

The Types of Knee Pain from Cycling

What can cause knee pain?

Although cycling is a low impact sport, too much of anything can lead to stress and strain on the body. Pedalling is a repetitive motion with the constant bending and extending motions flexing the knees and hips. Naturally, with overuse these are the most common sites of chronic-use injury.

Too much too soon

The number one cause of knee pain with cyclists is going too hard or far too soon. It is great to challenge yourself, but going further than your ligaments and muscles can handle will only hinder you progress. Endurance is something that is built up over time, conditioning your muscles over miles and hours. Ligaments take even longer to develop than muscles, with issues often arising from tightness or inflamation.

Improper bike fitThe Types of Knee Pain from Cycling

The little adjustments you can make to your bike can make all the difference when it comes to addressing or avoiding knee pain. The height and position of your saddle and the placement of cleats on the bottoms of your cycling shoes can cause or help avoid knee pain, depending on how well they are adjusted for you.

Not Enough Stretching and Rolling

Flexibility or lack of, is a cyclists nemesis. Eventually if you do not stretch or roll your muscles will tighten so much that you will have difficulty walking never mind riding. Make sure to do stretches that especially focus on the muscles surrounding the knee.

Knee pain can be disheartening when it comes to cycling, but most cases are not cause to give up on your training. However, if pain persists despite proper rest, stretching, or bike adjustments, then it may be a good idea to see a physiotherapist to see if there is an underlying issue that needs to be addressed.

Knee Rehab Program for Cyclists

Looking for a program that will help you address the muscle imbalance that is likely causing your knee pain? Dynamic Cyclist is an online training platform designed to help cyclists become stronger and faster while riding pain free for years to come. Complete your regimen with an all-inclusive program that addresses mobility, flexibility, strength and injury prevention, all for a fraction of the cost of one physiotherapy appointment. Try out their 6 Week Functional Rehab Program and experience the results for yourself. Click here to try 7 days free!

Cycling Intervals: The 2×20 Workout

January 16, 2020 by Aaron Robson

If you are looking for that killer workout that will take you to the next level in your biking, chances are, we have what you are looking for. Most training books will refer to this workout as 2x20s, but most cyclists tend to refer to it using some variation on the words ‘pain’, ‘torture’ and ‘excruciating’. Never fear though, you are made of tougher stuff than most, and a little pain goes a long way!

2x20 intervals - An Aerobic Power Workout

The Benefits of Interval Training

The benefits of interval training are numerous, which is why it has been a mainstay technique used by  fitness professionals throughout the world, in addition to a lot of cyclists.

Efficiency – Interval training is designed to get you the best results in the shortest amount of time, so you will find that you end up spending a lot less time on your workouts.

Fat Burning – The intense effort required in an interval training program means that you will burn a lot of fat much more quickly than you would with standard riding. You also boost your body’s repair cycle during interval training, which means that you will lose more calories and fat following the completion of the workout than you would after a standard ride.

No Equipment Needed – One of the main sticking points of going to the gym to build power is that you need to use equipment other than your bike. In doing so you aren’t improving your technique and you’re often spending money to get results. Interval training just needs you and your bike to get the job done.

Challenge – No workout is going to keep your attention for long if it doesn’t offer a challenge and, even worse, it will start to lose its effectiveness if you find you can do it easily. Interval training is never anything less than a challenge, especially because intervals can often be scaled up to become harder as your body improves.

2×20 Cycling Intervals

Here is what you will need:

  • Yourself
  • Your bike
  • A place where you can bike without having to stop for at least 20 minutes (I often use a 1-2 mile loop course for this)

The workout is fairly self-explanatory – you are going to ride two 20 minute efforts. In between is a 3-5 minute slow recovery pedal. You will want to pace your effort such that you maintain a steady pace throughout the first effort that leaves you feeling pretty tired, but knowing you held back a bit. For the second effort, you still want it to remain relatively even paced, but you should be about as close to falling over as you can push yourself. If you’ve done things right, your efforts should be about the same pace (or power level, if you happen to be using a power meter).

Why is this workout so beneficial? For starters, it is going to make you tough. The more times you do this, the harder you will be able to push yourself in that second leg, and that will translate directly to endurance at the end of a race.

Why It Works

To look at things a bit more technically, this workout targets what physiologists call your Functional Threshold Power, which refers to the maximum effort level you can maintain before lactic acid production begins to sharply increase. In simple terms, it is about the level you can maintain for an all-out 1 hour effort. Why is this so important? Well even if you don’t race in time trials very often, increasing your FTP means that any given aerobic effort will be easier. This allows you to recover faster after a hard surge in a race, or have more left in the tank for a final sprint after the pace ratchets up in the last few kms of a race. All of that sounds pretty damn good, doesn’t it? What are you waiting for?

7 Of The World’s Toughest Bike Races

January 16, 2020 by Sarah Lauzé

When you think of some of the toughest cycling races in the world, the Tour de France usually comes in near the top of the list. It goes without saying that it’s not easy, but it’s hard to measure one race more or less difficult than the other. It’s part of human nature to push the limits of our bodies. To strive for the next goal that may seem impossible in the beginning, but becomes achievable with the right amount of discipline and training. Although most of us will never tackle the Tour de France, there are a ton of other races and events out there to that could be added to your cycling bucket list (but maybe not these ones). Here are 7 of the world’s toughest bike races.

The World’s Toughest Bike Races

La Ruta de los Conquistadores – Costa Rica

Toughest Bike Races

Starting out with one the most feared races, the La Ruta is only for the world’s best endurance riders. It’s reputation is well warranted, as the course traverses the American land mass from Pacific to Atlantic. There’s over 29,000 feet of climbing over five mountain ranges including a 12,000 foot volcano. If that’s not enough to have you shaking your head, try riding through dense jungle, rainforests and rivers. It’s three days of hell on a mountain bike, and only the best finish it.

The Trans Pyr – Spain

Another one for the mountain bikers, the Trans Pyr inflicts a whole lot of pain over the eight day race. Starting out on the shore of the Mediterranean Sea, it sends riders over 509 miles on rugged paths through the Pyrenees. There’s over 66,601 feet of climbing (let that number sink in), with participants spending between 45 – 90 hours in the saddle.

Race Across America – United States

A race longer than the Tour de France, this gruelling test of endurance sends individuals and teams over 3,000 miles from California to Maryland. With no sleep requirements, some of the top individual riders will average just a couple hours a day–spending the rest of the time in the saddle or desperately trying to intake enough calories to keep their bodies going. Both teams and solo riders are given up to 12 days to complete the distance.

The Tour de France

Picture by Alex Broadway/ASO/SWpix.com – Cycling – 2017 Tour de France


There can’t be a list of the toughest races without the Tour de France simply due to its incredible speed. Riders must maintain an average daily speed of 25 miles/hour if they are to simply complete the race, let alone compete. That speed has to be maintained every day for 21 days and more than 2,100 miles. The intensity is grueling and puts the body on the edge of the lactate threshold. The last rider must finish within a certain percentage of the winner’s time or else they are not allowed to continue.

The Tour Divide – Canada / US

The grand tour of mountain biking, the Tour Divide is a completely self supported race across the country from Banff, Canada, to Antelope Wells, New Mexico. There is no entry fee and no medals, but if you finish you’ll be in the record books and will have the experience of a lifetime! The route is the forgotten passes of the Continental Divide, climbing over 200,000ft over extreme mountainous terrain.

The Iditarod Invitational

It’s not the longest, nor does it have the most elevation, but as far as races go this is one of the toughest. Riding over 1,110 miles from Anchorage, Alaska to Nome in the dead of winter is not for the faint of heart. In fact, most participants do not finish with extreme weather conditions and no set course. Racers are given the freedom to make their way on bike, ski, or foot, with an average speed being just over 3mph. This one is not for everyone, and can become dangerous if participates are unprepared for the freezing temperatures and bleak landscape.

The Death Ride – US

The Death Ride (aka The Tour of the California Alps) is 129 miles all wrapped up into one gruelling day. Riders navigate five mountain passes, 15,000 ft of total elevation and get to take in some stunning views–that is if they can see through the pain.

What are Bike Gear Ratios?

January 14, 2020 by Sarah Lauzé

Over the years, the number of gears on bikes has steadily increased. Today’s normal, generally speaking, is 22 gears through two chainrings and 11 sprockets. However, not only has the number of gears increased, but also the range of sizes for the chainrings and sprockets. Yes, this has allowed riders to fine-tune the gearing on their bike, but bike gear ratios can also be really confusing.

First, you need to understand that the size of chainrings and sprockets define the gearing on a bike. You can determine the size by the number of teeth (T) involved, but more important is the ratio. The ratio speaks to the way that the sprockets multiply the effort made with the chainring.

The Basics

Bicycle gears began with the introduction of the train drive, making the bicycle a lot more efficient. Historically, bikes were fixed gear, meaning one revolution of the pedals was equal to one revolution of the back wheel, for a 1:1 ratio. With a train drive, however, a single turn of the chainring can produce multiple revolutions of the rear sprocket and wheel.

Example: A 39T chainring is paired with a 12T cog, giving us a ratio of 39:12 or 3.25. So, one complete rotation of the crank will make the rear wheel rotate 3.25 times.

Do bike gear ratios matter?What are Bike Gear Ratios?

In short, yes. If your gears are too easy, you’ll get dropped on those flats as you spin out. On the other hand, if they’re too high you’re not going to be able to maintain an efficient cadence on steep climbs. Having the correct gears for you can impact the following:

  • Power Output – Your power output, measured in watts, is the most important factor in determining your speed. Bicycle gearing presents resistance, allowing you to transfer this power (through torque and cadence) from your legs into forward movement. Your gears should allow you to get the most from your power, which is varies from rider to rider.
  • Cadence – Cadence is the amount of times your foot completes a full pedal stroke in one minute (also known as rpm). First, you need to know what your preferred cadence range is. Do you like to spin in an easier gear, or push at a lower cadence but higher gear?

What are the choices?

As mentioned previously, gear ratios are determined at the crankset and the cassette. Essentially the lower the number of teeth on the chainrings results in an easier gear, and the lower the number of teeth on the cassette creates more resistance (harder gear).

Cranksets

Cranksets set the tone for bike gear ratios on your bicycle. In general, there are three size options that will dictate your gearing and also set your bike up for its intended use.

  • Standard (Double)- A standard crankset has a one hundred thirty millimeter bolt circle diameter (or BCD, Campagnolo cranks have a one hundred thirty five millimeter BCD). Almost always, the chainrings on standard cranks are 53 teeth and 39 teeth. Today it is still the choice for most cyclists, unless you will be tackling the steepest and longest of climbs consistently in your rides.
  • Compact – Compact cranksets allow a wider range of gearing options with their 110 millimeter BCD. Most often they will come with a 50 and 34 tooth pair of chainrings, but increasingly you will find 52 tooth and 36 tooth pairings. The former is a great all-around combination, especially if you are tackling significant climbs. The latter gives an easier gear for climbing and still has a big enough chainring to not lose very much top-end speed when compared to a standard crankset on the downhills and flat.
  • Triple – Until compact cranksets came out, triples were the only way to get a bike dedicated to climbing. The third chainring makes for a slightly heavier and more complicated shifting system. Today you will almost exclusively find them on touring bikes and mountain bikes.

Cassettes

What are Bike Gear Ratios?

Your cassette will fine tune the gearing of your crankset. The flatter your riding, the closer your gearing should be on your cassette. You will encounter fewer difficulties on your daily rides. With eleven speed cassettes, you could get an 11/25 (referring to the smallest and largest cogs) cassette and never be overgeared and never have more than a two tooth gap between cogs.

The biggest cog on a cassette you can use with a short cage rear derailleur is 28 tooth. Paired with a compact crankset, it is sufficient to ascend all but the longest and steepest climbs. If you need lower gearing, you can get a medium or long cage derailleur and get up to a 36 tooth cog. Note that you may have large gaps between cogs, although that is offset by your ability to get over serious difficulties with relative comfort.

With cassettes less than 11 speeds, you will not have all of the potential options available to you, but you can still find a cassette that will suit your needs. Large cogs are still available and so are cassettes with small gaps between cogs. The small sacrifice you make is not having both large cogs and smaller gaps.

What are Bike Gear Ratios?

At the end of the day, you want to find the right gear setup so that you can forget about gears altogether and enjoy the ride! Click here for more information and charts to help you find the right gear ratio.

« Previous Page
Next Page »
  • Facebook
  • Tumblr
  • Twitter

Latest Articles

JOIN Cycling: A New Training Platform for Cyclists

May 27, 2024 By Eric Lister

cold exposure

The Benefits of Cold Exposure for Cycling & Life

June 13, 2023 By Eric Lister

hill climb

The Ultimate Hill Climb Training Guide

May 31, 2023 By Eric Lister

shoulder pain cycling

How to Treat & Avoid Shoulder Pain While Cycling

April 12, 2023 By Eric Lister

psoas stretch

The Importance of the Psoas Stretch for Cyclists

April 6, 2023 By Eric Lister

cycling neck pain

The Ultimate Guide to Cycling Neck Pain: Causes and Solutions

March 21, 2023 By Eric Lister

Useful Info

  • Contact
  • Finally, A Global Cycling Club That Is Focused On Community And Love Of Cycling!
  • Privacy Policy
  • Share Your Story!
  • Terms And Conditions Of Use
  • Welcome to I Love Bicycling
  • What Happened When I Stretched Every Day For a Month

Recent Posts

  • JOIN Cycling: A New Training Platform for Cyclists
  • How to Hang Bikes in Your Garage: 4 Inexpensive Options
  • Gravel Bike Vs. Road Bike: Which One Is Better For You?
  • The 6 Types of Mountain Bikes & How to Choose the Best One for You
  • What Is a Touring Bike Good For? 5 Benefits We Know You’ll Love

Search I Love Bicycling

Connect with Us

  • Facebook
  • RSS
  • Tumblr
  • Twitter

Copyright © 2026 · Magazine Pro Theme on Genesis Framework · WordPress · Log in