• Training
    • Injury Prevention
    • Training Tips
  • How To
    • Bike Fit
    • Gear
  • Nutrition
    • Nutrition Tips
    • Weight Loss
  • Repair
  • Reviews
  • Stories
    • Funny Stories
    • Jokes
    • Quotes
    • Videos
    • Funny Videos

I Love Bicycling

I Love Bicycling is a website that is geared towards cycling for beginners with road cycling tips, training articles, nutrition tips, weight loss, how to’s and bike repair articles.

What Is a Hybrid Bike? (A Beginners Guide)

January 18, 2023 by Eric Lister

You may be a road cyclist, mountain biker, non-participant or somebody just getting into the sport of cycling. But whoever you are, it’s not at all uncommon to have posed the question upon visiting your local sporting goods store, “What is a hybrid bike?”

You may have had the experience of being one of those poor souls entering into a bike shop for the first time. It is then that you were encountered by an enthusiastic young salesman asking what kind of rig you might be in the market for.

Road? 

Mountain? 

Commuter? 

Touring? 

City? 

Hybrid? 

It can be a bit overwhelming…

Hearing the word hybrid no doubt implies the combination of some such things…all of which you know absolutely nothing about!

Well, we’ve today endeavoured to mitigate this experience to the best of our ability, by teaching you a little bit about what this style of bicycle entails, its uses, and who it might be best suited for out there in the vast landscape of buying possibilities. We hope that by the end you’re able to approach the matter in a way that makes you a little more comfortable, especially for those out there getting into cycling for the first time.

Sales associate helps a woman pick out a bike at a bike shop.

torwaiphoto/Adobe Stock

What Does “Hybrid Bike” Mean?

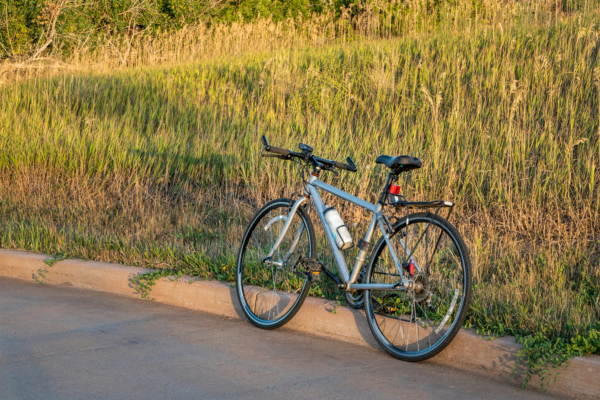
Hybrids are basically a blend of the two major cycling disciplines, road biking and mountain biking. They are a composite that seeks to address some of the major components of both types of bike in one, so as to create a machine that is versatile enough to accommodate activity performed on the road and on the trails.

Some of these components include the following:

Handlebars –  Hybrids typically have flat handlebars, like those of a mountain bike, as opposed to dropped handlebars like you would see on a road bike. This contributes to a more upright riding position.

Tires – Modern hybrid bikes can be fitted with several sizes and types of tires that you’ll find on both road and mountain bikes. 26” used to be the standard, but it is now common to see 27.5” and 29” as well.

Suspension – Typically hybrid bikes are limited in suspension, and some don’t have any at all. It’s not uncommon though to see front suspension forks that offer some relief if you were to head out on some light-medium duty trails.

Gears – Some hybrid bikes have only one speed (and are aptly named “single speed bikes”). Others can have a wide range of gears, which is something you’ll want to pay attention to. Less gears means less variability in intensity, which for a beginner rider can be overwhelming.

The term hybrid bikes can mean a lot of things. In general, yes, it means the combination of a road and mountain bike in one. But depending on the brand, style, etc. that hybrid bike could lean more towards a road bike or more towards a mountain bike. Let’s look at the pros and cons of this bike category to better determine if it’s going to be the right choice for you.

Hybrid bike on a trail

MarekPhotoDesign/Adobe Stock

Pros of Hybrid Bikes

If you’re someone who is just getting into bike riding (or haven’t done it in a long time), a hybrid bike is a good way to start acclimatizing your body to the sport. The more specialized you get with a bike into a particular discipline, the more aggressive the positions you’re going to be in on the bike. Different parts of your body are going to be subject to more load and intensity, and it’s going to vary depending on the specialty of your machine. 

A hybrid bike keeps you in a more upright position, which lessens the load on your hands, wrists, shoulders and lower back. Your body needs time to adapt to spending time on the bicycle, and if you eventually decide to get into road cycling, for example, your body will appreciate the time it had to strengthen itself on a hybrid before dropping into a more loaded, aerodynamic position.

The cost of a hybrid bike is another excellent benefit, and is reflective of its more generalized nature. If you were looking for the tip of the spear in terms of performance, parts and quality…you wouldn’t be buying a hybrid bike. That’s not to say they aren’t well-built and dependable pieces of technology. But it is to say that they will only take you so far in any such direction…

…which takes us to the cons.

Cons of Hybrid Bikes

By far the biggest con of a hybrid bike is going to be its limited performance. If you start to become more serious about a particular type of biking, a hybrid bike is going to quickly fail you as soon as the demands exceed its capabilities. A hybrid bike rapidly becomes just a bad road or mountain bike as soon as you venture further into one discipline or the other.

If you want to become a competitive triathlete, you better be able to ride a road bike – fast – and maybe for hours on end. If you want to rip down gnarly mountain terrain – tackling tight turns, huge drops and acute changes in speed – you better be able to harness the unique feel and frame of a high-end mountain bike. A hybrid bike just won’t cut it either way.

This can also have a troubling psychological effect, particularly on people who are getting further and further into mountain biking (which is what hybrids are often marketed for). Not knowing the potential performance metrics of your bike can be catastrophic when trying out new terrain that is more difficult than you’re used to. These types of bikes have to be treated with caution, and the trails you’re on have to always be respected for their level of difficulty.

Is a Hybrid Bike Right for You?

Hybrid bikes are perfect for people who want to cycle recreationally and on different types of terrain. They’re great for commuting and weekend rides with the family. They allow you to get into the sport at perhaps a slightly lower price point, and at the same time experience all the diversity of the outdoors, which is a major part of what makes cycling so engaging and attractive to its participants.

They help your body mold to the bike without putting it into positions that can lead to injury. This helps prepare the body for more aggressive postures that might need to be sustained in things like road racing somewhere down the line. But being more upright and taking things slow is always a good approach. The hybrid bike allows for that.

As soon as you start to become more specialized, it’s time to start looking at more specialized bikes. Not only will a more specific rig be more functional, efficient and durable for the tasks it is designed to do – it will be safer and more dependable as well. 


vit/Adobe Stock

Become a Better Cyclist!

Dynamic Cyclist is a training platform for cyclists that offers interactive, follow-along videos and programming that addresses mobility, strength, injury prevention and more! No matter what type of bike you’re riding, it’s always good to make sure your body is in check, healthy and prepared for the demands you’re about to place on it. Sign up for a 7-day free trial HERE!

Strength Training Considerations For Different Types Of Biking

August 10, 2022 by Eric Lister

Whether you’re on the road, a velodrome or carving up mountain trails, your bike riding is going to be significantly improved with a proper strength and conditioning routine. Strength training for cycling is often overlooked because it takes you off the bike, but with a small shift in perspective we’d like to suggest it will actually pack more riding into your life over time.

Source: 24K-Production – Adobe Stock

Strength Demands of Different Rider Types

Depending on the type of bike riding you choose to participate in, the demands on your body will also change from style to style. While there’s certainly cross over amongst the three types we have categorized below, they all have distinct differences that are unique to that particular discipline.

 Mountain Biking

Source: yanik88 – Adobe Stock

Diverse terrain, varying depths, hard corners, jumps, rocks, roots and everything the outdoors has to offer are factors that every mountain biker must deal with. The movement is much more dynamic than road or track cycling, and in terms of force absorption this is most definitely the hardest type of biking on your body. 

It is well known that adult road cyclists are typically at a much higher risk for osteoporosis than other athletes. Some studies actually show their bone density to closely resemble (and in one case, even be lower than) sedentary control groups. This is not encouraging news for the cycling community.

Conversely, related research has made note of mountain biking being a possible cycling alternative that doesn’t so negatively affect a person’s bone density. Operation of a heavier bike, turbulent jolts and violent carving all translate to more load being put through your body. Strength training for mountain biking should prepare you to handle these types of forces.

Road Cycling

Source: ibravery – Adobe Stock

As mentioned above, road cyclists tend to have a lower bone mineral density compared to other athletes and even the general population. This is because the bike is supporting you while you’re riding, so even though your legs are pumping hard and your heart is beating fast, your bones are sitting there wondering what all the huff and puff is about.

Another factor to consider with road cycling is the prolonged, folded over postures you’ll often find yourself in. The hips have to work in a less than optimal range, the lower back is in a vulnerable position and the neck gets craned back (only some of the issues unfortunately). Low back problems, faulty breathing patterns and tight hips are often the result.

Strength training for cyclists should focus on correcting these postural and functional shortcomings. Introducing load through the body off the bike will help you become stronger on the bike. Not only that, a properly designed program will actually make riding more comfortable and lower your risk of injury despite the less than optimal positions you might find yourself in.

Track Cycling

Source: AboutLife – Adobe Stock

Track cycling is a unique discipline within the broader realm of our sport. There are many types of events and formats, but for the purpose of this article we want to focus on the particular differences in sprint cycling. These are races performed over short distances where maximum power and force production is required. 

Athletes who are successful in sprint cycling tend to have a higher composition of type II (fast twitch) muscle fibers. Individuals with more fast twitch fibers are capable of producing quicker movements and generating more strength in a shorter period of time (power). There is a direct correlation between muscle fiber composition and sprint cycling performance.

Different muscle fibers react to different training modalities. An explosive athlete like a sprint cyclist will likely be doing a lot of jumping and sprinting exercises. Training with heavy weights for low repetitions will also be common in order to teach their body to produce as much force as possible in as little time as possible. Long, leisurely rides will be for nothing more than recovery.

Lifting Weights For Cycling

Source: Flamingo Images – Adobe Stock

Incorporating weight lifting into your cycling training plan is a great way to make yourself stronger on the bike, balance your pedal stroke and most importantly reduce the risk of injury. The #1 goal of any athlete in the gym (unless you’re a powerlifter, olympic lifter or bodybuilder) is injury prevention, because nothing else matters if you can’t actually do your sport.

Determining how to train, what exercises to do, in what rep range and at what weight can all be tricky variables if you don’t have much experience in the gym. This is where the help of a one-on-one coach becomes valuable, as they’ll be able to provide you with the guidance necessary to ensure you’re not wasting your time doing something counterproductive. 

As we’ve already seen, the type of riding you’re doing is going to determine the bulk of your strength training routine. You might be wondering though, is there anything I can do for strength training outside the gym? Regardless of whether I’m a mountain biker, road or track cyclist? The answer is yes!

At Home Strength Training For Cyclists

Dynamic Cyclist is our fully immersive training platform that combines mobility, stretching, injury prevention and strength workouts all into one, easy to use interface. We’ve taken care of all the programming, technical work and coaching so that all you have to do is follow along!

To give you a taste of the world class instruction and workout quality we provide, we’ve included below one of our FULL BODY routines that is going to work you from head to toe. Everything at Dynamic Cyclist is designed to make you better on the bike, regardless of what discipline you most participate in.

Follow along with Alisha, Dynamic Cyclist’s certified coach!

Oval Mountain Bike Chainrings Review – Absolute Black Oval Chainrings

May 9, 2016 by Ryan Taylor

absolute black oval chainrings

Whats with Oval Chainrings?

Absolute Black sent us a sample of their stunning Absolute Black Oval Chainrings. Why oval you ask? The benefits to oval rings have been discussed and tested for over 100 years. Do they work? Some labs say they do. In fact some of the latest Tour De France winners use them! But there is some contradictory evidence out there saying the benefits are negligible but a lot of it comes down to personal preference.

In the article where we featured oval chainrings, the basic idea of them is that no human can produce a perfect pedal stroke. When a cyclist’s legs are at the 6, and 12 o’clock part of the pedal stroke it is impossible to produce the same amount of power as one would produce while on the down or upstroke (3 or 9 o’clock). The oval chain ring is designed to make this process smoother by effectively reducing the gear (or making it easier) during these stages of the pedal stroke.

IMG_0010

Absolute Black Oval Chainrings

Absolute Black claims that not only are their chainrings more efficient but they are also easier on knees and joints. These bio-mechanical benefits can be denied but in the mountain bike world you also have the benefit of increased traction on soggy days (as the force is spread out more evenly throughout the pedal stroke reducing ‘spin out’) but they also come in a 1x or narrow-wide options AND in fantastic colors!

Initial Impressions and Setup

The Absolute Black oval chainrings we received are beautiful. The machining is extensive, and its obvious there has been a lot of thought and work put into these rings.

IMG_0012

Installation is very straight forward. Mechanics are rejoicing everywhere with the emergence of not only the single ring set up, but also direct mount crank systems such as Race Face and Sram where you effectively attach the chainring directly to the crank, as opposed to a ‘spider’ . The benefits are lighter weight, clean look, and to be frank, it has less  that can go wrong. The Absolute Black Oval Chainring went on in mere minutes and has been solid ever since on my Race Face crank.

Performance and Final Thoughts.

When doing the first few meters on oval rings the sensation is terrible. Its hard to describe, but its almost as if your bike is trying to buck you off! I considered turning around and taking the chainring off but stuck with it in the spirit of the test.

After mere minutes that feeling oddly dissipates and you are left riding with ‘normal’ riding sensations. Its a mystery to me why this happens but it does!

While its hard to say if the benefits of the chainrings are real from a power output point of view, the traction benefits are apparent. On a duel suspension sometimes it feels as if you are fighting the bike while on steep climbs. I found the chainrings smoothed out the pedal stroke and generally made for a better ride with more traction. I would go as far to say that I will continue to ride with oval rings from now on as there are many benefits with no real down side.

Chain retention with Absolute Black Oval Chainrings is fantastic. In 2 months, I never lost a chain once, despite having it on both a duel suspension and hard tail bike frame leaving the clutch mechanism off! This goes to show Absolute Black have made a great ring, as they have been ridden primarily on some of the roughest trails of British Columbia.

In conclusion this ring is fantastic. It’s light, it’s pretty, it works very well. I can’t really say a bad thing about it.

5/5 Hearts

Cycling Starting at 50

December 4, 2015 by Adam Farabaugh

There’s never a wrong time to get into cycling whether at 5 years old or starting at 50 years old. We all do it for various reasons but it always comes down to the fact that it is fun and enjoyable. Age can be seen as a hurdle by many and it can be if you don’t know a few things to look out for going into it.

There’s a learning curve with everything, and with age you’ve probably figured out the best way to excel at something. Know the background and what you need to do ahead of time to best prepare yourself. Taking a few easy steps toward cycling starting at 50 will help ensure a smooth start keeping you safe, healthy, and riding well into your prime years.

Cycling Starting at 50

Conquering the Fear

There can be a healthy dose of fear when starting anything new especially something like cycling that has a number of variables. The biggest thing in conquering those fears in cycling is understanding the risks and your specific fears. A few big fears are as follows:

  • Afraid of not succeeding.
  • Afraid of the level of exertion.
  • Afraid of injury and crashing.

These are all valid fears that if you didn’t have you would be un-human. Cycling can be a difficult sport but it’s all what you make of it. If you go and try to do a long steep climb you might not succeed in your first week of riding. However if you begin slowly and set small, reachable goals you will not only succeed but also grow as a rider to be able to accomplish that climb and more.

With age, individuals do have to be more concerned with what their body can handle. The cardiovascular system, the thing that is taxed the most during riding, is incredibly robust and flexible. As you start riding more and more, it too will become stronger and more resilient. Riding at a higher intensity will strengthen your heart not only making you a better cyclist but also stronger in general as you age due to being able to pump more blood with less effort. Heart health is imperative with age and cycling is a great way to keep it healthy.

Cycling does have the potential to cause injury but the majority of injuries and crashes are due to an error in judgement by the individual. As you’ll see below, having a good bike fit will help to avoid injuries. The best way to avoid crashes is to be good at handling your bike and making quick, risk-averse decisions. Becoming a better bike handler will come with experience but you can do a few things to practice your skills. (“Bike Skills: Cornering-Techniques to Know and get Good At“)

What You Must Do First

As with any new endeavors, and cycling in particular, you must go see your doctor to see where you’re at physically to make sure you are healthy enough to indulge in the sport. Depending on history, they may look at a number of things but the one that they will most definitely look at is blood pressure. This is a good metric to not only make sure is within an acceptable range to begin riding but also to get checked on a regular basis to see how your riding is improving your health. Also be sure to ask your doctor any questions you may have regarding your cycling in particular.

Getting a Good Fit

Before you start riding you are going to want to make sure that you have a good fit on the bike. With age, everything isn’t as flexible as it used to be and injuries can occur more easily and definitely take longer to recover from. The best way to avoid this is to make sure you are in the perfect position on the bike to not put too much strain on any one area. A professional fit is a good idea or you can find more information here on (“How to Do a Proper Bike Fit“) to get the most out of fitting yourself.

One good tip on top of having a proper fit on the bike is having a comfortable saddle. Everyone is different in their preferences so make sure you try a few and get one that fits. You can find more on (“How to Choose the Best Bike Saddle“)on getting the right saddle for you.

Getting Started

As you start riding you want to make sure you don’t go overboard the first couple of rides. All of the cycling muscles and tendons are going to take longer to adapt to the stresses than they would in your twenties. Try and keep rides flat and if you do go over any climbs make sure you spin at a higher cadence. As you continue to ride more and more, a good metric to not overdo it is to not increase your riding more than 10% each week in volume, duration or intensity.

One of the big benefits to riding on top of the health side of things is the social aspect. Cycling is a great way to meet new people and continue the relationship with great friends. As you first start riding more however, you should do a few rides on your own to make sure that you’re comfortable doing things such as clipping in (if you’re riding with clipless pedals), turning, braking, as well as riding in traffic. If you are still struggling with these when you start riding in a group, you can pose a danger to others. A great way to learn and get good at these things is to ride with one other more experienced rider who can give you tips on what to do and more importantly what not to do.

The Importance of Recovery

With cycling past 50, your body is going to take longer to recover than it used to. A big ride is going to take longer to recover from as well as the smaller rides even. There are two big things here that are going to make a difference. One is not trying to do too much after you are already tired. The second is to focus on recovery.

Making sure you get enough sleep after bigger rides as well as eating properly and stretching will help improve your recovery time. Everyone is a little bit different so with a little bit of trial and error you will find what works best for you.

Cycling starting at 50 is a great time to get into a new and exciting sport that not only is going to be fun but will also help your health and well-being. Knowing these few things before you get into riding and as you first start out will help to make sure that it is a beneficial direction on all levels for you. Cycling is fun, enjoying, and rewarding regardless of age. It’s always better late than never. Start smart and you’ll be riding for decades to come.

Haleakala Bike Climb – An Epic Journey

October 3, 2015 by Lee Agur

Haleakala Bike ClimbThe Haleakala bike climb is coined as “the longest paved climb in the world” and worthy of anyone’s bucket list. I know it was one of mine.

The reality of the climb did not really register until we had a chance to drive the entire road which seemed to go on forever, even in a car.

Haleakala Stats

  • Elevation of Haleakala: 3055 metres (10,023 feet)
  • Length of Climb: 57km (35.5 miles)
  • Average Grade: 5.4%
  • Corners: Too many
  • Overall Feel Of Grade: Never too steep, just very consistent the entire way
  • Haleakala Meaning: House of the Sun
  • Duration of Climb: 2.5 hours – 10 hours (Out of 1756 cyclists the average rider took 5 hours)
  • Temperature at the Top – Cold

Biking Haleakala - Biking up and down Haleakala

The Climb

So what is climbing Haleakala really like? Well, its a grind, not in the typical sense though, Haleakala is just a nice steady 5-6% climb the entire way, there is no one location that is steep or hard. The culmination of the entire climb is difficult, it is a test of endurance.

The Route

Climbing up Haleakala - The Start

The most common place to begin the climb is in Paia, at sea level. Make sure to touch the ocean before you begin! Start up Baldwin Ave and head to Makawao, there you just keep heading straight through the town and Baldwin Ave turns in to Olinda Road.

The first turn is at 13km (8 miles) take a right onto Hanamo Road, after 2km (1.2 miles) you will join up with State Highway 377 – also known as Haleakala Highway – take a left. (It will be the obvious uphill choice). Follow Haleakala Highway for 8km (4.9 miles) then make sure to read the obvious signage to make the left turn onto Crater Road. Follow Crater Road for 34 km and you are done! Easy right?

Stage 1

The Haleakala Hill Climb


I consider stage 1 the first 23km all the way to Crater Road. If you are attempting Haleakala then stage 1 should feel like a breeze, almost like a warm up to the climb. This is the easiest stage, not only because it is the start, but because it has the lowest average grade at 4.3%.

Stage 2

Haleakala Bike Climb - An Epic Journey


Stage 2 is from the start of Crater Road to the Visitor Centre located at 2130 m (7000 feet) nearly 40km (25 miles) into the ride.

This is where it starts to get real! I ended up pulling chute on my first attempt at the 6000 foot (1828 metre) marker as I wasn’t feeling yoo hot, it didn’t help that I had broken my collar bone a week and a half before, but it was more of a stomach issue.

Stage 2 is the steepest section of the climb averaging 6.3% and you should start to feel the legs tire, combined with the dropping temperature as you climb. Hopefully, you brought an jacket, because it is about to get chilly. The climb starts to morph from a beautiful green tropical paradise to more of a desolate lunar experience.

Stage 3

Stage 3 is from the visitor centre to the top of the House of the Sun.

That 8000 foot marker is where I felt the culmination of tired, cold and food deprived. Another factor was that I really started to notice the thin air. There were sections where I felt like I should have been going 20km/hr and I would look down… 12km/hr! What??? I thought I was in beast mode, decidedly not.

You may start cursing, but before you know it you will be at 9000 feet. Then joy comes because who couldn’t make it another 1000 vertical feet? Before you know what happens you are at looking at the sign “Elev. 10,000 feet” then it is right into the parking lot, where you will notice a side walk up to the true summit.

“Excuse me, sorry,” as you pass the pedestrians to the top who are all staring in bewilderment and treating you like an absolute rockstar. You made it, now hoist that bike over your head and take a picture at the top.

Take a while at the top, enjoy the scenery, get some food, then grab your gloves and any warm gear you hopefully brought with you and start the long epic bike ride down Haleakala.

Riding to the top of Haleakala

Mistakes to Avoid While Climbing Haleakala

Temperature at the Top of Haleakala

The temperature drops 3 degrees for every 1000 feet of elevation gain, meaning that it will generally drop 30 degrees Fahrenheit from the bottom to the top. The average temperature at the bottom of Haleakala is between 78 – 85 degrees Fahrenheit (25 – 30 degrees Celsius). The average temperature at the top of Haleakala is a bit unpredictable and can range from anywhere below freezing to as high as 60°F (15°C)

So what does this mean for a cyclist? Be prepared for cold weather! How much fun would it be to get to 8000-9000 feet and have to turn around because you are freezing! (Think about the descent)

Endurance and Patience

It’s a long freaking climb. There are no truly steep parts, but it is a relentless steady climb. There are almost no flats or downhills at all. Think of the first stage as a warm up, take your time, it is not a race and remember that there is some really thin air up there to add an extra little challenge. First time focus on completion, and if you are lucky enough (crazy enough) to do it again, then focus on time.

Most of all have fun and an epic journey. It will not be one to forget!

What are Clipless Pedals?

October 2, 2015 by Adam Farabaugh

What are Clipless Pedals?
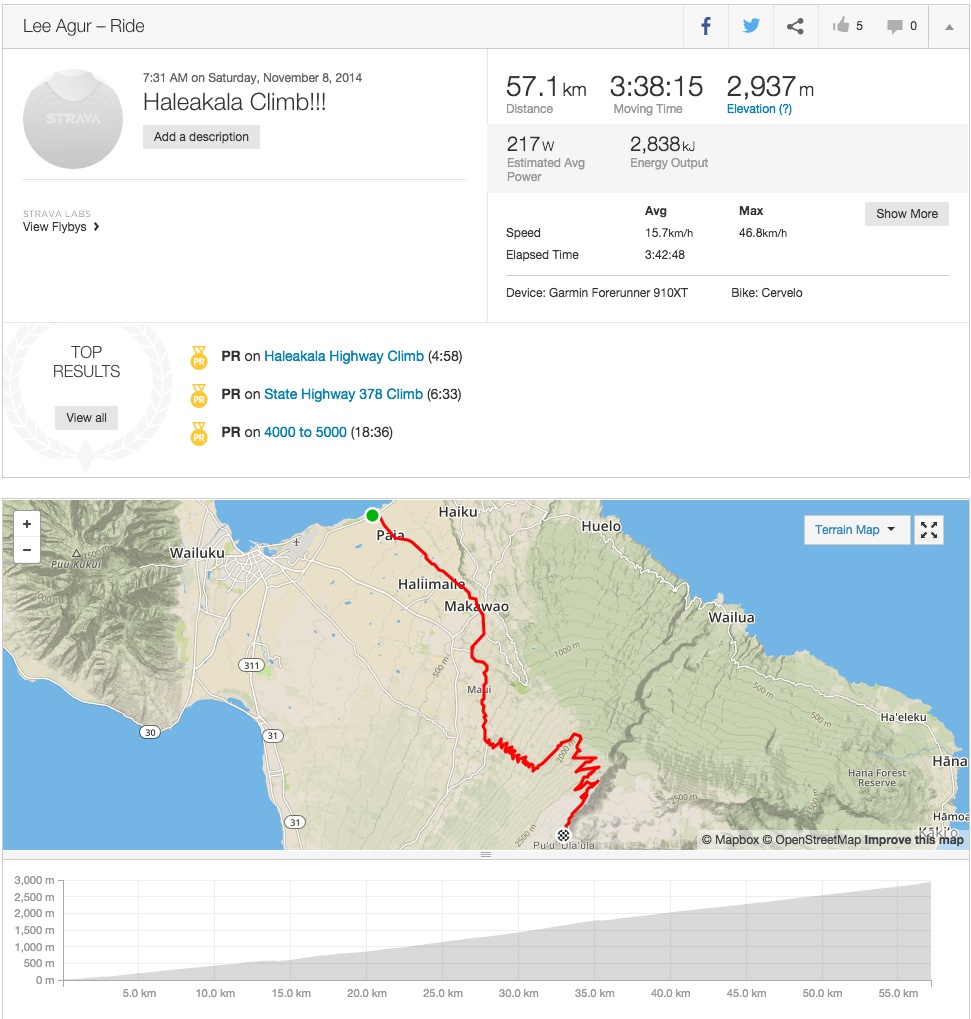
Clipless pedals are a pedal system that keeps your foot attached to the pedal of your bicycle with a spring-loaded system similar to that of a ski binding. Traditional pedals, those with flat sides that are ridden with everyday shoes, can allow your feet to slide around and even off the pedal resulting in a sore shin or potentially a crash. Clipless pedals are a three part system that not only keeps your foot from sliding off the pedal but also provides greater pedaling efficiency. The two types of clipless pedals can help improve your riding and make it more efficient and enjoyable.

What are Clipless Pedals

The three part system that makes up a clipless pedal starts with the pedal itself. This has a spindle just like a normal platform pedal but the plastic or metal platform is shaped in a way to allow the second part of the system, a matching cleat, to snap into it. A spring-loaded mechanism then secures the cleat in place so it doesn’t slide around nor pull out. The cleat is then attached to the final part of a clipless pedal system, the shoe. Shoes are made specifically for these cleats to be attached to the bottom of them via bolts. This three part system works in sync to keep your foot where it should be on the pedal as well as allowing you to pull up during the pedal stroke.

In this three part system, the cleats always come with the pedal as they are made to fit exclusively with each other. The shoes come in two styles, mentioned below, and can be used with their particular system, road or mountain.

How it Works

On the pedal there is a spring mechanism that holds the cleat to the pedal. To clip in, line the cleat up with the pedal and then push down, just like a ski binding. To release the shoe from the pedal, a simple twist of the heal outward releases the cleat. In the event of a fall, the pedal will release the cleat allowing your foot to come free from the bike.

Mountain/Touring System

A mountain setup, also referred to as a touring setup, consists of a pedal that can be clipped in easily on both sides. The cleat, which is attached with two bolts, is a smaller metal piece that is recessed into the shoe which is for mountain and touring only. The shoe has a walkable sole with a bit of tread on it to allow for easy and functional walking. This type of pedal is the only choice for mountain biking but also is a great choice if you are riding on the road but have frequent stops where you are walking around.

Road System

A road pedal set-up is made for road riding where walking is mostly avoided and efficiency is a high priority. Road pedals consist of a lightweight pedal that accepts a lightweight, typically plastic, cleat. The cleat is then attached to a “road” shoe with three bolts in a triangle pattern. This system creates a lighter and more aerodynamic pedal and shoe combo that is optimized for road riding.

Clipless pedals are a great way to improve your cycling and as you start to ride longer and farther it becomes a logical choice. A simple, non-high end, pedal and shoe system can actually be quite cheap and as your cycling progresses you can always upgrade. Cycling is full of technological advances and clipless pedals, although simple, provide an incredible advantage to both racers and recreational riders alike.

Switching to Clipless Pedals

September 30, 2015 by Adam Farabaugh

When to Switch to Clipless Pedals
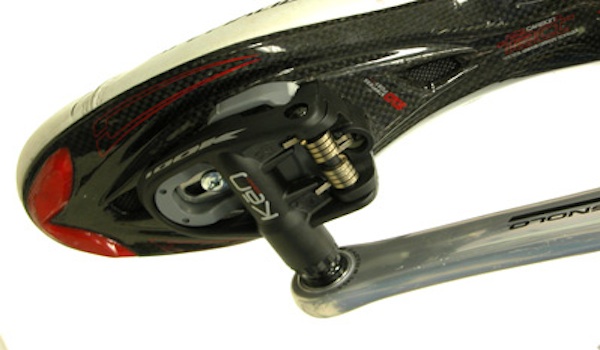
Riding clipless pedals allows you to ride further, faster, and over more technical terrain while giving you a smoother, more comfortable pedal stroke.  The only real downside is falling over when you come to a stop because you forgot to unclip before stopping; more of a hit to your morale than your body.  Switching to clipless pedals at the proper time along with taking the time to learn how to use them properly will take your riding up a level whether it is on the road or mountain bike.

Timing the Switch

When you start out riding a bike you want to be focused on the riding itself, making sure you know how to shift, brake, and keep it upright and going in the direction you want without having to think about it.  Adding in clipless pedals at this time just throws in another hurdle at the same time.  Riders should start riding their road or mountain bike with standard flat pedals for their first ten to twenty rides.  This time allows you to not only become proficient at riding but to the point that you can ride, negotiate turns, hills, and descents without having to think about it.  It is already second nature to you.  You need to get to this point before adding in clipless pedals otherwise they will be more challenging to learn how to use than needed.

Once you have completed ten to twenty rides on flat pedals and are extremely comfortable riding, it is time to switch to clipless pedals.  You may have noticed limitations with flat pedals both on the road and mountain bike.  Clipless pedals keep your foot secure in one location on the pedal as well as allowing you to pull up through the backside of the pedal stroke.  This allows you to ride much more efficiently as well as with more power, specifically on climbs where your cadence slows and you’re trying to get any help you can get pushing the pedals.  Also, on bumpy trails and technical climbs on the mountain bike, clipless pedals will keep your feet on the pedals, lessening the risk of them coming off and hitting your shin on the pedals, or worse, crash.

One fear that riders have in switching to clipless pedals is having their feet still engaged in the pedal in the event of a crash.  One of the big benefits to clipless pedals is that they are spring loaded, like ski bindings, and when there is enough force they will disengage.  The release point on most pedals can be adjusted giving you the comfort of knowing that if you do crash your feet won’t be stuck in the pedals.

Tips on Starting Out

Now that you’re comfortable on the bike and have your first set of clipless pedals and shoes, it’s time to practice to ensure that you know how they work and that you don’t fall over in front of everyone at that first red-light.  The first step is to sit on your seat and lean against something so you can stay in one place while spinning the pedals backwards.  The pedals work by first engaging the front part of the cleat (the piece that is attached to your shoe), on most pedal systems, and then pressing the back part of the cleat down into the pedal.  A good way is to point your toes a little bit and then drop your heel.  The biggest thing is lining up the cleat to the pedal itself.  With practice, you will feel where your foot should fall relative to the pedal.

To clip out, simply twist the heal of your foot out and that will disengage the pedal from your cleat.  Practice this with both feet multiple times until you can do it comfortably.

Now that you can comfortably clip in and out in place, it’s time to do it while riding.  Starting out, find a flat to slightly downhill stretch to get rolling on.  With one foot still on the ground, clip the other into the pedal and bring it to the top of the pedal stroke.  Then push off with the foot that is on the ground and give a big push of the pedal with the foot that’s already clipped in.  Now you will have some momentum and can now clip in your other foot.  Make sure this is on a safe stretch of road or area as you won’t be paying attention to traffic but rather your feet.

Now that you have both feet clipped in and have taken a couple of pedal strokes, it’s time to unclip.  While coasting put one foot down to the bottom of the pedal stroke and unclip (twisting your heel out).  Now you can come to a stop and put your foot on the ground.

Now do the above again, and again, and again.  You want to be comfortable finding your pedals and getting clipped in quickly as well as unclipping.  Once you can do this comfortably, off you ride.  During your first few rides you will have to focus on clipping in and out but once you do it enough it will become a habit and a breeze.  You can now take advantage of all the benefits of having clipless pedals without any of the downsides since you practiced and are now a pro at clipping in and out.

How To Be a Road Biker

January 28, 2014 by Lee Agur

How To Be a Road Biker

NSMB.com put together another hilarious video on the 26 steps on how to be a road biker.

How to be a road biker

If you liked this one check out How To Be a Mountain Biker

  • Facebook
  • Tumblr
  • Twitter

Latest Articles

JOIN Cycling: A New Training Platform for Cyclists

May 27, 2024 By Eric Lister

cold exposure

The Benefits of Cold Exposure for Cycling & Life

June 13, 2023 By Eric Lister

hill climb

The Ultimate Hill Climb Training Guide

May 31, 2023 By Eric Lister

shoulder pain cycling

How to Treat & Avoid Shoulder Pain While Cycling

April 12, 2023 By Eric Lister

psoas stretch

The Importance of the Psoas Stretch for Cyclists

April 6, 2023 By Eric Lister

cycling neck pain

The Ultimate Guide to Cycling Neck Pain: Causes and Solutions

March 21, 2023 By Eric Lister

Useful Info

  • Contact
  • Finally, A Global Cycling Club That Is Focused On Community And Love Of Cycling!
  • Privacy Policy
  • Share Your Story!
  • Terms And Conditions Of Use
  • Welcome to I Love Bicycling
  • What Happened When I Stretched Every Day For a Month

Recent Posts

  • JOIN Cycling: A New Training Platform for Cyclists
  • How to Hang Bikes in Your Garage: 4 Inexpensive Options
  • Gravel Bike Vs. Road Bike: Which One Is Better For You?
  • The 6 Types of Mountain Bikes & How to Choose the Best One for You
  • What Is a Touring Bike Good For? 5 Benefits We Know You’ll Love

Search I Love Bicycling

Connect with Us

  • Facebook
  • RSS
  • Tumblr
  • Twitter

Copyright © 2025 · Magazine Pro Theme on Genesis Framework · WordPress · Log in