• Training
    • Injury Prevention
    • Training Tips
  • How To
    • Bike Fit
    • Gear
  • Nutrition
    • Nutrition Tips
    • Weight Loss
  • Repair
  • Reviews
  • Stories
    • Funny Stories
    • Jokes
    • Quotes
    • Videos
    • Funny Videos

I Love Bicycling

I Love Bicycling is a website that is geared towards cycling for beginners with road cycling tips, training articles, nutrition tips, weight loss, how to’s and bike repair articles.

The Convenience Store Stop: How to Make it the Most Efficient

September 12, 2015 by Adam Farabaugh

The Convenience Store Stop: How to Make it the Most EfficientAs rides start to get longer and longer, stops mid-way for food and water are going to become more frequent as well as important. The coffee shop is a great place to stop for a while and have great conversation over a few brews but during training rides you want to be in, out, and on your way in a timely manner. You also want to get what you need to fuel properly for the remainder of the ride. Knowing what you want to eat and drink prior to going into a store will help prevent you from milling around looking at every possibility which we’ve all done before, especially if we’re already a bit depleted from the ride.

The Drink

Hydrating properly mid-ride is super important because if you don’t, it doesn’t matter what you get to eat, you are going to be suffering the rest of the ride. Typically you are going to want more than just water. Water is good but you want it along with something with electrolytes at the very least because your body depends on them to function properly. It depends on the store but typically you don’t want to pay for water. Take one of your bottles into the store as a lot of stores have a fountain drink dispenser with an option for water. If they don’t, then buying it is the next best choice. Some people opt to fill their bottles in the bathroom but you never know the quality of the water. If you are with a few people, get a gallon jug of it and split it; way cheaper that way.

Electrolyte Drinks

For the electrolyte drink, some fountain drink dispensers have a sports drink which can be a lot cheaper than buying them individually from the refrigerators. Just remember to take it to the counter and tell the cashier what it is to pay for it. If you can’t get a sports drink from the fountain drink dispensers then getting a big bottle of Gatorade or PowerAid can be good as they also have carbohydrates and sugar to continue fueling your ride.

Again, if you are with others, many stores have a “Buy 2” price, so see what you can get for a deal by splitting it. Some sports drinks come with a zero calorie option. This is typically always a bad idea for two reasons. One, you should always fuel for your rides as otherwise you are riding in a depleted state and can’t reach your maximum riding potential. Second, because they are zero-calorie they have to make them taste good with other additives which are never good for you. If you are trying to lose weight, the place to do it is not on the bike. Fuel properly for your rides and then eat less and the right foods off the bike.

Cheapest Drink Option

The cheapest drink option a lot of the time, other than water from the fountain drinks dispenser, is the big cans or jugs of iced tea. These are not the best way to hydrate as they don’t have many electrolytes, and they have a lot of sugar, but drinking them along with a sports drink can be a good cheap option. With these however, you have to look out for high fructose corn syrup if you are trying to avoid it as a lot of them will have them listed as the second ingredient, meaning there is a lot of it in the product.

The Sodas

Soda is one other drink option that many riders swear by mid-ride. Sodas shouldn’t be looked toward to hydrate so much but rather to give you a good boost toward the end of a ride. The high sugar content as well as the potential caffeine can give you a good kick to finish off a ride strong. The trick with soda though is timing it right, because if you have it too early in a ride you can burn through all the sugar before the end of your ride and then you’re left bonked. You want to make sure you have it close enough to the end of your ride or that you have another soda ready to keep you going until the end.

The Food

After you pick out the best drinks for you to finish your ride strong, you need to find the best foods. Drinks are easy comparatively as there are endless food options. The first place to start is; what kind of a ride are you doing?

The Hard Ride

If you are riding hard, at threshold and above, you need foods that are easily digestible along with a high carbohydrate and sugar content and low protein and fat content. Simple granola bars without too many nuts can be a good healthy option. Other foods that are often thought of as bad for you can actually be a good choice mid-ride. Foods like cookies, pop-tarts, pastries, and other little sweets have a lot of carbohydrates and calories packed into a small goodie. The fire with these is that a lot of them are highly processed and contain a lot of ingredients so if you are trying to avoid all that, go with a good quality cookie or pastry that contains fewer ingredients as well as nothing that you can’t pronounce.

Other good options for the end of a hard ride are candy bars. These too are thought of as “junk food” but they contain a lot of sugar that your body pretty much burns exclusively when you are riding hard above threshold. Be careful not to get any that contain too many nuts but otherwise go with what you like. Snickers tend to be a lot of cyclist’s favorite.

The Endurance Ride

When you are training at a lower intensity you still need the carbohydrates to keep you rolling strong but you don’t need as many and the ones you do need don’t need to be from sugar. You are burning calories at a slower rate so you want longer burning fats and proteins along with the carbohydrates. Easy pocketable items include more nut based bars as well as protein bars provided you can stomach them and they don’t contain too much protein. Another option, although it’s not quite as quick, is to get a small sandwiches or wraps that many convenience stores have pre-made. This gives you some of the carbs in the bread along with the protein in the meat. Don’t eat too much at one time though as you don’t want a heavy brick in your stomach.

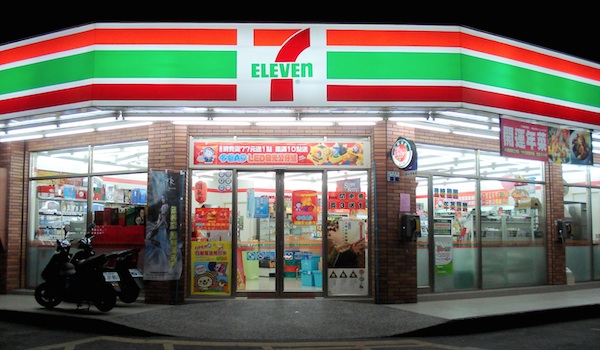
Depending upon where you live, there can be many options for where to stop to refuel. In most parts of the country, gas stations with convenience stores tend to be the most frequented as they are around from the big city to the only place around for miles and miles in parts of the American West. Plan ahead and know where you are going to stop mid-ride. You’ll not only get into a routine of which places you stop at, but also which food and drink you get at each place. Making good choices in the store will keep you going strong on the rest of your ride.

How to Ride in a Paceline

September 12, 2015 by Adam Farabaugh

How to Ride in a Paceline
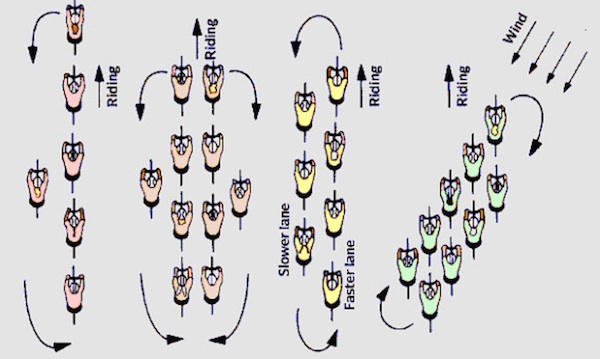
Riding in a group can bring a lot of benefits that you can’t get while riding on your own. A paceline is how a group of riders rotate through trading spots riding the front in the wind. Riding in this way is the fastest and the most efficient way down the road. However, knowing how to ride in a paceline is imperative as if you can’t, you not only pose a risk to yourself but others as well due to the possibility of crashing. Riders in the group can also give you pointers as you get the feel for how things roll.

The Rotation

A paceline starts with two lines of riders riding single file with one line moving forward while the other one moves backwards. This allows for a constant changing of the front two riders that are in the wind allowing the work to be spread over the group more evenly. The rotation is always continuous giving it the name “rotating paceline”.

When You’re at the Front

As you approach the front, the rider ahead of you will slide to the left and slow down a little. As he or she does this, you keep pedaling at the same speed. Do not accelerate. Stay the same speed and continue straight in your line. As you’re doing this look over your shoulder or under your arm to see where the rider is that just pulled off. Once you see that they are far enough back, slide over in front of them taking care to not take out their front wheel.

Once you are here, keep pedaling but take about two “soft” pedal strokes where there is not much pressure on the pedals. This will slow you a little but not so much as the rider now behind you has to slow. You are only slowing the difference in speed of the line that’s moving forward and the line moving backwards. Since the paceline is rotating, you do not need to do anything to signal the rider behind you to pull through. However, if you are taking longer turns on the front, give a slight “flick” of the elbow out as you slide to the side. This indicates that you are done pulling on the front and for them to pull through.

When You’re at the Back

As you slide backwards in the group you will eventually get to the back and have to switch lines to the one moving forward. You will probably have an idea of about how big your group is so when you are getting close, be ready to slide over. As the last rider slides over and is moving back up past the rider whose wheel they were just on, they should say something such as “last” or “last rider”. This gives the rider moving back a heads up that they are now last and that they need to slide over and reaccelerate to get on the wheel that’s now moving forward.

Always look to make sure that there is no one there otherwise you could ride straight into someone. To avoid sliding too far off the back and having to reaccelerate hard, you should start accelerating before the last rider comes past you. As you reaccelerate, you should start to slide to the side and end up having your front wheel move past the other rider’s rear just as you’re going the same speed as them. This takes practice but you’ll get the gist quick.

Clockwise or Counter-Clockwise

Pacelines don’t always rotate in the same direction due to the wind. If there is no wind then riders should rotate in a counter-clockwise direction as it’s easier with traffic. (Except if you’re in the UK or Australia, yours will be the opposite.) When there is wind however, you should always pull off into the wind. This means that if the wind is coming from the left, you ride counter-clockwise, and if the wind’s from the right, you ride clockwise. Riders will always be sliding to the side of the wheel in front of them that’s more out of the wind.

If the group is rotating in the wrong direction, as the first rider slides over, they risk taking out the front wheel of the rider that’s behind them. If the group is rotating in the wrong direction, yell that you are switching the rotation as you get to the front. When you are on the front, don’t pull off but rather keep riding to allow the riders sliding back to slide back a bit and then pull off in the other direction. If you need to make room for you to pull off, slide slightly to the opposite direction and moving the riders immediately behind you over, and then pull off.

The Double Paceline

When a group’s riding fast they will typically always ride a rotating paceline. When a group’s out for more of a training ride or relaxed ride, they will ride a double paceline. This is where the two lines ride side by side at the same speed and two riders on the front are in the wind at the same time. This allows for longer pulls of the riders on the front as well as for everyone to be able to have a conversation instead of just riding past each other. Pulls can be as short as one minute or as long as ten to twenty minutes depending upon the group and riding.

When the two riders on the front are ready to pull off, they first make sure that there is no traffic and then one slides right and the other left, moving backwards down the side of the two lines. When they get to the back, they reaccelerate and pick up the last two spots in line. Pulling off in this way can only be done when on wide enough roads. When the roads are narrow and/or there is not enough room due to traffic to ride four wide, the group rides a slowed rotating paceline essentially. When the two riders on the front are ready to pull off, one accelerates a little moving ahead of the other while the other one slows and moves back. The rider on the side that just moved up now slides forward and takes their spot on the front of the bunch. The group should rotate twice as much as when the rider is on the front, they are on the front for two turns essentially. Rotating in this way also allows you to talk to different people as the double paceline only really allows you to talk to the same person if there is an even number of people.

Some sort of paceline is typically how any group rides aside from a race or an event that has full use of the roads and where you can ride more than two abreast. Knowing the different kinds and how to ride in each of them will allow you to comfortably ride in a group along with being less sketchy and avoiding causing a crash. Also, an easy way to pick out a newer rider in a group is how they ride. If you mess up as well as ride sketchy, meaning you ride in a way that could cause a crash, you will probably be heckled as well as tried to drop. Everyone is new at some point but knowing how things work and then getting a few pointers in your first few group rides will allow you to fully enjoy and take full advantage of them.

The Echelon: Riding in the Wind with a Group

September 10, 2015 by Adam Farabaugh

The Echelon: Riding in the Wind with a Group
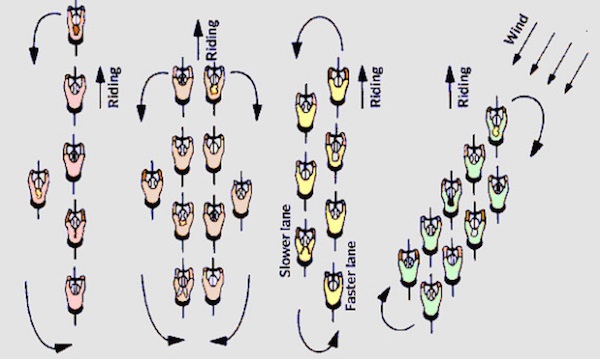
Two things that slow you down in cycling are uphill’s and wind. Some look to avoid them while others embrace them. Riding in the wind can be a drag but it’s going to happen so you should know how to get through it the most efficiently.  The wind can also have some good benefits, one being that you can ride a lot faster than you otherwise could when it’s at your back. When you are in a group riding into a headwind you can actually get more of a draft behind the other riders allowing you to pedal with much less effort. A side wind can give you a real advantage if you know how to ride in it as the other riders that you’re with will have to pedal that much harder because they are poorly positioned.  As with anything in cycling, the more you do it the better you’ll be at it.

The Headwind

On solo rides or rides with one or two others, headwinds can slow your ride dramatically while you have to pedal much harder. In a group however, the draft of a rider is magnified. The first rider still has to pedal extra hard, as they would on a solo ride, but the riders behind don’t have to pedal with nearly the same amount of effort. Since you are in a group, everyone can take shorter turns on the front in the wind keeping your speed closer to what it otherwise would have been.

The Tailwind

Tailwinds are fun whether you are solo or with a group. You can ride at speeds almost like you have a motor on your bike. The downside is when you have to turn around. The one drawback from tailwinds in a group is that you get less of a draft behind the rider ahead. Even though the first rider can go X amount faster, the riders behind are going to have to pedal at a closer effort to the rider on the front. You all are still going faster though so it’s still a benefit to all.

The Crosswind

Riding in a cross, or side-wind, in a group is really where knowing what position to ride in will benefit you. The first thing is that you obviously can’t see the wind, unless you spot a flag or something else blowing, so you have to feel it. When it’s a strong wind this is easy but when it’s only slight there is still an advantage to riding downwind of the rider in front of you. You just have to then know where that downwind is. Overtime you will get good at feeling where the wind is coming from.

Where to Ride

First we will simplify things down to two riders riding in the wind. The wind is coming from the left. Downwind, or where the best draft for the second rider, is going to be slightly behind the first rider and to the right. This will be just slightly to the right, the closer the wind is to a head or tail wind and when it’s closer to ninety degrees from the left, the draft will be further to the right of the first rider rather than being slightly behind them.

As you first start riding, you should avoid overlapping your front wheel with the rear wheel of the rider in front of you. As you get better as well as the riders you ride with, you will overlap your front wheel to get into the “sweet spot” of the draft. When you do this however you need to pay the utmost attention as the slightest movement to the right of the rider in front of you will cause them to hit your front wheel, thus crashing you. To avoid this, any movement the rider ahead of you makes you need to replicate.  When they move right, you move right keeping your front wheel in the clear.

Making the Switch

Now in our two rider scenario, the first rider took a short pull on the front and is going to move back behind the other rider. The first rider eases off the pedals slowly and moves slightly to the left and back. The second rider then slides left at the same speed filling the position the first rider was just in.  The rider pulling off then slides right passing their front wheel behind the now, first rider’s rear wheel and then slightly forward and to the right where the “sweet spot” is.

Pro Tip: When pulling into the front position it is important to keep a steady pace, one that you were holding while drafting. Many novices hammer on the pedals and force a gap behind them making the echelon less efficient and creating an accordion effect that forces people drafting to use excessive energy.

Adding it to a Group

Now taking the above scenario and adding riders to it gives an echelon.  It is the exact same thing except that behind the second rider is a third and so on. Because each rider is riding, in our scenario, slightly to the right of the rider in front of them, the echelon can only be so wide as you run out of road to the right. What then happens is a second echelon is formed with a bit of space before the first. Often times before this happens however is that a trail of riders will be riding down the extreme side of the road trying to get a draft. They can’t get as good of a draft as the riders in the rotating echelon so they will often lose ground when they tire.

In a rotating echelon no one takes a full pull on the front but rather rolls through the first position in the wind. As soon as a rider hits the first position they slide back and move gradually to the right one by one ensuring that they don’t hit their front wheel on any of the riders in the first row but no further back. This creates two lines of riders. It’s like a pace line, just tilted. When the rider moving backwards down the line reaches the last rider they accelerate forward into the last riders draft and follow them in that same position as the front row continues to slide left.

The Gutter

If you are in that situation where there is a cross-wind and no one is riding an echelon you’ll be forced to ride down the very edge of the road, often known as the gutter. The key to riding in this position well is being able to see past the rider in front of you so you can see where the exact side of the road is and if there is anything sticking out. A good trick to do here is to ride with your body slightly to the right of where you would normally sit on the bike with your head tilted even further to the right. This will give you that extra little bit to be able to see what’s coming up.  And if anything does come up, just push your bike back to the left, in our scenario.

Riding in the wind takes practice and even if you know how to, others in the group may not know how which can be frustrating. Cross-winds can be dangerous with the overlapping of wheels so just make sure you pay attention as to not cause a crash as well as to look out for others who might cause a crash. Riding in the wind isn’t always fun but at the very least it can be made a bit more enjoyable if you know how to ride it. Stay in the right position on the wheel in front of you and being a bit more aero always helps too.

Cycling Tips for Beginners

July 30, 2015 by U.M.

beginner cycling, beginner cycling tips, beginner cycling training, beginner cycling training plan, beginner cyclist, beginner road bike, beginners road bike, bike skills, cycling beginner, Cycling for beginners, cycling tips for beginners, cycling training for beginners, cycling training program for beginners, road bikes for beginnersStarting any form of exercise can be intimidating at first, so we thought it would be a good idea to give all of the beginners out there a handy guide that should help them get the gist of things and set them on their way to becoming good cyclists. This list assumes you have a bike already, but if not then check out our list of the top ten bike brands on the market today to get you started.

Cycling Tips for Beginners

Get The Right Equipment

It should go without saying that you need to get a good bike helmet before heading out onto the road, but you will find that a decent pair of padded cycling shorts and some cycling gloves will also help when it comes to overall comfort and quality of your ride. Your butt will never forgive you if you go on a road ride without padded cycling shorts as a newbie.

Positioning

Many beginners struggle with the positioning when they first climb onto a bike, particularly when riding a road bike. A good knowledge of the three main cycling positions will be extremely helpful:

Neutral – The most comfortable position, allowing you to change gears and brake easily in addition to being able to look around. You should be sat almost upright in this position.

Lowered in the Drops – This is where you lean into the handles in an effort to gain more speed. A road bike will generally have “drops” for you to grip when in this position. They are the part of the handlebars that make the “C”. d

Standing – You will use this position when you need to generate a little extra power in your riding, such as when you are going uphill.

Proper use and transitioning between these three positions is extremely important.

Using Your Gears

As a cyclist you want to maintain what is known as a regular cadence, which is the average speed that you can rotate the pedals and is measured in revolutions per minute (rpm). Keeping your cadence stable is important to improve as a cyclist, so you need to know how to operate your gears appropriately.

As such, try to figure out your cadence on a flat road and don’t stay in a high gear too long or you will place undue stress on your legs. Always move to a lower gear when going uphill so that you can maintain your cadence and ascend without issues.

Keep Your Eyes On the Road

One of the main issues that you are going to face when you actually head out onto the road is the condition of the roads themselves. Potholes and other debris can lead to you falling and, in worst cases scenarios, injuring yourself.

Always keep your eyes open when riding and be aware of what is around you. You don’t have to go full speed in every area, so if you are a little wary, slow things down a little bit so that it is easier to pay attention to what’s happening. You can speed things up again when you start to get more comfortable.

A Good Bike Fit

Bikes come in all different shapes and sizes, just like the people riding them, so it is important to get a bike that fits your body type. This will help in regards to comfort levels and reduces the risk of sustaining injuries or muscle aches during prolonged cycling.

A professional bike fitter will be able to help you ensure you have everything right; everything from the bike frame through to the positioning of the saddle and handlebars can cause issues.

Obey The Law

To cycle on the road you are going to have to obey the rules of the road, in addition to demonstrating some general cycling etiquette.

Don’t assume that you can run red lights because you are on a bike, as you put yourself in danger in addition to other road users. Also try to keep your cycling line as predictable as possible, rather than swerving around, as this can make other road users nervous and lead to more accidents. Finally, always stick to the right side of the road wherever possible, and be sure to clearly indicate your intentions if you want to make a left turn, so that everybody behind you knows what you want to do.

These are a few quick cycling tips for beginners. For a Complete Guide To Cycling For Beginners Click Here!

A Complete Guide to Cycling for Beginners

July 27, 2015 by Lee Agur

cycling for beginners, cycling tips for beginners, beginner cycling, beginner cycling training, cycling beginner, beginner cycling tips, cycling training for beginners
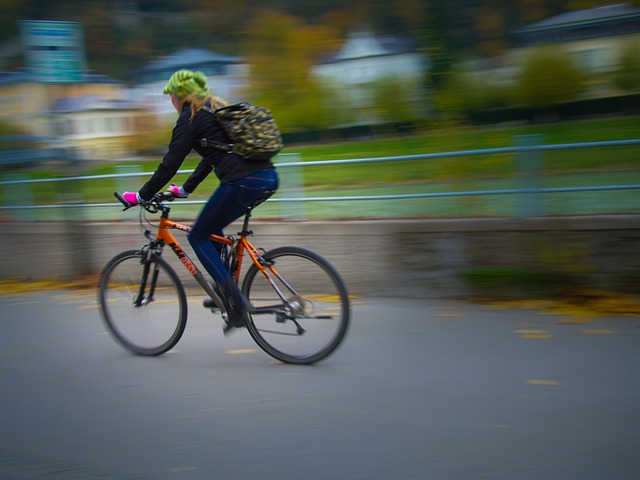
Cycling for beginners can be a scary thing. This guide will give you beginner cycling tips on everything you will need to know to get started. We will cover pedaling, stopping, position, corners, climbing, changing a flat tire, road bikes for beginners, cycling tips for beginners, training, nutrition, injury prevention, bike fit and training plans for beginners!

Pedaling Your Bike

Cycling for beginners, road bikes for beginners, beginner road bike, cycling tips for beginners, beginner cycling, beginner cycling training, beginner cycling training plan, beginners road bike, cycling training for beginners, cycling beginner, beginner cycling tips, cycling training for beginners, cycling training program for beginners

The first thing you are going to need to learn his how to pedal your bike! Pedaling the bicycle is what cycling is all about! Why would you not want to be the most efficient at this one thing?

Most novices “mash” the pedals, meaning that they apply all the force on the down stroke. It sounds ridiculous, but you really need to focus on pedaling in a circle and applying pressure through the entire stroke. You can accomplish this by pushing down, pulling back, lifting up and then pushing forward. That is one entire stroke.

If you find your quads are really sore after a ride it may be due to the fact that you are mashing the pedals.

If you find you are struggling with your pedal stroke visit: The Perfect Pedaling Technique for more detail.

Stopping Your Bike

Cycling for beginners, road bikes for beginners, beginner road bike, cycling tips for beginners, beginner cycling, beginner cycling training, beginner cycling training plan, beginners road bike, cycling training for beginners, cycling beginner, beginner cycling tips, cycling training for beginners, cycling training program for beginnersStopping your bike is likely the most important thing you can learn. Clearly, if you squeeze the brakes you are going to slow down and eventually stop, but there are different techniques involved.

Need to slow down or stop slowly. Sitting upright with you hands on the hoods and gently squeezing the brakes will be all that you need to do.

Need to stop more safely and quicker. Put your hands in the drops where you have more leverage and are able to squeeze the brakes harder but you also lower your centre of gravity allowing you to stop more quickly.

Need to stop immediately. Emergency stopping should be practiced. Have your hands in the drops squeeze hard but at the same time drop your bum off the back of the seat and lower your bum as low as you can to your back tire. This is the fastest way you can stop on a bike.

For more details on how to stop your bike go to All you need to know about stopping your bike.

Position On the Bike

There are three different riding positions on a bike: Neutral, drops and standing.

Neutral

The neutral position is the most common position and it involves sitting on the seat with your hands on the hoods “covering” the brakes (this means your hands are over the brakes ready to stop). If your bike fits properly then your arms should be at a 90 degree angle in relation to your torso. At first this may seem like you are leaning too far forward, but as you adapt from a beginner cyclist to a seasoned pro it will feel as natural as sitting in a chair.

Drops

Being in the drops is when your hands are in the C-shaped bottom portion of your handlebars. You are commonly in this position if you are trying to get more aero and go faster or when you are descending. It is safer to be in the drops while you are descending as it gives you more leverage on the brakes allowing you to brake harder, in addition to lowering your centre of gravity allowing you to stop faster.

Standing

Primarily used for climbing, standing is a position that uses a little more energy as you have to support more of your body weight with your arms and legs. In order to stand, start in the neutral position and then slide your weight forward as you begin to stand. Remember to keep pedaling! As you continue to pedal, slowly rock the bike side to side with your arms in unison with your pedal stroke essentially making it easier to pedal.

Taking Corners on a Bike

Cycling for beginners, road bikes for beginners, beginner road bike, cycling tips for beginners, beginner cycling, beginner cycling training, beginner cycling training plan, beginners road bike, cycling training for beginners, cycling beginner, beginner cycling tips, cycling training for beginners, cycling training program for beginners
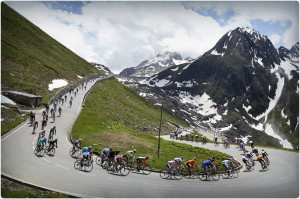
Most beginner cyclists assume they need to turn the handlebars in order to take a corner; while this is the case at very slow speeds it is usually not practiced while taking most corners at speed. Rather you will lean the bike frame the direction you want to turn and adjust your weight accordingly.

When riding you should always stay relaxed, but it is even more important around a corner as it will allow you to adjust your body weight properly.

Look Where You Want to Go

Your body likes to follow your eyes, so look where you want to go, not where you don’t. A common mistake is continuing to look at what you are trying to avoid; this generally results in a collision with that same object. Let your peripheral vision do the work, it can see that object and you will not hit it.

Look far in to the corner, not right in front of you. Your hips turn the same direction you are looking and your hips determine where the bike is going to steer. Beginners are guilty of looking directly in front of themselves quite frequently, especially when the turns come hard and fast. Depending on your speed and the angle of the corner determines how far in to the corner you look. In sharp corners look as far ahead as possible. Play with it and you will notice significant improvements immediately.

Brake Before the Corner

Cycling for beginners, road bikes for beginners, beginner road bike, cycling tips for beginners, beginner cycling, beginner cycling training, beginner cycling training plan, beginners road bike, cycling training for beginners, cycling beginner, beginner cycling tips, cycling training for beginners, cycling training program for beginners
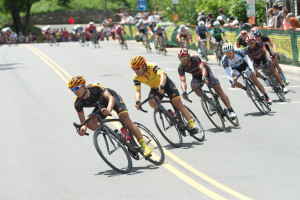
You should be going the speed you want to go around the corner at the beginning of the turn. Braking in the turn actually makes the bike want to stand up on itself and straighten out, two things you are trying not to do. You end up fighting the bike and shedding more speed than necessary to make the turn safely.

Generally, you only want to be doing one of the following things at any given time: braking, cornering, or pedaling. Combining these things can lead to disaster.

Find the Line

Approach the corner as wide as possible, cut through the apex and finish wide. This is the straightest line through the turn, allowing you to carry more speed and reducing the angle of the turn making it less scary. Many people cut to the apex too early which results in excessive braking near the end of the turn and exiting slowly.

Don’t Pedal in a Corner Pedal out of a Corner

Pedaling in a corner can cause you to strike your inside pedal on the ground and send you flying. If this happens try not to panic and over correct. Over correcting will certainly cause a crash.

Once you have completed the turn and the bike is in a more upright position it is safe to hammer on the pedals again. Hopefully you remembered to shift down to an easier gear before you entered the turn so it is not too difficult to pedal out of it.

How to Steer Your Bike

There are three different ways to steer the bike: Upright steering, leaning and countersteering.

Upright Steering

Upright steering is when you turn your handle bars and keep your body and the bike as upright as possible. This is best reserved for slow speeds and dangerous conditions i.e. wet and slippery conditions. If your tried this at a high speed you would fly off your bike. Been there, done that… don’t recommend it.

Leaning

This is the most common method of steering and involves leaning your bike and body over to make the turn. Lean over more to turn sharper and make sure that you have your outside pedal at the 6 o’clock position pushing your weight through that pedal to keep traction with your tires and not causing a pedal strike.

Countersteering

The next level of steering. In order to test it out, go down a straight road, pick up some speed then push your right hand down… what happens? Initially your front wheel turns right, but as the bike starts to lean over you turn left. The sharper the turn and less consistent the turn (more bends) the more important countersteering becomes.

Cycling for beginners, road bikes for beginners, beginner road bike, cycling tips for beginners, beginner cycling, beginner cycling training, beginner cycling training plan, beginners road bike, cycling training for beginners, cycling beginner, beginner cycling tips, cycling training for beginners, cycling training program for beginners

Position While Countersteering

Initially, you press with your opposite hand, but as you being to turn you want your inside arm straight and applying a bit of pressure to continue to turn the direction you want to go.

Lean your body over, but then lean your bike over even harder. This is not like the leaning technique where the angle of your bike and the angle of your body are the same in relation to the ground. In countersteering you lean the bike over more and your body is more upright in order to keep traction.

Try to keep your weight back and low and remember to push hard on your outside pedal that is located at the 6 o’clock position.

If you learn how to countersteer you will not regret it, it is safer and faster as it allows you to make adjustments through out the turn much quicker.


Ok! Now that we are done with the essential cycling tips for beginners we can move on to more exciting bike skills like climbing hills!

Climbing Hills

Cycling for beginners, road bikes for beginners, beginner road bike, cycling tips for beginners, beginner cycling, beginner cycling training, beginner cycling training plan, beginners road bike, cycling training for beginners, cycling beginner, beginner cycling tips, cycling training for beginners, cycling training program for beginners
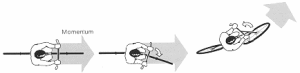
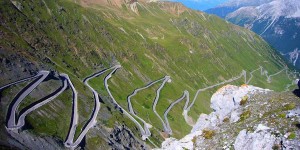
The most important aspect of hill climbing is maintaining a steady effort from the bottom all the way to the top. This is a difficult thing to achieve. If you have a heart rate monitor there is a lag of approximately thirty seconds to one minute – keep this in mind. If you are going off of perceived effort – the beginning of the hill is perceptively easy and top seems incredibly difficult at the same effort. Power meters are the only way of receiving instantaneous feedback of your actual effort.

Not everyone wants a power meter, so the best advice is:

  • Start out slower than you think at the bottom of the hill
  • Be familiar with the course or ride so you know how long the hill is and what type of effort is required
  • Practice the hill and see what pace works for you

Cadence

You can mash or you can spin. Everyone is different, but for most people it is more efficient to spin up a hill (maintaining a cadence of 80 to 105). Maintaining this high of a cadence may be difficult in the beginning but as your fitness improves it will become more natural.

What happens if you are in the easiest gear and you are unable to maintain a cadence of at least 80? It is likely that you need to get a compact or triple crankset. Beginners road bikes can come with a triple crankset up front and it is likely you should take that option. Mashing just burns you out faster.

Position

While climbing you should:

  • Sit upright in order to open your lungs for more oxygen intake to engage larger muscle groups.
  • Have a relaxed grip so you do not waste energy with a death grip and cause tension to limit your oxygen intake.
  • Have a quiet upper body (don’t bob your head back and forth – it wastes energy and is usually caused by mashing on the pedals instead of spinning)
  • Mostly remain seated:

Standing vs. Sitting.

It is more efficient to stay seated during a hill climb than to stand; however, you can produce more power while standing.

When you stand your core does more work because your pelvis is not anchored to the saddle so your core and back muscles have to pull up on an unweighted pedal resulting in a higher energy expenditure. You also engage your arms to pull down on the bars and support yourself.

When is it beneficial to stand?

  • On long climbs it is beneficial to stand to engage different muscles groups and let the other ones have a rest. Try to save this for the steep sections of the climb.
  • When your cadence slows down and it is difficult to continue “spinning”.
  • When cresting over top a summit to transition into a flat or descent. It can give your muscles a feeling of relief.
  • When you need to go as fast as possible as it engages more muscle groups, but be careful as it expends more energy.

Mental Attitude

Mental attitude towards hills makes a big difference on how you perform. You have to stay in a positive space no matter how much you are hurting and believe you can do it. Use little mind tricks as simple as envisioning rockets on your bike and then literally say, “rockets engage!” embarrassing, but effective. Never be mentally defeated and always finish a climb no matter how slow you have to go… even if you have to walk!

Shifting Gears Properly

Gear shifting comes with experience. Shift to an easy gear too soon and lose your momentum, shift too late and you run the risk of not being able to shift at all.

When you shift down to an easier gear there is more strain on the chain and sometimes it will not shift if there is too much pressure, ease up on the pedal stroke for a brief moment to allow the shift to happen. Shifting gears becomes a “feel” thing, over time you will instinctively know how much pressure your chain can take and how brief of a moment you have to stop pedaling for.

Additionally, when you change from a seated position to a standing position you should shift up at least one, if not two gears when your foot is at the two o’clock position because when you stand your cadence slows down. You do not want to lose momentum or have the person behind you run into you.

Changing a Flat Tire

A flat tire is the most common bike repair that you are going to have to perform. Find out how to change a flat bike tire by watching this short video:

What are Good Road Bikes for Beginners?

Cycling for beginners, road bikes for beginners, beginner road bike, cycling tips for beginners, beginner cycling, beginner cycling training, beginner cycling training plan, beginners road bike, cycling training for beginners, cycling beginner, beginner cycling tips, cycling training for beginners, cycling training program for beginners

The best beginner road bike is the one you are most comfortable on! For a great list of entry level road bikes click on the link. My top pick: The specialized allez.

The specialized allez sports comfortable yet fast geometry combined with its great handling makes it the best bike under $1000. To get the most bang for your buck you want something comfortable enough to ride on but stiff enough to go fast. The specialized allez sport is the best combination of these two qualities.

Cycling Tips For Beginners

One article is far too little to scratch the surface of all the cycling tips for beginners. Below is a list of additional articles that I highly recommend you read when you have time! There is a lot to learn as a beginner!

cycling for beginners, cycling tips for beginners, beginner cycling, beginner cycling training, cycling beginner, beginner cycling tips, cycling training for beginners

How To Breathe While Cycling – I bet you don’t do it properly.

Finding Your Ideal Cadence – The proper cadence can make you more efficient.

Perfect Pedaling Technique – This is difficult to master but it is worth your attention.

Cycling Aerodynamics – How much does it really help?

Should I Buy a Bike Online? – If you are getting a beginner road bike and have not bought a bike before, buy one from your local bike shop! If you know exactly what you want and have tried it before maybe there is some savings online.

How to Bike Safely on Wet Roads – As a newbie this can be particularly scary, make sure you give yourself ample time to slow down as it takes much longer.

How to Stay Cool While Cycling – Overheating while you are out road biking?

The Perfect Sprinting Technique – Want to start beating people to the line?

Climbing Steep Hills – So you have nailed climbing hills, but need a few extra tips to get you up the steep ones!

Top 10 Best Cycling Books – This list of books provides cycling tips for beginners, cycling training programs for beginners, amusing reads and more.

Descending on a Bike – Trying to descend on a bike safely and quickly is an art.

Road Bike Tire Pressure – Find the correct road bike tire pressure for you.

Beginner Cycling Training

When you start out as a newbie, cycling training can seem difficult. Firstly you need to learn the Basic Goals of Training, once you know what you are attempting to accomplish then you will have a better idea of how to get there!

cycling for beginners, cycling tips for beginners, beginner cycling, beginner cycling training, cycling beginner, beginner cycling tips, cycling training for beginnersInterval Training – What it is and how it works.

2×20 Interval Training Workout – This is the best workout for aerobic fitness there is. If you are training for a race longer than 10 minutes this should be your go to workout.

Beat Indoor Cycling Boredom – Find you are getting bored with training on an indoor trainer? Spice it up with these ideas.

The Benefits of a Proper Warm Up – You should always warm up before you add any sort of intensity in to your ride.

Aerobic Energy vs Anaerobic Energy – It is surprising how much more energy you use anaerobically rather than aerobically.

Cycling 100 Miles or a Century – Looking to complete your first 100 mile race?

Bonking – It is almost guaranteed that you are going to “bonk” (run out of energy and feel terrible) if you are a beginner cyclist because you will not have your nutrition needs figured out yet, nor will you have the efficiency to properly utilize that energy. Check out how to avoid bonking.

Nutrition for the Beginner Cyclist

When you start cycling, taking in the proper nutrition before, during and after a ride is likely your most important and difficult task.

cycling for beginners, cycling tips for beginners, beginner cycling, beginner cycling training, cycling beginner, beginner cycling tips, cycling training for beginnersWhat to Eat on a Long Ride – Here is a general guideline of how much you should be eating per hour of cycling.

Ten Foods to Eat After a Long Ride – Recovery is every bit as important as the actual ride for training. Make sure you allow your body to recover properly by feeding it the appropriate foods!

Nutrition and Fueling for Cycling – An overall look at nutrition and fueling for cycling written by Canadian National Road Race Champion Scott Price.

Best Way to Lose Weight Cycling – Most of the studies and suggestions are wrong. This common sense approach to losing more weight while cycling just makes sense.

How Many Calories do You Burn When Cycling – Do you know approximately how many calories you burn while you are cycling? Here is a rough guideline to follow.

ABC’s to Fats, Proteins and Carbs – Understand what your body needs and when it needs it.

Hydration Tips – Hydrating properly is such a variable, depending on the weather conditions, effort and individual. Get a rough guideline on how to determine how much water you need during your ride.

Is the Paleo Diet for Cyclists – Want to know if the paleo diet is beneficial or harmful to you becoming the best cyclist you can be?

What you need on a long bike ride – Don’t forget the essentials!

Cycling to Lose Weight Tips – A few quick tips that will help you achieve your goals that much easier.

Cycling for Beginners – Injury Prevention

There is nothing worse than finding a new passion and then immediately being sidelined by an injury, especially if it could have been prevented!

cycling for beginners, cycling tips for beginners, beginner cycling, beginner cycling training, cycling beginner, beginner cycling tips, cycling training for beginners

Knee Pain – This is one of the most common injuries as biking is a repetitive motion. If you are having knee pain and/or want to prevent it read this article.

Lower Back Pain – What causes lower back pain and how to solve the problems.

Stretching Exercises for Cyclists – Almost all cyclists are guilty of not enough stretching, it doesn’t matter if you are a seasoned pro or a new cyclist stretching is a great injury prevention measure that is not utilized enough.

Foot Pain – Are you getting foot pain?

Exercises to Strengthen Core – You need a strong core to be a great cyclist. Try these exercises to improve your core strength.

Post Ride Massage – The benefits of a post ride massage and how to do it yourself.

Cycling For Beginners- Bike fit

How to do a Basic Bike Fit – Learn how to do a basic bike fit so you can ride comfortably.

How to Find the Proper Saddle Height – A few centimetres too low and you will use a lot of extra energy and bring on knee pain, too high and you will sway back and forth reaching for your pedals.

Proper Cleat Position – Proper cleat position can help with alignment and endurance. Make sure to get it right.

Fore and Aft Saddle Position – Where your saddle is positioned in terms of how far forward or back it is in relation to your cranks is important for proper position and comfort.

Saddle Tilt – Important parts going numb? It could have something to do with the tilt of the saddle.

Beginner Cycling Training Plan

Cycling for beginners, road bikes for beginners, beginner road bike, cycling tips for beginners, beginner cycling, beginner cycling training, beginner cycling training plan, beginners road bike, cycling training for beginners, cycling beginner, beginner cycling tips, cycling training for beginners, cycling training program for beginners

You know what the best cycling training for a beginner is? Just getting out there and doing it! Whatever makes it more fun! Find groups to ride with, track your rides on strava. Whatever it takes to get you out riding!

I Love Bicycling will be coming out with some beginner cycling training plans soon. Subscribe to our newsletter below to stay in the loop.

« Previous Page
  • Facebook
  • Tumblr
  • Twitter

Latest Articles

JOIN Cycling: A New Training Platform for Cyclists

May 27, 2024 By Eric Lister

cold exposure

The Benefits of Cold Exposure for Cycling & Life

June 13, 2023 By Eric Lister

hill climb

The Ultimate Hill Climb Training Guide

May 31, 2023 By Eric Lister

shoulder pain cycling

How to Treat & Avoid Shoulder Pain While Cycling

April 12, 2023 By Eric Lister

psoas stretch

The Importance of the Psoas Stretch for Cyclists

April 6, 2023 By Eric Lister

cycling neck pain

The Ultimate Guide to Cycling Neck Pain: Causes and Solutions

March 21, 2023 By Eric Lister

Useful Info

  • Contact
  • Finally, A Global Cycling Club That Is Focused On Community And Love Of Cycling!
  • Privacy Policy
  • Share Your Story!
  • Terms And Conditions Of Use
  • Welcome to I Love Bicycling
  • What Happened When I Stretched Every Day For a Month

Recent Posts

  • JOIN Cycling: A New Training Platform for Cyclists
  • How to Hang Bikes in Your Garage: 4 Inexpensive Options
  • Gravel Bike Vs. Road Bike: Which One Is Better For You?
  • The 6 Types of Mountain Bikes & How to Choose the Best One for You
  • What Is a Touring Bike Good For? 5 Benefits We Know You’ll Love

Search I Love Bicycling

Connect with Us

  • Facebook
  • RSS
  • Tumblr
  • Twitter

Copyright © 2025 · Magazine Pro Theme on Genesis Framework · WordPress · Log in