• Training
    • Injury Prevention
    • Training Tips
  • How To
    • Bike Fit
    • Gear
  • Nutrition
    • Nutrition Tips
    • Weight Loss
  • Repair
  • Reviews
  • Stories
    • Funny Stories
    • Jokes
    • Quotes
    • Videos
    • Funny Videos

I Love Bicycling

I Love Bicycling is a website that is geared towards cycling for beginners with road cycling tips, training articles, nutrition tips, weight loss, how to’s and bike repair articles.

Repair

How To Remove A Cassette

April 22, 2016 by Adam Farabaugh

remove a cassette

Changing a cassette can be daunting. There’s only one way to remove it and it requires two, sometimes three, tools working in unison to successfully remove a cassette. Once you know how to do it though, it’s easy. Hopefully you don’t have to remove a cassette too often but when you do, you’ll be able to do it with ease.

How a Cassette Works

From the outside, a cassette just looks like a cluster of gears sandwiched together as one piece and that it’s just part of the wheel. The typical cassette however is made of a number of cogs that have key cutouts on them which line up and engage the underlying “freewheel” on the hub of the wheel. These cogs are then held in place by a threaded lockring that tightens down onto the smallest cog holding everything in place. Removing this lockring is how you remove a cassette.

When Do You Need to Remove A Cassette?

You shouldn’t have to remove a cassette very often but if you are racing or riding over vastly different terrain such as steep hills followed by a day of mostly flat, you will want to change the size cassette you are using for optimal gearing. Also, depending on how much you ride and how often you change your chain, you may need to replace your cassette from time to time.

Tools You Need

The first tool you are going to need is a Cassette Lockring Remover Tool. This engages the lockring on the cassette which must be turned counter-clockwise to loosen.


PARK TOOL FR-5 Cassette Lockring Remover Tool
Cassette Lockring Remover Tool


The second tool you will need is a Chain Whip or Sprocket Remover Tool which holds the cassette in place while you turn the cassette remover tool otherwise the cassette will just spin backwards.

Chain Whip/ Sprocket Remover

The third tool you will need is a wrench to turn the cassette remover tool. They also make an All In One Cassette Remover Tool which can be handy.

All in one Cassette Remover Tool

How To Remove a Cassette

  • Now that you have all the tools you need, first remove the skewer from the wheel.
  • Second, take the wheel and while standing, place it in front of you so the cassette is pointed out, away from you.
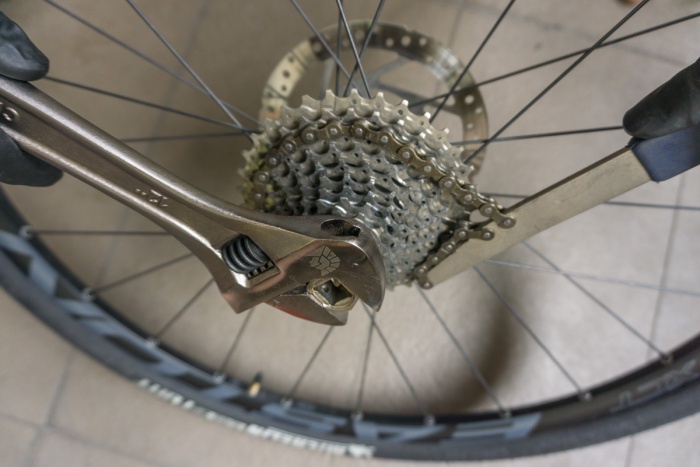
  • Thirdly, insert the cassette remover tool into the groves on the end of the cassette. Make sure the groves are fully engaged otherwise you can strip it. If you have the all in one Remover, place the handle so it’s at the 9’o’clock position if you’re looking at the wheel from straight on, or your right as you look down. If you’re using a wrench, place it on the Cassette Remover Tool in this position as well.
  • Fourth, place the Chain Whip so the loose chain end is drapped over the gears with the hanlde at the 2’o’clock position, your left as you look down. This will then hold the cassette in place when you turn the lockring otherwise it will just spin.
  • Finally now that you have everything engaged and in the correct position, press both handles down. This will turn the lockring counter-clockwise while holding the cassette in place.
  • Doing it this way gives you the greatest mechanical advantage in case of an extremely tight lockring.
  • Once the lockring is removed you can simply slide the cogs off from the freewheel.
  • Note: if any of the cogs become stuck, you can use a straight-bladed screw driver to insert between the cogs and rotate slightly to loosen it. Do it gently however and rotate around the cog if needed to avoid bending any teeth. Be advised on some cassettes as some of the cogs, if not all on newer ones, are once piece meaning it won’t slide off with the twist of a screwdriver. You’ll have to do it behind the next cog or whole cassette even.
  • And make sure you don’t loose the spacer behind the cogset if your wheel has one. If it does, use it behind the new cassette as well.
removing a cassette
You would be standing on the opposite side of this wheel looking down at it with the tools in these positions. Then just press both down to loosen and remove the lockring.

How To Install A Cassette

  • When installing a cassette, first make sure the spacer behind the cassette is installed if there was one when you removed it.
  • After that, take the cassette and line up the keys on the inside of the cassette with the groves on the freewheel of the hub. There is one larger one that makes it easy to line up. If you’re not sure which way is forward for the individual cogs, try it one way and if it doesn’t go on, flip it around. It will only go on one way. With the individual cogs also, make sure there is a spacer in-between each one.
  • Once you have all of the cogs on, double check that the last cog is lined up and engaged with the groves. It’s easy to have this one a bit off. It needs to be fully engaged and lined up with the other cogs.
  • Now take your cassette remover tool and insert it into the lockring. Add a dab of grease to the threads on the lockring to ensure it doesn’t seize. Now thread the lockring onto the end of the cassette by hand being sure not to cross-thread it. It should go on smoothly and straight. If it doesn’t, take it back off and try again. Turn it down snug by hand to avoid cross-threading.
  • Now take your wrench and put it on the Cassette Remover Tool, or if you have the All In One Tool, simply turn the handle clockwise to tighten down the lockring. It doesn’t need to be overly tight, just snug enough that it’s not going to come loose. If you over tighten this, it is easy to strip the threads.
  • Re-install the skewer and you’re good to go.

Things to Watch Out For When You Remove a Cassette

  • Stripping the grooves on the cassette lockring that the Cassette Remover Tool is engaged with.
    • Make sure the Remover Tool is pressed in all the way while turning.
  • Having the Chain Whip slip off the gears.
    • Place the loose end of the chain on a larger cog to engage more teeth.
  • The cogs are stuck after the lockring is completely removed.
    • Insert a screwdriver in-between the cogs and twist gently.
  • The cogs not reaching all  the way out to where the lockring can engage.
    • You forgot a cog or spacer or even the spacer behind the cassette close to the spokes if your wheel had one when you first removed the cassette.
  • The cogs reach too far over the end of the freewheel and the lockring won’t engage.
    • All of the cogs may not be properly aligned and pressed together or you took an extra spacer or cog from the cassette you just removed and accidentally installed it.
  • Cross threading the lockring when re-installing it.
    • Install it by hand first to make sure it’s lined up properly before tightening it with a wrench.
Setting Bike Chain Length

April 7, 2016 by Wade Shaddy

bike chain length

Chain sizing is one of the most misaligned topics of bicycle maintenance. It’s due in part because chains have about 400 individual moving parts depending on length. Even seasoned mechanics argue about bike chain length and it can be controversial.

Gear Accommodations

Changing or replacing the chain, chainrings, or altering the gears in back can result in a different bike chain length. But how do you know? Road bikes employ derailleurs with springs that tension the chain to accommodate gearing, so it’s difficult to determine just how long the chain should be.

Err on the Long Side

Most mechanics agree if you’ have to err, err on the long side. Specifically, you want the chain to be as long as possible without causing problems such as sagging.

No Shortening

In this day and age, when everything in the cycling world is measured in grams, it might be tempting to remove a few links to save weight. But again, most mechanics agree it’s never a good idea to shorten a chain in order to save weight or to run a chain that’s too short, even if it works. For one thing, it puts too much strain on the derailleur and it’s unwise to force the rear derailleur to work beyond its limits.

Derailleurs Have Needs Too

Understanding what’s expected from your derailleur is vital to proper chain length. Your rear derailleur shifts between gears on your cassette, obviously. But because the chain isn’t always wrapped around the same number of gear teeth, the derailleur must also manage the chain tension and capacity.  The least amount of tension your chain requires is when it’s on the small gear in the front and the small gear in the back. The most tension the chain requires is in the big-to-big gear combination. The pivot and spring action of the rear derailleur is what makes it all possible, but it has it’s limits.

The Basic Setup – Bike Chain Length

Determining bike chain length is not rocket science. It basically means that if your bike shifts clean and the chain doesn’t rub on the upper pulley’s chain guard and the tension pulley is vertical or slightly behind the guide pulley, it should work.

By Observation

Generally speaking, the derailleur limit is reached when the lower pulley is directly below the upper. The lower or tension pulley should never be in front of the upper. If this is the case, the chain is too short.

Easy to Replace

Snapping a chain is just one of the reasons why you might be replacing a chain in the first place or you simply have worn out your chain. New chains are typically around $20 depending on the model and type and they’re easy to replace. But how much chain do you need? How long should it be? It would seem simple enough to just measure the old chain and get a new one based on the measurement — but it doesn’t work that way. For one thing, chains can be cut only at whole inch increments. Chains cannot be cut into fractions of an inch.

Measuring Won’t Work

You have probably heard of chain “stretch” as if the chain was made of rubber. But chains are metal and metal won’t stretch — this is not how chains get longer. Chain “stretch” is metal wearing away where the link pin rotates inside of the bushing. If you take apart a worn-out chain, you can see notches worn into pins by the inside edges of the bushings. It’s not much, but when you multiply it over and over again it adds up. Because of chain elongation, measuring a broken chain is not a viable option to get the length. The chain, if it has any wear on it, will always measure longer than it was originally.

Equations Can Work

Even though it’s possible to determine chain length from equations and then cut the chain before installing it on the bike, it’s not easy, and you run the risk of getting it wrong. There’s easier ways to go about it.

Counting Links

Cyclists have long relied on a simple, effective way to get a replacement bike chain length right — count the links. Take your old chain and count each and every link. Purchase a new chain with at least that many links and use your chain breaker to remove links as needed from the new chain until the count is the same on both chains. It’s important to note that new chains are always longer than necessary and always require links to be removed.

On the Bike Sizing

On the bike sizing is another method that most mechanics seem to agree on when replacing chains. There are other methods, but using them typically winds up requiring more work with the same results.

Thread On New Chain

Assuming that you have no chain on the bike, shift the front and rear derailleurs into the smallest gears. Take the new chain out of the package and thread it on the front derailleur. It’s typically recommended that the open end of the chain be facing the back tire.

Wrap and Snap

Wrap the chain around the small cog from the rear of the bike, and through the rear derailleur. If this is your first time, it’s smart to snap a photo of the rear derailleur before you remove the old chain. If you forgot to snap a photo, use a spare bike as a model. It’s possible to thread the chain through the derailleur the wrong way. Lots of cyclists have done it which results in a non-functioning derailleur.

Use Your Fingers

From here it’s a bit of trial and error and you will get accustomed to it as you work with it. Begin by pulling down on the left half of the chain with your fingers, pulling the bottom pulley with it. When the chain clears everything, the length is adequate. This should allow the chain to operate without rubbing the derailleur in this combination — but with enough slack to operate — even if you’ve absent-mindedly cross-chained the bike.

Match the Ends

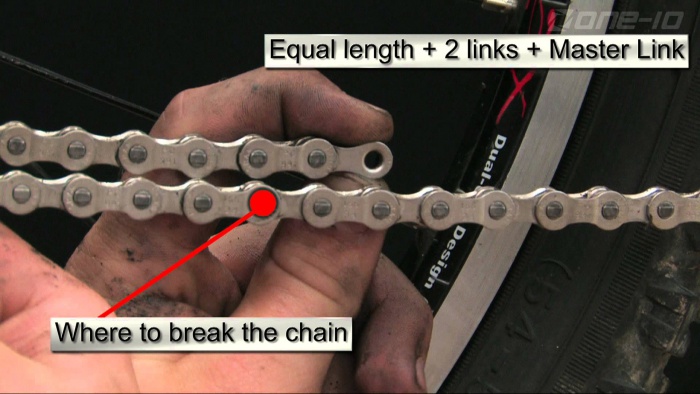
Bring the two ends together and mark the link that needs removed. This method should leave you with access to all of your gears – and without too much tension on your derailleur. Trim the length with a chain tool, and join the two ends of the chain with the master link or link pin. Note that there are no fractions in bike chain length calculations, rounding up one link is the typically accepted method.

When Should You Replace Bike Tires?

March 25, 2016 by Wade Shaddy

Tires are one of the biggest contributors to bike handling performance. They could be considered the most critical component on your bike. They are also the most consumable item on your bike, but what makes tires wear out? When should you replace bike tires? In some cases it’s obvious — missing or smooth tread for example. In other instances, it might be that your bike handles or rides poorly.

When Should You Replace Bike Tires

The major cause of premature tire wear is prolonged use of the tire with low pressure — it’s just that simple. It’s because sidewalls of tires usually fail before the tread is worn out. Low pressure causes the sidewall to bend and flex over and over again much more so than it would if it were properly aired.

Signs You Need To Replace Bike Tires

Cracks

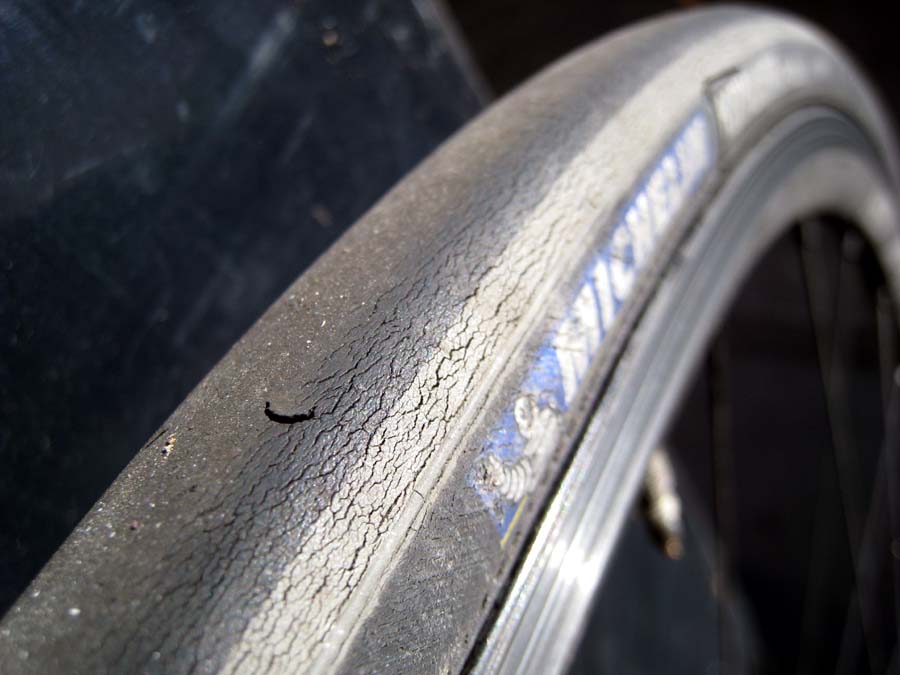
Cracks along the sidewall of road tires or mountain bike tires is a dead give-away you have sidewall damage and your tire needs replaced. Another indicator is uneven tread wear such as a smooth or bald band on the right and left side of the tire, with good tread in the middle. Checking and adjusting the inflation pressure before each ride with a pressure gauge is the most important thing you can do to prolong the life of your tires.

Frequent Flats

Frequent flatting is a red flag. Several flats in a week or multiple flats on longer rides likely means that your tire needs replaced. This is a no-brainer really. It happens because the tread is so thin it can no longer protect the tube from sharp objects. It happens to road tires and mountain bike tires alike.

Tread Wear

Worn out tires are obvious to a professional, but if your tires wear out gradually you might not notice it. The solution is simple — when your tires are new, make a mental note of how thick the rubber is on the contact point of the tire to the pavement, or how much tread they have, and visually monitor it over the miles. Keep checking it and you’ll see it disappear. When it does, consider replacing the tire.

Squaring Off

Even if the tread on your road bike tire seems fine, another indicator, squaring off, could also mean that your tire is history. Mountain bike tires often get a smooth center while the knobs on either side look fine. Squaring off happens mostly to rear tires because of the extra weight. Squared off tires handle poorly and aren’t as fast. It’s a sure sign that you need to replace the squared off tire as soon as you can.

Exposed Casing

Exposed casing is also very obvious if you look for it. This occurs on front and rear tires if you ride them long enough. If you keep riding on the tire, you’re asking for trouble because the only thing keeping the tube inside is a thin section of casing, which was not designed to contact the road and will wear much faster than the rubber tread. Exposed casing looks like a series of diagonal threads, typically on the side of the tire, but can occur almost anywhere on the tire.

Bulges and Bubbles

This one happens all the time. You’re riding along, and feel a regular bump. Or you might just notice a bulge in your tire before you get on your bike particularly on the sidewall of the tire. This is dangerous because the tire can burst at any time causing you to crash. If you have a bulge or bubble in your tire, fix it immediately with a tire boot if it’s small, or replace the tire altogether.

By Mileage

If you’re still not sure if your tires are worn out, there are a few guidelines applicable per mileage for road bike tires. Most road bike rear tires require replacement in the range of 1,500 to 3,000 miles. Front tires usually run upwards of 2,000 to 4,000 miles. Back tires wear more quickly than the front because about 60 percent or more of your weight is on that tire. Mileage data is not applicable for mountain bike tires because riding style (abuse) is too much of a factor.  Another part of the equation for both mountain and road tires; the lighter you are, the longer your tires will wear. The more you weigh, the faster they wear out.

Attrition by Age

Tires wear out even if you don’t ride the bike. If you store a bike for more than a few months be sure to check the tires. Wear is not always obvious because you haven’t been riding the bike. But rubber hardens over time and cracks. Even more serious is that the casing — sometimes referred to as the sidewall —  can rot, crack, and separate. Also known as dry rot, if you see frayed threads or cracks, or rotting of any type, don’t ride. The tire may appear to hold air just fine, but it won’t for long when you hit the road. Blowouts are common on aged tires. Blowouts scare the hell out of you and cyclists riding close to you —  and can lead to a crash.

Ride Quality

It might be that your tires pass the test for wear but you still hate them because your bike is slow, feels heavy, or cornering is twitchy or unstable. Poor handling is common on puncture-resistant, heavy tires made for flat protection, or even some of the all-weather tires. But they have their advantages. If you live in an area of inclement weather, bad roads or puncture weeds, they are worth their weight in gold. The choice is yours. Lighter tires handle and accelerate better but you’ll be fixing more flats and replacing them more often because they wear out faster.

Experiment With Tire Pressure

It’s been previously stated that proper pressure is important to your tire, but what good are rules unless you can break them. In the last decade it has become trendy to pump up tires as high as they will go. Or that the more pressure, the faster the bike will ride. At least one brand of tire actually requires 140 psi. That much pressure can make a bike ride harsh. Super high pressure can make the bike bounce depending on how heavy you are. It transmits road shock, fatigues the rider, causes the premature failure of bike frames and wheels and makes tires more prone to flats.

Stay at the lower end of the pressure zone for comfort and rough roads. Running lower pressure can yield a bike that corners better and gives a far nicer ride. Properly inflated tires roll over bumpy roads smoother and faster and get you home without shaking your teeth loose. On ultra-smooth roads however, when rolling resistance is crucial, such as in a time-trial or triathlon, go as high as 140 psi if your tires are rated to take it. The suggested inflation range is a good starting point but don’t be afraid to experiment with it. The point is, when should you replace your bike tires? Keep an eye on them and they will take care of you.

Long Term Bike Maintenance – Make Your Bike Last Forever

March 18, 2016 by Wade Shaddy

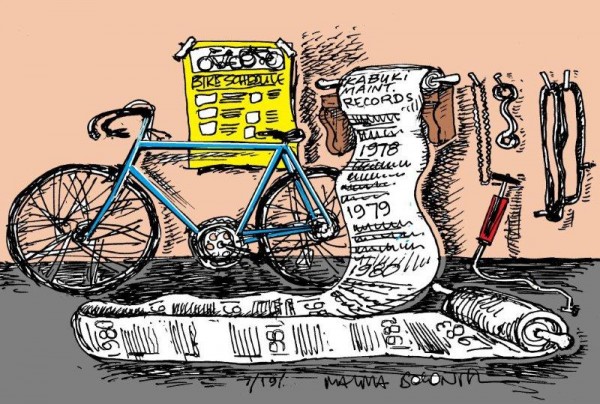
Many cyclists are under the impression that if you pay thousands of dollars for a bike, it will last for more than a few years, and it should — but not without a little TLC (tender loving care). It’s a given that you’ll be replacing consumable items like chains, cassettes, seats, brake pads, and cables, but other things like the frame should last a lifetime if long term bike maintenance is observed.
long term bike maintenance

Frames and Water

Paint and powder-coating is applied only to the outside of the frames on steel or aluminum, and is really not designed for long term bike maintenance. Water on the inside of a frame tube is actually more damaging than on the outside because it evaporates much more slowly. It also can’t be wiped down with a towel and easily dried. Plus, damage to the inside is hard to monitor.

Inspect for Cracks

Normal use can eventually result in fatigue cracks and then breakage. Keep an eye out for hairline cracks in the paintwork, especially in high stress areas such as around the top of the fork, underneath the downtube, around the bottom bracket, and around where the rear wheel attaches (the dropouts).

Other structural components such as the stem, seatpost and handlebars can also crack, so inspect those too. If all else is equal, an aluminium frame will be more susceptible to cracking than steel in long term maintenance, and carbon fiber even more so, but any frame can fail. It’s preferable to find a hairline crack before it develops into a fully broken frame. If you have a brand name bike, check with the manufacturer, they often offer a lifetime frame warranty.

Serious Frame Maintenance

Water can seep into a bicycle frame from many points. The more common points are around the seatpost, headset, bottom bracket, and water bottle braze-ons. Some builders provide drain holes at the bottom of the fork tubes, in the seat stays near the rear dropouts, and at the bottom bracket to allow accumulated water to drain out. If you can find them, use them.
Another way water can get inside is through condensation. Even if you don’t ride in the rain, moisture laden air gets into a frame. As the process repeats itself, a corrosion or rust problem can gradually develop.

If you want to perform long term maintenance, you will need to remove the crankset & bottom bracket, seatpost, and headset at a minimum. Spray bicycle-specific frame protectant inside and reassemble the bike.

Long Term Bike Maintenance

Long term maintenance is very basic:

  1. Keep your bike indoors.
  2. Wipe it down after riding in wet conditions.
  3. Apply bicycle specific protectant to the frame.

Carbon Frames

Carbon fiber frames are much easier to care for than steel or aluminum, and carbon fiber is incredibly tough and weather-resistant. Most carbon fiber frames can’t be disassembled like steel or aluminum. On stems and handlebar and seatpost contact surfaces, regular carbon paste applications can keep them operating and working smoothly for years to come.

Seatpost Concerns for Alloy Bikes

Remove your seatpost and stem every 6 to 12 months, clean off any corrosion, and lubricate with grease. Most other steel to aluminium interfaces such as pedal threads and bottom bracket cups should also be greased prior to fitting for exactly the same reason.

Maintenance on High Mileage Bikes

The mechanical cleaning and maintenance of your bike’s drivetrain is often the most overlooked. It’s the gritty, gross, black-hands work that is easiest to delay or ignore but will definitely make your bike’s components last longer.

Bearings are Everything

Ball bearings are everything to your bike. They’re used in the freewheel, the pedals, bottom bracket, the headset, and the wheels. Most need a bit of new grease and adjustment a few times a year depending upon how much you ride. With bearing maintenance every 12 months, good bearings will last for years. If a bearing is used without grease it wears quickly and may rust. If a bearing is a bit loose but continues to be used, all the weight and force is placed on only one or two balls instead of being shared equally. This causes more rapid wear and can cause almost instant damage.

Adjust or Replace

It is almost always cheaper to fix a bearing problem early than to leave it. If spotted in time, all it may need is a little adjustment. If the bearing surfaces are damaged from continuous use, the only option may be to replace the whole component.

Lube is Critical

Regular lubing reaps the largest benefit for your bike. Anything joints between moving parts must be lubed. It is also where cleanliness equates to smoother shifting, greater efficiency, and increased longevity of the parts.

Chains and Pivots

Lubricate the chain and pivot points on the brakes and derailleurs. Pivots are places on the derailleurs and brakes where things move. For derailleurs, apply the lube where the body of the derailleur moves or swivels. Use a light, bicycle-specific lubricant and don’t apply too much, because that only attracts dirt and grit that accelerates wear. Chain links appear bright and shiny when they need lube and they also make noise. Apply only enough lube to put a light coat on the chain, about one drop per link. Any more than that and grime and gunk just builds up. Be sure to wipe off the excess.

Chain Issues

Chains are one of the biggest concerns for long term bike maintenance. But when should you change it for a new one? Some recommendations call for changing your chain every 2,000 miles, but this can be misleading. Chains wear more quickly for riders who often encounter hills or bad weather, while identical mileage over flat terrain in nice weather causes far less wear. In addition, if you weigh 125 lbs, 2,000 miles of cycling will wear your drive-train much more slowly than a 195 pound cyclist.

Measure It

Chain wear can be measured with an ordinary 12-inch ruler. Measure from one link pin, down to the 12-inch mark. The next pin should measure exactly at 12-inches. If the next pin does not line up exactly with your ruler’s 12-inch mark — it’s time to replace your chain. There are chain checker tools sold at bike shops that help you evaluate chain wear more easily. Failure to replace chains when they need it will lead to a complete drivetrain replacement because worn chains wear out the teeth of the gears.

Presta Vs Schrader Inner Tubes – The Differences

February 25, 2016 by Wade Shaddy

Presta vs Schrader

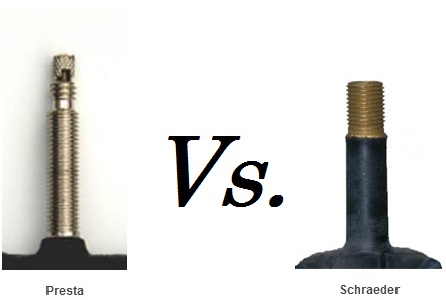
Differences in inner tube valves is a common issue for newer cyclists. It’s because department store bikes, mountain bikes, kids bikes, and cruisers are often equipped with the stubby, utilitarian car tire valve known as the Schrader. Moving up to a road bike you find the long, skinny Presta valve with the knob on top that screws and unscrews. The battle of Presta vs Schrader inner tubes depends on what you expect, what kind of bike you ride, and what you need from a bicycle inner tube.

Presta vs Schrader

Schrader valves are much more commonly found on cheaper bikes of all types, mountain bikes, or kids bikes, and you can blow them up at a gas station. Presta valves are used only on bicycle inner tubes. You won’t see them on cars or anywhere else.

Road and Mountain

It’s very unusual to see Schrader valves on contemporary road bikes. Presta vs Schrader valves are used almost universally on road bikes. There is a very good likelihood that Presta’s are what you have on your road bike. Mountain bikes can go either way, some use Schrader, some prefer Presta. However, it’s unusual to see Schrader valves on higher-end mountain bikes.

How To Use

A Schrader valve is easier to use than a Presta valve. All you need to do is removed the cap from a Schrader, apply the pump head making sure it is placed on far enough as to not let any air leak out, and air up your tire. Presta valves need the small head unscrewed (counter-clockwise) before the pump head is placed on to the valve. Then make sure the head is on far enough and pump up your tire. When you remove the valve head, you then need to tighten the small head all the way down but not overly tight. The Schrader valve is bombproof, rarely suffering from damage, and works beautifully most of the time. Presta valves are a bit more delicate with the post with the threads sometimes bending if you aren’t careful with the pump head.

Pressure Points

Presta valves adapt to higher pressure than Schrader. Road bike tires often exceed 125 pounds, while Schrader tubes top out at about half that.

Presta Length

Presta stems come in different lengths, so if you have deep carbon rims you can purchase tubes with stems that are long enough to accommodate your rims. However if you mistakenly purchase Presta tubes with valve stems that are too short, all you can do is to give them to someone who can use them unless you want to go through the hassle of using valve extenders.

Checking Pressure

If your tubes have Schrader valves, you can check your tire pressure by using a standard car tire gauge. If your tubes have Presta valves, you need a special pressure gauge made just for Presta valves. Typically, most floor-type pumps for Presta tubes already have them built-in.

Releasing Air

Presta vs Schrader valves can be used for a release of air pressure by just pressing the unscrewed valve down, allowing for a controlled air pressure release.  This is much easier than a Schrader valve that requires an object to be inserted into the valve to release air.

Local Availability

If you’re running Schrader tubes and you blow a tire or run out of tubes for any reason, chances are that the local auto parts store or the mom-and-pop general store will have a spare Schrader tube in stock. If you blow a Presta tube and there’s not a bike shop in town, you may not be able to find a replacement.

Diameter Issues

The diameter of a Schrader valve, 8mm,  is greater than the diameter of a Presta valve at only 6 mm. The hole where the valve stem goes through the rim of your wheel is drilled to fit either Schrader or Presta valves. Presta valves are more commonly used on skinny road bike tires because they are narrower and require a narrower hole in the rim. The valve hole is the weakest part of the rim so the smaller this is the better.

To Drill or Not to Drill

If your rims are drilled for Presta vs Schrader valves, you can’t use a tube that has a Schrader valve because the stem won’t fit through the hole. You may be able to have your wheels re-drilled with larger holes but it’s not a good idea on road bikes. Narrow wheels can be significantly weakened by larger valve holes. However, it’s fine to drill out mountain bike rims if so desired because they are much wider.

The Slime Factor

Schrader valves have a removable core. That might sound weird to a roadie, but if you’re a mountain biker, or just want extra flat protection, the removable core allows you to add puncture-resistant sealant to your tube. Valve stems on a Presta are typically not removable but they can be found.

Common Adapters

We’ve dealt with the fact that you can’t air up Presta valves with a typical air compressor like they have at gas stations — but it’s not out of the question. Most experienced road riders are prepared for emergency situations, such as a disabled frame pump, by carrying a small, cheap Presta to Schrader valve stem adapter. This small brass fitting screws on to your Presta valve and allows you to use any air compressor, almost anywhere. Keeping one of them in your underseat pack at all times for emergencies is a great hedge against being stuck without any air in your tires. You won’t regret it.

The Smart Head

If you’re going to purchase an air pump, consider purchasing one with a dual-purpose head. This type of head has both Schrader and Presta heads built-in and you can air up either type of tube. Most of the standing floor pumps already have them, but some of the smaller, frame pumps do not.

To Sum it Up

With Presta vs Schrader ,there are benefits to both types of valves and neither one should be considered superior to the other. The short answer is to just keep what is on your bike unless you have a good reason to switch.

How to Tighten a Headset

January 27, 2016 by Adam Farabaugh

how to tighten a headset

Knowing how to tighten a headset is simple and is something that could save your ride if yours is loose for whatever reason, without a trip to the bike shop. There are only three bolts on most stem/headset combos but you have to know which ones to tighten first and how much.

First – Test Your Headset Tightness

To determine if your headset is too loose or tight, lift your front wheel off the ground and spin the bars back and forth. They should turn with ease and not bind in any one place. If they do your headset is likely too tight or in more rare cases, your headset bearings may need replaced. Second, with your wheel on the ground, lock the front brake and rock the bike forward and back. What you are looking for is to see if the steerer tube rocks forward in relation to the frame. It should not move at all and if it does, your headset is too loose and needs to be tightened.

How to Tighten a Headset – Starting From Scratch

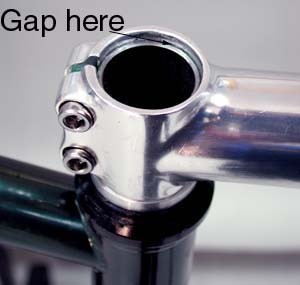
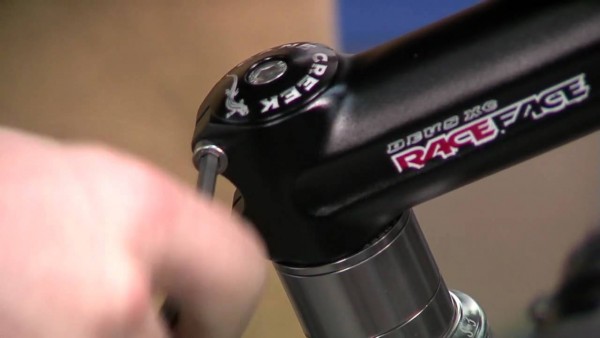
First with how to tighten a headset, loosen all the bolts on the stem that tighten down onto the fork. Secondly, take the top-cap bolt on the top of the steerer tube/fork completely off. The top cap will now come off as well. The way the headset works is that the spacers, or the stem itself (depending on how many spacers you have) press down on the outside of the steerer tube. The top cap does not press on, or even touch, the steerer tube/fork. This means that you have to have enough of the spacers or stem sticking up above the steerer tube. You can see this in the image below. Also, remember that when you tighten down the top cap, that gap is going to shrink and could be enough to cause the top cap to touch the steerer tube. You may need to add another small spacer.

tightening a headset

Install the Top Cap

Once you have enough of a gap put the top cap and bolt back on and tighten it down snug but not too tight as if you over tighten it you won’t be able to turn the handle bars as the bearings will be compressed. Also make sure your handle bars are straight with your front wheel otherwise you’re going to have to re-loosen everything to line it back up.

Tightening the Stem Clamp Bolts

Once you have the top cap tight enough, now tighten the two bolts (normally two) on the side of the stem to cinch the stem to the steerer tube. Tighten them down evenly meaning tighten one a little and then do the other. Again, these should be snug but not overly tight as you can strip the bolt or crush the steerer tube particularly if it’s carbon.

There you have it; how to tighten a headset. Your headset should now be properly tightened. You can test it by doing the headset tightness test again to make sure it’s not too loos or too tight.

Bike Chain Lube — The Lowdown on Differences

January 13, 2016 by Wade Shaddy

bike chain lube

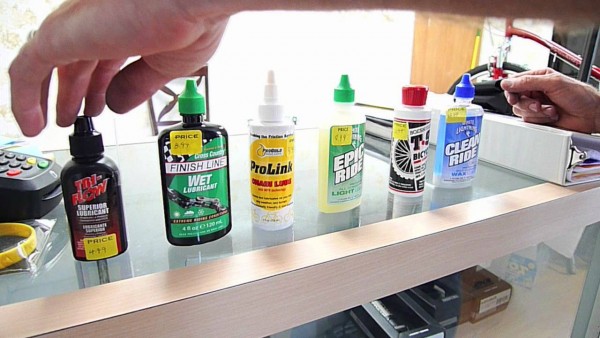
There was a time that Tri-lube or WD-40 was considered standard bike chain lube for bicycles. The light penetrating oil was used for all moving parts on bikes. But things have changed. Walk into a bike shop today and the selection of bike chain lube is almost overwhelming. Some expensive, others affordable. Wet, dry, synthetic, wax, Teflon, polymerizing or a combination of everything. What’s the difference?

Maximum Performance Bike Chain Lube

The point of any lube is to get maximum performance from your drivetrain while preventing premature wear and tear on your bike. The majority of bike lubes typically focus on chain maintenance and most of them work just fine on the chain, no matter the formula. The key to keeping your chain running smoothly and quietly is to use lube regularly, but not excessively. Too much lube allows dirt and grit to collect on your chain, and the abrasive debris is what causes premature wear.

No Stand Alone

The truth is, none of them have a better formula, or more intelligent approach to lubricating your bike. No single product stands alone as the Queen or King of bike chain lube. The choice of any lube depends on what you want from it, and there are specific products for your type of riding and the conditions that you ride in.

Wet Lube

Wet bike chain lube is recommended for wet riding conditions. The formulations are oil-based and are not easily washed off by water. They attract significantly more dirt and grime than dry bike chain lubes. Wet lubes require a more thorough cleaning between applications than dry lubes. Wet lubes are typically used more often on mountain bikes than dry lubes, as your much more likely to be riding through slop conditions than on a road bike.

Dry Lube

Dry bike chain lube, no brainer here, is recommended for dry riding conditions. The formulation is a dry lubricant with a liquid carrier solvent. Dry lubes work through evaporation. Most manufacturers recommend applying dry lube generously and letting the carrier solvent evaporate for about two hours or more before riding. The leftover dry film is what actually lubricates the chain. Dry lubes attract significantly lower levels of dirt than wet lubes. The downside is a loss of durability, especially in wet conditions. Dry lubes typically wash off in a light rain, or if you’re on a mountain bike, a single water crossing.

Viscosity Formulations

The thicker the lube is, the longer it will last in wet conditions, but the messier and stickier it is. If you live in a rainy environment, you’re best off using a thicker lube. It lasts longer and doesn’t require as many reapplications. If your roads are dry and dusty, such as a desert environment, then you’re better off with a thinner lube that won’t collect as much dirt that gums up your drivetrain.

Basic Chemicals

Even though the plethora of products on the bike shop shelves are varied, there are only a few basic chemicals in most of them. They may be blended formulations but can be broken down into smaller categories as follows:

Teflon-Based Lube

Teflon-based lubes are the most common type of bike chain lube, and for good reason. It’s not only for bicycles, but used industrially to lube much more demanding machines than simple bicycle chains. Teflon has an incredibly low level of friction. Teflon penetrates into the pins and plates of a bicycle chain and sticks around long enough to be useful while still retaining self-cleaning properties. It can be mixed with many kinds of solvents and oils depending on the conditions it has been designed to perform in.

Wax-Based Lubes

Wax-based is another common bike chain lube. Just like Teflon, wax lubricant comes in different formulations depending on the conditions it’s intended for. Wax-based lubes are generally thought of as a cleaner option to Teflon but they do have drawbacks. While they collect less dirt and dusts, wax lubes have a tendency to build up and create a mess. Take care of how much you apply to your chain. Big globs of wax between your pulley wheels and derailleur cage are unapplealing. Wax lubes also require proper chain cleaning before application. Wax lubes don’t have the longevity of a Teflon-based product and wear off sooner.

All-Purpose Lubes

Polymer-based bike chain lube is different.They offer protection to your chain in both wet and dry conditions. Polymer-based lube is similar in appearance to the old-fashioned penetrating oil but with significant differences. When riding, the pressure, motion, and friction of the chain causes polymers to morph from a liquid into a hard plastic coating or plating, which is considered a dry lubricant. Plating means it is bonded to the pins, plates, and rollers of the chain; it can’t be washed off with water. And since it is a dry lube, it doesn’t attract dirt and grime at the same rate as other lubes.

When to Lube

There is no regular maintenance schedule for applying lube. It depends on your style of riding, the weather and what lube you are using. Some manufacturers suggest re-applying lube based on chain appearance, riding conditions, distance ridden, time since last application and after the chain has been cleaned. But many cyclists simple rely on the sound of the chain. Sound is a good indicator of whether a chain lube is doing its job. A clean, quiet, smoothly shifting chain, is well lubricated. Listen to your chain. It shouldn’t be making much sound. If it’s making noise, it likely needs lubed.

Clean Chain

If your chain is black, it needs cleaned. No amount of lube is going to penetrate through all that gunk. You can have a mechanic take it off and submerge it in solvent, or if you’re mechanically inclined, do it yourself. If you don’t have the time, or just don’t want to tackle it, use a good quality chain cleaner and wipe it down yourself.

Get Personal

The choice of any bike chain lube is personal. And just like personal lube, what some love, others hate. The best advice is to try each king od bike chain lube if you’re curious. If your chain is quiet, your bike shifts smooth and clean and it’s been a while since you lubed, you’ve got a winner. If it sounds like a freight train after a few weeks, switch to something else and give it a try.

Fixing a Bike Chain

January 9, 2016 by Wade Shaddy

fixing a bike chain

Chain manufacturers attempt to make all of their links equally strong, but a chain is only as strong as its weakest part. The problem is, chains often consist of about 400 moving parts. Fixing a bike chain is a routine task that you should be able to accomplish in a few minutes whether on the road or trail or in the garage.

Fixing a Bike Chain – Chain Breaker and Master Link

Before fixing a bike chain, you’ll need one tool in particular; a chain breaker, if you don’t already have one in your saddle bag and a master link that fits your chain. Note that some chains come with their own master link included with the purchase.

Fixing a Bike Chain – Get the Length Right

If you’re simply fixing a bike chain, you don’t have to worry about chain length. Simply remove the broken link, and replace it with a master link, sometimes referred to as a power link, or missing link, depending on brand. If you don’t have a master link, you can just remove the broken link, and reinsert the pin provided you don’t push the pin all the way out the other side.  If you’re replacing an old chain with a new one, count the links in the old chain, and use the chain breaker to remove links on the new chain so that they both have the same number of links.

Steps to Fixing a Bike Chain

  1. First locate the broken link. There should be two plates that are loose, and flapping around or a link that has a bend in it. These are the ones that get removed. You do not need to remove the chain from the bike. Keep the chain threaded through the derailleurs if you can as it will save you time.
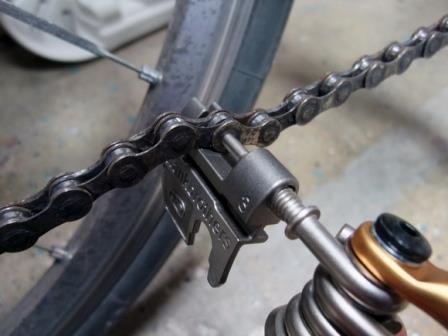
  2. Examine the chain breaker tool. You’ll notice a circular cradle that the push-pin moves through. Rest the link in this cradle where the pin lines up with the push-pin of the link you’re removing.
  3. Turn the push-pin to push the pin through and out the other side. If you’re using a master link, you will need to have both ends of the chain an inner link as the master link is an outer link. If you don’t have a master link or another connector pin, do not push the pin all the way out the other side of the chain. Leave it so the pin is over enough to remove the inner link but not so far that it falls out. This will be important in the next step. Now do the same one full link removed, one inner link followed by one outer link or vice-versa, from the pin you just pressed out with the broken link being in-between.
  4. If you removed the chain from the derailleurs, thread it back through being sure that it’s going the right way. Then place the chain in the smallest gear in the back and rest the chain to the inside of the chain rings on the front against the bottom bracket to give enough slack.
  5. Now install the master link if using one through both the inner links and lock into place. If you have a connector pin, line up the ends of the chain and press that through breaking off guide end with your chain tool. If using the same pin that you just pushed out and left on the outer link, line the end up and push the pin back in. You want it so both sides of the pin are flush with the outer plate of the chain. If you pushed the pin too far through when you were removing it, line the chain up in the chain tool and set the pin on the resting plate to then press the pin in. It may be a bit off at first but it should line up as you continue to push it through the hole.
  6. That’s it. The link with the pin you just installed may be a bit stiff but if you bend it laterally slightly with your fingers, it should loosen up to where you can’t even tell which link it was. The chain is now one link shorter, unless using a master link, but will still be good to go.
  7. One note is that reinserting a pin is now the week point of the chain. When you do make it home, take out that pin and put in a connecting pin which will better strengthen the chain. The problem is you may not be able to tell which link it was so it’s recommended that you replace the entire chain.

Fixing a Bike Chain – Why Chains Break

One of the most common reasons for chain breakage is bad closure at the factory. With hundreds of thousands of parts going through, it’s inevitable that pins fail to center properly. The giveaway is a bulge on the inside of the outer plate that indicates that the end of the pin being pushed through wasn’t lined up, and bent the plate before going through the hole. This can also occur after you’ve ridden the bike for a while. Keep an eye out for this, even on brand new chains.

Bad Gear Combinations

Chains rarely break while in a straight line. The energy is evenly dispersed across the links while pedaling normally, even under load. Chains typically break when using extreme gear combinations, like big front to big back or little front to little back, also known as cross-chaining. The force is temporarily focused to a few links, slightly diagonal to each other, as the chain moves from one cog to another. Cross-chaining bends the chain, and it’s a recipe for snapping chains.

Chain Suck

Chain suck occurs when downshifting under load to a smaller chainring. The bottom of the chain doesn’t  disengage from the larger ring and gets carried upward (sucked up,) and wedges between rings and snaps. Chain suck is commonly caused by bent chainring teeth, dirty chains, or occasional burrs on the teeth of new chainrings.

Listen and Feel

If you hear or feel a regular click or your chain hangs up each and every revolution, it could mean that one of the pins has come loose on one side, allowing the link to bulge slightly to the side. The chain hasn’t broken yet, but it’s too wide to fit through the cage on the bottom of the derailleur. As it passes through the bottom of the guide, the leaf ticks or, in worst case scenario, hooks the side of the derailleur and locks up.

Bad Shifts

Broken chains, when in good working condition, are really not that common and are almost always the result of putting load on the chain when it’s not fully in gear.

Let Up

Experienced riders intentionally “let up” on the pedals during the shift when under hard effort such as hill climbing or sprinting. This has two effects, the first being less stress being placed on the chain and the second being simply more efficient and responsive shifting. Even top-of-the-line Dura-Ace drivetrains don’t shift well under load.

Fixing a bike chain isn’t too difficult of a task and can save you when out on the road or trail otherwise stranded. If doing longer rides farther from home, you should be able to fix a broken chain as easily as being able to fix a flat. Both leave you on the side of the road but if you know how to fix them, you’re home free.

Installing a Bike Chain

January 9, 2016 by Wade Shaddy

installing a bike chain

Installing a bike chain is routine maintenance for road and mountain bikes. Chains travel countless times over sharp gears, often under a heavy load. Chains have hundreds of parts that wear out because of dirt, gunk and attrition. Some manufacture’s recommend a chain replacement every 1,000 miles or once a year. Others say 2,000 miles is adequate. It’s a simple task that any cyclist can accomplish on their own with the right tools and know-how.

Bad Chains

If you ride hard, ride in dust, mud or water, you may need to replace your chain frequently. In some cases, there’s a warp or bulge you can’t see, and the chain eats away at the teeth of your rings, gears and derailleur. Keep an eye on your chain for any of these issues. If you’ve recently repaired a chain, plan on replacing it the first chance you get.

Check for Bulges

When working with any chain, new or old, bear in mind that the majority of chain failure is because one of the pins was improperly installed whether it be the manufacturer or when the chain was installed on the bike. Contemporary chains are very narrow and even the slightest misalignment can cause the chain to fail under load. Check all the links by examining each and every pin for bulging at the side plates just as a precaution.

Chain Anatomy

Chains are made up of a series of inner plates, rollers or bushings, a rivet (also call a “pin”) and outer plates. The pin or rivet presses into both outer plates, but the rivet slides freely through the inner plates and roller. Chains should have a small amount of play at each link — even when brand new. As you ride your bike, the chain wears down the rivets, and the free-play at each link increases.

Stretch Versus Play

Chain elongation is sometimes mistakenly referred to as “stretch,” although the plates do not literally become longer. Stretch is nothing more than tiny, accumulative increments of wear that have added up. A worn, elongated chain will not engage the cogs correctly, and will eventually slip over the cog teeth when pressure is applied, this is known as “skip.”

Chain Measuring Tool

Use a chain measuring tool to check chain wear. This is routine in all bike shops. If the measurement is less than 1/8-inch, you might get by with using it a while longer. If it’s more than that, it needs replaced to prevent premature wear on your drivetrain. Another way to measure “chain stretch” is to measure exactly one foot. The center of the pins should line up on the zero and twelve inch mark. If the twelve inch mark falls more than an 1/8 of an inch past, it’s time to replace your chain. If the chain is excessively long, you may have to replace the cassette as well and in rare cases, the chain-rings.

Installing a Bike Chain – Measure Up

Remove the old chain from your bike. If it’s broken already, skip this step. Remove the new chain from its packaging, and stretch both chains parallel to each other on the floor or a worktable.

Don’t Measure Up

You will likely notice that the links on both chains at the far end don’t line up exactly — it’s because the old chain is worn and has elongated. Match the chains so your new chain has as many links as the old one. Do a double check and count the links on the old chain before “breaking the chain” to the length you need. Both chains should have the same number of links. If you don’t have the old chain to compare to, put the chain around the big chain ring in the front and the largest cog in the back on the cassette. The derailleur should be swung nearly as far forward as it can go. Mark which link lines this up and that’s how long you want your chain. Another way to test this is to put the chain in the little ring upfront and the smallest cog in the back. The chain should still have tension on it when you line up the chain with the link you just marked. If it’s excessively slack, you’ll need to take an additional link out.

Installing a Bike Chain – Think About It

Now consider how the ends of the new chain must fit together. Depending on what type of master link you’re using, you may need two inner links, or an inner link matched with an outer link.  Generally speaking, you don’t want two inner links facing other, nor two outer links — you want an outer link on one end, and an inner link on the other. Take your time, examine your master link, and what you need to match up to get the chain joined the right way.

Break the Chain

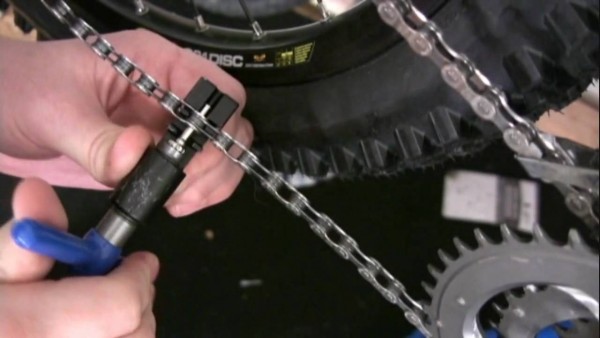
Once you’ve got everything figured out, and have marked the length of the chain, break the new chain at the desired link using a chain breaker tool. Place the chain breaker on the chain and push the pin through the hole and all the way out the other side.

Connecting Pin Versus Master Link

There are two ways that chains can be connected. The first is a master link that attaches over two inner links and snaps into place. The second method is using an extend pin that you push through the link holes. These have a recessed point that’s designed for you to break off when the pin is pushed through to the center of the link.

Installing a Bike Chain – Thread on The New Chain

Shift the bike into it’s smallest gears on the front and back. Prop the bike against a wall, or place it in a bike stand. You can also place the bike upside down if need be for improvised working. If you can’t remember how the chain threads through the derailleur, use another bike as a model. It’s advisable, if you haven’t removed the old chain yet, to snap a picture and use it for reference.

Installing a Bike Chain – Chain Routing

Route the new chain through the derailleurs and over the smallest gear in the back while just letting the chain fall to the inside of the front gears to keep tension at a minimum. Pass the chain on top of, then in front of the upper pulley, then straight down to the bottom pulley. The chain passes behind the bottom pulley, then forward under it. After you’re sure the chain runs through the derailleurs properly, line up the links to attach them together either with a connecting pin or master link. If using a connecting pin, a pro-tip is to install it from the back side (from the wheel side). You insert the smaller diameter side first which pushes through the link and out the other side. This piece is then broken off which can leave a slight edge but if it’s on the outside of the cassette, it won’t catch on the gears to the inside. If you push the pin through too far, simply break off the outer pin and push the pin back in a little from the other side.

Slightly Stiff

Note that the newly joined link will likely be slightly stiff, that’s fine and to be expected. Work the repaired link up and down, and side-to-side until it bends freely. After the chain is properly installed, shift it through the gears and make sure the stiff link is worked out and that the connecting pin, if used, is properly aligned without any of the sides sticking out of the chain. Working with chains is for some reason, particularly fun and rewarding. Don’t be intimidated. Get an old chain and practice breaking it with a chain breaker before you install your new chain if you’re unsure — you’ll get the hang of it.

Mountain Bike Suspension Service – Front Fork

January 8, 2016 by Wade Shaddy

mountain bike suspension service

Most road bikes these days rely on carbon forks to absorb vibration. They’re simple, and require little in the way of maintenance. Mountain bikes need more, relying on fully-loaded shock absorbers that are capable of taking big hits over and over again. Mountain bike suspension service has come a long way with the first shocks being made with rubber elastomers and springs. Contemporary front suspension typically relies on air and oil to cushion the ride.

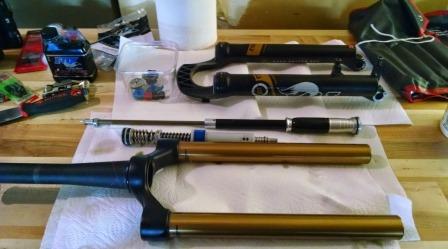
Fork Anatomy

The typical front fork is comprised of two struts that connect the front wheel to the frame’s head tube. The exception is Cannodales “Lefty” that has only one strut. The distinction of “fork” is due to the steerer tube emerging from the top of the struts, giving it the appearance of a fork. The steerer tube joins onto the “crown.” The “stanchions,” are the shiny parts of the fork that travel inside the “sliders.” The sliders have the traditional dropouts that connect the assembly to the wheel axle.

Aftermarket Shocks

If you’re servicing or otherwise have questions about your fork, your bike’s manufacturer may not have the answers you’re looking for. Bicycle manufacturers don’t make their own suspension products. Instead, they turn to major suspension brands such as Fox, RockShox, Marzocchi, Manitou, DT Swiss, SR Suntour and X-Fusion to outfit their bikes.

About Brakes

If you’re thinking about the compatibility of a new fork, take into consideration that it may or may not work on your bike. Most modern mountain bikes now employ disc brakes. If you want to replace a fork that has rim brake mounts, your choices will be limited to some very basic suspension models unless you upgrade your wheels, brakes, and frame which must have the correct mounts for each type of brake.

Vertical Travel

Mountain bike frames are designed to work with a suspension fork featuring a specific amount of travel. Travel refers to the distance the fork will move before it’s fully compressed.  Suspension travel equals the distance the wheel travels vertically. Before replacing any fork, consider that it could drastically change the way your bike handles.

Some Sizes

Older mountain bikes may have an 80-mm fork, which has went the way of the dodo bird. A 100-mm fork may be an acceptable replacement, but a 120mm fork will likely alter the bike geometry enough to make the bike harder to handle. Always check with your bike manufacturer for replacement fork recommendations.

Lockout Valve

Lockout is the ability to turn a shock off or make it inactive. The lockout is typically accomplished by turning a dial or moving a lever. Lockout is useful for riding on flat ground or going uphill when the constant compression and decompression of the shock wastes energy.

Damping Control

Damping is probably the single most important feature of a suspension fork. Damping controls the speed at which the fork moves up and down. Damping provides the rider with increased control, comfort and safety through rough terrain. Damping is usually accomplished by forcing oil or air through a small hole or port, but some very basic forks use only friction between the upper and lower tubes for dampening. Without damping, energy from impact would compress the shock immediately and then shoot the fork up again in the blink of an eye.

Damping Adjustments

Most forks rely on external knobs to adjust damping rate. Turning external knobs clockwise increases the amount of damping. Internal adjustments are also possible, but not as easy. Internal  adjustments include changing oil viscosity for slower or less dampening. Most serious mountain bikers prefer to fine-tune damping to provide the best possible performance for their weight and riding style.

Mountain Bike Suspension Service – Fork Care

As far as bicycle components go, suspension forks are relatively complex things as there’s a lot going on in there. Basically, the more moving parts, the more maintenance required. Servicing suspension forks is vital to keep them operating smoothly.

Mountain Bike Suspension Service – Oil Changing

Changing the oil in your fork requires special tools and supplies that you probably don’t have in your garage. Seals can get damaged or fail to seat properly. Servicing a fork to this degree should probably be done in a bike shop unless you’re experienced.

Mountain Bike Suspension Service – Do It Yourself?

Full servicing can be carried out at home if you’re experienced, and have the tools. It involves removing the lower legs or sliders, cleaning and inspecting the seals, stanchions and bushings before topping off the oil and re-assembling the fork. Before attempting any work or opening the fork, make sure you release any pretension or air pressure.

Mountain Bike Suspension Service – How Often

Most manufacturers recommend  changing the lubrication oil at least every 30-50 hours, and doing more extensive damper overhaul once a year. Other manufacturers recommend cleaning and changing the oil every 25 riding hours and a full service every 200 hours. Full-blown servicing is recommended at least once a year by most dealers, but it also depends on what type of fork, how you ride and where you ride. The three things that will affect the service interval and performance of your fork are water, mud and dust. How much you use your fork in those conditions will determine how much servicing it requires.

Mountain Bike Suspension Service – Simple Lube

Keeping the fork well-lubricated is the most important part of maintaining your fork and making sure there is uncontaminated lubrication inside the fork. Lube happens naturally when oil pools in the lower part of the fork where it lubricates the bushings and seals within the fork allowing it to move smoothly without friction.

Seals and Dirt

Seals must remain well-lubricated to repel dirt effectively, and for internal bushings to remain smooth and working properly. Many modern forks contain only 5 or 10-ml of oil for lubrication, but this is all it requires to keep the system running smooth.

How Oil Lubricates

 To encourage oil to lubricate the upper bushings and seals in the fork, it’s recommended by some manufactures to simply turn your bike upside down and allow 20 minutes for the oil to run down into the seals. Remove the dirt and gunk from the fork stanchions and around the seals, especially between the stanchions and crown or arch at the front of the fork. Use a water hose if desired, but keep the pressure away from the seals.

Mountain Bike Suspension Service – The Take Away

The take away with mountain bike suspension service is to stay ahead of it and replace the oil and seals before they need completely replaced as if you wait, this can cause damage and the potential for needing a new front fork. Take note of how you’re riding and what conditions you’re in and if you can’t do the servicing on your own, take it to a local bike shop who knows there stuff. They’ll be able to do a complete overhaul and guide you in when next to bring it in.

« Previous Page
Next Page »
  • Facebook
  • Tumblr
  • Twitter

Latest Articles

JOIN Cycling: A New Training Platform for Cyclists

May 27, 2024 By Eric Lister

cold exposure

The Benefits of Cold Exposure for Cycling & Life

June 13, 2023 By Eric Lister

hill climb

The Ultimate Hill Climb Training Guide

May 31, 2023 By Eric Lister

shoulder pain cycling

How to Treat & Avoid Shoulder Pain While Cycling

April 12, 2023 By Eric Lister

psoas stretch

The Importance of the Psoas Stretch for Cyclists

April 6, 2023 By Eric Lister

cycling neck pain

The Ultimate Guide to Cycling Neck Pain: Causes and Solutions

March 21, 2023 By Eric Lister

Useful Info

  • Contact
  • Finally, A Global Cycling Club That Is Focused On Community And Love Of Cycling!
  • Privacy Policy
  • Share Your Story!
  • Terms And Conditions Of Use
  • Welcome to I Love Bicycling
  • What Happened When I Stretched Every Day For a Month

Recent Posts

  • JOIN Cycling: A New Training Platform for Cyclists
  • How to Hang Bikes in Your Garage: 4 Inexpensive Options
  • Gravel Bike Vs. Road Bike: Which One Is Better For You?
  • The 6 Types of Mountain Bikes & How to Choose the Best One for You
  • What Is a Touring Bike Good For? 5 Benefits We Know You’ll Love

Search I Love Bicycling

Connect with Us

  • Facebook
  • RSS
  • Tumblr
  • Twitter

Copyright © 2025 · Magazine Pro Theme on Genesis Framework · WordPress · Log in