• Training
    • Injury Prevention
    • Training Tips
  • How To
    • Bike Fit
    • Gear
  • Nutrition
    • Nutrition Tips
    • Weight Loss
  • Repair
  • Reviews
  • Stories
    • Funny Stories
    • Jokes
    • Quotes
    • Videos
    • Funny Videos

I Love Bicycling

I Love Bicycling is a website that is geared towards cycling for beginners with road cycling tips, training articles, nutrition tips, weight loss, how to’s and bike repair articles.

Gear

  • Bike Fit

The Best Types of Cycling Socks

December 2, 2019 by Sarah Lauzé

The first step to becoming faster is looking good…right? This may be why cyclists have a bit of a sock obsession. Most riders wear the same cycling kit, or with little variety, every day, so changing up the sock game is a fun way to add a little bit of your own personal style. Not only that, but they are a highly functional piece of cycling gear that can make or break a ride. Here are some of the best types of cycling socks to get you looking and feeling good for your next ride.

cycling socks

The Big Players

With so many brands of cycling socks out there, it can difficult to choose the ones that will work best for you. Hopefully these brief descriptions of a few of the larger brands will make the decision easier.

  • Swiftwick socks are made in the USA and focus on comfort and quality. Their socks feature managed compression, chemical-free wicking, and anti-blister and anti-odor technology. These are the four pillars they build each pair of socks to.
  • Defeet International socks are also made in the USA and prioritize operating at a higher level to produce one of the best cycling socks on the market.
  • Pearl Izumi yields not only great cycling socks, but also other clothing to keep you matching from head to toe!
  • Sock Guy is the go to sock company when looking for custom socks, they have a 4-5 week turn around and are manufactured in the USA.

Racing Socks

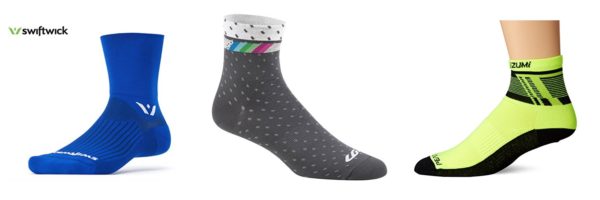
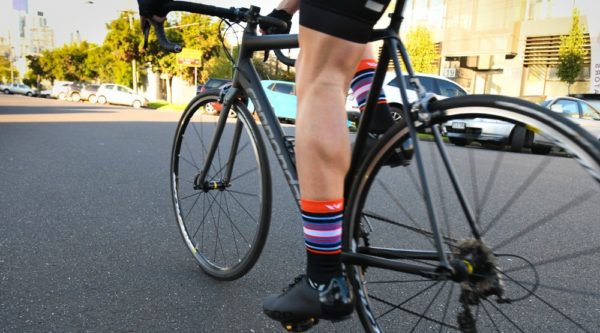
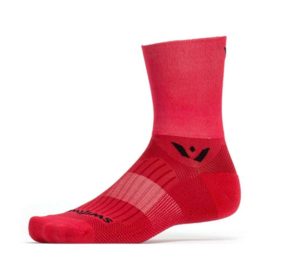
Racing cycling socks are designed with performance in mind, so they offer breathable material and an attention to performance over style. The Swiftwick Aspire socks have a thin cushion bed, and offer compression to different anchor points in the foot. The Louis Garneau Men’s Coni Cycling Socks are made from Coolmax fiber, and are supposed to wick moisture and increase the speed they dry out. Pearl Izumi’s Elite Socks feature the ELITE Transfer material to also dry out quickly, and have “compression for a performance fit.” All of these racing style cycling socks have two things in common. One, they are super good at drying out quickly to keep your feet cool while competing. Secondly, most of these socks come up one-quarter of your calf to give you that pro look.

Wool Cycling Socks

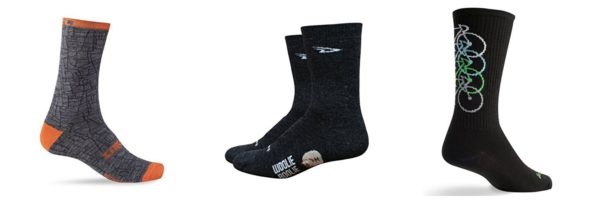
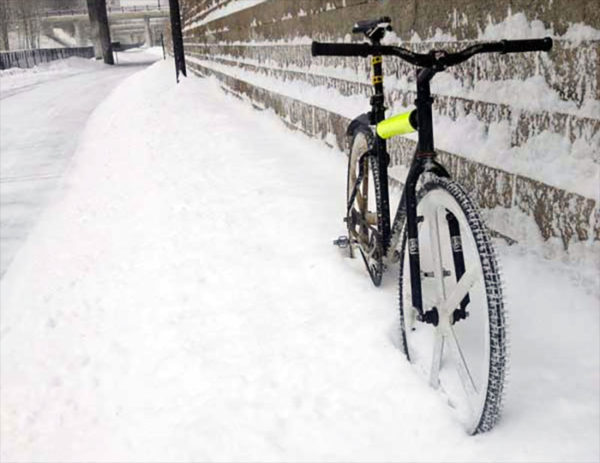
Wool socks can be a real lifesaver in the winter months, keeping your feet warm and dry. DeFeet makes some of the most popular wool cycling socks on the market. They are called the Woolie Boolie sock. They are durable and provide a great deal of warmth as they are made out of almost 50% American Merino Wool. These socks come up six inches to provide you with a great deal of warmth. The Sockguy wool cycling sock is twelve inches high and features a mesh upper panel above your foot to allow for ventilation. Giro also makes a six-inch sock out of merino material in a ton of patterns and colors.

Compression Cycling Socks

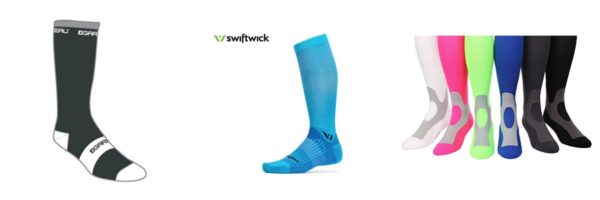
Compression socks are nothing new in the world of endurance sports, but finding the right pair may not be so easy. They are measured in millimeters of mercury (mmHg), the larger the number the more compressed the socks will feel. The Swiftwick Twelve is 15-20mmHg and features their anti-odor technology and will help to reduce swelling during recovery. The Louis Garneau R-Compression cycling socks decrease recovery time between workouts and have “stretch zones at the heel and toe.” The Mojo Coolmax recovery cycling socks offer 20-30mmHg, a bit more compression than competitors, although more is not always better with compression.

The Best Indoor Bike Trainers

November 26, 2019 by Sarah Lauzé

Depending on where you live, your rides outside may be numbered. As much as we may go in with the the intention to tackle winter riding with vigor, when it’s dark and cold it can be tough to bundle up and get out there. Riding inside is a great way to not only keep up your fitness level, but it’s a great opportunity to focus on specific aspects of your technique and push for some improvements. There are a lot of options out there when it comes to indoor bike trainers, so this guide will take you through the different options and some of the best of each category.

Types of Bike Trainers

Trainer

A trainer is a stand that holds your bike in one place via the rear axle and has a spindle that is pressed against the tire transferring resistance. With your bike locked in place you can easily look away from the bike to an entertainment device as opposed to rollers (discussed below). Trainers come in three main kinds that are differentiated by how they apply resistance to the wheel.

– Fluid Trainer

A fluid trainer uses, you guessed it, fluid inside a drum that is attached to a spindle that the tire rests on to create resistance. Fluid trainers apply the most even resistance to the wheel while also being relatively quiet. The resistance level in a fluid trainer goes up in an exponential fashion the harder you pedal.

– Wind Trainer

Wind trainers use a fan that is designed to catch wind as it turns to create resistance. This is then attached to a spindle which rests on your rear wheel like that of a fluid trainer. Because the fan is cutting through the air to create resistance, they are loud. With stationary riding however, it can be quite hot due to the lack of wind across your body but wind trainers often direct the breeze toward you creating a bit of a cooling effect. The resistance level with wind trainers does go up the harder you pedal but not to the extent of fluid trainers.

– Magnetic Trainer

Magnetic trainers use magnets to place resistance on the spindle. Most magnetic trainers have an adjustment that allows you to vary the resistance level while riding. Magnetic trainers can vary widely in the amount of resistance they can give but a decent one will give you plenty of leg searing resistance.

– Wheel-less

One drawback to all of the trainers above is that the resistance is placed on the tire which causes the tire to wear down rather quickly. Many riders use old tires that are only ridden on a trainer, but if you’re frequently switching between riding inside and out, changing a tire all the time can get old. Fortunately there is a new style of trainer out there that doesn’t use a rear wheel. The trainer has a cassette that is attached to the stand that your bike is locked into which provides the resistance. Many cyclocross riders opt for this one as it eliminates the need for a trainer-only wheel to warm up on.

Rollers

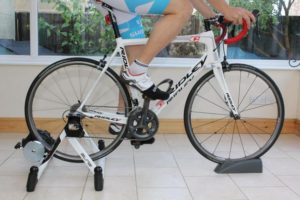
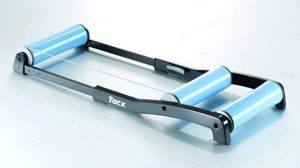
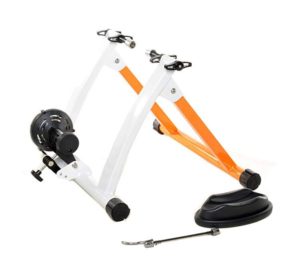
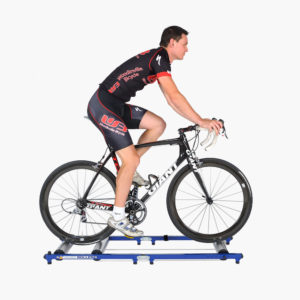
Another device for indoor riding is rollers. These use three drums, one under your front wheel and two under your rear which your wheels rest on and rotate while riding. The centrifugal force of the wheels rotating keeps you balanced much like riding down the road. Riding the rollers does take a bit of practice as it requires balance and focus to stay upright, but once you’ve adapted it’s quite easy and much more enjoyable than riding the trainer which requires pretty much no focus to ride.

– Resistance

Rollers come in a variety of sizes of drums which dictates how much resistance there is on the rear wheel. The smaller the drum, the higher the resistance. However, some rollers come with resistance that can be added, most often in the form of magnets on the side of one of the drums.

– Free Motion Rollers

By far the best indoor riding device are free motion rollers which are rollers that are attached to a stand which allows them to glide forward and back with your riding via bearings. Free motion rollers allow the bike to move not only side to side as you ride but also forward and back allowing you to get out of the saddle as well as making it feel like you are riding down the road. They also have variable resistance with a magnet attached to one of the drums.

Stationary Bikes

A final option for indoor riding is a stationary bike. These bikes are made to only be ridden in place. If you ride inside a lot and don’t move your setup, this can be a good option provided you place a similar saddle and the same pedals on it as well as have the position the same as your normal bike. These can save your bike from the stresses placed on your frame by a trainer as well as running through tires on both a trainer and road bike. The down side is it’s a bike only to be ridden indoors.

The Best Indoor Bike Trainers

Fluid Trainer – Kinetic Rock and Roll Trainer

Price: $569

Kinetic is one of the most popular best sellers in the market, and with good reason. The cost upfront may seem daunting, but the high-quality and ease of use makes their trainers well worth the investment. The Rock and Roll trainer gives a more realistic ride than most others, making it unique, and it’s compatible with almost all bikes. It’s quiet, smooth, and features a fluid resistance unit. It also works with Bluetooth compatible smart phones, tablet, and laptops so you can use Kinetic Fit, Zwift or TrainerRoad.

Magnetic Trainer – Blackburn Tech Mag Race Trainer

Price: $109

The Blackburn Tech Mag Race Trainer is the perfect example of a great tool for the job at an affordable price. It’s small foldable design makes it easy to transport and store, and it has a surprisingly smooth road-like feel. The magnetic resistance system is controlled via a handlebar- mounted lever, making it quick and convenient. The adjustable legs also make it so you don’t really need to raise the front wheel. This trainer will work for both road and mountain bikes.

Rollers – Tacx Antares Rollers

Price: $218

The Tacx Antares Rollers are loved for the conical shape of the drums, ensuring your bike always remains in the middle of the roller (making it both easier to ride and safer). They also sell a support stand that clasps your front wheel, and can be a great toll to get used to the feeling of riding on rollers.

Budget Friendly Trainer – Conquer Portable Bike Trainer

Price: $59

For the casual cyclist looking to keep up a base over the winter, the Conquer Portable Bike Trainer gives you a lot of bang for you buck. It’s simple to set up and operate, and takes up very little space (perfect for apartment dwellers). The heavy duty frame and overall stability of the ride makes it a great option for beginners. It features magnetic resistance, and requires a bike with a rear quick release wheel.

The Best Gifts for Mountain Bikers

November 22, 2019 by Sarah Lauzé

It’s coming up to that time of year, and last minute gifts can be tough (cut to me wandering around a crowded mall like a lost puppy), so why not go with something that is both fun and useful? If you have a road cyclist on your list, check out our Top 10 Gifts for Cyclists, but for the mountain bikers, it may look a little different. Mountain bikers are hard on their gear, between beating it up on the trail, then scrubbing the dirt out of everything afterwards, which makes upgrades and replacements the perfect gift. Here’s some of the best gifts for mountain bikers.

10 Best Gifts for Mountain Bikers

Dynaplug Racer

Punctures are a part of the sport, so fixing them is a necessary evil. The Dynaplug Racer is the newest repair tool for tubeless bike tires. All you have to do is locate the hole, asses the size, and then use either the Megaplug end, or the standard plug for smaller punctures. It leaves behind a sticky rubber substance to give the sealant something to weld to. It’s quick, easy, and a great gift for any tubeless rider.

Park Tool IB-3 I-Beam Multi-Tool

The best thing short of a mobile mechanic, the Park Tool IB-3 has everything you need for most trailside emergencies. Eight hex wrenches, a T25 Torx driver, flat-blade screwdriver, chain tool compatible up to 12 speed, tire lever, box wrench and spoke wrenches.

Granite Rockband Carrier Strap

A lot of mountain bikers are ditching hydration packs in favor of water bottles and on-bike storage. The Granite Rockband Carrier Strap is pretty self explanatory, as it is a great alternative for those who want to have a multi-tool and spare tubes on hand, but don’t want to ride with a backpack.

Rylo 360 Video Camera

Rylo is a powerful little 360° camera that allows anybody to create stunning videos. This camera captures everything around you in 5.8K resolution with breakthrough stabilization- perfect for capturing some beautiful single track. When they’re done shooting, they can connect to the app and edit the video right there on their smartphone.

Race Face Aeffect Bike Pedal

The Race Face AEffect Pedals are strong, light and offer the best of both looks and performance. The chromyl axle and bottom loading hex traction pins can take a beating, making them perfect for trail and downhill riders alike.

Cycling Socks (Yes, socks)

Socks may seem like a lame gift, but the mountain biker on your list will be stoked! Check out some Swiftwick socks to keep their feet comfortable and dry no matter what the conditions.

Big Blue Book of Bicycle Repair

Save them some money with this great resource. The Big Blue Book of Bicycle Repair addresses the most advanced materials and technologies used in today’s bicycles. Each job is carefully explained in a way that makes sense to a novice mechanic. Each repair or maintenance project has easy to follow steps, complete with photographs, examples and helpful tips.

Custom stem cap

Bring some style to their bike with a custom stem cap. You could get something made just for them, or choose from one of the many fun ones available on Amazon.

100% Brisker Gloves

Perfect for those cooler days, the 100% Brisker Glove has an insulated top layer with a thin synthetic leather palm. This keeps the hands nice and warm, while not compromising grip and hand function while riding.

Osprey Raptor (Men’s) and Raven (Women’s) Hydration Packs

Made for rugged single track, Osprey hydration packs are known for their bio stretch harness and comfortable connection to the body. The design reduces liquid movement so you’re not sloshing your way down the trail. There’s plenty of room for snacks, tools, and a helmet carry system when you’re off your bike.


The Best Flat Mountain Bike Pedals

October 14, 2019 by Sarah Lauzé

If you’re a dedicated road cyclist branching out into some mountain biking, you may choose to go directly to clipless mountain bike pedals. Although there are plenty of advantages to riding with the clipless system, starting out on flat mountain bike pedals will help build your technical foundation. Riding on flat pedals keeps you from cheating, and will teach you to move your body and your bike efficiently. It may be frightening to take a break from obsessive wattage and tracking and instead work on some basic skills, but it’s worth it in the long run!

Flat Mountain Bike Pedals
It happens to the best of us.

The Balancing Act

When you’re first starting out, it’s common to balance by shifting your weight too far back. Although this is great to keep you from going over the handlebars, it can make it difficult to maneuver. Riding flat pedals encourages you to shift the weight by dropping your heels, keeping the bike steady and giving you a great platform to stand on.

While being clipped in can be great for forcing you to stay on your bike on technical trails, it can also be intimating when you’re first starting out. Flat pedals give you the peace of mind and confidence to tackle some tough trails knowing that you can easily drop a foot and aren’t at risk of the slow tip-over.

The Best Flat Mountain Bike Pedals

Spank Oozy Trail Platform Pedals


Price: $119

Extremely lightweight, the Spank Oozy Trail Platform Pedals have more than just great looks and a fun name. At just 12mm thin, they offer incredible ground clearance when pedaling in rough terrain. This exceptional thinness also improves stability and pedaling efficiency by bringing your foot almost flush with the pedal axle, drastically reducing dreaded “pedal flip.” Available in four colours, they all have the chamfered edges to keep the pedals from getting that trached look that most colored pedals get after a couple rides.  


Crank Brother’s 50/50

Price: $54

The CrankBrother 5050 their classic platform pedal for adventures of any type. Ten adjustable pins per side deliver a degree of grip and customization sure to keep your feet exactly where you want them. The medium-sized platform and thin profile that make them all-around performers, and the huge openings keep the mud-compacting to a minimum.

Race Face Aeffect Bike Pedal

Price: $100

The Race Face AEffect Pedals are strong, light and offer the best of both looks and performance. The chromyl axle and bottom loading hex traction pins can take a beating, making them perfect for trail and downhill riders alike.

Shimano PD-MX80 Saint Pedals

Price: $65

Developed and dedicated to downhill riding, the Shimano Saint MX80 have a unique shape and concave platform for better control and efficiency. The previous MX30s were popular for their durable, smooth rotating axle, and the MX80 carry this over with some added features. They are now slightly wider and lower, allowing for responsive levels of acceleration and deceleration.

Fyxation Gates Slim Platform Pedal

Price: $29

If you’re looking for an entry level flat pedal, then the Fyxation Gates Pedal is a great option. Designed as a BMX pedal, it is made of durable nylon and will work on the trails with ease. Thin bodied with loose ball bearings they can work great for casual mountain bikers and urban riders.


7 Essential Bike Tools Every Cyclist Should Have

October 10, 2019 by Sarah Lauzé

Working on your own bike can be satisfying, plus it can save you a bunch of money and trips to the bike shop. Having the essential bike tools for the job is necessary on both accounts. Seeing as you are the one who rides your bike all the time, only you really know what’s going on with it. If it’s making a certain noise, or feeling weird in a way, it can be tough to describe those smaller issues to a bike mechanic. With the right tools and general know-how, you can diagnose and fix the problems– and even have fun doing it!

That being said, botching a quick repair or making it worse because you’re trying to get through it with some multi-tools you had lying around can make for an embarrassing trip to the bike shop. Make sure the tools you have are up to the task, and ensure your also know how to use them. Seek out someone to teach you, watch videos online, read articles and practice on an old beater in a low-stakes repair before moving on to your top bike.

7 Essential Bike Tools

1. Floor Pump

While a floor pump is not the most exciting bike tool, proper and regular use can avoid the most common bicycle repair: a flat tire. Correct inflation pressure for the rider/tire/rim/surface condition combination can lead to fewer flats, along with better handling for your bike. Pressure that is too low risks pinch flats and pressure that is too high can lead to more puncture flats. Finding the right pressure will keep your bike rolling, keep you more comfortable on the bike, and more confident in your bike handling.

2. Tire Levers

Bad tire levers are really frustrating. If you’re out on a ride and get a flat, struggling to get your tire off with your bare hands can be tough, so you reach for your tire levers. If they proceed to break, then you’ll most likely be ready to pull your hair out. Good tire levers are the difference between a simple fix and the above situation. It is not a huge investment, so get the good ones and they will last you.

3. Hex Keys/Torx Keys

Most bolts on bicycles have metric hex bolts, so a good set of hex keys with ball-end drivers will make repairs a breeze. They will fit in your bolts securely, minimizing the chance of stripping the bolts. The ball end allows you to tighten and loosen hard to reach bolts at angles other then perpendicular. The set should have a full range of sizes to accommodate all of the bolts you will work on. Again, this is not a huge investment.

More and more bike parts have Torx bolts, six pointed star heads that give their wrenches more surface area, reducing the chance of stripping them. The same rules that apply to hex keys apply to Torx keys, except that they cannot accommodate ball-ends.

4. Cable Cutters

Replacing cables is not a complicated job with the right cable cutters. And there is only really one right cable cutter, which is often copied. With the wrong cable cutter, you risk fraying the cable or housing you are working with. A frayed cable is useless as the frayed section can spread and will not go cleaning through the housing, compromising its function.

5. Chain Tool

Cutting your a new chain to the correct length and installing it is one of the most satisfying repairs to do. It increases the longevity of your drivetrain if done at the correct intervals and makes it more efficient with crisper shifting. The only way to push the pins through a chain is with a chain tool.

6. Screwdrivers

There are a few adjustment screws on bikes, usually for derailleur limits (although some have moved to small hex heads) and usually number two Philips heads. But not all screwdrivers are equal, a good fit goes a long way to preserving your screws. Additionally, you should have a flat head screwdriver around, but this is mostly for scraping clean derailleur pulleys and other hard to reach places.

7. Torque Wrench

The last tool, the torque wrench, is a recent necessity. With the explosion of lightweight parts that require a certain torque to both hold fast and not fatigue prematurely, a torque wrench is the only tool for the job. Fortunately, most bike parts that require a certain torque have it printed right on them. Make sure you get the right bits for your bikes. Lots of people say they can do it by feel, but that has been proven wrong time and again.

Your own work is always more satisfying than relying on someone else’s, and it can also give you a sense of ownership of your bike. These bike tools should get you on your way to mastering most basic repairs. Remember to learn how to use a tool properly before attempting any repairs.

The Best Waterproof Bike Covers

October 1, 2019 by Sarah Lauzé

A bike cover is one of the most simple and effective ways to protect your bike. A bike can be considered an investment, so it’s worth doing what you can to protect that investment and make it last as long as possible. A quality waterproof bike cover can protect your bike from the elements and ensure it lasts for years to come.

Ideally you want to keep your bike inside, but depending on your living situation this is not always possible. If bringing one more bike into the house is going to be the last straw for your significant other, then you need to take advantage of other options.

Leaving your bike open to the elements will speed up the aging process. The sun, water and dirt will end up causing damage to your bike and cost you in repairs. If you’re in a humid climate, rust on certain metal components can also develop quicker.

When you are choosing a bike cover, first thing to look at is what material it is made from. You want to ensure that it is, in fact, waterproof and that it will not snag when you’re taking it on and off. Next you will want to try it on your bike to make sure it fits and covers the entirety of the bike, including the wheels.

Here are some of the best waterproof bike covers to ensure you do all you can to protect your bike.

5 Of the Best Waterproof Bike Covers

Pro Bike Tool Cover

Price: $30 – $40

The Pro Bike Tool Cover is on the more pricey end of the the spectrum, but it does offer high performance protection. Made from Ripstop Oxford Fabric and with heat sealed seams, it really does keep out the snow, ice, wind, dust, sun, and pretty much anything else you throw at it. With a variety of sizes, you can get one to fit over your road bike, mountain bike (even with 29ers), or multiple bikes.

MayBron Gear Bike Cover

Price: $27

This heavy duty MayBron Gear bike cover is also made from durable Oxford fabric, which is not only heavy-duty but also relatively lightweight. Be sure to measure your bike before purchasing as there isn’t much wiggle room when it comes to the cover fitting snugly over your tires. This cinching bottom works great, and it includes holes for your bike lock.

YardStash Bicycle Cover

Price: $30

The YardStash bike cover is designed to offer ground up coverage, made from durable 210D Polyester. It has an elastic bottom, and also includes a middle buckle making it a good choice if it will be exposed to a lot of wind. There are two vents in the front of the cover that aim to eliminate condensation and corrosion if you live in a humid environment.

COVRIR Ultra-Tech Waterproof Bike Cover

Price: $20

The COVRIR Ultra-Tech bike cover was designed to offer lasting quality at a affordable price in an attempt to eliminate waste created by replacing a bike cover every year. Using a three strap system, this cover is “hurricane proof” while made from breathable fabric to prevent condensation. It also comes with a lock and cable, although you may want to invest in a secondary lock to ensure your bike’s security.

Kotivie Waterproof Sun Protective Bike Cover

Price: $26

The Kotivie bike cover is double sided, so black on one side and reflective on the other for UV protection. It is made from durable Polyester Oxford fabric, with a Silver PU coating to keep it from breaking down in extended sunlight. It is large enough to fit 1-3 bikes, with straps to pull it snug.

The Best Mudguards to Get You Through Winter Riding

September 6, 2019 by Sarah Lauzé

Many cyclists think slapping mudguards on a carbon fiber bike is a little daft, but once you try them you will realize just how useful they can be. Unless it’s pouring rain, it’s the spray from the wheels that most often get you wet, so mudguards are your first line of defence. Not only do they keep spray from flying into your face and going up your back, but they are also a common courtesy on group rides.

Winter riding can be a ton of fun, but it also makes for some tough riding conditions. Between the sudden changes in weather and wet roads with muddy shoulders, mudguards can make all the difference. For commuters, fenders are a no brainer, but for cyclists heading out on training rides, they also have the advantage of keeping your feet and legs from getting soaked and chilled. That means you’ll be able to ride longer (also a no brainer).

Best Mudguards

Types of Mudguards

Full Length

Full length, bolted mudguards are most commonly seen on touring bikes. These obviously provide the best coverage and protect the rider behind you, but they do have limited clearance and won’t fit all bikes. Some have a large rubber flap on the end of the front of the mudguard as well. The longer the front mudguard, the better chance that you feet will stay dry as they are in the firing line for water kicked up from the front wheel. For a bike to accommodate full length mudguards, you’ll want to make sure you have enough clearance under the brakes and behind the seat tube. You also want to make sure it has mudguard mounts.

Plastic Clip-On Guards

Plastic clip-on guards will attach to most road bikes. Clip-on guards are great for bikes without mudguard eyelets, but they typically provide less coverage.

Mountain Bike Style

Mountain bike style mudguards attach to the downtube and seatpost. These will fit on almost any bike, and provide a ton of clearance, but provide the least amount of coverage.

The Best Mudguards

Full Length: Portland Design Works Full Metal Fenders

Price: $118

Made of anodized aluminum and adorned with laser graphics and an embossed alloy head badge, the Full Metal Fenders look great. They provide full-wrap coverage, even shielding your shoes and riders on your rear wheel thanks to sturdy rubber mudflaps. Safety release tabs ensure your wheels keep turning even if debris gets lodged between the fender and tire. The mounting system has a creative workaround for forks that do not have a center mounting hole through the use of zip ties. They have two sizes: “The Road” and “The City” that cater to road or commuter bikes.

Full Length: SKS Chromoplastic

Price: $115

The SKS Chromoplastic are a great full length option that have stood the test of time. Made by sandwiching aluminum strips inside plastic housing, they are durable and provide great coverage. They feature stainless steel stays and hardware, with a front fork crown fitting and secu-clip to lock it in place. The Chromoplastic also include a mudflap on the front and a reflector on the rear. They’re available in a variety of sized to fit tires from 20 – 45mm.

Full Length: Velo Orange Hammered Alloy Fender

Price: $65

These fenders feature a classic hammered pattern and include a hardware kit to work with almost any type of mounting in the same finish as the fenders. Made from aluminum alloy for strength while staying lightweight, they come in a variety of sizes to ensure a good fit. They can be a pain to install, but they are built to last.

Clip On: SKS RaceBlade Pro XL 

Price: $60

These easy to install clip on plastic mudguards are designed for 700c tires up to 32mm in width. They can adapt to the radius of the wheel by adjusting the length of the stays. Each mudguard consists of two parts that join together with steel brackets, held by the brake caliper bolt. They do a great job of keeping both your feet and your bottom dry, and protecting the rider behind you from getting sprayed in the face.

Mountain-Bike Style: Zefal Swan Road

Price: $15

If you don’t have mudguard mounts and are looking for some protection from road spray from your rear wheel, then the Zefal Swam Road is a great option. It includes a simple but sturdy bracket that attaches to the seatpost, making it super easy to take on and off.

Mountain-Bike Style: Crud Catcher

Price: $15

The Crud Catcher fits on your downtube to catch any loose mud being flicked up from your front wheel. Mostly used on mountain bikes, you can use it on your road bike as a means of keeping mud and spray out of your face. It’s easy to mount with the supplied fittings, and gets the job done with little fuss.

Stay Visible: The Best Use of Bike Reflectors

August 27, 2019 by Sarah Lauzé

Riding at night can be a ton of fun, and it’s unavoidable if you commute on your bike early in the morning or later at night. Ensuring that drivers can see you in tough lighting conditions is the first step in staying safe on your rides. This includes bike lights, reflective gear, and making use of bike reflectors.

Bike Reflectors

Bike Reflectors as a Supplement to Lights

First things first, you’ll want to have a front-facing white light and a rear facing red light (one solid and one blinking is best). These are legally required in many places, and are a very good idea. Reflectors can be used to supplement bike lights, not replace them.

Fortunately, new LED lights are both affordable and long-lasting for those longer rides. Drivers have to 
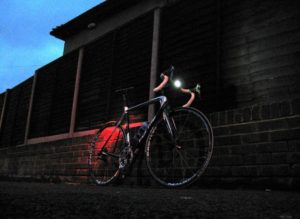
be able to see you to have enough time to react, so better to have too many lights than not enough.

If you’re planning on heading down any low light or country roads, you’ll want to ensure your front light is bright enough to light your path. Be sure that all your lights are fully charged before heading out with more than enough battery life for the duration of your ride, and it’s a good idea to have an extra backup light as well.

The Best Use of Bike Reflectors

Bike reflectors work to bounce light back in the direction of it’s source, in this case a car’s headlights. Depending on your bike, it may already have some reflectors. Most new bikes come with a set of reflectors, but are rarely installed by the bike shop before sale. The most common places will be on the back of the pedals, the fork, handlebars, seat post, and rear rack if you have one.

Front and Back Reflectors

Front and back reflectors usually have a bracket that fits around the stem or handlebar. These will either snap shut, or have small screws that hold it in place. Back reflectors will go on the stem below the seat, but make sure it isn’t so high that the seat or your jacket will block it. Front reflectors will go right on the handlebars, or the front stem. If you don’t want to attach reflectors on your bike, strips of reflective tape can be used instead.

Pedal Strips

It’s been proven that drivers will notice the up and down movement of pedaling before the smoother movement of the whole bike, so it’s important to get something reflective on your pedals or feet. For pedals that don’t have built-in reflectors, you can get a reflector attachment that will bolt into your pedals. Or you can use strips of reflective tape on your pedals and wear reflective ankle bands to ensure you are visible.

Tire Spoke Reflectors

You may not want to have tire spoke reflectors on your favourite road bike or mountain bike, but they are a great idea. The rotation of the wheel will make sure you are seen from the sides as well as the front and rear. Basic plastic tire reflectors will snap on and off easily, so you could just put them on for those rides at dust or in the dark.

Cycling at night doesn’t have to be dangerous and can open up a whole new world of riding, not to mention the additional time available to actually do it. Be prepared and stay smart and you’ll reap the benefits of cycling at night be it commuting or getting some extra training in.

4 Ways To Protect Your Bike While Traveling

July 31, 2019 by Sarah Lauzé

Strapping your bike on your car and heading out on an adventure can be a great way to expand your cycling experience. You can find quiet roads or some new new single track and get away from your go-to routes. The only issue can be figuring out how to best protect your bike while travelling from one place to another.

There are quite a few options when it comes to transporting your bike, and you have to find what will work best for you. This will also be determined by what kind of vehicle you have. Here are some of the best ways to protect your bike and ensure your adventure isn’t tainted by a damaged or stolen bike.

Protect Your Bike

Pick the Right Carrier

  • Rear Mounted Carriers

Rear mounted carried are easy to use, but can have some drawbacks to consider. In most cases they limit access to the trunk or back of the vehicle, which can become an issue when it comes to gear. They are also more susceptible to damage, whether it be from dirt and rocks or an accident. You also need to ensure your plates and lights remain visible, as this can be cause for a road fine in many countries.

  • Roof Racks

Not only does a roof rack tell the world that you are a fun Protect Your Bike
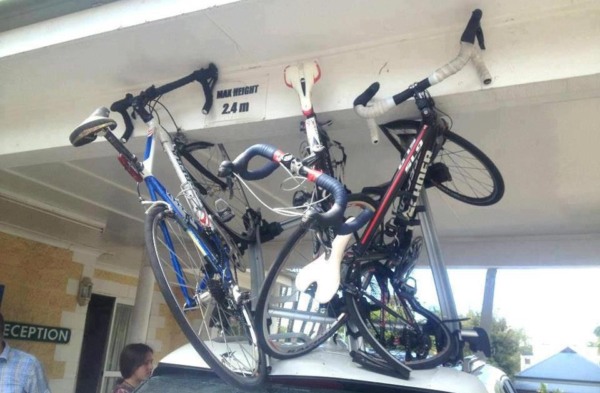
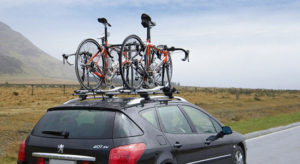
outdoorsy person, but the it is a great option when it comes to transporting your bike. You can either keep your front wheel on, or some require you remove the front wheel and include a fork grabber that can be locked for extra security. Although roof racks generally keep your bike a lot cleaner, it increases your wind resistance and can affect how your car handles. It can also be difficult to get your bike on and off the roof depending on the height. Plus, there is the added risk of forgetting it’s up there and driving under something (like a garage) and hearing that sickening crunch.

  • In your car

Protect Your Bike
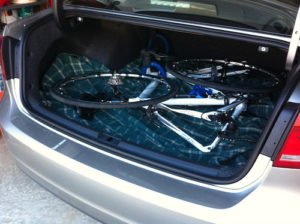
Some choose to remove the front wheel and transport their bike in the vehicle for piece of mind. Yes, this is the cheapest and perhaps the most secure method, but it does have its drawbacks. Not only can it be awkward to get your bike in and out, but it can damage your vehicle through catching material or bike grease and dirt. Also, it doesn’t leave much room for anything else if you are heading out with some friends or need other gear.

Position the Bike Correctly

Almost all bike carriers will hold the bike frame somewhere for stability. You’ll want to make sure to place the clamp as close as possible to the frame joint as that’s where the frame will be strongest. This is particularly important for carbon frame bikes.

Lock it up

If you are going to leave your bike unsupervised on your car for any amount of time then you’re going to want to lock it up. Many bike racks include a locking mechanism, but an additional lock is always a good idea. Not only does it make thieft more difficult, but it a visual deterrent to bike thieves in the first place. Whenever possible be sure to leave your car and bike in a well lit and populated area.

Keep it clean

To help avoid scratches while transporting your bike, give it a wipe down before popping it on or in your Protect Your Bike
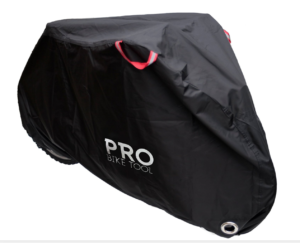
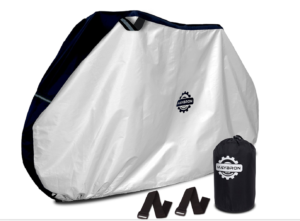
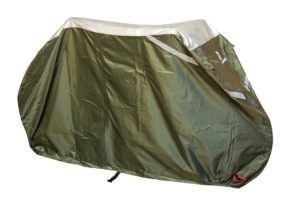
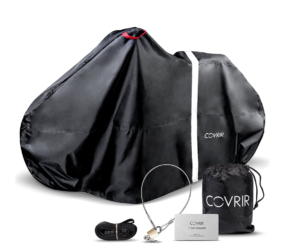
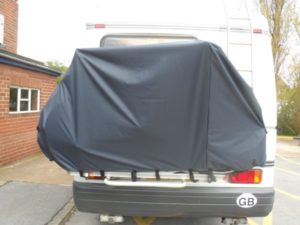
car. This is especially important for carbon bikes. Likewise, you’ll want to keep your bike rack nice and clean to keep dirt from getting trapped between your bike and the rack. If you’re using a rear mounted bike you can also use a bike cover to keep your bike clean and protect it from incoming rocks and dust.

No matter how far you are transporting it, make sure you take the necessary things with you to protect your bike. Always take a bike lock, at rag or wipe to give your bike a quick clean, and a bike cover if you are going to be leaving your bike out in the elements for any period of time.

The Essential Cycling Accessories

June 18, 2019 by Sarah Lauzé

Cycling can be an intimidating sport to get into, especially when you walk into a bike shop with no idea where to start. You may see a ton of kitted out riders with all the bells and whistles, but you really don’t need much to get started. The essential cycling accessories can not only be affordable, but can last you years to come.

Essential Cycling Accessories

What you need:

1. A Bike

Okay, this one is pretty self explanatory. Check out this article on “How to Choose Your First Road Bike” for more information.

2. A Helmet

The second most important piece of equipment after your bike should be a helmet. Whether you’re doing a five minute commute to work or heading out for a couple hours, never get on your bike without a helmet. There is not doubt a helmet can save your life, so ensure you get one that is a proper fit. On a side note, don’t be tempted by the UFO-looking aero helmets, unless you are a professional, you really don’t need it!

Core Accessories

These items may not be absolutely necessary, but they can definitely make cycling more enjoyable, especially when you’re just starting out.

A Bike Lock

Unless you plan on only riding from your house, and never stopping out on the road for a coffee or snack, then you’re going to need a bike lock. You may think the bigger the better, but the size of the lock is less important than the functionality. There are dozens of different bike locks on the market, so be sure to invest in one that can give you peace of mind when you have to leave your bike.

Cycling Clothing

Obviously you don’t need to go all in with the lycra to go on your first ride, but a couple staple items will make the experience a lot more comfortable. First is a waterproof jacket or shell that can keep you dry and warm even if the weather takes a turn for the worse. The second a solid pair of cycling shorts with a good chamois. These will feel awkward at first (kind of like wearing a diaper), but they allow you to feel more comfortable, powerful, and in control while on the bike. Cycling shorts will also allow you to ride for longer periods of time without discomfort or risk of saddle sores.

Many cyclists claim that you have to go with clipless pedals and cycling shoes to ensure efficient riding. True, this system does help you with power transfer, and can be a big step in improving your cycling, but you don’t necessarily need to start with them. Besides, the idea of being clipped into the bike can be daunting for a lot of beginners, so take you time and grow into the idea as you become more confident in your cycling skills.

Pump, Spares, Tools

You won’t want to have to end your ride and take your bike into the shop every time you get a flat. You’ll need both the tools and the know-how to take care of some of the most common bike fixes. A good tire pump, multi tool and spare tubes (if you have clincher tires) will go a long way to keep you out on the road. For some basic maintenance and repair, check out “101 Best Bike Repair and Maintenance Tips.”

A Water Bottle

Staying hydrated on your bike is key to both how you’ll feel and can affect your overall health. Ensure you always have water with you when you head out on a ride, whether in the water bottle and cage system, or a hydration pack.

A Saddle Bag

If something goes wrong on a ride and you’re stuck without tools and supplies, you’re walking or calling for help. It’s not so much having a tool for each and every issue, it’s about having the right tools and supplies to get you back on the road again. A saddle bag is the easiest way to carry all the essentials to keep you rolling.

Cycling Cap

A cycling cap is for both function and style. It keeps the sun out of your eyes as well as sweat and rain, and winter caps can keep you warm on a chilly day. Also, if you use your bike for commuting around town and are worried about having hemet-hair, a cycling cap can be a great lightweight fix.

Cycling Glasses

You may have a pair on sunglasses you’ll wear on those bright, summer days, but wearing glasses while on your bike can do more than shield from the sun. Glasses help break the wind when you’re riding, preventing eye irritation. They also work wonders to keep bugs, rain, and other debris from smacking you in the eyeball (which is not a pleasant experience). Many cycling glasses will come with interchangeable lenses, so you can wear the same pair no matter what the weather.

« Previous Page
Next Page »
  • Facebook
  • Tumblr
  • Twitter

Latest Articles

JOIN Cycling: A New Training Platform for Cyclists

May 27, 2024 By Eric Lister

cold exposure

The Benefits of Cold Exposure for Cycling & Life

June 13, 2023 By Eric Lister

hill climb

The Ultimate Hill Climb Training Guide

May 31, 2023 By Eric Lister

shoulder pain cycling

How to Treat & Avoid Shoulder Pain While Cycling

April 12, 2023 By Eric Lister

psoas stretch

The Importance of the Psoas Stretch for Cyclists

April 6, 2023 By Eric Lister

cycling neck pain

The Ultimate Guide to Cycling Neck Pain: Causes and Solutions

March 21, 2023 By Eric Lister

Useful Info

  • Contact
  • Finally, A Global Cycling Club That Is Focused On Community And Love Of Cycling!
  • Privacy Policy
  • Share Your Story!
  • Terms And Conditions Of Use
  • Welcome to I Love Bicycling
  • What Happened When I Stretched Every Day For a Month

Recent Posts

  • JOIN Cycling: A New Training Platform for Cyclists
  • How to Hang Bikes in Your Garage: 4 Inexpensive Options
  • Gravel Bike Vs. Road Bike: Which One Is Better For You?
  • The 6 Types of Mountain Bikes & How to Choose the Best One for You
  • What Is a Touring Bike Good For? 5 Benefits We Know You’ll Love

Search I Love Bicycling

Connect with Us

  • Facebook
  • RSS
  • Tumblr
  • Twitter

Copyright © 2025 · Magazine Pro Theme on Genesis Framework · WordPress · Log in