• Training
    • Injury Prevention
    • Training Tips
  • How To
    • Bike Fit
    • Gear
  • Nutrition
    • Nutrition Tips
    • Weight Loss
  • Repair
  • Reviews
  • Stories
    • Funny Stories
    • Jokes
    • Quotes
    • Videos
    • Funny Videos

I Love Bicycling

I Love Bicycling is a website that is geared towards cycling for beginners with road cycling tips, training articles, nutrition tips, weight loss, how to’s and bike repair articles.

Training

  • Injury Prevention
  • Training Tips
  • Training Camps

Improve Your Cycling With These Cross Training Sports

June 22, 2020 by Sarah Lauzé

We may be of the opinion that cycling is the single best sport out there, but sometimes widening our horizons can make us appreciate time in the saddle even more. While it remains true that the only way to get better at cycling is to ride more, cross training can help you get there. It can help fill in the gaps by building bone density and strengthening muscle groups that may be underused on the bike.

Whether your taking a break due to an injury or just trying to work some variety into your training plan, here are some of the best cross training sports to improve your cycling.

Hiking

Hiking is a great way to enjoy your surroundings at a relaxed pace. While you may be chasing segments on your bike, hiking makes you stop and take in the view. This can have a great stress-relieving impact on the brain.

Why it’s great for cyclists: Taking a stroll in the woods, especially if you tackle a mountain, is a great workout for your glutes, quads, hamstrings, core and hips. Those muscles sound familiar? They are also your mission-critical muscles used cycling, so hiking is a great way to build strength and endurance. It also helps build bone density as a weight bearing activity, but without the high impact of running.

Swimming

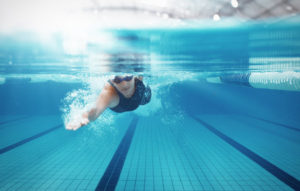
Who doesn’t want to go hit up the beach in the summertime? Whether it be in your nearest body of water or the local pool, swimming is one of the best ways to exercise while injured. It is also one of the more efficient strength and cardio workouts.

Why it’s great for cyclists: A weak core can lead to a whole lot of issues for cyclists, largely sharing up as lower back pain. As cycling naturally leads to underdeveloped core muscles, it is important to find another way to strengthen that area. If this is a challenge for you, swimming needs to be your new favourite thing. It is also a great way to recover after a hard ride.

Strength Training

Hitting the gym may not be everyone’s particular cup of tea, but even doing some strength exercises at home can be a great way to balance muscles. When done right, strength training can make you feel stronger, faster, and fitter both on and off the bike.

Why it’s great for cyclists: Cycling is a low impact activity, which means it’s great for your joints, but not so great for supporting your bone density. Strength training can help fill the gaps and build stronger bones and complementary muscles to have you feeling stronger than ever on your bike.

Running

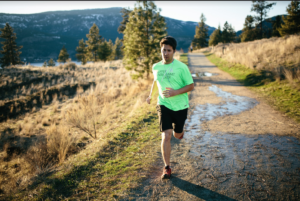
Running is a great option if you’re travelling without your bike, or have limited time for a workout. It is effective in maintaining the condition of your cardiovascular system and gives you some variety in your training.

Why it’s great for cyclists: Running strengthens your bone density in a way that cycling doesn’t, and will keep you top climbing shape when you can’t put the time in on your bike.

Yoga

There are a lot of misconceptions around yoga, and you may scoff at the idea of it improving how you feel on your bike. However, more and more pros are using yoga as their secret weapon to get faster and prevent injury.

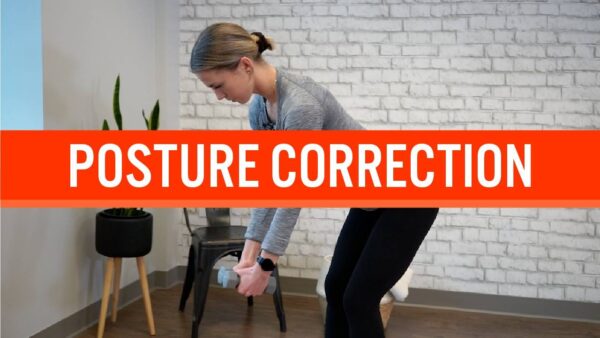
Why it’s great for cyclists: Yoga helps strengthen your core, which in turn can prevent lower back pain. It maintains a healthy range of motion in your muscles and joints, and will improve your flexibility and posture over time. Regular stretching and yoga will reduce your risk of suffering from the typical overuse injuries that plague cyclists. These include IT band syndrome, tight hamstrings, back pain, and knee problems.

3 Hidden Cycling Injuries and How to Fix Them

June 20, 2020 by Sarah Lauzé

We all know the wonderful feeling of cycling, but unfortunately it’s not always sun on the face and wind in the hair. Pedaling is a low-impact motion, making cycling one of the best ways to stay fit without putting stress on your joints. However, it’s also a highly repetitive action through a limited range of motion, which has consequences over time. Injury is a part of almost every sport, and cycling is no exception, but that doesn’t mean you need to hang up your jersey and sell your bike. Here’s what you need to know about hidden cycling injury and what you can do to fix them.

The Issue: Adaptive Muscle Shortening

Muscles do not naturally maintain their healthy or ideal range of motion on their own. In fact, it’s just the opposite, especially with the increase of 9-5 desk jobs. Muscles will change their functional resting length to adapt to the length at which they are habitually used or positioned. The process by which muscle fibres physically shorten is called “adaptive shortening.”

Cycling is one of the few activities in which muscles contract concentrically (while shortening), rather than eccentrically (while lengthening). The repetitive motion causes muscle fibres to shorten if action is not taken. Not only will shortened muscles impact your efficiency, comfort, and aerodynamics on the bike, but they will eventually lead to injury.

The cycling position is, unfortunately, more time spent in a hunched over posture that can compound already tight hip flexors, weak glutes and rounded shoulders. If you’re a weekend warrior, then it really is a case of when you will suffer an injury rather than ‘if.’ When you’ve spent most the week in a relatively sedentary position, and then hit the weekend with high levels of activity, you are taking chronically shortened muscles and forcing them to fire so quickly that it can lead to joint injury.

The Symptoms: Weak and shortened hamstrings are caused by the combination of the upper section becoming loose and weak while the lower section behind the knee becomes tight and never fully extends. This can show up as either knee or hip pain.

The Fix: The problem is a little more complex than just lengthening the muscles back to their natural state. It is a combination of stretching and strengthening that can reverse the effects of adaptive shortening, as it takes both range of motion and strength to bring muscle balance.

The Issue: Lower Crossed Syndrome

Lower Crossed Syndrome (LCS) is a neuromuscular condition in which there are both tight and weak muscles. Specifically, it refers to weak abdominal and gluteal muscles combined with tight iliopsoas and erector spinae muscles (see diagram). This is the most common underlying cause of anterior pelvic tilt, which is common among even professional cyclists.

The seat of power on a bicycle is the pelvis. When the pelvis is properly aligned the rest of the body can pedal efficiently. When the pelvis is misaligned and unstable, it is a recipe for not only lower back problems but hamstring problems too. An unstable pelvis leads to rocking. With each rock, the pelvis engages lower back muscles and hamstrings in ways that should not be involved in pedaling, overworking and straining the muscles unnecessarily.

The Symptoms:  LCS can become obvious in posture, as it leads to forward head posture, flat glutes, and a protruding abdomen as the pelvis tilts anteriorly (forward). The inhibited muscles, 
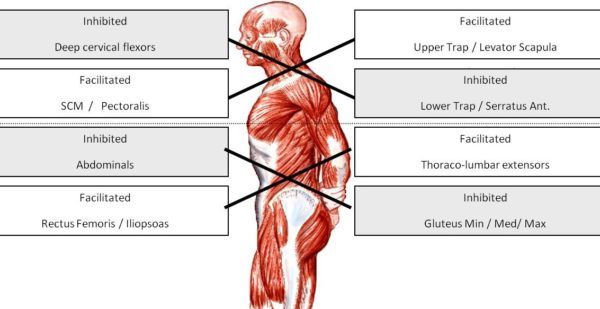
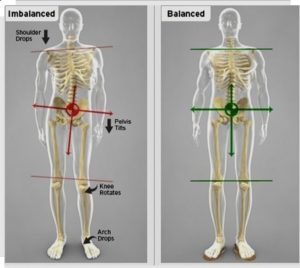
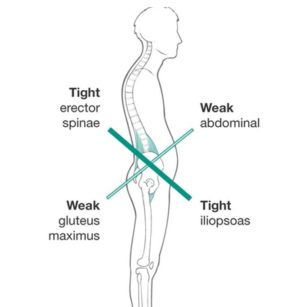
abdominals and gluteals, are never fully engaged in cycling, while the facilitated muscles, rectus femoris (quadraceps), iliopsoas and thoraco-lumbar extensors  are always engaged and often overworked. Constantly engaging those lower back muscles without proper support from a stable core often results in lower back pain for cyclists.

The Fix: The first step is to loosen the tight cross, which will quickly alleviate pain and discomfort caused by LCS. This is done this through targeting stretching, mobility movements, and foam rolling. The second step is targeted and deep stabilization exercises that will help build up the glutes and abdomen.

The Issue: Knee Pain

This one may not be so hidden, as knee pain is one of the most common injuries among athletes. In fact, a 2010 study of professional cyclists found that knee pain was the cause for over half of the time spent off the bike. As one of the most complex joints in the body, and in combination with muscle imbalance as discussed, it makes sense that it’s often one of the first places we experience pain.

To understand knee pain it is helpful to have a basic idea of what lies beneath the skin. In simplistic terms, think of the knee joint as a hinge where the quadriceps muscles pull the knee straight and the hamstring muscles bend the knee. The quadriceps run from the front of the femur (thigh bone) to the patella (knee cap). The patella acts as a pulley to increase the force generated by quadriceps which creates a greater torque on the tibia (shin bone).

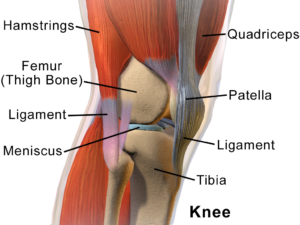
To make matters more complicated,  the ITB runs down the outside of the thigh and blends into the outside of the knee. ITB stands for iliotibial band and is a well known potential source of trouble for cyclists, runners and active people in general. The ITB is also attached to your glutes (buttock muscles) and hip flexors. Often when looking for the source of knee pain we have to pay close attention to hip flexibility and control.
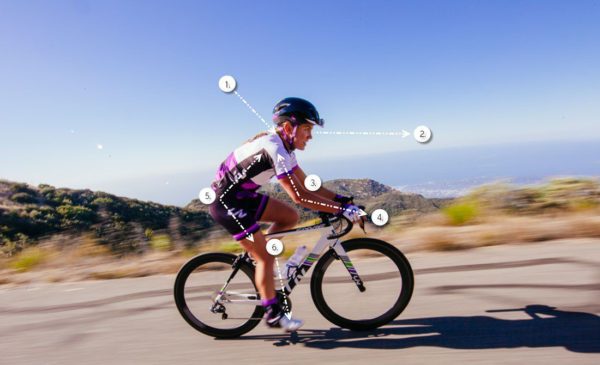
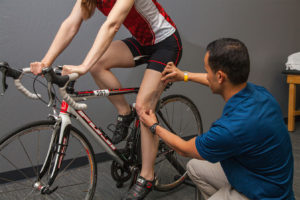
The Fix: Some types of knee pain require rest, but most are caused by muscular imbalance. Again, it takes a combination of stretching and mobility exercises to loosen tight muscles and build up the proper supporting muscles.

The Mistake Most Cyclists Make Stretching: Not Having a Plan

Most of us were taught that stretching for a couple minutes before exercise would help loosen the muscles and prevent injury, but this is not the case. Holding a static stretch for 10 seconds will do nothing to lengthen the muscle, and barely scratches the surface of what needs to happen in the structure of the muscle.

The only way to achieve muscle balance is to practice a variety of stretches over a prolonged period of time (at least 2 weeks), hold each for the appropriate amount of time, and complete in combination with some strength training.

It can be tough to accomplish all that on you own. Even with the best of intentions and a plan laid out by a physiotherapist, it’s easy to never do it at all, or stop as soon as the pain is gone. Stretching should be thought of as basic body maintenance, especially for cyclists.

As cyclists, we know how hard it is to stick to a stretching routine. We all want to spend more time on our bike, but maintaining a healthy range of motion and flexibility will, in the long run, keep you on the bike without injury. That’s why we’ve partnered with Dynamic Cyclist to bring you a stretching and strength program that is easy to follow, and is geared towards cyclists. They’re offering our readers a free 7 day trial, just click the link below to get started.


How to Maintain Proper Cycling Posture

June 17, 2020 by Sarah Lauzé

There are some cyclists that make riding look effortless and smooth. Although it may come naturally to some, it takes time and practice to achieve that gliding look, but it’s not just for professionals! If you understand the basics of how your muscles are working, both for and against you, then you can ensure you stay balanced and relaxed in the saddle. Maintaining proper cycling posture is important to not only your efficiency, but to prevent injury.

There is no “correct cycling posture” that is right for everyone. We are all built differently, so what will work for some won’t for others, but there are some general rules to go by. After ensuring your bike is fit to you and your riding style properly, then it’s time to start thinking about what proper cycling posture looks like for you.

Cycling Posture

Why is cycling posture important?

Being as efficient as possible is the easiest way to go faster while spending less energy, sound good? The first thing you want to focus on is staying as relaxed and stress-free as possible, tension is the enemy! Many cyclists will slowly tense up over the course of a ride, not only compromising efficiency, but demanding more than is necessary from their bodies. Letting go of that tension and relaxing into a natural position will work to:

  1. Increase efficiency
  2. Keep you comfortable
  3. Improve bike handling
  4. Easier breathing
  5. Prevent injury

What does proper cycling posture look like?

As stated above, this will look different for everyone, but here are some things to keep in mind:

Keep your shoulders relaxed 

Many cyclists will find their shoulders slowly creeping up to their ears while riding, which puts unnecessary stress on your shoulders, neck, and back. This can also get in they way when you need to shoulder check or move your head around. You will actually stay more alert by keeping you shoulders down and relaxed.

Bend your elbows

Riding with locked out elbows will make for a rough ride, so adding a slight bend will act as suspension and keep any bumps on the road from tossing you overboard. Keep your elbows tucked into your sides rather that out like wings. This will reduce the stress on your shoulders, and also result in less pressure on your hands and wrists (your wrists should NOT be bent).

Maintain a neutral spine

Left: Too straight, putting tension in the lower back, Center: Correct posture with core engaged and back relaxed, Right: Core unengaged and rounded spine.


You want your back to be relatively straight, but not locked or tensed into a line. The most common mistake is letting the back round outward, which can cause all sorts of issues over time. The best way to ensure you are keeping your back straight enough is to keep your core engaged. If your abs are just taking a free ride, your back will inevitable round out, putting pressure on your hands, shoulders, and crotch (which can be super painful).

Keep your knees in line with your foot

You do not want your knees to bow outward at any point during the pedal stroke. Not only is this incredible inefficient, but it will cause some painful knee issues. So, focus on keeping your knee in line with and over the ball of your foot as you ride.

How to improve your cycling position

If you think you are struggling with any of these aspects, it is worth taking the time to correct what you can to ensure you are comfortable and efficient on the bike.

Proper bike fit

First things first, everything has to be in the right spot to even make it possible for you to maintain proper posture cycling. If you’re not sure your bike is the right fit, or isn’t adjusted to you, then it’s worth looking into having a professional bike fit.

Think about it

Pay attention to your body when you’re on the bike. Where do you feel tension? In what ways is your body out of alignment or its natural range of motion? Focus on relaxing your muscles and breathing, and think about each aspect of your posture piece by piece.

Stay flexible

Flexibility, or rather inflexibility, can lead to unbalance in the body and even cause the body’s structure to move out of alignment. If you are not flexible enough to hold proper posture over the course of a ride, then you need to work on increasing your flexibility through stretching and strength training exercises.

Stretch

It is important to have a healthy range of motion and flexibility to move freely and efficiently. Stretching can aid in aligning the thick and thin muscles back into their ordered state after movement, as well as remove the lactic acid buildup that causes soreness. Regular stretching will also increase your flexibility, making that aerodynamic position more attainable.

Strength Training

The facilitated (overworked) muscles, like the quadraceps and lower back, do not need strengthening but stretching. Instead, it is the inhibited muscles that benefit most from strength training – the abdominals and gluteals. Because the core needs to be engaged to stabilize your spine and the movement of your legs, strengthening it off the bike is important.

Posture Correction Program for Cyclists

Looking for a program that will help you improve your posture and restore muscle balance? Dynamic Cyclist is an online training platform designed to help cyclists become stronger and faster while riding pain free for years to come. Complete your regimen with an all-inclusive program that addresses mobility, flexibility, strength and injury prevention, all for a fraction of the cost of one physiotherapy appointment. Try out their 2 Week Posture Correction Program and experience the results for yourself. Click here to try 7 days free!

Bike Handling Tips for Spring Conditions

June 12, 2020 by Sarah Lauzé

Early season riding conditions can be challenging. During the winter, a ton of grit and salt gets dumped on roads to keep them grippy and snow-free, and, come spring time, all of that stuff ends up in one place – the shoulder where you want to ride. Spring is also pothole season, as water seeps into cracks in the road and freezes overnight, opening up holes the size of the Grand Canyon on your favorite roads. There are a few simple bike handling tips to keep your skin off the road and your bike in one piece.

Take It Slow

This seems obvious, but it is easy to forget in the middle of one of your favorite descents. Slower speeds mean more time to react to what is in front of you. Slow down well in advance of corners so you aren’t braking hard while turning – doing so increases the chance of losing traction.

Move Into the Lane

Most of the road grit accumulates on the shoulder of the road, and you can avoid this by moving out into the travel lanes. Be VERY careful when doing this – think ahead, and don’t try to move out in front of a line of cars just before your corner. Wait for a large gap in traffic, and move out well into the lane, so cars aren’t tempted to try and squeeze by you. On long, switchbacking descents, I will usually just stay in the travel lanes to avoid having to move back and forth.

Relax

Hitting a small patch of gravel or wet spot won’t necessarily cause you to crash. Overcorrecting for a small skid of your back tire will. Staying relaxed and confident will help you ride through small skids instead of tensing up and turning the small skid into a huge wipe-out. You can build this confidence through other types of cycling – mountain and cyclocross riding will both give you the experience of feeling your bike sliding through turns, which will help you become a more confident road rider.

Avoid Obstacles

Be it potholes, glass, or ice, there is a lot of stuff on the roads that you and your bike would rather avoid. Your first key to avoiding this nasty stuff is to look ahead – the earlier you see something, the easier it will be to avoid. When you know what you want to avoid, doing so requires a bit of practice. Anyone who has managed to hit the only pothole on a clear stretch of road knows what I am talking about – your bike will tend to go where you are looking. If you are looking at that one pothole, there is a good chance you are going to hit it. Instead, work on keeping your eyes focused on the clear path you want to take, and your bike will follow.

Master the Bunny-hop

Sometimes, despite your proactive road reading and all of your best obstacle avoidance techniques, you just can’t ride around something. Often this has something to do with the 2 ton hunks of metal passing by on your left. This is when the bunny-hop comes in handy. Bunny-hopping is like jumping on your bike – both wheels lift off the ground for a split second. If you have never done this before, practice at slow speeds first. Clipless pedals make it much much easier and safer as well. When you do encounter something you can’t ride around, don’t try to jump too high – for potholes, your wheels barely need to leave the ground.

Keep these tips in mind when you head out on your next ride, and you will be well equipped to deal with whatever the spring roads will throw at you!

Cycling Foot Pain, Tingling, and Numbness

June 4, 2020 by Sarah Lauzé

It’s common for cyclists to experience tingling or numbness in their hands, but what does it mean when it shows up in your toes and feet? Foot numbness usually occurs when the nerves between the bones under the ball of the foot become compressed. Besides numbness, symptoms can show up as cycling foot pain, tingling, bruising, or even a burning sensation. Here’s what you need to know about the common causes, and what you can do to treat it.

Cycling Foot Pain

The Common Causes of Cycling Foot Pain

Shoe Fit

The first thing to look at is the fit of your cycling shoes. A pair of shoes that fit you correctly will feel as though they are not there, you should forget about your shoes while riding. Getting fit for the right shoes goes a long way towards comfort. Take your time when trying shoes, feeling out any potential pressure points. If you have wider than average feet, then make sure you get shoes that are wide enough.

If your shoes are too tight, it can cause inflammation between the joints as it decreases blood circulation, as well as constrict the ball of the foot. This can cause numbness, as well as a tingling sensation during and even after a ride.

Cleat Position 

Correct cleat placement, just like the correct shoe, will let you forget that they are even there. Placing the cleats poorly can lead to uncomfortable foot position and can cause pain in nerves from pressure points or strain from improper twisting of the foot. Particularly if the cleat is too far forward it can cause numbness, as it places pressure on the ball of your foot. Take the time to dial in your cleat placement whether on your own, or with a professional bike fit.

Socks

Socks may be the most overlooked element of the foot pain complex. You want a sock that does not bunch up or is too bulky so that it creates pressure points in an otherwise fine shoe. They should keep your feet at the right temperature too. If they are too hot, it could lead to more swelling, exacerbated pressure points and chafing. Feet that are too cold start to hurt from the lack of blood flow or frostbite.

Technique

Climbing without proper pedaling technique or too slow of a cadence can put too much pressure on the balls of your feet and make them go numb. Ensure you are keeping your cadence within the proper range, and as consistent as possible.

Treatment and Prevention

Exercises on the Bike

While out on a ride, pay attention to your feet before the problems show up. If you’re going for a long ride, then try unclip and lift your foot up into the air at the top of the pedal stroke a few times to get your blood flowing. When you’re sitting at red lights, or stopping for a break, then flex your toes or do some circles with your ankles. You can even get off and walk a few paces if need be (although this can be awkward with cycling shoes).

Shoe Modifications

If you find your feet are painful, or going numb during rides, then try invest in some custom arch supports. These can help distribute your weight more evenly and decrease the pressure placed on the ball of your foot and on your toes.

Stretching & Rolling

There are some exercises and stretches you can do off the bike, especially before a ride, to help treat and prevent foot pain. The first is to sit with one leg up on your other knee, fingers locking into your toes. Then rotate your foot around with your hand, stretching out the ankle joint and getting the blood flowing.

Second, you can use a tennis ball or a roller to apply pressureto the bottom of your foot. This can be painful, so don’t apply too much pressure if it’s too uncomfortable. Simply place the ball or roller under your foot, then roll front to back.

If your feet are comfortable while you ride, then it’s going to be a whole lot more fun. Never look at foot pain as an inevitable side effect of cycling, and make sure you do what you can to prevent it.

5 Cycling Tips to Master Hill Climbing

June 1, 2020 by Sarah Lauzé

Love them or hate them, hill climbing is an inevitable part of cycling (unless you somehow map out perfectly flat routes). So, when you’re sitting at the bottom of a daunting climb what is your go-to game plan? When you’re pushing your muscles to the edge of their ability, you can only tell them to “shut up” so many times – no matter how tough you are they are going to win that conversation.

The best thing you can do mentally is to learn to love climbing. If that’s a little too drastic, then at least go in with the tools needed to feel your best as you grind up the hills. There’s nothing more satisfying than conquering a tough climb–and we want to get you there!

Tips to Master Hill Climbing

Pace Yourself (and use your gears)

Attacking the hill may work if it is small climb with the crest in view from the bottom. However, if you go in too aggressively, sure you’ll feel strong at the bottom, but once you hit a certain point it’s easy to hit a wall. You overexert your muscles and skyrocket your heart rate rather than pacing yourself for the long game. If you find yourself often slowing to a crawl halfway through a climb, think about gearing down earlier and keep those legs spinning. You will then have the energy to “attack the hill” when you reach the final push over the top.

Stand Up Strategically

Should you sit or stand while climbing? It might seem like you’re more power standing by using your upper body weight, but it also requires 10 to 12 percent more energy. The net effect is more energy used and an increase in your oxygen uptake. However, it is good to get out of the saddle to stretch it out a bit and to incorporate different muscles, just save it for the steeper parts– and even then use it sparingly.

Focus

It may seem counterintuitive to try and find your inner peace while your lungs and legs are screaming at you, but the mental game is most of the battle. As you approach the hill, be your own cheerleader, and convince yourself that you love the climb. Focus on your steady cadence. Relax your body from the top down, starting with your eyes, face, neck, and moving all the way down to your toes. If you have a mantra, now is the time to start visualizing it!

Find Your Power Position

If you’re tackling hills with a tense upper body, you’re going to burn out a lot faster. The natural tendency as we get tired is to round the back and slump the shoulders forward, but to allow for efficient breathing, keep your back straight and your chest open. Position your hands on the brake hoods and relax your arms so your elbows sit slightly wider than your hips. Try keep your body free of tension, all the while tightening your core to stabilize your movements.

Practice Hill Repeats

Practice makes perfect. You’re not going to get better at anything by wishing it into reality. Climbing is tough, and it’s never going to get easier, but the more you challenge yourself the stronger you’ll get. Find a hill and spend some time going up and down. Half the battle is finding your rhythm with climbing. Once you do, you may find yourself even looking forward to the hills!

This Cyclist Stretched Every Day For a Month – Here’s What Happened

May 18, 2020 by Guest Post

Let’s be honest, most cyclists are not known for their flexibility. Not saying I thought it was a waste of time, but I’d rather be out riding than sitting around at home in downward dog.

I’ve been an endurance athlete for most of my life, and with that has come both the joys and the pains of pushing my body to its limits. It also meant that I had no problem crushing a 100 mile ride, but I couldn’t bend over and touch my toes. My limited range of motion had never been a problem for me, so I didn’t pay it much attention.

About a year ago I started having hip pain that eventually turned into knee pain, and I found myself forced off my bike. After sitting around in self pity for a few weeks, I decided to take matters into my own hands. I called up a local sports physiotherapist and set up an appointment. His prescription? Twenty minutes of targeted mobility movements and stretches a day.

In my case the pain may have reared its head in the hip and knee, but the underlying cause is something most cyclists deal with. Dr. Ackerman explained that,

Most people have muscle imbalances, especially in today’s office chair culture, but the issue is taken one step further with cyclists. Hours on the bike is just more time in a bent over position that will inevitably lead to tight hamstrings, weak hip flexors, rounded shoulders, and a pelvic tilt.

The moral of the story? We sit too much, don’t move enough, and as cyclists we spent a lot of time in one position with repetitive movement. Don’t get me wrong, cycling is great for your health, but we’re not engaging our bodies in different types of movements, which in turn leads to imbalance.

Top: Excessive Lumbar Flexion with rounded shoulders. Bottom: A neutral spine in proper cycling position.

This all made sense to me, but it wasn’t until I started paying attention to my posture that I realized just how bad my muscle imbalances had progressed. On the bike my spine would naturally round as my shoulders were pulled forward by tight lats, and tension would gather in my low back. As pictured, tight hamstrings and a weak core accentuated the poor posture.

Now that the problem had been made clear, it was time for some solutions. Along with some specific movements and poses, Dr. Ackerman recommended I try out Dynamic Cyclist, which provides daily stretching videos for cyclists. I was skeptical at first, but on day one as I moved through the poses it felt like my pain points were being pulled apart- in a good way.

After the first routine I decided I would stretch everyday for a month and see how my body adapted. It was totally worth it. Within a couple weeks I could feel my posture improving, I became more aware of how my muscles and joints were feeling day to day and, most importantly, my knee pain was gone.

With my new found mobility, when I finally hopped back on my bike it was no problem maintaining proper posture with a neutral spine and relaxed shoulders. As I tackled my first climb I could feel new found power from my glutes and I was breaking PRs all over my regular route. I felt like I was ten years younger and couldn’t wipe the smile off my face as I rode.

I know it may seem like a stretch, but getting mobilized really has changed my body for the better. If you want to give it a try for yourself, check out Dynamic Cyclist and start your 7 day free trial.

Bike Accidents Happen – Here’s What You Need To Know

May 16, 2020 by Wade Shaddy

Evel Knievel once said, “pain is temporary, bones heal.” If you’re a cyclist you can identify. The majority of road bikers don’t wear protective gear of any kind. But if you’ve done any serious miles, you know that hitting the pavement is unavoidable. It’s part of cycling. Bike accidents happen, here’s what you need to know to make sure you get back on your bike.

Bike Accidents Happen

Don’t Let Fear Hold You Back

Fear of an injury should never keep you off your bike. But if you do go down, it’s good to know the mechanics of getting injured. Fortunately for cyclists, road rash is the most common injury, and typically doesn’t require a call to 911. Lacerations, broken bones and internal injuries require more attention to details.

The big lesson to learn from crashing is that while cyclists use the sport as a way to relieve stress, staying engaged on the bike is paramount to safety. Making stupid mistakes that could have been avoided is typically what causes cyclists to go down. It’s important to remember that you’re flying down the road at high speeds, wearing what some consider little more than underwear.

Remain Calm

Cycling crashes often look worse than they really are, and when pedestrians or motorists see someone scraped up and bleeding, they sometimes over-react. If you’re the one who crashed, you may end up needing to help your over-enthusiastic rescuer to calm down. If you’re coming to the aid of someone who crashed, stay calm and do your best to keep them calm.

Hitting the pavement can cause you to become disoriented. Making decisions right after a crash might not be the best idea. It’s not always a good idea to jump to your feet instantly after a crash. Do a short inventory of your condition. Did you hit your head? If you’re unsure, check your helmet for damage. Can you recall what day it is. Do you know your name? Do you know where you are?

If it’s another cyclist on the ground instead of you, these are important questions to ask them. If you’re by yourself and you’ve determined that you did indeed hit your head, you might not be thinking clearly. You may think you’re fine but you’re not. If you have damage to your helmet, the safest thing to do is call for someone to come and get you.

Take Your Time

Cycling produces endorphins, which are natural painkillers, and they make you feel good. Take time to settle down before moving around to any extent. Stay on the ground. Its not wise to jump up, only to crumple back down in a heap of pain. If you have a concussion you’re probably confused. If you don’t recall exactly where you are and what you’re doing, it’s likely you do have a concussion.

Check For Injury

Check your body next. Can you feel your limbs. Do you have bones sticking out of your skin. Is there a lot of blood. Don’t risk moving too much if you feel seriously injured. Call for help. If everything seems to check out OK, stand up slowly. Take a few moments to steady yourself, and then try to lift your bike. If you can lift it without excessive pain, it’s relatively safe to assume that your upper body is fine. Try to walk. If you can walk, and your joints can bear your weight, you can probably pedal your bike again.

It might not feel like it at first, but road rash is a sign that you may not have broken bones. Crashing at speed causes you to slide on the pavement, which can disperse the energy from a crash. Slower speeds often result in broken bones. That’s one reason why mountain bikers often break more bones than roadies. Hitting the ground hard, without tumbling or sliding breaks hips, wrists and arms. Low speed tip-overs break bones. High-speed slides shred clothing and removes skin, but often spares bones.

Road Rash

Road rash is about the only thing you can deal with by yourself, typically without professional medical attention.  In most cases it’s not too painful right after the crash, but once you get home, the suffering starts. It’s painful because of the number of nerve ends that have become exposed.

Infection is a real risk with road rash. Cleaning debris out of wounds is an awful lot easier without hairs in the way. It’s one of the main reasons for cyclists shaving their legs.

If you get a patch of road rash, assess the severity of the wound. If it’s larger than your palm, it’s wise to seek medical attention. If you’ve got debris, sand, gravel, pebbles, sticks or anything else embedded in the wound, it typically requires a visit to the ER, with pain medication, the proper equipment and experience to remove the debris and clean the wound.

  • Clean It — If Possible

It’s unlikely that you have the medical equipment on your bike to take care of road rash. But if you are going to maintain first aid gear, keep a bottle of saline, and some gauze for cleaning the wound. If you’re treating yourself, the first step is the most important – clean the wound as thoroughly as possible by squirting the saline solution over the wound and using sterile wipes.

  • Be Gentle

Clean road rash as gently as possible. Scrubbing road rash is not recommended, it embeds particles even deeper into the wound, and besides that, it’s extremely painful to scrub road rash. Most cyclists don’t have the necessary first aid on board to deal with road rash. Call someone if possible. Place gauze over it if you have it, and try to keep the road rash from drying out before you get home, where you can deal with it properly.

Road Id Bracelet

Don’t think yourself immune to a more serious accident. It might be that you become incapacitated, and you need to let someone know who you are, even if you’re down for the count. Think about having a road Identification bracelet made for you. It’s a good way for paramedics to find your critical information. This way the hospital knows your medical history and can call your spouse, parents or children.

From Pavement to Trails: Mountain Biking for Beginners

May 14, 2020 by Sarah Lauzé

Mountain biking is one of the greatest ways to get some exercise, spend time outside, and hang out with friends. For road bikers, it can be a great way to switch things up, get out on some new terrain, or stay in shape while the weather may not accommodate hitting the pavement. However, there are some major differences between the two, so here is a guide to mountain biking for beginners.

If you have only ridden a road bike, there will be some key differences you’ll notice right off the bat. Mountain bikes have much wider tires with rugged tread for optimal traction and durability on off road terrain. With road biking you want to minimize the contact point between the bike and the road, but on trails you want as much traction as possible. There will also be some sort of suspension system to make riding over rough terrain bearable.

The Bike

First things first, you need a mountain bike. Before deciding what kind you want, you need to think about what type of riding you’re going to be doing. Generally speaking, this will break down into two main features: suspension type and wheel diameter.  There are three main types of mountain bikes when it comes to suspension: rigid, hardtail, and full suspension. Wheel diameter is a choice between 26, 27.5, and 29ers.

Rigid mountain bikes are a bit more rare, but some people do choose to use them. With no suspension, they are less expensive and easy to maintain, but can make for a pretty rough ride when tackling technical trails.

Mountain Biking for Beginners

Hardtail mountain bikes have a suspension fork in the front, but not the rear of the bike. They are typically less expensive because there are less moving parts, and can have the option to lock out the front suspension for more efficient climbing. Many cross country riders will choose a hardtail as they allow for more direct power transfer between the pedal stroke and the rear tire.

Mountain Biking for Beginners

Full suspension bikes are a bit more complicated, so there are more variations when it comes down to the specifics. Generally, there is front fork suspension as well as a rear shock to absorb as much of the trail as possible. If you’ve been riding a hardtail and get on a full suspension for the first time, it will almost feel like you’re floating. It makes for a much more forgiving and smooth ride. Most downhill bikes will be full suspension, but more and more cross country bikes also feature full suspension.

Mountain Biking for Beginners

The Gear

A Helmet

Mountain biking is a ton of fun, but it can also be really dangerous. So, you should always wear a helmet anytime you hop on your mountain bike. It should fit your head snugly, and be level on your head so it doesn’t obscure your vision.

Gloves

Gloves are not a necessity, but they are definitely nice to have when you’re starting out. Not only will they protect your hands if you crash, but they can reduce soreness that comes from the vibrations of the bike on rough terrain. For summer riding you can get fingerless gloves so your hands don’t overheat, but you’ll want a pair with fingers for the coolers months.

A pump, puncture repair kit, and multi-tool

Punctures and their resulting flats are almost inevitable, so you should have the proper equipment and know-how to do a quick fix to at least get you home or to the bike shop. You should always carry a pump, repair kit, and multi-tool with you on your rides, whether in a saddle bag or in a backpack.

Clothing

The most important thing is to be comfortable in what you’re wearing. You may think a plain t-shirt would be the easiest thing, but as soon as it gets wet from rain or sweat, it’s going to become cold and clammy (not to mention the chaffing). You’ll want at least an athletic-specific top designed from a moisture wicking material. You should also always carry a windproof or rain jacket in case the weather takes turn!

As for shorts or pants, its a good idea to invest in a pair of bike shorts with padding. You could use your road cycling shorts, or there are mountain biking specific shorts with a more casual, baggy look.

The Technique

Perhaps the more drastic difference between mountain biking and road biking is in the technique. The key for mountain biking is to stay relaxed and flexible on your bike, as it’s going to jump around a lot more than you may be used to. If you are used to just sitting and spinning, this can be a bit of an adjustment.

You want to always be looking ahead on the trail towards what is coming up. Staring at your front wheel may work to get over some roots, but it’s also a good way to clip a tree.

Riding Downhill

Tip: Don’t do this.

When you hit a downhill, stand up on your pedals (keeping them level) and try get your weight to the back of the bike, pushing your hips backwards behind the seat if possible. Keep your legs and elbows bent with your body low to the bike. This will keep you from flying over the handlebars if you need to stop suddenly.

Climbing

If you see a climb coming up on the trail, you want to ensure you gear down well in advance. You want to try stay seated and spin in an easy gear when possible, as standing and pedaling hard can cause you to spin out and lose traction.

Riding through corners

Cornering can also be a bit of a challenge in the beginning, but they are a ton of fun once you get your technique down! You want to take control of your speed BEFORE you hit the corner so you can roll through it without touching your breaks. As with descending, you may want to stand on your pedals with your knees flexed as you lean into the corner.

Obstacles

Obstacles like rocks and roots are the reason for both the width and tread of mountain bike tires. They are built to roll over these things. So, it is more likely you’ll have to conquer the mental aspect of it rather than the physical. When you see an obstacle coming up on the trail, pick your route and exit point then commit to it mentally. Control your speed and try ride through without breaking. Make sure you are not resting all your weight on your handlebars, but instead keep your arms and legs flexed and your butt off the saddle, pulling your front wheel up to pop over the obstacle. Once you’ve done it a few times, it will become second nature.

Mountain biking for beginners can be a little overwhelming, but the learning curve is well worth it! Start off with some easy, rolling terrain, and you’ll be tackling those technical rides in no time.

Steps to Master Clipping In On Your Bike

May 8, 2020 by Sarah Lauzé

The fear of clipping in on your bike is a real thing when you’re just starting out. However, it’s not just a right of passage as you move from beginner to intermediate, but it also has some clear advantages. Riding clipless pedals allows you to ride further, faster, and over more technical terrain while giving you a smoother, more comfortable pedal stroke.  The fear is well worth working through, and with these tips you can be clipping in and out like a pro in no time.

The Clipless System

First things first, what are clipless pedals? The name may seem counter intuitive, but it stems from the time when toe-clips (with a cage and strap that secured your toe to the pedal) were popular, so the term clipless was born as a way of differentiating the system.

The three part system that makes up a clipless pedal starts with the pedal itself. This has a spindle just like a normal platform pedal, but the plastic or metal platform is shaped in a way to allow the second part of the system, a matching cleat, to snap into it. A spring-loaded mechanism then secures the cleat in place so it doesn’t slide around or pull out. The cleat is then attached to the final part of a clipless pedal system, the shoe. Shoes are made specifically for these cleats to be attached to the bottom of them via bolts. This three part system works in sync to keep your foot where it should be on the pedal as well as allowing you to pull up during the pedal stroke. In this three part system, the cleats always come with the pedal as they are made to fit exclusively with each other.

Why should you clip in?

You may have heard stories of the classic slow motion tip over that happens when cyclists are getting used to being clipped in. It’s fair to say that most have experienced this somewhat embarrassing turn of events, but don’t let it deter you from taking the leap. Some of the advantages are:

  • Clipping in allows you to recruit more muscles to increase pedaling efficiency. It’s not necessarily about being able to pull up as well as push down, but about creating forward momentum as you pull through the bottom of the pedal stroke.
  • When you have your pedals and cleats set up properly for you, being clipped in will keep you in the optimum riding position.
  • Your feet won’t slide around like they do on flat pedals.

Pedal Systems

As mentioned above, there are three variable in the clipless pedal system: the pedals, the shoes, and the cleats. There are two main types within this definition.

  • Mountain/Touring System

A mountain setup, also referred to as a touring setup, consists of a pedal that can be clipped in easily on both sides. The cleat, which is attached with two bolts, is a smaller metal piece that is recessed into the shoe which is for mountain and touring only. The shoe has a walkable sole with a bit of tread on it to allow for easy and functional walking. This type of pedal is the only choice for mountain biking but also is a great choice if you are riding on the road, but have frequent stops where you are walking around.

  • Road System

A road pedal set-up is made for road riding where walking is mostly avoided and efficiency is a high priority. Road pedals consist of a lightweight pedal that accepts a lightweight, typically plastic, cleat. The cleat is then attached to a “road” shoe with three bolts in a triangle pattern. This system creates a lighter and more aerodynamic pedal and shoe combo that is optimized for road riding.

Clipless pedals are a great way to improve your cycling and as you start to ride longer and farther it becomes a logical choice. A simple, non-high end, pedal and shoe system can actually be quite cheap and as your cycling progresses you can always upgrade. Cycling is full of technological advances and clipless pedals, although simple, provide an incredible advantage to both racers and recreational riders alike.

Getting Started Clipping In

At Home

Once you’re comfortable on your bike and have been set up with your first set of clipless pedals and shoes, it’s time start practicing. Before hitting the road (and those inevitable red lights), you’ll want practice clipping in and out. Sit on your seat and lean against something like a countertop or a wall so you can stay in place while spinning the pedals backwards.

To clip in, most systems work by first engaging the front part of the cleat, then pressing the back part down into the pedal. Once clipping in, try spinning your legs backwards and getting a feel for being clipped in. Next you’ll want to practice getting out the pedals. Try twisting your heel out, disengaging the pedal from the cleat. This should be fairly easy, so if you find you are really having to put in all your effort to unclip, then you will need to find the tension adjustment and back it off a little.

On the Road

Starting out, find a flat to slightly downhill stretch to get rolling on.  With one foot still on the ground, clip the other into the pedal and bring it to the top of the pedal stroke.  Then push off with the foot that is on the ground and give a big push of the pedal with the foot that’s already clipped in.  Now you will have some momentum and can now clip in your other foot. Make sure this is on a safe stretch of road or area as you won’t be paying attention to traffic, but can focus on your feet.

Now that you have both feet clipped in and have taken a couple of pedal strokes, it’s time to unclip.  While coasting put one foot down to the bottom of the pedal stroke and unclip (twisting your heel out).  Now you can come to a stop and put your foot on the ground.

Now do the above again, and again, and again.  You want to be comfortable finding your pedals and getting clipped in quickly as well as unclipping. During your first few rides you will have to focus on clipping in and out, but once you do it enough it will become a habit and you’ll find you will think about it less and less.

« Previous Page
Next Page »
  • Facebook
  • Tumblr
  • Twitter

Latest Articles

JOIN Cycling: A New Training Platform for Cyclists

May 27, 2024 By Eric Lister

cold exposure

The Benefits of Cold Exposure for Cycling & Life

June 13, 2023 By Eric Lister

hill climb

The Ultimate Hill Climb Training Guide

May 31, 2023 By Eric Lister

shoulder pain cycling

How to Treat & Avoid Shoulder Pain While Cycling

April 12, 2023 By Eric Lister

psoas stretch

The Importance of the Psoas Stretch for Cyclists

April 6, 2023 By Eric Lister

cycling neck pain

The Ultimate Guide to Cycling Neck Pain: Causes and Solutions

March 21, 2023 By Eric Lister

Useful Info

  • Contact
  • Finally, A Global Cycling Club That Is Focused On Community And Love Of Cycling!
  • Privacy Policy
  • Share Your Story!
  • Terms And Conditions Of Use
  • Welcome to I Love Bicycling
  • What Happened When I Stretched Every Day For a Month

Recent Posts

  • JOIN Cycling: A New Training Platform for Cyclists
  • How to Hang Bikes in Your Garage: 4 Inexpensive Options
  • Gravel Bike Vs. Road Bike: Which One Is Better For You?
  • The 6 Types of Mountain Bikes & How to Choose the Best One for You
  • What Is a Touring Bike Good For? 5 Benefits We Know You’ll Love

Search I Love Bicycling

Connect with Us

  • Facebook
  • RSS
  • Tumblr
  • Twitter

Copyright © 2026 · Magazine Pro Theme on Genesis Framework · WordPress · Log in