• Training
    • Injury Prevention
    • Training Tips
  • How To
    • Bike Fit
    • Gear
  • Nutrition
    • Nutrition Tips
    • Weight Loss
  • Repair
  • Reviews
  • Stories
    • Funny Stories
    • Jokes
    • Quotes
    • Videos
    • Funny Videos

I Love Bicycling

I Love Bicycling is a website that is geared towards cycling for beginners with road cycling tips, training articles, nutrition tips, weight loss, how to’s and bike repair articles.

Training

  • Injury Prevention
  • Training Tips
  • Training Camps

Beginner’s Guide: What To Wear Cycling

July 14, 2020 by Sarah Lauzé

Figuring out what to wear cycling can be a little confusing when you’re starting out. If you’re new to the sport, putting on a pair of funny looking shorts and a jersey may seem unnecessary. However, all it takes is a couple rides in a baggy t-shirt and you’ll be more than willing to give it a try.

A lot of it comes down to wind resistance, a snug fit to avoid chafing, and moisture wicking material. So, that loose fitting t-shirt won’t do you any favours as you get faster and stronger. Plus, having a cool looking jersey can make you feel like a pro and have you ripping up those climbs in no time.

What To Wear Cycling

What to Wear Cycling: The Cycling Kit

You may hear the term “cycling kit” thrown around when you’re just starting out. A cycling kit refers to the core cycling clothing: the combination of cycling shorts (with a chamois) and a jersey.

Step 1: Bike Shorts

Bike shorts may just be one of the most important pieces of gear you’ll get for cycling. Cycling shorts will include a chamois, which is the padded part. When you wear these shorts correctly (without underwear), the chamois not only adds a little extra padding for your sit bones, but it also but also prevents chafing. The three main reasons to wear bike shorts are:

  • Extra Cushion – The padded area provides a smooth surface for your bottom, with no uncomfortable seams or uneven bits.
  • Reduce Friction – The snug fitting fabric moves with you as you pedal, minimizing the chance of chafing.
  • Moisture Management – Normal pants or shorts can act as a trap to moisture, keeping sweat on your skin while making the material damp. Cycling shorts are made from materials that work to move and evaporate moisture away from your skin.

Not only will a good pair of bike shorts allow you to ride longer, a bad pair will make for a painful experience! Ensure shorts should be snug enough so they will conform to your body and not shift with your movements.

Shorts vs Bibs – Bike shorts come in two styles: regular shorts or bibs. Bibs are bike shorts with built in suspenders. Most beginners will shy away from the look of them, but once you try them, few go back. Since they have no need for an elastic waistband, bibs can be more comfortable as they conform to your body. When bibs are worn under a jersey, they look just like regular bike shorts.

Step 2: Jersey

Similar to bike shorts, cycling jerseys are made from materials that should work to get moisture away from your body. The general design will be a zipper down the front, with back pockets specifically designed to carry food, tools, and whatever else you’ll need out on the road. They have a shorter front panel (as you will be bent over on your bike), with a longer back panel. The bottom hem will have silicon grip tape to keep the jersey in place as you ride. A jersey should be fairly form fitting to keep you as aerodynamic as possible.

Step 3: Layers

Although bike shorts and a jersey are the basics, knowing how to layer to stay comfortable in any weather is an important skill. The most important thing is to keep your core temperature consistent as you ride. Being too warm or too cold both waste energy, so you want to avoid it whenever possible.

It’s always a good idea to take a waterproof outer shell with you just incase you get caught in a rainstorm. There are also bike tights or pants you can get to wear over your bike shorts to stay warm on those cooler rides.

Step 4: Accessories

Cycling Caps

Cycling caps are great to both keep your head warm in the winter, and keep the sun and sweat out of your eyes in the summer. Plus, they look pretty cool when you stop at a coffee ship on your ride.

Gloves

It’s nice for beginners to have a bit of padding on the palm of their hand, which cycling gloves can offer. You can get fingerless gloves for the summer, and then full moisture-wicking gloves for the winter months.

Cycling can be an intimidating sport to get into, especially when you walk into a bike shop with no idea where to start. You may see a ton of kitted out riders with all the bells and whistles, but you really don’t need much to get started. Start off with the basics, and you can build from there!

What Is Bike Geometry?

July 9, 2020 by Sarah Lauzé

Bike geometry is the collection of measurements (lengths and angles) that make up a bike frame. In short, everything on a bike can be changed, but the geometry cannot. Looking at geometry charts on manufacturer’s websites can be confusing, but all those numbers translate into very real and understandable concepts.

There is a lot to know about bike geometry, but understanding the basics can go a long way in ensuring you choose the right bike for your style of riding. Bike geometry can help you understand how a bike will handle, feel, and how comfortable it will be to you.

Most bike manufacturers provide bike geometry charts within the description of the bike, but what is included does vary. Most will include frame size, head and seat tube lengths, top tube length, wheelbase, and chainstay length. Others will also include stack and reach measurements, fork rake, bottom bracket drop, and trail.

Stack and Reach

Stack and reach are the two fundamental elements that can help you determine right away if a bike will fit you. This is especially important because it helps standardize fit between size and manufacturer. Even if a bike is labelled as “medium” or 53cm, the actual fit can differ by up to 2 cm.

  • Stack is the vertical distance (in cm) from the center of the frame’s bottom bracket to the top of the head tube, where the fork passes through the frame. It gives an indication of how tall a frame is.
  • Reach is the horizontal distance from the center of the bottom bracket to the top-centre of the head tube. This gives an indication of how long a frame is excluding the stem.

Head Tube Angle, Fork Rake, and Trail

Head Tube

The head tube angle is the angle of the head tube in relation to the ground, with the angle being either ‘slack’ or ‘steep.’ The classic head tube angle for a road bike is 73 degrees, so a steeper angle (higher number) will mean less effort to steer making it better for high speeds. A more slack angle (lower number) may require more effort to steer, but perform much better at slow speeds.

Head tube length is just what is sounds like. Longer head tubes result in a more upright riding position. Short head tubes lower the front of the bike, putting you in a more aerodynamic position.

Fork Rake (Offset)

Fork rake or fork offset is the distance between the steering axis and the wheel center. Whether the fork is curved forward or is straight, but angles, if the offset is the same then it will handle the same. Generally speaking, less fork rake will increase the trail as the center of the wheel is moved back from the steering axis, and more fork rake means less trail.

Trail

Trail is a bit more complicated, and can be difficult to wrap your brain around. Think of it as the tire patch trailing behind the steering axis, determined by the head tube angle and the fork rake. The steeper the headtube angle, the less trail there will be.

Its impact on the feel of the bike is arguably more important and much simpler. A small amount of trail will result in a fast handling bike, meaning it will require less rider input and will handle well at high speeds. The downside is a certain amount of twitchiness, making for a rougher ride.  A large amount of trail will result in a slow handling bike, so it will take more work from the rider to steer at high speeds, but will feel more stable and smooth.


Bottom Bracket Drop

The bottom bracket drop is effectively how low you sit on the bike. It is measured by the vertical distance the center of the bottom bracket sits below the wheel axis.

The lower (more) the bottom bracket drop, the better the bike will corner and the faster it will respond (as your center of gravity is lower). The issue is pedal clearance, because the bottom bracket can only be so low before the pedals will catch ground while leaning into a corner.

Less bottom bracket drop will feel more stable at slow speeds, but will be reluctant to corner. This means more input from you through the handlebars to corner.

Seat Tube Angle

The seat tube angle is the angle of the seat tube in relation to the ground. This angle will generally be between 71-74 degrees, and doesn’t vary as much as the head tube angle. You can effectively influence the seat tube angle by changing the saddle position to be more slack or steep.

Chainstay Length

Chainstay length is the horizontal distance from the center of the bottom bracket to the center of the rear axle.

The chainstay length impacts the length of the wheelbase (distance between front and rear wheel axles) as well as the handling of the bike. Bikes with long chainstays will have more stability, as well as allowing room for panniers, making great touring and endurance bikes. Performance bikes, however, will have a shorter chainstay length for sharper handling.

Each measurement on its own can give you a snapshot into how a bike will fit and feel, but they all rely on each other. To get an idea, try looking at two bikes with very different geometry and then ride each one, paying attention to how it handles. You can then refer to those charts, picking out elements that worked and others that didn’t. For more information, getting a professional bike fit is always a great place to start in figuring out what will work best for you and your type of riding.

The Many Benefits of Cycling

July 6, 2020 by Sarah Lauzé

If there’s a single form of exercise that medical experts promote above all others – it’s cardio. Your cardiovascular health is incredibly important, and as a cyclist you’re already benefitting. But just how beneficial is cycling for your health? Does it simply improve your internal well-being, or can it have an effect on your external and emotional health too? The answer is actually pretty incredible. In fact after years of research, doctors state that cycling is one of the most advantageous exercises around. Here are the many benefits of cycling for you mind, body, and overall health.

Your Mind

People often overlook this fact, but have you ever wondered why individuals that are physically active always seem so much happier than those that aren’t? It’s not just a coincidence, and it actually has a lot to do with the chemicals inside of your brain. When we cycle, our heart pumps blood to every single blood vessel and cell at a greater rate. With blood comes oxygen, and oxygen plays host to some of the most positive endorphins imaginable!

Endorphins are a microscopic chemical that help us to feel good. The more endorphins we have, the happier we feel. Just a few hours of cycling a week can trigger a consistent flow of these chemicals, and they aren’t just great for your emotions – they have also been linked to fighting illnesses like Alzheimer’s! The next time you take to your bike, try to remind yourself that you’re doing much more for your brain than simply enjoying the ride!

Your Body

Keeping your organs fit and healthy is very important. When you’re cycling, your heart and lungs are in consistent use and, just like any other muscle, the more that you use them, the stronger they’ll grow. Studies have shown that just 15 minutes of exercise a day can encourage the development of healthier organs, and cycling just so happens to be one of the best forms of exercise!

As briefly mentioned above, cycling is a form of cardiovascular exercise (as is anything that gets your heart pumping at an improved rate consistently). The more that you cycle, the more that your heart and lungs will be in use. As your heart pumps blood around your body, your lungs provide a fresh supply of oxygen, and this is what’s so beneficial to your organs.

Your Strength

Unlike direct muscle-building exercises, cycling is a little more focused on endurance, but with endurance comes strength. The main muscles used while cycling are your quads, hamstrings, calves and even glutes and hip flexors. As you pedal, your leg muscles are being used consistently, and the higher the gear; the more strain will be placed on your muscles.

The more that you cycle, the more often your muscles will be put to work, and the stronger they’ll grow. If you eat the proper amounts of protein, fat and carbs, you’ll soon find that your muscles begin to increase in size, as well as strength.

Your Health

As enjoyable as cycling is, it’s actually a powerhouse of health and fitness too, and the more that you do it, the healthier you’ll feel. The great thing about cycling is that there really isn’t a limit on how much it can improve your health. Even the unhealthiest individual can climb on a bike, spend 15 to 30 minutes cycling, and start to feel a change. So imagine how healthy active cyclists could be if they consistently went for a ride a few times a week?

A healthy mind can go a long way, and a healthy body will go even further. The harder you push your limits, the quicker your body will adapt to the pressure, and you’ll soon be tackling rides that you struggled with at first. If you’re already at a point where you feel like a pretty competent cyclist, then there’s no harm in pushing your limits to improve your performance.

How To Prevent and Treat Saddle Sores

July 1, 2020 by Sarah Lauzé

None of us like to talk about them, but unless you’re some sort of unicorn of the cycling world, then you’ve experienced saddle sores in one form or another. As an unfortunate side effect of those long rides, here’s what you need to know to get healed up and back in the saddle in no time.

saddle sores

What are saddle sores?

First things first, just what are saddle sores? They can vary from person to person, and are a side of cycling not many of us are too keen to talk about, but when it comes to that pain in the butt, there are actually two different types.

  1. Being “saddle sore” refers to deep muscle bruising that makes you wary to sit down for days post-ride. This is most often experienced by beginner cyclists, or at the beginning of the season. Unfortunately, the only cure is to get back out there and get your bottom used to it. However, if after your first couple weeks of riding it’s not getting any better, your saddle may not be the right fit for you.
  2. Having “saddle sores” is another experience entirely. They can show up as little red bumps (almost like a pimple or ingrown hair), a cyst, or even abrasion on the skin.

What causes saddle sores?

Saddle sores are caused by a combination of factors including heat, pressure, and friction. Although many look at the tiny saddle on a road bike and think it looks like a torture device, a seat that is too wide is more often the problem.

Different saddles have different pressure points, with the majority of the pressure resting on either your ‘sit bones’ or soft tissue.


The saddle comes into contact with your body at three main points: your two ‘sit bones’ (ischial tuberosities) and the soft tissue between your legs. Although you may experience that deep tissue bruising we mentioned earlier in your sit bones, it is the soft tissue that causes the most problems when it comes to saddle sores.

The number one cause of saddle sores is chafing. Combine constant friction with heat and sweat, and your skin is likely to become painful. Another issue can be the inflammation or infection at the base of a hair follicle (like an ingrown hair) that is caused by the constant pressure. Finally, skin ulcerations or boils can form and left raw and open to bacteria, these can quickly become infected.

How can you avoid saddle sores?

Although saddle sores may be an unavoidable part of the sport for many, there are things you can do to prevent them and ensure you heal up quickly.

Find the saddle that’s right for you.


  • Break your butt in – You’ve heard the saying “slow and steady wins the race” right? Well, when it come to cycling, breaking into long distances gradually, whether as a beginner or at the start of the season, can make all the difference.
  • The right chamois/saddle combination – You may have to do some trial by fire here, but finding the right combination of cycling short and saddle that fits your bottom just right can minimize friction and reduce the risk of developing saddle sores. If you think your saddle isn’t the right fit for you, go to your local bike shop and see if you can try a few out before committing to buying a new one.
  • Skip the underwear – This may seem kind of intimidating at first, but wearing underwear beneath your chamois is a recipe for disaster. Skipping the undergarments eliminates potential hot spots and lets the chamois work to its fullest potential.
  • Keep it clean – This should be a no brainer, but you should wear clean chamois shorts every ride. You don’t want to be adding dried sweat and chamois cream to the equation, as it will just speed up the chaffing process. Be sure to shower before and after riding when possible, and give any irritated skin ample time to breath.
  • Chamois cream – Chamois cream can help reduce the friction between your skin and cycling shorts, but using too much can also cause issues, so you will have to find the right amount that works for you.
  • Get a bike fit – Making sure your overall positioning on your bike and on your saddle is your first line of defence against saddle sores. If you’ve ever borrowed someone’s bike, you’ll know exactly what I mean. We are all shaped differently, and what works for one person won’t for the next. Lowering your seat to eliminate any side-to-side rocking can also help reduce friction.

How can you treat saddle sores?

As mentioned previously, for the deep tissue ‘saddle sore’ pain there is really nothing you can do. Fortunately, this pain goes away with practice, and an hour ride that leaves you tender at the beginning of the season won’t a couple weeks in.

For saddle sores themselves, rest may be in order to give your bottom time to heal up. Riding on raw and irritated skin will only increase pain and the chance of infection. Here are some things you can do in the meantime to speed up the process:

  • Keep the area clean – Frequent showers or even a quick wipe with a damp towel will help keep bacteria out of the area, and will speed up the healing process.
  • Let it breath – Think breathable underwear. Make sure the area isn’t trapping in heat and sweat, as this will continue to irritate the skin. Wear loose fitting pants or a skirt to minimize further chafing.
  • Ointment or cream – Some cyclists recommend the use of an over-the-counter acne cream like Noxzema to both prevent infection and act as pain relief. Tee tree oil also offers antiseptic properties while actively cooling and soothing the area.
  • Antibiotics – Antibiotics should only be used in extreme cases and at the advice of your doctor.

When to see a doctor

Most cases of saddle sores are uncomfortable, but aren’t cause for concern. However, if the sores are not going away within 2-3 weeks, are extremely painful, or get infectected, then it is time to see a doctor.

Although saddle sores are a pain in the ass, hopefully with these tips they won’t keep you off your bike for long! For more information, check out “Finding the best road bike saddle for you” and “Hygiene for cyclists – Why it’s important.”

Bike Saddle Height: Too High, Too Low, or Just Right

June 30, 2020 by Sarah Lauzé

Finding the right bike saddle height can be a bit of a process, but it’s the foundation of a good bike fit. Just imagine you’re Goldilocks, and have to go through the process of having it too hight, too low, and then just right. Once you find the perfect spot, you’ll want to mark it somehow. That way if it gets readjusted somehow (like your kid borrows your bike), then you can easily find the sweet spot again.

Bike Saddle Height

Why Bike Saddle Height Matters

Bike Saddle Height

Ensuring that your seat is at the right height will make a difference when it comes to how much power you transfer to the pedals, and how much energy you use to move forward. It also effects how comfortable you are on your bike, which simply results in being able to spend more time in the saddle. You’ll be able to ride longer and push yourself harder. Riding with the wrong bike saddle height will most likely result in pain and injury in the knees, lumbar vertebrae, and the ankles.

How to tell if your bike saddle height is too low

Riding with your seat too low is a common mistake for beginners, as it can be easier to get on and off that way. A saddle too low or too far forward can cause tendonitis of the patella or quadriceps, which will both show up as pain in the front of the knee. So, if you have pain in your kneecap after riding, you will want to try adjusting your saddle height and position.

Get someone to hold you steady on your bike, or balance yourself in a doorway. Hop on and get into pedalling position, while letting your legs dangle straight down. Pedal backwards until one leg is at it’s lowest point. Your heel should barely be able to touch at the bottom when your leg is fully extended. If you can easily reach make your saddle height higher.

With your heel on the pedal, your leg should be fully extended, but still touching the pedal.

How to tell if your bike saddle height is too high

A saddle that is too high will cause the hips to rock back and forth. Not only does this detract from pedalling efficiency, but it can also be extremely uncomfortable. Discomfort can show up in your lower back or as knee pain (especially in the back of the knee).

Have someone watch you ride from behind, whether out on the road or on a stationary trainer. The hip wobble should be easy for them to see, and you’ll want to bring your seat down a little. Or, if you bring your foot to the bottom of the pedal stroke, your heel should barely be able to touch at the bottom when your leg is fully extended (see photo above). If you can’t touch the pedal at all, then lower the seat.

When you get a new saddle

Generally speaking, most beginner cyclists set their bike seat position initially and then adapt to it, but that’s not the best option. This is particularly true when changing from one saddle to another. The differences in padding thickness and design can throw off your bike seat position drastically. Changing saddles should always include taking a good hard look at seatpost height.

If your new saddle is making you uncomfortable, don’t adapt to it before adjusting the seatpost to get your actual position exactly the same as the old one. Knowing how your seatpost is integrated with your saddle will allow you to change your position or saddle as needed to keep you the most comfortable on the bike.

5 Beginning of the Season Mistakes Most Cyclists Make

June 28, 2020 by Sarah Lauzé

Whether you’re getting into training for the first time, or just getting back into it after a layoff (seasonal or otherwise), there are some mistakes most cyclists make. We don’t blame you, when you’re getting back into things it’s all so exciting that caution sometimes goes out the door. However, some little steps will set you up for not only a better ride, but a more successful season- no matter what your goals are.

6 Beginning of the Season Mistakes Most Cyclists Make

Not Checking Equipment

The sun’s out, and you’re in a panic to get out on the road. Motivation is heightened at the start of the season, which is great, but it can lead to a lack of preparation. You may head out the door in record time, but often times you’ll end up back at home with a sore body or a non-functional bike. Whether it’s a flat tire of a squeaky train train, these things can ruin training plans and even damper that motivation. The good news is, they are often avoidable!

  • Do a quick bike check / tune up – Check your tire pressure, ride around the block to check brakes and gear function.
  • Layer up – Early season riding can make for some unpredictable weather, so be sure to layer up with some quality clothing. Leg and arm sleeves and a light shell are great to include on every ride just in case!

Not Having a Plan

We all know that the key to becoming a stronger cyclist is to ride more, but proper training is slightly more complex than that. Having a plan of attack for your season will help you avoid burnout and wasted rides. Sticking to a few basic rules can help you avoid these common pitfalls.

  • Measure your effort – Whether you use a heart rate monitor, power meter, or just check in with how you’re feeling, it’s important to be able to measure your effort in some way. You don’t want to go too hard right out of the gate, but you also don’t want to go too easy and never reap the benefits of high intensity training.
  • Warm up – Always warm up at a moderate pace at the beginning of your ride.
  • Include variety in your rides – It’s important to include both high intensity rides as well as long slow distances. The variety you can add to your training routine, the stronger you’ll be.

Not Fueling Properly

Although cycling is a great way to lose weight, you’ll want to leave your diet at home. Under fueling your rides or eating the wrong food at the wrong time can halt your progress and make training a miserable experience. At the same time, over fueling and using a long ride as an excuse to each 3 cheeseburgers also isn’t great.

  • Don’t take your diet on your rides –  If you have weight to lose, restricting calories and controlling macronutrient intake is important, but don’t aim to do that on your rides. Eating the right things before and during your ride is important to keep up energy levels.
  • Manage your intake post ride – In the 30-60 minutes after a ride your insulin sensitivity is naturally elevated, making it a great time to consume carbohydrates and have them stored as glycogen in the muscles to fuel future workouts rather then as fat. This is also a good time to consume protein to stimulate muscle repair.

Not Using Group Rides Properly 

Riding in groups and the community feeling is one of the best parts of cycling. The ability to use the draft to increase your speed ,challenge yourself against others and embrace the social aspect of training can be a huge benefit. Group rides can improve your bike handling ability, push you to better fitness and even provide better safety on the road when done right. However when approached the wrong way, groups can do the opposite for a rider. The wrong group rides can be too fast, too easy, time inefficient and make riding more dangerous.

  • Pick the right group –  When first picking a group be conservative. If they advertise an average speed (eg 25-28kmh) you should be able to hold the low end of that range on your own without a huge effort. You can always push harder on an easier group ride, but if you overestimate your abilities you might find yourself pushing too hard or getting dropped. 
  • Focus on organization and safety – If your group ride is always leaving 20 minutes late, or don’t follow the rules of the road, then it’s probably not a great group to be a part of.

Worrying About What Everybody Else is Doing

If you find yourself focusing on what everybody else is doing, then you’re not going to figure out what’s best for you. It can easily make you doubt your progress and even damper your motivation. Stay  focused on the big picture, and drown out all the noise.

  • Stop scrolling – You don’t need to scroll through Strava or Instagram and see what everyone else is doing! If you do look to others for motivation, find someone with the same goals as you and recruit them as a training partner.

Tips for Biking in the Heat

June 24, 2020 by Adam Farabaugh

Summer can bring great riding weather, but sometimes it goes overboard and brings excessive heat as well as humidity which can bring your riding to a grinding halt.

The biggest thing to heat is how used to it you are, or acclimated.  Remember in the early spring when 60 degrees Fahrenheit (15.6°C) used to feel like balmy shorts and jersey weather? And now, during summer, you practically want a jacket and gloves for the same temperature. Your body becomes adapted to heat over time but if you try and ride in excessive heat before your body is ready for it you can pay dearly.

Whether you are adapted to it or not, you need to take the necessary steps to stay hydrated and cool before, during, and after your ride.  Doing so will not only keep you out of the hospital but also make your rides in the heat more enjoyable.

Biking in the Heat

Biking in the Heat

Acclimating

Getting used to riding in the heat is the first step to being able to ride comfortably and efficiently when the mercury goes up. Hopefully the temperature eases its way up but if it doesn’t, try avoiding the heat of the day and ride in the early morning before it warms up too much. If you are traveling someplace where it is considerably warmer or if you see in the weather forecast that the temperature is going to be hot, overdress on your rides now.  Wear an extra jacket or vest to add a few degrees to your body. Don’t go overboard but if you do, you can simply take it off and cool down. This is an easy way to prepare for riding in the heat without yet having the heat around to ride in.

Hydrating

Whether it is cold or warm you should always hydrate properly. When it’s cold your body won’t feel as inclined to drink as it is to eat but you should make sure to drink enough. When it gets warm those tendencies switch. You need to drink more than just water as your body needs electrolytes to continue functioning at the same level. Salt, or sodium, along with potassium, magnesium, and calcium will help your body to continue muscle function as well as other life essentials. Electrolytes allow your cells to absorb the nutrients they need (in short). Depending upon how hot it is and how hard you are riding, you should roughly be aiming to drink one 24oz. bottle each hour.  This should be primarily sports drink mix but can be supplemented with water.

Prior to riding in the heat you need to make sure you are hydrated going into the hot ride. Focus on drinking enough water and carry around a water bottle throughout your day and make a mental note to drink to thirst. This combined with having enough salt in your meals will help your body to be fully hydrated going into your ride. Half an hour or so before your ride you can start drinking small amounts of your sports drink mix. Drinking it before this is not necessary unless it is an electrolyte only drink that only contains electrolytes and no sugar or carbohydrates. Save them for the ride as your body will need and burn them then.

Following a ride you still need to make sure you hydrate. Having a super sugary drink such as soda or a strong sports drink can make your stomach upset so focus on water with electrolytes and some sugar and carbohydrates. A post workout recovery drink can be a good option which combines protein and other building blocks to help you recover from your ride.

Some good food options to eat during the heat are those that are simple and easy to digest. You will want to go lighter on the protein as well as fat as they are harder to digest. Some foods like homemade rice cakes give a good balance of water in the food itself so your stomach doesn’t need to pull water from elsewhere in your body to digest. At rest stops, foods like watermelon and cantaloupe give a big punch of water so stock up on these if they’re available.

Staying Cool

Along with drinking enough during your ride you will want to make sure you stay cool as well. This starts with wearing a jersey that is made of a light material that is also light in color. Having a lighter jersey will allow air to more easily pass through as well as to more quickly absorb and evaporate sweat from your skin which is how your body keeps cool. Having a lighter color jersey will keep you much cooler as it will absorb less of the sun’s rays by reflecting much more of its energy. Some riders find that unzipping their jersey all the way helps to get more air across their chest thus keeping them cooler. This can be true if you have a hot jersey but a lot of warm weather jerseys are designed to stay zipped up to wick sweat and keep you cool.

Some riders, particularly racers, in the heat will put ice socks on the back of their neck in their jersey. This may feel good but it actually does more harm than good as the extreme cold on the skin sends a shock to your body causing it to send blood to the core instead of to the skin where it can dissipate heat. The best way to stay cool is to continually squirt water on your head, the back of your neck, and shoulders as this will help to dissipate heat more effectively.

Riding in extreme heat can be dangerous so if it’s too hot, simply don’t ride. But if it’s not crazy hot and you are ready for it, biking in the heat can give you more days of good weather riding. Prepare ahead of time and make sure you bring enough water as well as know where your stopping points are mid-ride as well as what your options are if you need to bail out half-way through. Riding in the heat can also help to raise your VO2 max as well as help you shed some extra weight. Stay safe and stay smart and you can come to enjoy riding in the heat!

Improve Your Cycling With These Cross Training Sports

June 22, 2020 by Sarah Lauzé

We may be of the opinion that cycling is the single best sport out there, but sometimes widening our horizons can make us appreciate time in the saddle even more. While it remains true that the only way to get better at cycling is to ride more, cross training can help you get there. It can help fill in the gaps by building bone density and strengthening muscle groups that may be underused on the bike.

Whether your taking a break due to an injury or just trying to work some variety into your training plan, here are some of the best cross training sports to improve your cycling.

Hiking

Hiking is a great way to enjoy your surroundings at a relaxed pace. While you may be chasing segments on your bike, hiking makes you stop and take in the view. This can have a great stress-relieving impact on the brain.

Why it’s great for cyclists: Taking a stroll in the woods, especially if you tackle a mountain, is a great workout for your glutes, quads, hamstrings, core and hips. Those muscles sound familiar? They are also your mission-critical muscles used cycling, so hiking is a great way to build strength and endurance. It also helps build bone density as a weight bearing activity, but without the high impact of running.

Swimming

Who doesn’t want to go hit up the beach in the summertime? Whether it be in your nearest body of water or the local pool, swimming is one of the best ways to exercise while injured. It is also one of the more efficient strength and cardio workouts.

Why it’s great for cyclists: A weak core can lead to a whole lot of issues for cyclists, largely sharing up as lower back pain. As cycling naturally leads to underdeveloped core muscles, it is important to find another way to strengthen that area. If this is a challenge for you, swimming needs to be your new favourite thing. It is also a great way to recover after a hard ride.

Strength Training

Hitting the gym may not be everyone’s particular cup of tea, but even doing some strength exercises at home can be a great way to balance muscles. When done right, strength training can make you feel stronger, faster, and fitter both on and off the bike.

Why it’s great for cyclists: Cycling is a low impact activity, which means it’s great for your joints, but not so great for supporting your bone density. Strength training can help fill the gaps and build stronger bones and complementary muscles to have you feeling stronger than ever on your bike.

Running

Running is a great option if you’re travelling without your bike, or have limited time for a workout. It is effective in maintaining the condition of your cardiovascular system and gives you some variety in your training.

Why it’s great for cyclists: Running strengthens your bone density in a way that cycling doesn’t, and will keep you top climbing shape when you can’t put the time in on your bike.

Yoga

There are a lot of misconceptions around yoga, and you may scoff at the idea of it improving how you feel on your bike. However, more and more pros are using yoga as their secret weapon to get faster and prevent injury.

Why it’s great for cyclists: Yoga helps strengthen your core, which in turn can prevent lower back pain. It maintains a healthy range of motion in your muscles and joints, and will improve your flexibility and posture over time. Regular stretching and yoga will reduce your risk of suffering from the typical overuse injuries that plague cyclists. These include IT band syndrome, tight hamstrings, back pain, and knee problems.

3 Hidden Cycling Injuries and How to Fix Them

June 20, 2020 by Sarah Lauzé

We all know the wonderful feeling of cycling, but unfortunately it’s not always sun on the face and wind in the hair. Pedaling is a low-impact motion, making cycling one of the best ways to stay fit without putting stress on your joints. However, it’s also a highly repetitive action through a limited range of motion, which has consequences over time. Injury is a part of almost every sport, and cycling is no exception, but that doesn’t mean you need to hang up your jersey and sell your bike. Here’s what you need to know about hidden cycling injury and what you can do to fix them.

The Issue: Adaptive Muscle Shortening

Muscles do not naturally maintain their healthy or ideal range of motion on their own. In fact, it’s just the opposite, especially with the increase of 9-5 desk jobs. Muscles will change their functional resting length to adapt to the length at which they are habitually used or positioned. The process by which muscle fibres physically shorten is called “adaptive shortening.”

Cycling is one of the few activities in which muscles contract concentrically (while shortening), rather than eccentrically (while lengthening). The repetitive motion causes muscle fibres to shorten if action is not taken. Not only will shortened muscles impact your efficiency, comfort, and aerodynamics on the bike, but they will eventually lead to injury.

The cycling position is, unfortunately, more time spent in a hunched over posture that can compound already tight hip flexors, weak glutes and rounded shoulders. If you’re a weekend warrior, then it really is a case of when you will suffer an injury rather than ‘if.’ When you’ve spent most the week in a relatively sedentary position, and then hit the weekend with high levels of activity, you are taking chronically shortened muscles and forcing them to fire so quickly that it can lead to joint injury.

The Symptoms: Weak and shortened hamstrings are caused by the combination of the upper section becoming loose and weak while the lower section behind the knee becomes tight and never fully extends. This can show up as either knee or hip pain.

The Fix: The problem is a little more complex than just lengthening the muscles back to their natural state. It is a combination of stretching and strengthening that can reverse the effects of adaptive shortening, as it takes both range of motion and strength to bring muscle balance.

The Issue: Lower Crossed Syndrome

Lower Crossed Syndrome (LCS) is a neuromuscular condition in which there are both tight and weak muscles. Specifically, it refers to weak abdominal and gluteal muscles combined with tight iliopsoas and erector spinae muscles (see diagram). This is the most common underlying cause of anterior pelvic tilt, which is common among even professional cyclists.

The seat of power on a bicycle is the pelvis. When the pelvis is properly aligned the rest of the body can pedal efficiently. When the pelvis is misaligned and unstable, it is a recipe for not only lower back problems but hamstring problems too. An unstable pelvis leads to rocking. With each rock, the pelvis engages lower back muscles and hamstrings in ways that should not be involved in pedaling, overworking and straining the muscles unnecessarily.

The Symptoms:  LCS can become obvious in posture, as it leads to forward head posture, flat glutes, and a protruding abdomen as the pelvis tilts anteriorly (forward). The inhibited muscles, abdominals and gluteals, are never fully engaged in cycling, while the facilitated muscles, rectus femoris (quadraceps), iliopsoas and thoraco-lumbar extensors  are always engaged and often overworked. Constantly engaging those lower back muscles without proper support from a stable core often results in lower back pain for cyclists.

The Fix: The first step is to loosen the tight cross, which will quickly alleviate pain and discomfort caused by LCS. This is done this through targeting stretching, mobility movements, and foam rolling. The second step is targeted and deep stabilization exercises that will help build up the glutes and abdomen.

The Issue: Knee Pain

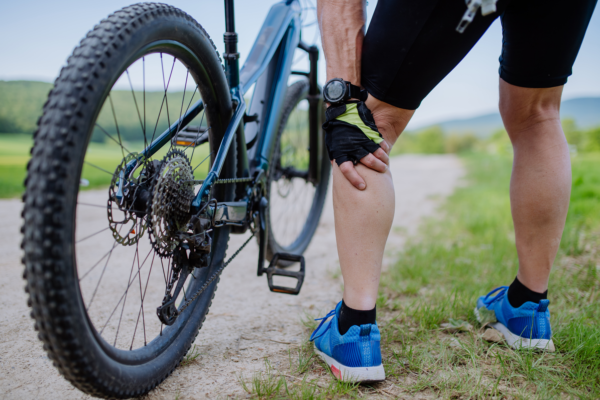
This one may not be so hidden, as knee pain is one of the most common injuries among athletes. In fact, a 2010 study of professional cyclists found that knee pain was the cause for over half of the time spent off the bike. As one of the most complex joints in the body, and in combination with muscle imbalance as discussed, it makes sense that it’s often one of the first places we experience pain.

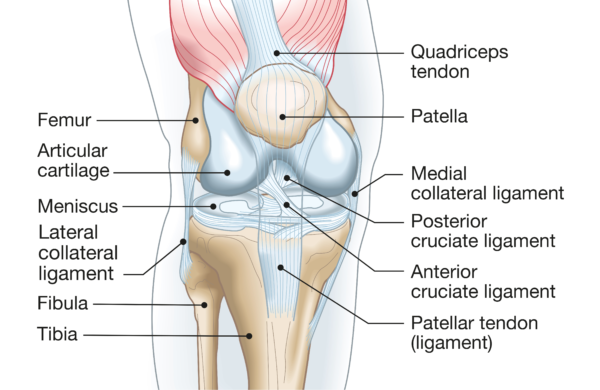
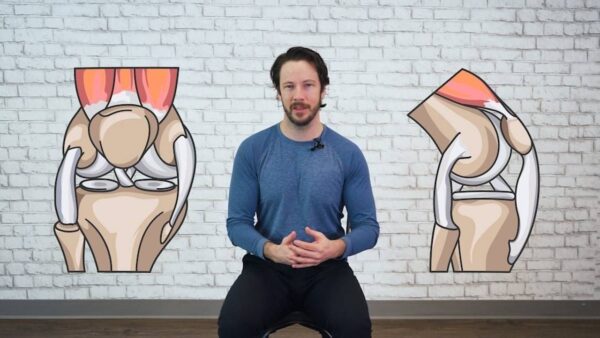
To understand knee pain it is helpful to have a basic idea of what lies beneath the skin. In simplistic terms, think of the knee joint as a hinge where the quadriceps muscles pull the knee straight and the hamstring muscles bend the knee. The quadriceps run from the front of the femur (thigh bone) to the patella (knee cap). The patella acts as a pulley to increase the force generated by quadriceps which creates a greater torque on the tibia (shin bone).

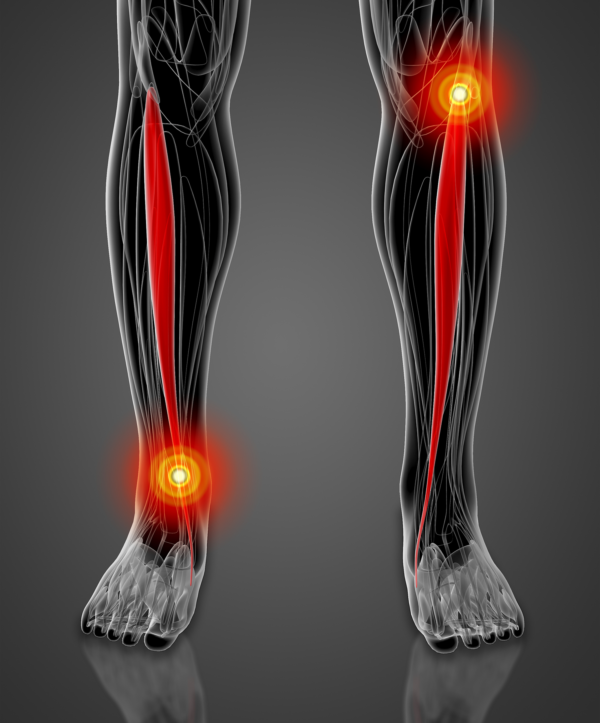
To make matters more complicated,  the ITB runs down the outside of the thigh and blends into the outside of the knee. ITB stands for iliotibial band and is a well known potential source of trouble for cyclists, runners and active people in general. The ITB is also attached to your glutes (buttock muscles) and hip flexors. Often when looking for the source of knee pain we have to pay close attention to hip flexibility and control.

The Fix: Some types of knee pain require rest, but most are caused by muscular imbalance. Again, it takes a combination of stretching and mobility exercises to loosen tight muscles and build up the proper supporting muscles.

The Mistake Most Cyclists Make Stretching: Not Having a Plan

Most of us were taught that stretching for a couple minutes before exercise would help loosen the muscles and prevent injury, but this is not the case. Holding a static stretch for 10 seconds will do nothing to lengthen the muscle, and barely scratches the surface of what needs to happen in the structure of the muscle.

The only way to achieve muscle balance is to practice a variety of stretches over a prolonged period of time (at least 2 weeks), hold each for the appropriate amount of time, and complete in combination with some strength training.

It can be tough to accomplish all that on you own. Even with the best of intentions and a plan laid out by a physiotherapist, it’s easy to never do it at all, or stop as soon as the pain is gone. Stretching should be thought of as basic body maintenance, especially for cyclists.

As cyclists, we know how hard it is to stick to a stretching routine. We all want to spend more time on our bike, but maintaining a healthy range of motion and flexibility will, in the long run, keep you on the bike without injury. That’s why we’ve partnered with Dynamic Cyclist to bring you a stretching and strength program that is easy to follow, and is geared towards cyclists. They’re offering our readers a free 7 day trial, just click the link below to get started.


How to Maintain Proper Cycling Posture

June 17, 2020 by Sarah Lauzé

There are some cyclists that make riding look effortless and smooth. Although it may come naturally to some, it takes time and practice to achieve that gliding look, but it’s not just for professionals! If you understand the basics of how your muscles are working, both for and against you, then you can ensure you stay balanced and relaxed in the saddle. Maintaining proper cycling posture is important to not only your efficiency, but to prevent injury.

There is no “correct cycling posture” that is right for everyone. We are all built differently, so what will work for some won’t for others, but there are some general rules to go by. After ensuring your bike is fit to you and your riding style properly, then it’s time to start thinking about what proper cycling posture looks like for you.

Cycling Posture

Why is cycling posture important?

Being as efficient as possible is the easiest way to go faster while spending less energy, sound good? The first thing you want to focus on is staying as relaxed and stress-free as possible, tension is the enemy! Many cyclists will slowly tense up over the course of a ride, not only compromising efficiency, but demanding more than is necessary from their bodies. Letting go of that tension and relaxing into a natural position will work to:

  1. Increase efficiency
  2. Keep you comfortable
  3. Improve bike handling
  4. Easier breathing
  5. Prevent injury

What does proper cycling posture look like?

As stated above, this will look different for everyone, but here are some things to keep in mind:

Keep your shoulders relaxed 

Many cyclists will find their shoulders slowly creeping up to their ears while riding, which puts unnecessary stress on your shoulders, neck, and back. This can also get in they way when you need to shoulder check or move your head around. You will actually stay more alert by keeping you shoulders down and relaxed.

Bend your elbows

Riding with locked out elbows will make for a rough ride, so adding a slight bend will act as suspension and keep any bumps on the road from tossing you overboard. Keep your elbows tucked into your sides rather that out like wings. This will reduce the stress on your shoulders, and also result in less pressure on your hands and wrists (your wrists should NOT be bent).

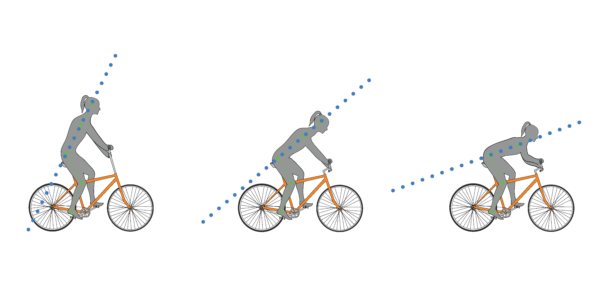
Maintain a neutral spine

Left: Too straight, putting tension in the lower back, Center: Correct posture with core engaged and back relaxed, Right: Core unengaged and rounded spine.


You want your back to be relatively straight, but not locked or tensed into a line. The most common mistake is letting the back round outward, which can cause all sorts of issues over time. The best way to ensure you are keeping your back straight enough is to keep your core engaged. If your abs are just taking a free ride, your back will inevitable round out, putting pressure on your hands, shoulders, and crotch (which can be super painful).

Keep your knees in line with your foot

You do not want your knees to bow outward at any point during the pedal stroke. Not only is this incredible inefficient, but it will cause some painful knee issues. So, focus on keeping your knee in line with and over the ball of your foot as you ride.

How to improve your cycling position

If you think you are struggling with any of these aspects, it is worth taking the time to correct what you can to ensure you are comfortable and efficient on the bike.

Proper bike fit

First things first, everything has to be in the right spot to even make it possible for you to maintain proper posture cycling. If you’re not sure your bike is the right fit, or isn’t adjusted to you, then it’s worth looking into having a professional bike fit.

Think about it

Pay attention to your body when you’re on the bike. Where do you feel tension? In what ways is your body out of alignment or its natural range of motion? Focus on relaxing your muscles and breathing, and think about each aspect of your posture piece by piece.

Stay flexible

Flexibility, or rather inflexibility, can lead to unbalance in the body and even cause the body’s structure to move out of alignment. If you are not flexible enough to hold proper posture over the course of a ride, then you need to work on increasing your flexibility through stretching and strength training exercises.

Stretch

It is important to have a healthy range of motion and flexibility to move freely and efficiently. Stretching can aid in aligning the thick and thin muscles back into their ordered state after movement, as well as remove the lactic acid buildup that causes soreness. Regular stretching will also increase your flexibility, making that aerodynamic position more attainable.

Strength Training

The facilitated (overworked) muscles, like the quadraceps and lower back, do not need strengthening but stretching. Instead, it is the inhibited muscles that benefit most from strength training – the abdominals and gluteals. Because the core needs to be engaged to stabilize your spine and the movement of your legs, strengthening it off the bike is important.

« Previous Page
Next Page »
  • Facebook
  • Google+
  • Tumblr
  • Twitter

Latest Articles

Who Invented the Bicycle?

October 6, 2020 By Sarah Lauzé

What size bike do I need?

October 4, 2020 By Sarah Lauzé

The Number of Calories Burned Cycling

October 1, 2020 By Sarah Lauzé

The Benefits of Cycling for Your Mental Health

September 9, 2020 By Sarah Lauzé

Symptoms of Bad Bike Fit

September 8, 2020 By Sarah Lauzé

How to Choose the Best Cycling Jersey

September 2, 2020 By Sarah Lauzé

Useful Info

  • Contact
  • Finally, A Global Cycling Club That Is Focused On Community And Love Of Cycling!
  • Share Your Story!
  • Terms And Conditions Of Use
  • Welcome to I Love Bicycling
  • What Happened When I Stretched Every Day For a Month

Recent Posts

  • Who Invented the Bicycle?
  • What size bike do I need?
  • The Number of Calories Burned Cycling
  • The Benefits of Cycling for Your Mental Health
  • Symptoms of Bad Bike Fit

Search I Love Bicycling

Connect with Us

  • Facebook
  • Google+
  • RSS
  • Tumblr
  • Twitter

Copyright © 2021 · Magazine Pro Theme on Genesis Framework · WordPress · Log in