Our friends at Dynamic Cyclist had the pleasure of using the JOIN Cycling app recently. Check out what they had to say about this innovative new cycling platform!
As people dedicated to enhancing the wellness and performance of cyclists worldwide through stretching, strength training, and injury prevention programming, we at Dynamic Cyclist have had a phenomenal experience exploring the JOIN Cycling platform.
Our team has been in the cycling industry for close to a decade, and are no strangers to the digital experience of helping cyclists perform at their best. What JOIN Cycling has created is nothing short of impressive.
Over the past few months we’ve been lucky to test out the programming and apply it to our personal cycling goals. Our team has been pleased by the ease of use, training efficiency, and adaptable training plans that fit into our busy schedules. Let’s dive into the main reasons why we love using JOIN Cycling!
Adaptive Training Plans
JOIN Cycling’s smart, adaptive training plans are a standout feature. They flexibly fit into our daily routines, allowing us to maintain a balanced training regimen that supports our holistic approach to cycling health. Whether it’s a long ride day or an easy recovery workout, JOIN Cycling’s schedule adjustments keep us on track without having to worry about overtraining.
Easy Access to Data
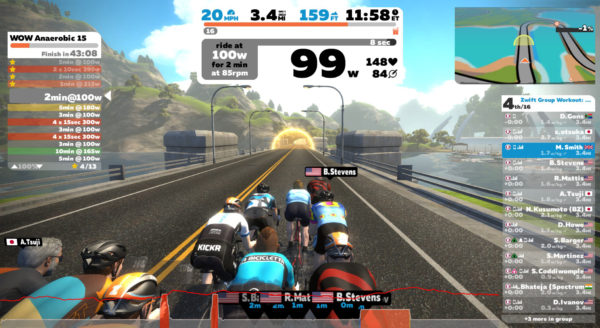
One of the highlights has been how simple it is to access and interpret the training data. The app presents everything from ride stats to fitness trends in a clear and accessible manner, making it easy to track improvements and understand the impact of each workout.
Community and Support
The social features within JOIN Cycling are a welcome bonus. Meeting local riders through the app and finding upcoming races has allowed us to go beyond our training metrics and further integrate ourselves into the cycling community.
User Interface
We have found the user interface to be intuitive and incredibly easy to navigate, as well. Some digital training plans out there can seem too information-heavy, making the experience overwhelming and difficult to understand. JOIN Cycling does a great job of organizing everything into categories that transition smoothly and blend well with the social aspects of the app.
JOIN Cycling is not just a training app; it’s a comprehensive training partner that understands the dynamics of modern cyclists’ lives. It’s been a go-to tool in our training arsenal, and will continue to be going forward. We are impressed with how the training plans adapt, not just to our cycling goals, but also our daily schedules. This perfectly complements our Dynamic Cyclist commitment to riding pain-free!
Here’s to more cycling, more goals being achieved, and continuing to enjoy the sport we all love so much!
Join Cycling is the perfect companion app to Dynamic Cyclist, and is offering a 30-day free trial to you! CLICK HERE to sign up for your risk-free subscription today, and discover what adaptive and flexible training plans can do for you.


 Although cycling is a great way to lose weight, you’ll want to leave your diet at home. Under fueling your rides or eating the wrong food at the wrong time can halt your progress and make training a miserable experience. At the same time, over fueling and using a long ride as an excuse to each 3 cheeseburgers also isn’t great.

 Stretch & Roll