• Training
    • Injury Prevention
    • Training Tips
  • How To
    • Bike Fit
    • Gear
  • Nutrition
    • Nutrition Tips
    • Weight Loss
  • Repair
  • Reviews
  • Stories
    • Funny Stories
    • Jokes
    • Quotes
    • Videos
    • Funny Videos

I Love Bicycling

I Love Bicycling is a website that is geared towards cycling for beginners with road cycling tips, training articles, nutrition tips, weight loss, how to’s and bike repair articles.

Cycling While Pregnant: What You Need To Know

September 15, 2015 by Lee Agur

Should I Cycle While I Am Pregnant?

Cycling While PregnantAs people learn you are pregnant you will receive all kinds of advice, some good and lots bad. At the end of the day you have to do what is right for you, the golden rule: Listen To Your Body.

As long as you are able to stay safe, and avoid the risk of falling, then cycling can be a great exercise while pregnant.

Tips To Cycling While Pregnant

Instead of “Training” Think More “Fitness”

Your body is focused on growing a baby, it is not the time to increase training or even maintain previous training regimens; doing so will surely lead you to exhaustion and have a negative impact on the fetus. It is the time to focus on feeling happy and healthy. A general rule of thumb, bike as far as you feel like.

If you used to bike 60 miles in a day then 15 – 20 miles is reasonable. Make sure to decrease intensity along with the distance as well.

Be Careful Not To Fall

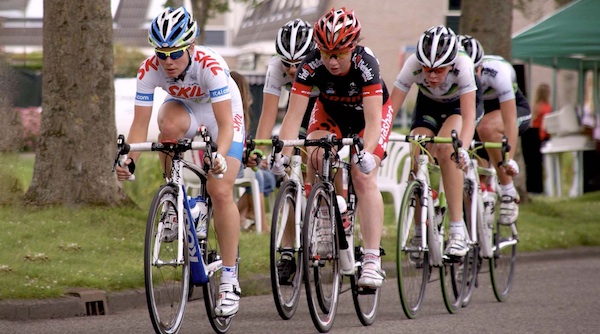
Take all the precautions you can in order to reduce the risk of falling! Mountain biking, unless on extremely flat and non-technical terrain, is not suggested especially during the first trimester as there is a higher risk of miscarriage. Road biking, commuting or riding a cruiser bike where the risk of falling is negligible is ok.

Take it slower than you are used to, unclip a second earlier than you may normally, don’t draft off anyone, stay away from the roads with the ridiculous amounts of potholes.

Listen to Your Body

Knowing when to not go for a ride or stopping early is even more important than knowing when to go for a ride. If you are exhausted or feel dizzy, or there is any other negative that is out of the norm why risk your baby for a simple ride?

Cycling Can Help With Morning Sickness

It is not a scientific fact, and each individual is different, but some women believe that cycling (or exercise in general) helps reduce morning sickness.

Bikefit While Pregnant

As your tummy grows, you will become more uncomfortable, that is just a fact; however, this is not something that needs to deter you from going for a ride. A bikefit when you are pregnant focuses on comfort first, and everything else last.

A few key areas to focus on are:

  • Handle bars – raise them to get you in a more relaxed position and to reduce cramping
  • New saddle – you may need a different saddle – think gel seats and wider platform
  • New apparel – new shorts with added padding and larger waistline is advisable along with a new jersey.

Any Pain Stop

If there is any abnormal symptoms or pain at all stop immediately.

  • Leg, chest or stomach pains
  • Light headed or dizzy
  • Have difficulty with balance
  • Any vaginal bleeding
  • Shortness of breath
  • Contractions

Benefits of Cycling While Pregnant

  • Reduces tiredness, pains, aches, swelling, depression, anxiety, stress and insomnia.
  • Makes you feel better about the changes that are happening in your body.
  • Helps maintain a healthy body weight.
  • Better prepares the body for the demands of labour.
  • More likely to have a positive effect on overall mood.

Cycling in the Different Trimesters

First Trimester

During the first trimester you are likely very tired as you expend a lot of your energy into growing placenta. Try to go for a ride in the morning when you are likely more energetic, avoid long rides and know when to skip a day if you are exhausted.

The fetus is delicately attached to the womb, any violent falls would put your baby at great risk. You don’t want to fall at any time during the pregnancy; however, the first trimester is when you are at the highest risk of miscarriage. Follow the advice listed above that much more delicately.

Second Trimester

You may have more energy in the second trimester, but make sure not to exhaust yourself by riding too much.

Third Trimester

As you grow bigger, your organs will start to get compressed. Shortness of breath will be common, but make sure it does not get extreme. You will continually become more uncomfortable on (and off) the bike. A bikefit that is focused on comfort while you are pregnant is a must.

What Doctors Say

There are benefits to cycling while pregnant including: reducing tiredness, pains, aches, swelling, depression, anxiety, stress and insomnia. Major risks to reduce to ensure the fetus becomes a happy and healthy baby is that you take every care to reduce falling as well as to hydrate properly and not overheat. Reducing major stresses on your body should be your number one priority. If you experience any major dizziness, pain, shortness of breath or bleeding stop and consult a medical physician immediately.

Cycling Etiquette

September 5, 2015 by Adam Farabaugh

cycling etiquetteWhen you are out in the middle of nowhere and have exhausted all of your tubes, traffic can be a life saver to get you home. When you’re not in the middle of nowhere and there is traffic, it can be a pain that detracts from the joy of riding. The thing with most drivers is that they are just trying to get from point A to point B. They’re not out to hit you or give you a hard time. If you give them the proper visibility and space, they will avoid you and let you go on your way safely. A smaller percentage of drivers believe that the road is for them and them only. You are in their way no matter what and they are going to give you a hard time at any chance they get. It’s not you, it’s them. Knowing how avoid conflict as well as what to do if there is a problem will allow you to keep your cool in the heat of the moment.

Riding Two Abreast

The biggest reason that anyone will ever have a problem with you riding is if you are riding where the driver has to slow and alter their course down the road. Of course you are allowed to be there in the road but they don’t see it this way. When riding alone, make sure you ride where you are visible. Not down the extreme side of the road where traffic can’t see you but slightly in traffic. Here cars should be able to easily slide around you without putting you in danger. If there is not much room for them to pass, then slide right. When you are riding two abreast and there is a car behind you, as long as they have room to safely pass, keep riding two abreast. If the road is narrow or curvy, have the rider further out in traffic slow and move over behind the first rider. Even if traffic still can’t pass, this at least shows that you are courteous. They will most likely wait without issue and pass when it is safe.

Blind Curves

Riding on narrow roads can already be a bit treacherous if there is traffic. If there’s no traffic they’re amazing. Narrow roads more easily create corners that can’t be seen around until the last second. Going into a blind corner, whether single file or two abreast, you should ride further into the lane to make sure that no vehicles try and pass you from behind. Make sure you are far enough right though to avoid any oncoming traffic that isn’t staying in their lane. When you are far enough into the corner and can see that there is no traffic coming, slide right and give a wave that it’s alright to come through if there is a car waiting behind you. This ensures that a car doesn’t try and squeeze past at the wrong time because if they do, they risk a head-on collision with you most likely being pushed off the road or worse.

Traffic Lights

The place that you are most likely to make verbal contact with a driver is when you are slowed or stopped at a red light. The best way to avoid confrontation is to make your lane changes clear and safe if you are turning. If you are going straight you can ride down the side of traffic on the right if there is a bike lane or ample room for you to fit. Then when you arrive at the first car, stop just to the right of it slightly in front of their bumper to make sure they see that you are there. If there is not room for you down the side, just stop at the back of traffic in the lane. Doing it these ways will minimize any time that a driver will have to say anything to you as well as give them the least amount of reasons to have something to say to you.

Encounters

Unfortunately with riding, encounters with drivers will happen. If you do have an unfortunate encounter, know that you are in the right and they are in the wrong, unless you did actually do something wrong. If you did, admit to it and apologize and be on your way. If they were in the wrong the best thing to do is just acknowledge them but keep on your way. They want a reaction from you. If you do respond back, be polite with facts and the law. Those are two things that shouldn’t be argued with. That may be enough to have them on their way but if it still isn’t, revert back to just ignoring them and being on your way. The last thing you want is to escalate things and have them get out of their vehicle. If there is a bigger issue, try and have other people stop and be around to help prevent anything bad. Then contact the police and keep a cool head. Some drivers won’t back down so you need to make sure that you don’t make things worse.

Riding should be a fun and relaxing endeavour but when drivers create unsafe and unneeded situations it becomes less enjoyable. Ride in a way that is courteous to them and nine times out of ten they should let you on your way. If they do give you a more difficult time, be polite and keep the situation minimal. Larger problems can happen but if you follow these tips they can be minimized. Stay safe and have fun by following this cycling etiquette.

Clearing Road Obstacles with Grace

September 4, 2015 by Adam Farabaugh

Clearing Road Obstacles with Grace
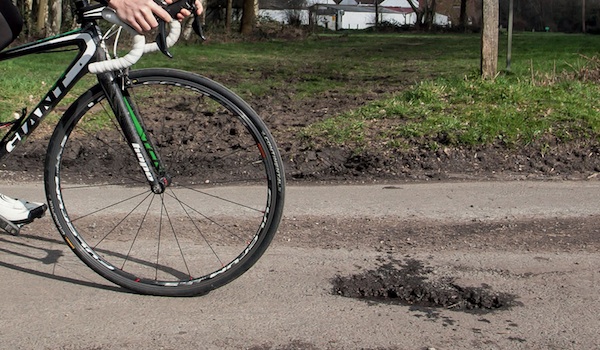
Road riding compared to mountain biking or gravel road riding can be smooth and straight forward; so much so you could practically take a nap sometimes. However, in most parts of the country, roads can take a beating and be rough and full of potholes. If they are smooth you still have to watch out for things like manhole covers and railroad tracks. Knowing what to do when you encounter these will save more than just your skin. You not only need to know what to do but also be able to react to the hazard without even thinking about it so practice is necessary.

Bumpy Roads

Bumpy roads are bumpy for a reason. They’re old and not taken care of so the likely hood of potholes and other hazards is much greater. The first thing in encountering any road hazard is to always make sure that you have a good grasp on the bars. You never know when something is going to pop up and having your hands on the bars will at least allow you to react otherwise you’ll most definitely be on the ground.

Pot Holes

There are three ways to get to the other side of a pothole. Around it, over it, and through it. If you see the pothole far enough in advance you can simply ride around it. However when you spot it late and don’t have time to gradually steer around it, you have to react at the last second. The way to do this is to steer your bike to the side of the pot hole you want to go around. This is a quick flick of the bars to that side while you keep the bike in an upright positon. As you do this you will be off balance so you need to maintain that balance by moving your body toward the opposite side you are steering to. (If you steer around the left of a pothole you move your body slightly to the right of the bike) Once you pass the pothole you immediately re-center your balance on the bike to keep from tipping over. This requires a bit of practice but once you get the idea you’ll be able to do it without even thinking about it.

The second way to getting past a pothole is to go over it with a bunny hop. This again requires some more skill but can easily be learned. Bunny hopping is often the best way to get over a hole if it’s not too big as it doesn’t put you in front of potential traffic or other riders. There are two ways to bunny hop. The first can be used for shorter pot holes where you lift the front wheel and then the back wheel as it approaches the same point. Pretend there is a log there that you are trying to get over. It’s the same idea. The second way is to bring both wheels off the ground at the same time. This is the way to get over anything that is longer as well as if you are going at a faster speed. The way to do this is to slightly bend your legs and almost jump by pushing your body up from the bike and then pulling the bike up toward you. This will require practice and the video below should get you rolling.

The third way to get past a pothole is to ride right through it. Obviously this should be avoided but sometimes it’s just too late to do anything else. If this happens, make sure you hold onto the bars tight and let the front wheel drop into the hole. If you try to hold it up and don’t make it to the other side you will slam your front tire straight into the opposing side potentially causing a flat or a crash. Then once your wheel is in the hole, lift, or take as much weight off the front wheel as possible. As the back wheel comes through try and do the same. Lifting your butt off the saddle will also help to absorb the impact with your legs rather than have all your weight go straight through the seat post into the back tire.

Road Grates

Road grates in some parts of the country can spell disaster. Some cities make sure that they are made or situated so a bike tire won’t fit through but in many places this is not the case. Riding over one can cause your front wheel to drop in sending you straight to the pavement. The best way to avoid this is to never ride over them. Even if you see that they are safe, don’t risk it. Use the pothole techniques to go over or around them.

Gravel and Loose Corners

Gravel can sneak up on you in corners anywhere, especially if winter has just broken and you live in a place with snow. The best way to avoid crashing in a loose corner is to take it gingerly but that’s not always possible particularly if you didn’t expect it to be loose. Crashing on loose surfaces happens because as you lean into the corner there is not enough traction to counteract that movement. To avoid that, you need to lean your body through the corner, not your bike. Your bike should stay more upright, as you lean your body to the inside of the corner. Think motorcycle racer. They’re further to the inside of the corner than their bike. You then steer the bike more than leaning in to it.

Manhole Covers and Other Slippery Surfaces

Slippery surfaces like manhole covers and crosswalks should be avoided like road grates if possible. When they can’t however, you should ride across them like it’s ice or a loose gravel corner. Do not lean the bike, as soon as you do your wheels will wash out from under you. Keep your weight centered over the bike and any turns you have to make you have to do so gingerly.

Railroad Tracks

Railroad tracks pose another challenge that can be treacherous particularly in the rain. Directly perpendicular tracks are relatively straight forward to cross and can be done so without too much caution. The only real issue here is when they are not smooth as you can get a flat or even break a wheel if you hit them too hard. You need to approach them like a pothole and bunny hop them if you can, otherwise unweight your wheels as they go across each bump and absorb the impact with your arms and legs.

Diagonal tracks pose another threat. They are perhaps one of the hardest road obstacles to navigate particularly if they’re wet. The best way to approach them is to make sure no traffic is coming and swing wide into the lane so you can cross them at a ninety degree angle. If you try to ride straight across wet angled tracks, you are almost guaranteed to crash. The other way of getting over them is hop each track individually with a quick double bunny hop where you lift your front wheel over and then back and as the back wheels coming down you do it again for the second track. The added space between the tracks, because it’s at an angle, gives just enough room for this to work. It takes practice but when you’re good, it’s the easiest and safest way to cross.

Road hazards come in all shapes and sizes and knowing how to get around, over, or through them will save you more times than one. All of these need practice however so when the time comes you can react and navigate your hazard gracefully and not think about it. Make sure you have a safe area with no real dangerous hazards that could injure you and give the techniques a go. You would much rather be put under pressure to do something difficult when there isn’t a car, or other riders, behind you waiting for you to get across some wet railroad tracks. Practice now, pedal past the hazard later and keep all your skin intact.

Becoming Comfortable Riding on the Road with Traffic

August 23, 2015 by Adam Farabaugh

Becoming Comfortable Riding on the Road with Traffic
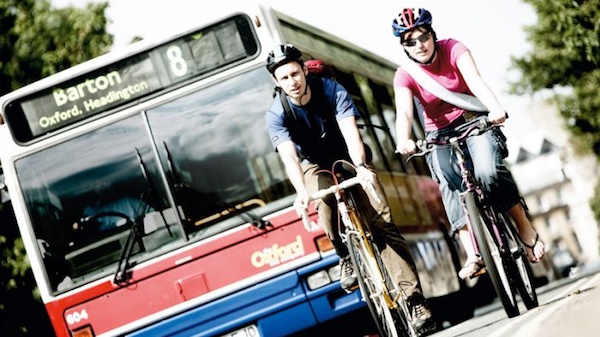
Riding trails and empty roads endlessly on bikes is every riders dream but not all of us have that luxury.  We may have to ride in traffic on commutes, to get to the good roads or trails, or roads that have traffic are all that are available to ride close by.  Knowing the rules, knowing the techniques and practice will help save your life but will also allow you to be more relaxed and not despise any part of your ride.

Rules of the Road for Cyclists

Cyclists are under the same laws as motor vehicles so riding the same as you would drive a car is, in general, how you should ride.  This means that you ride on the same side of the road as traffic, stop at traffic lights and stop signs, and signal your turns.  Past this however, knowing what to do in every situation will keep you safe and perhaps save you from getting yelled at by motorists, although that still may happen.

Traffic Lights

Traffic lights are a pain for motorists as well as cyclists.  Even though running them may seem more doable on a bike, don’t.  You can still get a ticket but more importantly if you get hit it is more life threatening as you are the soft item that gets damaged not a fender.  If there is enough room to pass stopped vehicles already waiting for the red light, continuing on the shoulder or bike lane is advisable as long as you make sure no cars are potentially turning right into your lane.

Making a left hand turn at a traffic light can be difficult particularly if there is a lot of traffic.  Before you arrive at the intersection, make sure there are no cars immediately behind you, put your left arm out signalling your intention to move left, take the lane (riding down the middle of it), and then proceed to the left to the turning lane if there is one.  If there is not one, stay to the left but not so far as to be in the way of oncoming traffic, but far enough that cars behind you can still pass you safely on your right.  Once it’s clear and/or the light is green, make your turn to the left.

Riding With Two or More Riders

Take extra caution when riding in a group and use common sense. There are many different theories on how to ride safely in a group. Suggestions vary from riding single file, to two a breast or even taking the whole lane. Each situation warrants a different style for instance: highway riding stay single file or at a minimum stay to the right of the white line. Riding on a country road ride two a breast to be more visible as a group, then depending on how large the group is go back to single file to allow the car to pass safely. If you are in a very large group it may be wise to continue to take up the lane and make the car pass along a straight stretch when no one is coming the other way. If you are riding in town, it may be easier to keep up with the stop and go traffic and it may be wise to take the lane. The most important thing to do is use common sense to stay as safe as possible.

Tips & Techniques

The biggest thing to riding in traffic is to make sure motorists see you and that you don’t make any sudden moves that they are not anticipating.  Most motorists are not going to hit you as long as they see you and know where you are and where you are going.  A good way to ensure that motorists see you, is to establish your position early. For instance, if there is an obstacle coming up like a narrow bridge or large potholes, you should shoulder check and move in to the lane well before you get to the obstacle, basically stating to the motorists that it is not safe for you to pass here. Once across the bridge you will move back onto the shoulder and allow cars to pass.

This leads to the next point of being able to turn your head and actually look behind you while still riding in a straight line.  This is something that every rider must learn to do.  Some people use mirrors but they should only be used in addition to turning your head, not as a substitution.  This should be learned and practiced on an empty road without potholes or anything that could cause you to crash.  A good drill is to ride on the white line and turn your head briefly and then back and make sure you are still on the line.  Gradually work up to a longer and longer time that your head is turned.  You should be able to do it over your left and right shoulder.

Another technique to use while riding, particularly when it is around twilight and even dark, is to ride like you are invisible.  Pretend that no one can see you.  You have to make sure that each and every car is not going to hit you.  This becomes particularly important at intersections where cars are pulling out in front of you. The majority of the time they are not looking for cyclists. You should always error on the side of caution.

Practice and Becoming Comfortable

As with anything, practicing and being in a situation more and more will make you better at that situation as well as more comfortable.  Don’t seek out busy dangerous roads to ride but rather take these notes into consideration when you are on the road with traffic.

When you are in these situations, ride with hyperawareness and pay attention to everything and everyone.  Once you become more comfortable with navigating traffic you will naturally begin to relax since you will be more used to it and know what to do.  Of course the best way to not worry about traffic is to avoid roads with traffic but that’s not always possible.  Try and seek out a route of back roads, bike paths, wide shoulder roads or anything that puts more distance between you and traffic.  You can’t afford to take a fender bender like a vehicle.  It has the potential to kill you.  Take it seriously and be in control of your situation.  You will navigate the hectic roads like a champ and arrive at your destination or sweet roads or trails more relaxed and ready to enjoy.

Advantages of an Unbroken Bike Path

December 17, 2014 by Dyani Herrera

Advantages of Riding on an Unbroken Bike Path

unbroken bike path, continuous bike path

One of my favorite aspects of cycling is the feeling of freedom, and ability to take in my surroundings while exercising. Although I love long paths in my city that take me either along the beach or farmlands, these routes typically require several stops due to traffic lights and traffic overall. When I’m in training mode one of the most practical routes I use is a local golf course that goes around in a four mile loop, with no traffic lights or stops. There are several advantages I’ve found with this route as a beginner cyclist and now avid rider. Here are some advantages for riding on an unbroken bike path despite what level of experience you have riding.

Bike Handling

Riding on a continuous route allows you to practice several things required when riding, in particular if you are just learning how to ride. For one, you are able to practice the maneuvers required in turning, such as slightly leaning your body, weight distribution, and bringing up the leg closest to the turn. You can also practice wide turns versus sharp turns, because both skills are needed in different riding situations. It is ideal to practice this along a continuous stretch with no concerns for oncoming traffic, or having to clip and unclip. Also, it gives you the ability to play around with your gear shifters and familiarize yourself with the different speeds and your comfort level with each one. This is even better if your unbroken path is a flat one so you don’t have the resistance of any rolling terrain. Typically, with this type of route you will experience a tailwind and headwind, which may affect which gear you use when going into a headwind, depending on your fitness level. Playing around with gear shifting will teach you which gear is most efficient in each situation.

Bike Position

This type of path also lends itself to practicing bike positions without having to be as vigilant as you would be if riding in a higher traffic area. If you’ve recently purchased a tri bike, you can practice getting down in the aero bars, and still maintaining balance. I remember as a beginner I had a difficult time with this as I attempted practicing in a bike lane next to oncoming traffic. I was so nervous, and white knuckled on my aero bars I nearly rode off the bike lane into trees that were on the right of me. After this experience, I decided to practice in a low traffic area like my neighborhood. I would practice staying aero and gear shifting in this position as well as reaching down for my water bottle without having a tragically, embarrassing fall. Also, if you own a road bike you can play around with the position that is the most comfortable for you, and leaning forward on the road bars when going into a headwind.

Another position that is important to practice is pedaling off the saddle as this offers a few advantages as well. This requires some practice so you may become comfortable with the “dancing” motion required with this technique. When I ride on this route, I use this motion a lot to gain more speed after turns. Additionally, to simulate climbing since it is a flat route. This specific exercise helps your legs get stronger, and makes you more comfortable whenever you are actually climbing a hill or bridge. Since it is a continuous path I tend to time myself and do intervals of one minute pedaling off the seat and two minutes of riding with high rpms.

Training

Having a continuous path is ideal for interval training because you don’t have to interrupt your work sets by stopping at traffic lights or signs. You’re able to experience the advantages of interval training, and have a great workout. Also, you can fully focus on your gear shifting, pedal stroke, and RPMs. It is especially beneficial if you are completing a ride in a cycling group, and take turns drafting and pulling.

It is also great to practice different cycling drills within a workout without interruption. Some examples may include “spin-ups” where you’re in an easy gear and are working on maintaining high RPMs; Also, “pick-ups” where you do work intervals faster than your race pace. Another good drill to complete on this route is “isolated leg work”, where you complete intervals pulling with one leg, while the other one is “resting.”

Safety

When comparing this route to one which requires me to ride with traffic or alongside a busy road, I find this one to be a lot safer. As a beginner or someone who is still not comfortable riding with traffic you can still enjoy cycling without the constant worry of being hit. These paths typically are in low traffic areas with several signs indicating it’s a bike path and to respect cyclists. Therefore, the few cars that drive in these areas are aware that it is a common cycling location. There are also minimal, if any parking lot entry/exits so you don’t have to be in a constant high alert environment. Lastly, many cyclists ride on these routes so if you have any bike trouble such as a flat tire, you can count on someone being nice enough to stop and help you.

Although riding on an unbroken bike path may not be the most scenic route, as you can see it does have its advantages for all levels of cyclists. All of which, can improve your riding ability and make you a stronger cyclist.


Dealing with Spring Road Conditions

December 12, 2014 by Aaron Robson

Dealing with Spring Road Conditions

spring road conditionsRoad conditions are a huge problem with spring riding. During the winter, a ton of grit and salt gets dumped on roads to keep them grippy and snow-free, and, come spring time, all of that stuff ends up in one place – the shoulder where you want to ride. Spring is also pothole season, as water seeps into cracks in the road and freezes overnight, threatening to open up holes the size of the Grand Canyon in your favorite roads. There are a few easy things you can do to beat these obstacles and have a safe and enjoyable spring riding season.

Staying Flat-Free

Nobody likes to change a flat tire, and the side of a road in a spring downpour is about the worst time to have to do it. But this time of year seems to produce an abnormal number of frustrating flats. The culprit? Road grit. As it builds up on the side of the road, it collects all the little bits of stuff that would normally get blown off into the ditch – pieces of glass, metal shards, nails, etc. Normal, lightweight road tires get torn up in these conditions.

To keep you riding, a durable, puncture-resistant tire is essential. These tires have Kevlar fabric, or something like it integrated into the casing of the tire to strengthen it. Most major tire manufacturers offer at least one model like this. They won’t be the lightest, or the smoothest rolling tires, but they will take a beating. I have the Continental Gatorskins on my bike right now that are a nice balance of performance and protection. The same company also makes even more durable (and heavier) tires – the GatorHardShell and the Grand Prix 4-Season. Other options include the Specialized Armadillo and Schwalbe Marathon Plus.

Pothole Avoidance

Weaving your way through the obstacle course that some spring roads tend to turn into can be a daunting task, but there are a couple of tricks that will help you out. The simplest is to look where you want to go, rather than looking at all the things you want to avoid. If you have ever managed to hit the only rock/hole/whatever on a nice smooth stretch of road because you were staring straight at it, you will know how well this works. Look ahead, pick your path through the debris, and then follow that path with your eyes. Your body will guide your bike there without you having to think about it.

As skillful a bike slalomer as you might be, occasionally there will be times that you can’t go around something – maybe you are on a shoulder with cars to your right, or you might be in a group with other riders. Whatever the situation, you need to take alternative action. Enter the bunny hop. If you haven’t heard the term before, the general idea is to ‘jump’ your bike – both wheels leave the ground for an instant. This isn’t something that you want to try out for the first time at 25 mph on pavement – find a grass field to practice on. With clipless pedals, the task is considerably easier. There are countless YouTube tutorials out there, but in short, you are going to ‘hop off’ your pedals (not literally, since your feet are clipped in), and then bring the bike up along with you. Don’t think about pulling the bike up first – your body has be be airborne before your bike can follow. When you’ve got the hang of the maneuver on grass, try it out at slow speeds on the road before working your way up to full speed.

Embrace the Fender

Grit and water aren’t much fun to ride through, and they are even less fun when you end up covered in them during a ride. Fenders are your friend for spring riding. They keep you (relatively) dry, grit-free, and they also keep all that same stuff from getting into your drivetrain, reducing maintenance and keeping your bike running smoothly. The type of bike you have will determine what your fender options are. For full-fledged race bikes choices are limited since attachment points and tire clearance are minimal. The SKS Race Blade fender is just about the only good option.

With lower-end road bikes, and touring/cyclocross bikes, you have more possibilities. Some people like clip-on fenders, since you can take them off at the end of the season to keep your bike looking slick. The downside to these are they won’t offer the same coverage and performance as a dedicated bolt-on fender set. If I just had one bike, I’d probably use clip-ons, but with my current set-up – one touring/commuting/spring riding bike, and another race/summer riding bike – I like bolt-on fenders that I leave on my commuting bike year-round. Whatever you choose, it will be light-years better than going without!

How To Stay Safe on the Streets

November 23, 2014 by Aaron Robson

How To Stay Safe on the Streets

Staying safe on the streets - how to stay safe on the streets
Cyclists protest in London for safer streets.

Biking is a fun, cheap and healthy way to get around town (and if your traffic is as bad as mine, faster too!) but all of that goodness can be ruined by a run in with one of those other occupants of the roadway. Some people subscribe to the view that if you bike regularly in traffic, it is just a matter of time before you get hit, but I’m not one of them. While I do agree that some car-bike accidents are just really bad luck and timing, in my opinion, these are rare. More often than not, when I hear about car-bike encounters, I can identify things that the cyclist could have done to avoid the collision entirely or at the very least mitigate the severity. This isn’t to say that the cyclist was in the wrong in these instances, but right or wrong doesn’t really matter when you end up on your backside in the street. So what can you do?

Gear Up!

First and foremost, safety gear. A helmet should be a given – the specific type doesn’t really matter. Get one that is comfortable, and that you will like wearing. Unless you are into wearing body armor while riding, there isn’t much else you can do to protect yourself, but there is a lot you can do to help you see and be seen. Lights are a necessity at night, but you can still use them during the day to increase your visibility. I also really like to use a rear view mirror in the city. It helps me stay aware of what’s behind me and means I don’t jump out of my shorts when a car buzzes past me at 45 mph honking their horn. There are both helmet and handlebar mounted versions available. Try them both out, and see what you like best.

Constant Vigilance

Now that you are suitably equipped, when you get out on the road in traffic, your biggest concern should be knowing everything that is going on around you. Where are the cars near you, and what are they likely to do? Are there any intersections coming up, or driveways that a car could suddenly pull out of? Is your lane going to end, or merge? It is impossible to cover every possibility that you might face on the road – good situational awareness develops over time – but generally, you should be thinking about what is going to happen before it actually does.

People are Dumb

Even though you are constantly assessing the situation around you, the next step to staying safe in traffic is assuming that all the other people on the road with you are the exact opposite – completely clueless. Never assume that someone sees you, or is going to stop for you, or won’t change lanes because you are already there. If you start expecting people to do silly things, it won’t come as a surprise when they do. You can take this assumption to the next level by imagining yourself to be invisible! This mind game helps you to pick out the safest places to be and routes to take as you navigate the maze of obstacles on the road.

Exit This Way

All of the awareness and foresight in the world still sometimes isn’t enough to keep you out of a sticky situation. Your last line of defense is to try and keep a buffer space around you, and always have ‘escape’ routes available. Obviously, you can’t always have the space you want, but for an example, when cycling past a line of parked cars, I will always ride far enough away that if a door opens suddenly, I’m not going to hit it. In heavy traffic, you should always be thinking about where you can go if, say, a car moves into your lane suddenly, or starts to turn into you. Hopefully, you will rarely have to use your emergency escape tactics, but it is better to have them and not need them, than to need them and not have them!


If you are new to city cycling, take it slow. Don’t start off riding down main street at rush hour. Pick a quieter neighborhood, and work your way up. Make sure to always keep these tips in mind, and your city riding experience will be a safe, and perhaps even enjoyable one! Good luck!


Why You Should Not Always Bike In the Bike Lane

May 13, 2014 by Lee Agur

Why You Should Not Always Bike In the Bike Lane

A little video about a ticket Casey Neistat got for riding his bike not in the bike lane.

Why You Should Not Always Bike In the Bike Lane

Who knows why Casey got a ticket for not biking in the bike lane, maybe Casey takes it too far, but he has a point! Biking lanes are not always the safest place to be cycling.

How To Bike Safely On Wet Roads

January 11, 2014 by Lee Agur

How To Bike Safely On Wet Roads

Braking

how to bike safely on wet roadsBraking on wet surfaces is much more dangerous than braking on dry surfaces and requires a bit of practice and skill. Most of your braking power is still in your front brake; however, apply to much pressure and you are sure to have a front wheel slip out. It is important to get a “feel” for your bike and know how much brake to apply front AND back. On wet surfaces I apply a little more even braking; approximately 60% front brake and 40% back brake depending on the conditions. The dryer the surface the more front brake you can apply.

Since the surface is wet there is less traction, since there is less traction you need to start braking earlier not to mention that your braking is slowed even further because of the water on your rims. You will notice when you brake on wet roads that your brakes take a few seconds to “kick in” that is because there is water on your rims and your brake pads must clear it before you are able to get adequate friction on the rims.

One trick to better braking is actually shedding this water before you even want to start braking; this is done by gently squeezing the brake so that the brake pad caresses the rim and clears the water without slowing down.

When you are ready to brake apply more pressure on the front brake than the back, but not so much as to cause a front wheel slip out. You will get a better feel for this the more you practice. You will even get to a point where you can start to feel the front tire want to go on you and that is how you know to back off a little.

Turns

Don’t forget to brake much earlier than you are normally accustomed and make sure that you have slowed down enough so that you are not required to brake during the actual turn. Braking during the turn is one of the more common mistakes and I have seen a few people go down as a result.

Try to take the turn as wide as possible to cut down the angle as much as possible (straighter line = safer). Always look ahead at where you want to go and not at what you are trying to avoid. Keep in mind want kind of tires you have on, racing slicks in a turn can be disastrous at the same speed where a winter treaded tire can be safe.

Tire Pressure

Biking with a lower psi in your tube will allow greater traction as more of the tires surface area will be in contact with the road. I know most roadies jack up the psi as high as possible as they think it results in faster times, (not always true) but try and avoid this especially on a wet road. I reduce psi from my standard 105 psi to 95 psi in my tubes.

Any other tips? Leave a comment below:


  • Facebook
  • Tumblr
  • Twitter

Latest Articles

JOIN Cycling: A New Training Platform for Cyclists

May 27, 2024 By Eric Lister

cold exposure

The Benefits of Cold Exposure for Cycling & Life

June 13, 2023 By Eric Lister

hill climb

The Ultimate Hill Climb Training Guide

May 31, 2023 By Eric Lister

shoulder pain cycling

How to Treat & Avoid Shoulder Pain While Cycling

April 12, 2023 By Eric Lister

psoas stretch

The Importance of the Psoas Stretch for Cyclists

April 6, 2023 By Eric Lister

cycling neck pain

The Ultimate Guide to Cycling Neck Pain: Causes and Solutions

March 21, 2023 By Eric Lister

Useful Info

  • Contact
  • Finally, A Global Cycling Club That Is Focused On Community And Love Of Cycling!
  • Privacy Policy
  • Share Your Story!
  • Terms And Conditions Of Use
  • Welcome to I Love Bicycling
  • What Happened When I Stretched Every Day For a Month

Recent Posts

  • JOIN Cycling: A New Training Platform for Cyclists
  • How to Hang Bikes in Your Garage: 4 Inexpensive Options
  • Gravel Bike Vs. Road Bike: Which One Is Better For You?
  • The 6 Types of Mountain Bikes & How to Choose the Best One for You
  • What Is a Touring Bike Good For? 5 Benefits We Know You’ll Love

Search I Love Bicycling

Connect with Us

  • Facebook
  • RSS
  • Tumblr
  • Twitter

Copyright © 2025 · Magazine Pro Theme on Genesis Framework · WordPress · Log in