• Training
    • Injury Prevention
    • Training Tips
  • How To
    • Bike Fit
    • Gear
  • Nutrition
    • Nutrition Tips
    • Weight Loss
  • Repair
  • Reviews
  • Stories
    • Funny Stories
    • Jokes
    • Quotes
    • Videos
    • Funny Videos

I Love Bicycling

I Love Bicycling is a website that is geared towards cycling for beginners with road cycling tips, training articles, nutrition tips, weight loss, how to’s and bike repair articles.

Should You Descend Like Chris Froome?

July 11, 2016 by Adam Farabaugh

should you descend like Chris Froome

If you’re following the Tour de France or happened to tune in Saturday, you may have seen Chris Froome’s descending style. It is known as the super-tuck where you sit on the top tube to get the least amount of aerodynamic drag. Froome also takes it to another level where he pedals while in this position. This gives a little bit of extra forward propulsion while still staying aero. But should you descend like Chris Froome?

The Details of the Super-Tuck

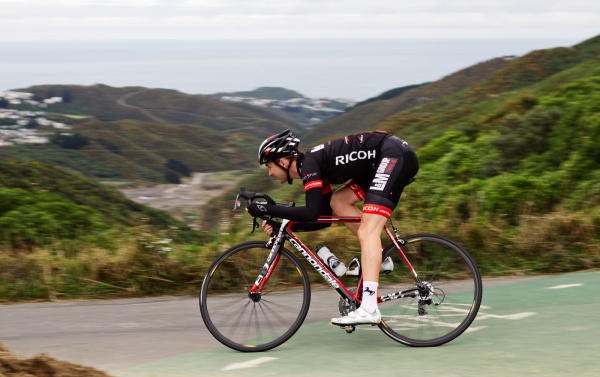
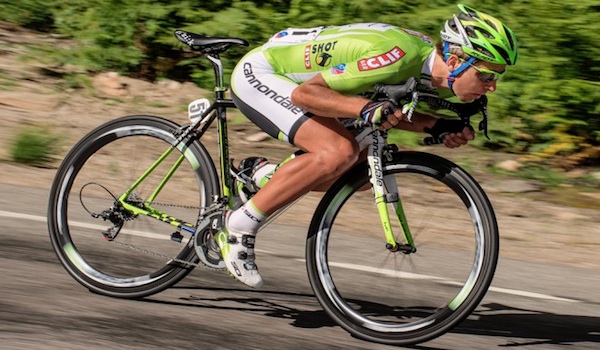
The normal tuck down a descent on a road bike is to place your hands in the drops, slide your butt back a little, and lower your chest down toward your handlebars. This position gives you an aerodynamic position while being able to corner, brake, and handle your bike as needed. Taking this position one step further brings your hands from the drops to just next to the stem on the tops. This position brings your arms in giving you a bit more of an aerodynamic advantage. Taking the tuck one step further brings you to the super-tuck. There are two ways to do this. The first is how Chris Froome does it which is by sitting on the top tube and putting your hands in the drops. This gives you a bit more stability and ability to brake should you need to quickly. The second, and more dangerous way, is to sit on the top tube and place your hands next to the stem. This is the fastest way to go down a descent but also the most dangerous.

What Speeds Can the Super-Tuck Take You To?

The speed you can hit on a descent largely depends upon the road and whether it’s twisty, rough pavement, or windy. Each more aerodynamic position will up your speed by a few miles per hour. Froome was probably touching speeds of close to 60 mph but not more since he was still able to pedal a little without being completely spun out.

When To Use The Super-Tuck

The super-tuck is ideal when there is a long, straight, as well as smooth section of road. If there are any turns or bumps in the road, descending in this style is a sure way to crash and at these speeds is definitely something you do not want to even come close to doing. Additionally, even if all the conditions above are met, you should only use the position if you have a really good reason for going fast. Something like getting Yellow in the Tour de France, or maybe a big local race if you are confident in your abilities.

Should You Descend Like Chris Froome?

The short answer is no. 99 out of 100 times you should never descend like Chris Froome. The position is incredibly unstable because it places so much weight on the front wheel. If you want to test it out just to see what it feels like, find an open, smooth, traffic-free section of road that is not very steep so you are going slow and gently slide your butt forward from your seat to the top tube. Make sure you have a good grip on the bars in the drops. Be careful though when you go back to the saddle as you will have to slide your butt slightly forward to not catch it on the nose of the saddle. You’ll see how this happens very easily. Now that you know how it feels, never do it unless you are in a position where it is well worth it. Getting a Strava segment, a new top speed, or out-doing your buddies are not reasons that are worth it. Stay safe, and have fun descending in the drops.

How To Tuck On A Road Bike Effectively

April 27, 2016 by Josh Friedman

The greatest force to overcome on a bicycle is wind resistance. The greatest source of wind resistance is your body (despite what the equipment companies would lead you to believe). What do you do when you have spun out of all your gears but you are still frantically trying to catch the pack? The answer is knowing how to tuck on a road bike effectively. There are all sorts of ways to do it wrong. Here you will learn how to do it correctly.

how to tuck on a road bike

Taking In The Scenery – Or Not

You see pros on TV do it all the time; the aero tuck. It is a sacrifice of a bit of agility and control to go as fast as possible. It also provides a dramatic and exciting visual; riders pushing themselves to the physical limits of speed with a backdrop of beautiful vistas. But those riders have no time to take in the scenery and you don’t either if you try this. It requires the utmost focus on the road unfurling itself before you at ever increasing speeds. Your focus will have to move further and further up the road as speeds increase. It will allow you to have ample reaction time to changes in the road as you go hurtling towards them.

Safety and Starting Out

The most important aspect of the aero tuck on a road bike is SAFETY. Do not try to do anything you are uncomfortable with or puts you in unnecessary risk. There are a few steps to ensure that you get comfortable along the way. The first few times, practice on a straight road that is not too steep to get a feel for it. As you become more experienced, you can graduate to more challenging situations.

Staying Loose

Because of reduced reaction time and agility while you are tucked on a road bike, you have to be able to handle imperfections in the road. Keep your grip loose on the handlebars yet tight enough that your hands won’t slide off and absorb any impacts in your already flexed joints. It will keep your bike tracking straight and safely over any holes or bumps.

Reducing Drag

Think about reducing your frontal area, which is also known as the surfaces that the wind will hit, when you go into the aero tuck. Bring your head down as low as it will go and still allow you to see the road. Never look down to get more aero; always look at where you’re going. Bring your arms and legs in as close to your frame and torso as they will go. To start, put your hands in the drops and bring your elbows in. As you get more comfortable, you can move your hands to the tops of the bars right next to the stem. This is a move that sacrifices a little control because it’s harder to maintain stability if you hit a bump and you’re also away from your brake levers but when your goal is maximum speed, you are not thinking of slowing down at all. It is also a bit harder to steer with your hands so close to the stem, although at the speeds you are hoping for, most of the steering comes from your body.

Where to Sit on the Seat

While learning how to tuck on a road bike, you should make sure that you are sitting on the nose of your saddle, much like a time trial position. It will allow your body to rotate forward easier than if you’re positioned on the back of the saddle. This is because it opens your hip angle and moves your thighs down out of the way.

Additional Stability

For additional stability, grab the top tube with your knees. This is also a great tactic to counter any speed wobbles you may get at any time at high speed. It gives you another point of contact and control while you are descending at blinding speed.

How To Tuck on a Road Bike With The Super Tuck

The final addition to knowing how to tuck on a road bike is the super tuck. For the fastest version of the aero tuck, you move from sitting on the saddle to sitting on the top tube in front of the saddle. This is a last ditch attempt at additional speed. It further reduces your frontal area but it also reduces your control of the bike dramatically if you need to brake, turn, accelerate, or absorb a bump or pothole. Some riders are able to pedal while sitting on the top tube but it’s doubtful that it will add any speed. If you are going fast enough to require any form of aero tuck, you are likely going to spin out the biggest gear you have. It has to be a very high stakes situation for you to go into a super tuck. Think staying away to win a race. Otherwise it is not worth the risk in most situations.

Recovery While Tucked

An additional benefit of aero tucking is that it you gives you a chance for complete recovery while achieving maximum velocity. Opportunities like this are rare in a competitive environment. When you reach the bottom of the descent you will be ready to start smashing again, whether it is to bridge back to a group up the road or to keep building a gap to the riders behind you.

The Take Away

Like any skill that you would like to master, the key is practice. It is especially important with learning how to tuck on a road bike because it is a high-stakes activity; one small error can lead to catastrophic results. But once you master the aero tuck you will be hooked. Every descent will become a challenge to break your all-time speed record. Go and try it. You will have some exhilarating results but always make sure to stay safe. 

The Descent, Don’t Let it Get You Down

November 20, 2015 by Wade Shaddy

descending

Road bikes are capable of hitting 40, 50 mph or more when descending. It’s like flying, and one of the most adrenaline pumping, heart stopping experiences of your life. But it’s one thrill ride to take seriously. Men are more likely than women to push the limits, mostly because of machismo that should be reeled in. But descending can be done safely if you use your head.

Bike Safety

Your bike is the most important aspect of descending. Even the most insignificant issue can spell disaster at high speed. Everything should be checked before you cross the line and pick up serious speed. Most of the checkup can be done before you leave home, but if you’re going down a long, steep hill, it’s advisable to check things at the top, and hold on for dear life, with the knowledge that if something goes wrong, it won’t be because you didn’t check your bike first.

Tires

Checking your tires is a no-brainer. If you’re at the top of a hill, pick up the bike and give the wheels a spin. If there’s a wobble or bulge in the tire you’re already in trouble. If you have no other choice, and depending on the severity of the issue, ride it down, but slowly. In the event your tire fails you can stop in time.

Wheels

Wheels are another thing that can disintegrate before your eyes. If they swerve back and forth your wheel is out-of-true. The severity of swerve in the wheel — it happens all the time to road bike wheels — is not that much of an issue, and will not necessarily cause you to go down, but should result in slowing down considerably on your descent.

Spokes

Run you hand over the spokes. If any are loose, rattly or you might have noticed a “ping,”  your wheel could be in danger of coming apart at high speed. Keep the speed down.

Quick Release

Always check the quick-release before descending. This one is so simple, that further explanation should not be necessary. Loose wheels cause accidents.

Handlebars, and Brake Levers

Do a quick check of your brake handles and handlebars. Place both hands on the brakes, squeeze them and twist the handlebars from side to side. If anything is loose, get out your tools and tighten it. Briefly check the position of your brake pads. If one of them is tilted, it can rub a hole in the tire.

Body and Hand Position

The jury is still out on the proper body and hand position for descending. Pro cyclists prefer to go downhill with their hands in the drops. The reasoning is that it makes you more aerodynamic, and it does, but if you’re uncomfortable down there, it’s a drawback to safety, and can make the bike feel twitchy at high speeds. It’s fine to descend with your hands on grips or hoods, hunched forward slightly to gain the aerodynamic approach. The best position is one that you’re most comfortable with personally. Try different positions before hitting high speeds, use the position that fits you, and then stick with it — it’s not a good idea to change hand positions at 40 mph.

The Aero Tuck

One thing you should avoid — at first anyway — when learning to descend, is the aero tuck. You’ve probably seen it many times if you’ve watched any pro cycling; experts with their hands close together, practically kissing the stem, head super-low in front. This position may win races, but makes the bike hard to control for beginners, and even the slightest problem causing you to brake is risky. The aero tuck is somewhat dangerous and not worth the risk.

Two Up Two Down

Never take your fingers off the brake levers. Most cyclists prefer to have two fingers on the bars, and two fingers on the levers, or “two up and two down.” Get used to riding this way all the time, and you’ll be prepared for any downhill.

Braking at 90-Degrees

It’s natural to see a curve and brake for it, but there are right and wrong ways to go about it. Apply brakes before the turn. Try not to brake after you enter the turn, if you’ve carried too much speed into the curve, you’re already in trouble. Brakes are most effective when your bike is upright, at 90-degrees. Braking in a curve means the bike is tilted at an angle, you have less traction, and can throw the bike into a skid. If you’ve misjudged your speed and need to brake, apply them only gently, feathering them if possible, to avoid washing out your front end, skidding and crashing.

Don’t Steer

Speeds above about 10 mph is where you begin to lean instead of steer. The faster you go, the less you steer. Focus on leaning into curves instead of turning the handlebars. When leaning into curves, the pedal on the low side of the bike should always be in the 12-oclock position. If you’re swerving into tight corners in both directions, alternate the pedal to keep the inside pedal up, away from the pavement.

Don’t Tense Up

Many riders tense up when descending, but it compromises your control. If you feel yourself getting intimidated by a hill, stop at the top. Try shaking out your arms and shrugging your shoulders to loosen your arm, shoulder and neck muscles. Touch your toes and reach for the sky to loosen your back and legs. Breath deep to get some fresh air in your lungs and calm yourself.

The Descent

When you’re ready, roll off the summit and begin the descent. If you feel yourself getting tense again try to control it. Bend your elbows, relax your neck and shoulders, keep breathing and hold the bars firmly but not too tightly. Keep your eyes focused 20 to 30 feet down the road so you can anticipate your next move.

Things to Watch For

Several factors can influence speed on a descent. Among the most dangerous is debris, sand or gravel. Stay away from the side, riding nearer the center of the road, traffic permitting. Cross-wind can also be tricky. A sudden blast of cross-wind at 40 mph can spell disaster, be aware of it, and always be ready for the unexpected,  things happen fast at 40 or 50 mph. Bikes are quiet. Riders have crashed because birds or wildlife have been scared up, right in front of them.

Have Fun

It takes time to become confident, to relax and make descending fun. Practice your technique by riding down familiar hills a few times to get the feel for it, it’s a great way to improve your downhill skills and build confidence. Always ride within your limits, wear a helmet, and keep it fun and safe.

Descending Maui’s Haleakala at Sunrise

October 13, 2015 by Lee Agur

I’ve fulfilled one of my dream trips of a lifetime: cycling down Maui’s Haleakala Volcano.  And to make the trip even more memorable and special, I did this adventure trek at sunrise!

Arriving Before Sunrise:

I joined a group of thrill seekers with Cruiser Phil’s Volcano Riders for this unique, exhilarating experience.  We were driven (at 2:15 am!) to their shop, where we were given a continental breakfast, including some black Hawaiian coffee to wake us up, while the bikes were loaded into a trailer, and then we were driven in a van, with the loaded trailer, all the way to the summit of Haleakala via the steep,  winding, twisting mountain road.  We arrived at our destination in the dark, so there was very little use of looking at ‘the scenery’ on this ascent, and we assembled at the summit by 5 am, in anticipation of that day’s scheduled 5:40 am sunrise.

“Haleakala” means “House of the Sun”, and I find it difficult to find the right words to convey to you the special feeling that I had to be on that summit, at a height of over 10,000 feet, in the stark blackness of the night – and then to witness those first rays of light in the sky as the sun was about to emerge – and then to see the sudden bursting forth of that bright yellow ball of light!  It was awesome!

Descending Maui's Haleakala at Sunrise
At the Summit of Haleakala before descending!

Let There Be Light:

Descending Maui's Haleakala at Sunrise
The Sun has arrived in all its glory!

I was soon able to take photos deep into the volcano, for it was as if a vast number of stadium lights had suddenly been switched on – and it was, indeed, bright!  In just a few minutes of actual elapsed time, it felt as if I had gone from night time to noon!

Baby, It’s Cold Outside:

Standing on Haleakala’s summit, in the wee hours of the morning, brought to light another reality of the situation: it was windy and cold!  We were bundled up in vests, weather-proof parkas, and gloves, and we needed all of these items.  However, as time passed, and we began our descent by bike, it was certainly necessary to stop and strip layers of clothing along the way.   By the time we reached our destination far below, we were actually sweating!   Yes, it’s quite an extreme temperature change!

Descending Maui's Haleakala at Sunrise
I look like an astronaut as I prepare to descend Maui’s Haleakala.

A Controlled Descent:

Our cycling leader was Jay, and he led the way down. No one was allowed to pass him, and this controlled our speed.  He used hand signals so that we knew when we had to cling to the edge of the road (because of approaching traffic) and when we could use the centre of the road, too (because the road was then clear, and it was certainly safer on those sharp curves).  He had us ride in single file, and he had us stop for several photo ops (another way to control our speed).  Our driver, Josh, followed us down in the van, and these two were in constant radio contact (for greater safety).  At each stop, we could go to the van and retrieve our cameras, but we weren’t allowed to carry them during the actual descent (yet another safety precaution).

An older couple followed the cycling group down the mountain, as passengers in the van with Josh, and they were able to get a photo of me on the actual descent.  Riding right behind me was their grandson!  This couple (from Oregon) had decided that they’d reward each of their grandchildren, upon graduation, with a week’s vacation in Maui, and this particular grandson had specifically requested to “bike down the volcano” – so here he was!

Several companies offer escorted tours by bike down Haleakala.  Cruiser Phil’s is one of these, and they’ll provide round trip transportation from your condo or hotel, good bikes (with lowered seats ,for greater stability), and other top equipment, including warm clothes, gloves, and full face helmets.  You may feel as if you’re dressed for a space shuttle when you begin your two-wheeled descent!

Descending Maui's Haleakala at Sunrise
It’s getting brighter as we begin our descent.

The Verdict:

The bike trip is very well organized and quite safe – if you follow the leader’s instructions.  However, not everyone always does, and there have been some very serious accidents, even deaths.  After all, you’re basically going down a treacherous mountain road, for about 40 kilometres, with more than 30 very sharp, challenging hairpin turns – some without protective guardrails.  I loved it!

For More Information: www.cruiserphil.com; toll free phone: 1-877-764-2453

How To Descend Like a Pro

September 8, 2015 by Guest Post

How to descend like a proDescending is a mysterious art form, which, if mastered can shave minutes off your times. Some riders seem to possess an innate ability to drop like a stone from the side of huge mountains without any trace of fear – others are not so blessed. Recent summit finishes in the Vuelta España have shown that, even for the best climbers, going uphill presents an opportunity to take a few seconds or a couple of minutes from your rivals. A good descender can take five minutes on the way back down. It’s a fantastic skill to have in your arsenal and believe it or not, it doesn’t take that much to master.

If you’ve ever felt the fear on a descent, suffered a nasty crash that you haven’t quite mentally recovered from, or have simply never been told how to do it right – we’ve put together some essential tips which will have you nailing it downhill with supreme confidence.

Look as Far Ahead as Possible

It sounds pretty obvious, but when riding a bike, you will go where you point yourself. So much of where you’re ‘pointing’ comes down to where you’re looking (with the exception of the odd glance back over your shoulder to check the position of the pursuing peloton). When descending, don’t just look ahead of your front wheel or the rider in front of you, instead try to set your gaze well down the track, ideally after the bend you’re currently tackling. If you do this, you’ll flow through the bends with ease and you’ll still catch small hazards like gravel in the road or someone trying to overtake on the inside with your peripheral vision.

Body Position is Everything

We’ve all seen the likes of Peter Sagan and Vicenzo Nibali heading down the slopes of Grand Tour climbs with their bodies contorted into an aero tuck. While we wouldn’t suggest you go the whole hog and start sitting on your top tube at the slightest downward incline, a good low position on the bike like the pros’ is what you should be trying to emulate. When you’re descending it makes sense to get as low as possible on the bike. Yes, it makes you nice and aerodynamic, but that’s only part of the benefit.

Being low-down to the bike also lowers your centre of gravity, making you more stable as you corner and providing better power through the pedals into the wheels. When you’re hurtling into the bends, fight your instinct to lean into the curve with your body – instead, keep your body weight above the tyres as much as possible and lean the bike instead. This’ll boost the traction you get through the turns.

Learn to Read the Road

Unless you’re blessed enough to live at the foot of an Alp and you never venture further than a few km from home, it’s likely that you won’t always know the roads you’re descending like the back of your hand. If you can get used to reading the signs along the road it’ll really help you with your descending. The more you descend, the better you’ll get at recognizing the signs. You can predict where the bends will come by looking at the profile of the hills ahead of you. In the same way, you can also use the tree-line to predict what will happen next, before it does.

Be mindful of hazards and interpret what’s at the side of the road. Shops, restaurants, bars and other businesses all mean people, so don’t be surprised that after you pass one of the aforementioned there’s a guy walking home around the next bend. Likewise, if you hear the clanking of cow bells then you’re probably going to meet something bovine at some stage of the descent. Just because you recognize these hazards, doesn’t mean immediately killing your speed, it just puts you in the right mindset to respond quicker should such an obstacle arise.

Getting Your Bike Set Up Right

Having a bike that is properly maintained and set up will do wonders for your descending, not just from a practical point of view, but from a mental one as well. Having full confidence in your brakes is a must, but having your bars correctly positioned and your seat at the right height will also play a big role in helping you drop like a stone.

Having ridden a hire bike in the Pyrenees for a couple of days I can say without doubt that I was slower on the descents on the first day than the second. At first I was wary of the unfamiliar setup, including front and back brakes that were on the opposite sides to my own bike, but as my confidence in the machine grew, my descending speeds also began to rise.

Keep Those Legs Moving

Guess what – it get’s cold at the top of very high mountains. Especially if you’ve just been labouring to get to the top for an hour and you’re dripping sweat. It can be tempting to see the descent of a climb as the break or reward after your exertions, but it’s vital that you keep your heart rate high and your moving parts moving.

Get into a low-ish gear, with enough traction that you can still pace it out of the climbs, but one that will have you spinning a high cadence. This way you can keep the blood flow to your legs going and keep your all important heart ticking over too, so when you hit the flat at the bottom you haven’t frozen up completely.

At the top of the major climbs in big races you’ll often see the pros take a jacket or (if they’re old school) a sheet of newspaper from a soigneur at the side of the road, to keep them warm as they plunge back down the other side. Unfortunately, for us mere mortals, there’s not going to be a dude handing out free jackets, so make sure to carry one with you. If you’re confident enough in your bike handling skills to put it on while moving, do. If you’re not, take a pit stop at the top and layer up.

  • Facebook
  • Tumblr
  • Twitter

Latest Articles

JOIN Cycling: A New Training Platform for Cyclists

May 27, 2024 By Eric Lister

cold exposure

The Benefits of Cold Exposure for Cycling & Life

June 13, 2023 By Eric Lister

hill climb

The Ultimate Hill Climb Training Guide

May 31, 2023 By Eric Lister

shoulder pain cycling

How to Treat & Avoid Shoulder Pain While Cycling

April 12, 2023 By Eric Lister

psoas stretch

The Importance of the Psoas Stretch for Cyclists

April 6, 2023 By Eric Lister

cycling neck pain

The Ultimate Guide to Cycling Neck Pain: Causes and Solutions

March 21, 2023 By Eric Lister

Useful Info

  • Contact
  • Finally, A Global Cycling Club That Is Focused On Community And Love Of Cycling!
  • Privacy Policy
  • Share Your Story!
  • Terms And Conditions Of Use
  • Welcome to I Love Bicycling
  • What Happened When I Stretched Every Day For a Month

Recent Posts

  • JOIN Cycling: A New Training Platform for Cyclists
  • How to Hang Bikes in Your Garage: 4 Inexpensive Options
  • Gravel Bike Vs. Road Bike: Which One Is Better For You?
  • The 6 Types of Mountain Bikes & How to Choose the Best One for You
  • What Is a Touring Bike Good For? 5 Benefits We Know You’ll Love

Search I Love Bicycling

Connect with Us

  • Facebook
  • RSS
  • Tumblr
  • Twitter

Copyright © 2025 · Magazine Pro Theme on Genesis Framework · WordPress · Log in