• Training
    • Injury Prevention
    • Training Tips
  • How To
    • Bike Fit
    • Gear
  • Nutrition
    • Nutrition Tips
    • Weight Loss
  • Repair
  • Reviews
  • Stories
    • Funny Stories
    • Jokes
    • Quotes
    • Videos
    • Funny Videos

I Love Bicycling

I Love Bicycling is a website that is geared towards cycling for beginners with road cycling tips, training articles, nutrition tips, weight loss, how to’s and bike repair articles.

How To Curb Tired Legs

December 15, 2014 by Dyani Herrera

tired-cyclistHow To Curb Tired Legs

We’ve all been on those group rides, where we became overzealous and thought we were speed bikers at the Kona World Championships. Then, spent the next few days paying the price, feeling like you were lugging around cement blocks; thinking, how can you rid yourself of these tired legs so you can hop back on for your next ride? Here are a few tips to speed up recovery after a tough ride.

Post-Ride Recovery Shake

It’s crucial to have a protein shake with some carbohydrates within 45 minutes of finishing your ride. Research has demonstrated that when combining carbohydrates with protein immediately after exercise it increases muscle synthesis. As we ride we break down muscle, and the body builds more muscle after activity as a process of adaptation to exercise. Forty-five minutes is the time frame when your muscles are most hungry for nutrition, and absorb readily to aid with muscle repair. In addition, it is a crucial period in restoring the glycogen (energy) stores we’ve depleted during our ride. It’s also been shown that endurance athletes rely on protein during long rides as a last fuel source once we’ve depleted our glycogen and fat stores. Recommended daily allowances of protein for males include 84-112 grams and 66-88 grams for females. Furthermore, some of my favourite mixes include soy milk with a scoop of vanilla, whey protein, mixed with some strawberries, and blueberries for the antioxidant effect. If I’m craving something sweeter, then I add a scoop of peanut butter along with protein powder, and some banana slices.

Stretch Before and Post Ride

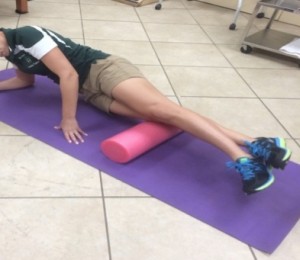
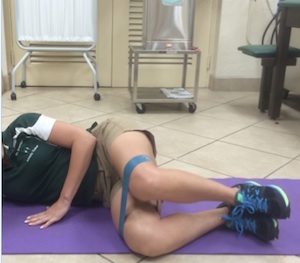
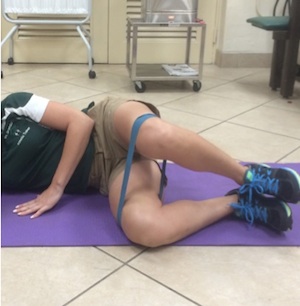
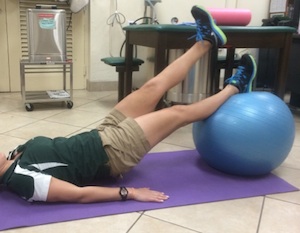
Make sure you stretch your leg muscles in order to minimize the decreased range of motion due to sore muscles, which could lead to strains. Vital muscles to be stretched include quadriceps, hamstrings, calves, IT bands, hip flexors, and glute maximus. There are several stretching techniques one can use to achieve elasticity. The most commonly known is “static stretching”, which requires you to stay in a stationary position, and place the muscle in a stretch, typically in the opposite direction the muscle performs.

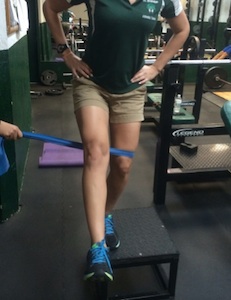
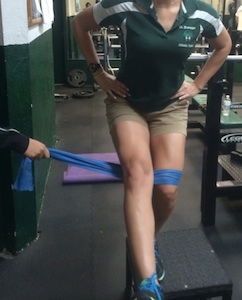
There is also “proprioceptive neuromuscular facilitation (PNF) stretching”, which involves stretching the muscles with alternating sets of static stretching versus muscle contraction; with this style you would need a partner to assist you. A PNF stretching example includes a static stretch of the hamstring for 10 seconds, and 10 seconds of contracting the hamstring by pushing against the person’s hands/body, with a stretch-contract-stretch sequence. The advantage of this stretching is you see immediate gains in flexibility, more so than in static stretching.

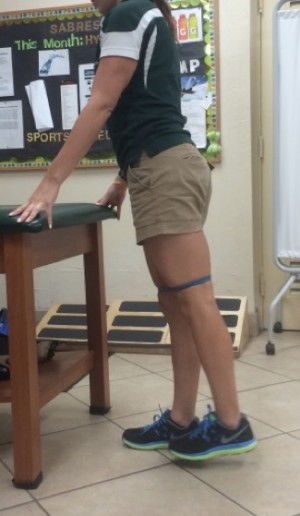
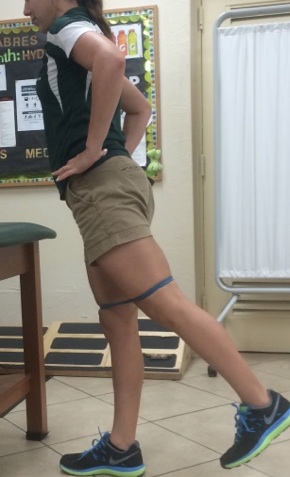
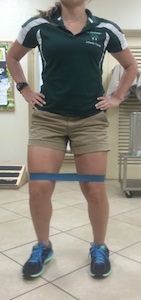
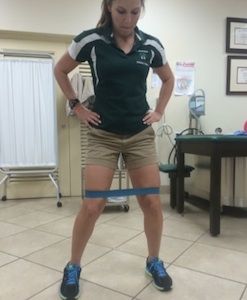
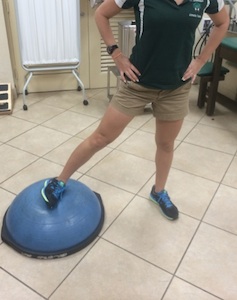
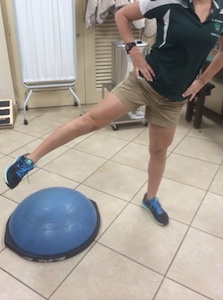
Another form is “dynamic stretching”, which involves a person performing low intensity exercises involving that muscle action; for instance, walking lunges to stretch the hip flexors. These are best completed before a ride in order to get the muscles firing and geared up for cycling. Each stretch should be completed 2-3 times, for no more than 30 seconds each. It’s more effective to stretch these muscles once you’ve completed a 10-15 minute warm up, as well as immediately post ride. Research has shown minimal elasticity gains when performing these stretches prior to a warm up. “I Love Bicycling” has an article on some great stretches for cyclists with photos included.

Hydration Post-Ride

After a ride, drink plenty of water mixed with a cap of Pedialyte, per 8 ounces. Pedialyte contains condensed electrolytes, and aids in speeding up muscle recovery by hydrating muscles, and flushing out lactic acid. By drinking plenty of fluids with electrolytes, it helps your body eliminate the lactic acid through urine. In addition, it helps in hydrating your body in preparation for your next ride. There are formulas online, which can be used to figure out how much water is needed for your particular body weight and activity level. One way to check if you’ve hydrated adequately is by observing the colour of your urine. If your urine is yellow you’re still in need of hydration, but once it comes out clear or a pale yellow you are hydrated.

Ice Bath

A great way athletes minimize soreness and achy joints is by making themselves an ice bath. The advantage of an ice bath is allowing several muscles and joints to be treated at the same time. It is also the one ice treatment that has the deepest penetration effect of tissues. This treatment can be done in the bathtub of your home. Fill up the tub until it passes your thighs and dump in 1.5-2 bags of ice. In order for it to be therapeutic the temperature should be between 50-60 degrees. Granted, you’ll be freezing for the first 5 minutes, but afterwards you’ll be numb. If you don’t have a bathtub this can also be done by purchasing a 10 gallon garbage tub, and completing the same process. The ice bath can be completed for a minimum of 20 minutes, but no longer than 30, because then it has the adverse effect. If done for more than 30 minutes the body begins to think it’s entering a hypothermic state, and starts to dilate the blood vessels in order to increase body temperature. This is the opposite effect of the ice, which is intended to constrict blood vessels in order to decrease swelling and eliminate pain.

In following these four tips, it’ll help you avoid delayed onset muscle soreness (DOMS), which happens when you’ve pushed your body a bit too far. By speeding up recovery, we can gear ourselves up for our next ride, where this time we can imagine ourselves to be as fearless as Sebastian Kienle going into a headwind.


7 Exercises to Cure IT Band Syndrome

December 15, 2014 by Dyani Herrera

It’s 5am and off goes your motivational, cycling alarm. My personal favorite is MACCA’s “Embrace the Suck” slogan. Sluggishly you get up from bed and gear up for your morning spin. Then, the moment you get on your saddle you question why you were so reluctant getting out of bed in the first place. After a nice warmup, you really start to crank it, and climb at speed when suddenly you feel that nagging pain on the outside of your knee again. It’s been creeping up for a few weeks now, and although you stretch your legs, you can’t seem to pinpoint the cause.

This, my cycling community, is known as the annoying “IT band syndrome” a common injury plaguing cyclists. If not recognized in time and treated appropriately it could really put a damper on those rides and even force you to stop altogether.

Here are 7 exercises you can do to prevent issues with your IT band, which usually occur due to lack of proper stretching and gluteus maximus (aka butt) weakness. One essential tool for any cyclist, besides flashy cycling kits is a foam roller, preferably one with ridges, which can be found at any local sporting goods store or amazon.com here.

Exercise 1: IT Band Foam Rolls  

It’s vital that cyclists roll out their IT bands immediately after their rides to release them. Hip abductor muscles such as the tensor fascia latae which tapers into the IT band, and glute medius are used frequently during cycling causing them to tighten. Proper execution of this exercise requires you to lie on your side and foam roll past your knee and hip, bilaterally. As I always tell my athletes, “if you’re not in pain, you’re not rolling it out correctly.” It hurts, but I promise you’ll feel a decrease in pain and looser afterwards.

it band hip exerciseIT band syndrome cure

Exercise 2: Glute Max Extensions

Strengthening your Glute max is vital in order to avoid compensation patterns, which can lead to IT band syndrome. The Glute Max can be strengthened with the standing hip extension exercise, making sure you don’t throw your hips back as you complete the motion. Complete 3 sets of 12-15 repetitions on both legs.

IT band syndrome symptomsIT Band Syndrome Surgery

Exercise 3: Clamshells

‘Clamshells’ require you to wrap a theraband loop around the top of your knees, and move your legs apart as your heels are kept together. As this exercise becomes easier, you can increase resistance with a thicker theraband loop. They typically range from least resistance to most resistance in a colour coded progressive system of yellow, green, red, blue, black, and grey in that respective order. Complete 3 sets of 10 repetitions.

IT Band Syndrome CyclingExercises to Treat and Prevent IT Band Syndrome

Exercise 4: Side-walks

Keeping the theraband loop in the same position (looped around both legs, above the knee), you can stand up, and complete side-walks with a slight bend in the knee in order to eliminate any assistance from your calves. You’ll want to complete these along a long stretch, which includes 20 or more steps, going left and right. You should feel the soreness on the outside hip over your glute medius and tensor fascia latae. Remember to make sure your toes are always pointing forward and not rotated in order to prevent assistance from other muscles.  Complete 3 sets, moving a minimum of 20 steps to the right and then 20 to the left.

Exercises to treat and prevent IT band Syndrome? These exercises will help cure IT band symptoms and causes. Rolling the hip and...Exercises to treat and prevent IT band Syndrome? These exercises will help cure IT band symptoms and causes. IT band syndrome hip pain is bad.

Exercise 5: 1 Leg Glute Max Bridges

Using a large medicine ball, lie on the floor with both legs fully extended, 1 leg with the heel of your foot on the ball, and the other leg in the air. Tighten your core, and glute max muscles, dig your heel into the medicine ball, and come up off the floor. Complete 3 sets of 12-15 repetitions with each leg.

Exercises to treat and prevent IT band Syndrome? These exercises will help cure IT band symptoms and causes. IT band syndrome hip pain is bad.

Exercise 6: 1 legged Squats

This exercise requires an elevated step box placed near a pole or anchor of somesort; you can also complete this exercise with the help of a partner. You must use a larger theraband loop, which has some extension, and place it around the knee of the leg you are strengthening. Once in place you can tie the band to the pole, or have your partner hold the other end. In this position you will perform 1-legged squats on the step box as you keep your hips back, keep your back straight, and make sure your knee does not go past your toes. The non-weight bearing leg should be extended out in front of you in the air. You should feel the soreness in your glute max, if you don’t, push your hips back a bit more. Complete 3 sets of 10-12 repetitions on each leg.

IT Band causes and solutionsIT band pain and cure

Exercise 7: Hip Abduction

Using a bosu ball/half medicine ball, place the side of the foot of your moving leg on the top of the bosu ball. Keep your stationary leg slightly bent on the floor. Then, keeping your foot in the same position, extend it sideways, as seen in the photo, making sure you don’t jerk your body to the side to compensate for weakness. A good way to prevent this is by keeping your hands on your hips, and this will serve as a guide for you. Complete 3 sets of 10 repetitions on each leg.

IT band exercisesIT band exercises hip abduction

As we get more dedicated to cycling, and start logging in those miles, it’s essential to be proactive with your injury prevention tactics and listen to your body. By completing these 7 exercises, 3 times a week with a day of rest in between, you can avoid one of the most nagging injuries experienced by many cyclists. In following this program, you’ll be one step closer to becoming a stronger cyclist.

IT Band Program for Cyclists

Looking for a program that will help you address the muscle imbalance that is likely causing your knee pain? Dynamic Cyclist is an online training platform designed to help cyclists become stronger and faster while riding pain free for years to come. Complete your regimen with an all-inclusive program that addresses mobility, flexibility, strength and injury prevention, all for a fraction of the cost of one physiotherapy appointment. Try out their 7-Day IT Band Program and experience the results for yourself. Click here to try 7 days free!

Interval Training: Why It Works

April 23, 2014 by U.M.

Interval Training: Why It Works

interval training why it works
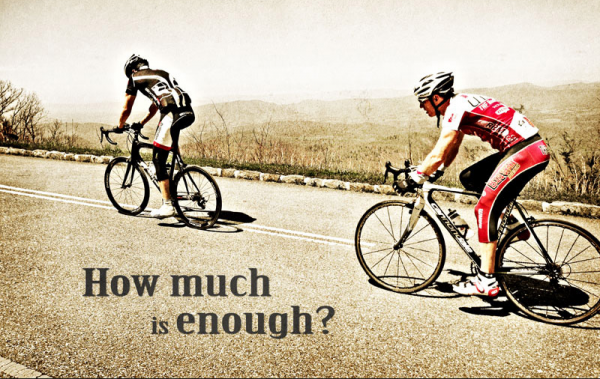
A number of athletes turn to interval training in order to improve their performance. Interval training involves periods of high-intensity riding that alternate with low-intensity rest periods. The purpose of interval workouts is to improve a cyclist’s speed/power as well as his or her level of endurance. Here is a look at precisely what interval training does and why it works. [Read more…]

What To Do After a Bike Accident

April 2, 2014 by Aaron Robson

What To Do After A Bike Accident

what to do after a bike accidentSo it finally happened. After years of close calls and near misses, you finally hit the deck. Maybe it was a errant patch of gravel, or someone’s back wheel that was the culprit, but the end result is always the same – you leave a significant portion of your skin behind on the road. Recovering from a crash can be a tricky process, and you will only ever do it the wrong way once (it hurts that much!). To spare you some learning pains, here are some tips on dealing with the dreaded road rash.

Cleaning the Wound

The first thing you want to do is wash the wound out as well as you can – unless you managed to fall on hardwood floors (velodrome?), you are going to have a ton of grit and dirt embedded in there. This needs to come out. A lot of people are tempted to use alcohol or hydrogen peroxide to ‘disinfect’ the wound. DON’T!!! These substances will damage your exposed tissue, potentially increasing the likelihood of scarring, and delaying recovery. Warm water and a mild soap, and/or a saline solution are all you need. Try to get as much of the dirt out as possible, but don’t scrub too hard and inflame the area. A small squirt bottle can be really handy here.

Now that you have a relatively clean area to work with, it is time to disinfect the wound. Depending on how much things are hurting at this point, I will use a couple different methods. If the pain is really bad, I have a antiseptic spray that contains lidocaine (a numbing agent) that works so well I think it might be some sort of witch magic. After spraying it on and letting it dry off a bit, I will cover the affected area with a triple antibiotic ointment like Neosporin. If you can find the stuff that also has ‘pain relief’ get it – it’s not lidocaine, but it will help. You want to have a thin film of the ointment covering the area – don’t gob the stuff on!

Bandaging the Wound

Hopefully by now, things are hurting a little less, and you can think about dressing the wound. This was where I made my biggest mistake on my first crash – I used regular dressings, and didn’t change them soon enough. By the time I got around to switching my bandages a day later, my skin had started growing back into the bandage, and I ended up spending two hours soaking in the bathtub, slowly ripping my own skin off as I peeled the bandages off. So beware!!!

In general, you should always keep the wounds covered – if your raw skin gets too much sun it will scar for sure and letting them scab over will leave you with a couple of weeks (or more) of very stiff, painful, awkward moving about. By keeping the wounds covered, you allow the new skin to form underneath, and when it has completely closed up, you can take the bandages off and be just about good as new! There are a couple of options for dressings. If you are super fancy, you can use what are called semi-occlusive dressings – these allow the wound to breathe while still sealing fluids inside and other contaminants outside. All of the professional racing teams use these – the best brand is probably BIOCLUSIVE. The downside is that they are pretty pricey – depending on what size you need, up to $5 per patch.

My low-tech alternative to these was a combination of the non-stick gauze pads you can find at any drug store and vaseline. I found that the non-stick pads alone weren’t quite non-sticky enough, but with a thin layer of vaseline on them, they worked perfectly! I used mesh wrap to hold them on. You will have to change these a bit more frequently than the Bioclusive dressings (once a day, versus once every few days) but if you can’t find the fancy stuff, these are a great second option.

Now you should be well on your way to a successful recovery! Change your dressings frequently, and don’t try to do too much too soon, and you will be back riding in no time. After the aforementioned crash and skin peeling incident, I was back racing (still slightly bandaged up, albeit) in two weeks.

Why Cycling Is Better Than Running

March 9, 2014 by U.M.

There are many benefits to both cycling and running and they can often be used together when you train. However, if you’re going to pick between running and biking there are several reasons why biking is the better choice. Here’s a couple of facts why cycling is better than running. [Read more…]

From Bike Riding to Bike Racing

March 9, 2014 by Aaron Robson

From bike riding to bike racingYou’ve been riding for a couple of years now. The days of struggling up every incline, and falling over at traffic lights because you can’t get your feet out of your pedals is over. You’ve done some epic long rides with friends. Maybe you have started commuting in to work. But now, riding is starting to get a bit stale. The motivation to get out the door on the weekend isn’t quite what it used to be. You are looking for the next thing to add to your bike riding experience. What you are looking for is bike racing.

Bike Racing in a Nutshell

Amateur bike racing works a little differently than running, triathlons, and similar sports. If you were to sign up for your local 5k road race, you would line up with everyone else at the start, the gun would go off, and you would race. Bike racing isn’t like that – due to the differences in skill and bike handling ability, races are broken up into different categories. As a beginning rider, you will start off in the lowest category (usually Cat 5) and work your way up as you gain experience and skill. In most areas, just finishing 5-10 races will be enough to move up from the bottom category, but after that, the only way to move up is to place well in races. Most amateur riders end up in Cat 3 or Cat 4 – Cat 1 and 2 are getting into serious, semi-professional level racing.

Choosing Your First Race

Picking your first race can be daunting. The best place to start looking is the website of your state or provincial bike racing association. They should have a calendar showing all of the upcoming races in your area. There are three main types of races:

  1. Road races are what you typically think of when you think of bike racing – a bunch of people racing in a big bunch from point A to point B.

  2. Time trials are individual efforts over a set distance where you don’t have the advantage of drafting off other riders.

  3. Criteriums are a special, high-octane style of race usually held on a small 1-2 mile loop course, with intermediate sprints, bonuses, and no set race distance.

A road race is a pretty safe choice for your first race. Time trials don’t really give you a proper bike racing experience, and criteriums require a higher level of bike handling skill and fitness. Pick a race at least one or two months away – you need enough time to get yourself ready!

Training & Preparation

With your goal race in mind, it’s time to get down to training. Yes, you can show up to a race without having done anything different and survive, but you will get a lot more out of it with a bit of race-specific preparation. This centers around two things:

  1. Bike-handling: you will spend most of the race with other riders just a couple of feet ahead, beside and behind you. It takes some getting used to. Try to find a local group ride that you can join – the more people the better. Usually, the more experienced riders are pretty good about helping out newer riders. The most important thing to remember is don’t make any sudden, unexpected moves.

  2. Fitness: racing is far more intense than any recreational ride you have been on. It won’t be 100%  intensity from start to finish, but when the pace heats up, you’d better be ready, otherwise you will get dropped and have to finish the rest of the race solo. Some groups rides can get pretty intense, and if you can find one of these great – you get bike handling and fitness training all in one. If not, intervals are your best friend. Find a traffic-free circuit that you can ride without interruptions, and do sets of 30 second, 1 minute and 2 minute hard efforts with 1-3 minutes of recovery between each effort. Aim for at least 10 minutes of hard effort time; 20 is better.

It’s Here – Race Day!

Now that you’ve put in all the hard preparation work, it’s time for the race! Most bike races are in the morning, and it is important to wake up well before race time. 3 hours before is usually my minimum, and 4 is better. You will want to make sure your bike is in tip-top shape the night before – on race day, you shouldn’t have to worry about anything more than a quick top up of your tires. Aim to arrive at least an hour before your race is scheduled to start to give yourself enough time to check in, get your numbers and get everything ready. The race officials will tell you how you need to pin your numbers on. Once you are all kitted up, get on your bike and do some easy cycling to warm up, finished off with a few very short sprints to get your legs accustomed to moving fast. Then it is time to line up! When the race starts, just relax, and enjoy your first race. As the race progresses, you will get more and more comfortable with racing. Before you know it, you will be gasping across the finish line, wondering what happened to the last hour or two of your life, and hopefully eagerly anticipating signing up for the next one!

Top 10 Best Cycling Moments That Everyone Experiences

March 8, 2014 by U.M.

best cycling moments on a bikeMany cyclists are into the sport for different reasons but there are some cycling moments that everyone experiences at least once in their cycling lives. Here’s the top 10 best cycling moments that everyone experiences. [Read more…]

How To Mentally Prepare For A Race

March 1, 2014 by Guest Post

how to mentally prepare for a bike raceBeing in a good place mentally is half the battle when it comes to preparing for a race. You want to be focused, relaxed, and confident when you begin. If you show up flustered, disorganized, or worried you’ll have a harder time focusing on what you need to do, how to pace yourself, or even how to breathe properly. Here’s some tips on how to mentally prepare for a race. [Read more…]

Bike Handling Tips for Early-Season Riding

February 28, 2014 by Aaron Robson

bike handling tips for early season ridingEarly season riding conditions can be very challenging. During the winter, a ton of grit and salt gets dumped on roads to keep them grippy and snow-free, and, come spring time, all of that stuff ends up in one place – the shoulder where you want to ride. Spring is also pothole season, as water seeps into cracks in the road and freezes overnight, opening up holes the size of the Grand Canyon on your favorite roads. There are a few simple bike handling tips to keep your skin off the road and your bike in one piece.

SLOW DOWN!!!

This seems obvious, but it is easy to forget in the middle of one of your favorite descents. Slower speeds mean more time to react to what is in front of you. Slow down well in advance of corners so you aren’t braking hard while turning – doing so increases the chance of losing traction.

Take your lane.

Most of the road grit accumulates on the shoulder of the road, and you can avoid this by moving out into the travel lanes. Be VERY careful when doing this – think ahead, and don’t try to move out in front of a line of cars just before your corner. Wait for a large gap in traffic, and move out well into the lane, so cars aren’t tempted to try and squeeze by you. On long, switchbacking descents, I will usually just stay in the travel lanes to avoid having to move back and forth.

Relax.

Hitting a small patch of gravel or wet spot won’t necessarily cause you to crash. Overcorrecting for a small skid of your back tire will. Staying relaxed and confident will help you ride through small skids instead of tensing up and turning the small skid into a huge wipe-out. You can build this confidence through other types of cycling – mountain and cyclocross riding will both give you the experience of feeling your bike sliding through turns, which will help you become a more confident road rider.

Obstacle avoidance.

Be it potholes, glass, or ice, there is a lot of stuff on the roads that you and your bike would rather avoid. Your first key to avoiding this nasty stuff is to look ahead – the earlier you see something, the easier it will be to avoid. When you know what you want to avoid, doing so requires a bit of practice. Anyone who has managed to hit the only pothole on a clear stretch of road knows what I am talking about – your bike will tend to go where you are looking. If you are looking at that one pothole, there is a good chance you are going to hit it. Instead, work on keeping your eyes focused on the clear path you want to take, and your bike will follow.

Bunny-hops.

Sometimes, despite your proactive road reading and all of your best obstacle avoidance techniques, you just can’t ride around something. Often this has something to do with the 2 ton hunks of metal passing by on your left. This is when the bunny-hop comes in handy. Bunny-hopping is like jumping on your bike – both wheels lift off the ground for a split second. If you have never done this before, practice at slow speeds first. Clipless pedals make it much much easier and safer as well. When you do encounter something you can’t ride around, don’t try to jump too high – for potholes, your wheels barely need to leave the ground.

Keep these tips in mind when you head out on your next ride, and you will be well equipped to deal with whatever the spring roads will throw at you!

What You Need On a Long Bike Ride

February 15, 2014 by U.M.

What you need on a long bike rideLong bikes rides are a wonderful way to enjoy your time to yourself or others and get in some much needed fun. However, if you do plan on spending hours or even days on your favorite bike route, there are some things that you will want to take with you. This simple checklist will help you take on any challenge or emergency you may meet on the bike trail. [Read more…]

« Previous Page
Next Page »
  • Facebook
  • Tumblr
  • Twitter

Latest Articles

JOIN Cycling: A New Training Platform for Cyclists

May 27, 2024 By Eric Lister

cold exposure

The Benefits of Cold Exposure for Cycling & Life

June 13, 2023 By Eric Lister

hill climb

The Ultimate Hill Climb Training Guide

May 31, 2023 By Eric Lister

shoulder pain cycling

How to Treat & Avoid Shoulder Pain While Cycling

April 12, 2023 By Eric Lister

psoas stretch

The Importance of the Psoas Stretch for Cyclists

April 6, 2023 By Eric Lister

cycling neck pain

The Ultimate Guide to Cycling Neck Pain: Causes and Solutions

March 21, 2023 By Eric Lister

Useful Info

  • Contact
  • Finally, A Global Cycling Club That Is Focused On Community And Love Of Cycling!
  • Privacy Policy
  • Share Your Story!
  • Terms And Conditions Of Use
  • Welcome to I Love Bicycling
  • What Happened When I Stretched Every Day For a Month

Recent Posts

  • JOIN Cycling: A New Training Platform for Cyclists
  • How to Hang Bikes in Your Garage: 4 Inexpensive Options
  • Gravel Bike Vs. Road Bike: Which One Is Better For You?
  • The 6 Types of Mountain Bikes & How to Choose the Best One for You
  • What Is a Touring Bike Good For? 5 Benefits We Know You’ll Love

Search I Love Bicycling

Connect with Us

  • Facebook
  • RSS
  • Tumblr
  • Twitter

Copyright © 2025 · Magazine Pro Theme on Genesis Framework · WordPress · Log in