• Training
    • Injury Prevention
    • Training Tips
  • How To
    • Bike Fit
    • Gear
  • Nutrition
    • Nutrition Tips
    • Weight Loss
  • Repair
  • Reviews
  • Stories
    • Funny Stories
    • Jokes
    • Quotes
    • Videos
    • Funny Videos

I Love Bicycling

I Love Bicycling is a website that is geared towards cycling for beginners with road cycling tips, training articles, nutrition tips, weight loss, how to’s and bike repair articles.

Freewheel vs Freehub

April 23, 2016 by Wade Shaddy


There’s always been controversy and confusion about the difference between a freewheel and a cassette. It’s because the two terms are often used interchangeably, causing cyclists to waste time and effort when attempting to order parts or perform work on the bike. Knowing the difference from a  freewheel vs freehub or cassette is also knowledge you should know if you’re into older bikes.

freewheel or freehubFreewheel vs Freehub – Thread Differences

One of the main difference is that freewheels typically have a threaded hub. Bikes equipped with cassettes do not have a threaded hub, but instead, slip onto the hub with splines. But the differences, without getting too technical — go deeper than that.

The Freehub

Around 1980, the cassette replaced the conventional threaded rear hub. Not to be too confusing, but cassettes run what is referred to as  a freehub. This newer style hub works so well that they have  replaced the traditional freewheel and have become the new standard for contemporary road bikes. One of the major differences between a freewheel and a freehub is the location of the coasting mechanism.

Inside a Freewheel

On a freewheel, the coasting mechanism is built into the gears or cogset. “Freewheel” refers to the gear cluster as a whole, with the coasting mechanism inside.

Inside a Freehub

On a freehub, the coasting mechanism is part of the wheel’s hub. The gear cluster is a unit with non-moving parts, and is referred to as a cassette. The cassette slides into place onto the freehub body and is held in position by a series of ridges, or splines, and locked in place using a cassette lockring.

Installing a Freewheel

Installing a freewheel is simple, because you don’t need any tools.  Just use your fingers to screw the freewheel on the hub, as if you were screwing on any type of lid. The tightening happens when you ride the bike up a short hill. You can feel the freewheel slip forward slightly as it tightens. A strong rider pushing a freewheel mile after mile can tighten threads to such a high degree that the freewheel can be difficult to remove.

Tandem Bikes

If freewheels are used on a tandem bike, the combined power of two riders makes freewheels extremely tight. This is where grease is so important when installing a freewheel on any bike. Always apply it to prevent the freewheel from over-tightening to such an extent that you can’t get it off eventually.

Freewheel Gears

The majority of older freewheels have replaceable, interchangeable sprockets that come off in one piece. Newer freewheels use splined sprockets and you need only unscrew one or two outer sprockets, and slip the others off. In the old days it was a common bike-shop service to replace or add custom gearing to freewheels with any desired combination of sprockets.

The Ratchet

The ratchet mechanism — the thing that allows you to pedal backwards — is located on the cogset with freewheels. The ratchet mechanism on a cassette is located in the freehub.

Cassette and Freehub

One big advantage of the cassette and freehub design is that when you wear out your sprockets, or want to use different gear ratios, you can unscrew the cluster or cassette, and replace it with a different one.

Cassette Replacement

The sprockets, cluster, cogset or cassette are commonly sold as a set. The gears in cassettes are held together by three small rivets, making it easy to install. These bolts or rivets are there to aid with installation and make it easier to keep the sprockets and spacers in the correct order and position when they are removed from the freehub ratchet body.

How it Stays Put

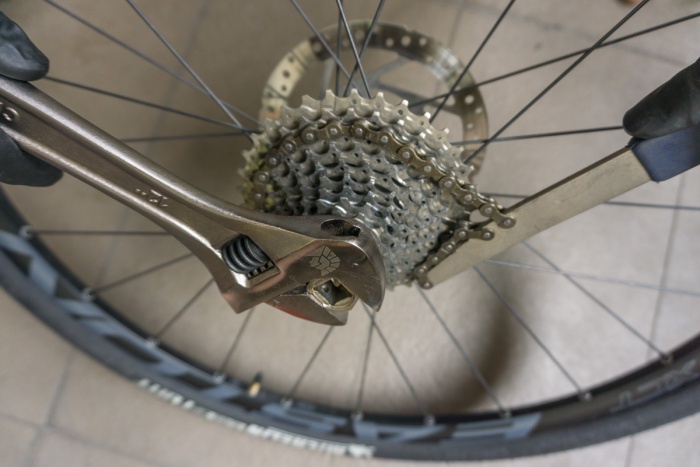
The majority of cassettes use a threaded lockring to hold the sprockets onto the Freehub body via the splines; a special splined tool fits the notched hole in the lockring. The lockring has a normal right-hand thread; turn clockwise to tighten it. To remove the lockring, you need to turn it counterclockwise, but due to the ratchet, the cassette will freewheel, so you need a chain whip to hold the cassette while you loosen the lockring.

Identify It

It’s a safe bet that if you’re using a bike made after about 1980, that your running a cassette, freehub design. Older bikes with 7 gears or less typically use a freewheel; most contemporary bikes with 8 gears or more use a cassette and freehub, although there are some 7-speed systems in use. The different appearance of a freewheel and a freehub is not completely noticeable to the average cyclist when comparing Shimano systems, which are in the majority.

Subtle Differences in Appearance

If you’re still not sure what you have on your bike, it’s somewhat possible to ID it by how it looks. Freewheel axles are typically recessed slightly into the axle. Cassettes are typically flush with the face of the gears, and you can see the splines, appearing as the rays of the sun around the perimeter. Freewheel axles may also show splines, but not as many as a cassette, and are recessed into the body deeper, around the axle itself, not the gear like a cassette.

Where Freewheels are Used

Freewheels are still in use on kid’s bikes and some department store bikes. You might still find freewheels on adult bikes under about $500 and single-speed bikes. Freewheels are also used on BMX and single-speed mountain bikes, both high and low-end. The quality level of most replacement freewheels is for the most part equivalent and they are considered somewhat generic.

Older Bikes

You might think twice about trying to update an older freewheel-equipped bike with a cassette. The best advice is to stick with the freewheel. It’s much easier to find older freewheel assemblies than it is to find dated cassettes that work with your older bike.
How To Remove A Cassette

April 22, 2016 by Adam Farabaugh

remove a cassette

Changing a cassette can be daunting. There’s only one way to remove it and it requires two, sometimes three, tools working in unison to successfully remove a cassette. Once you know how to do it though, it’s easy. Hopefully you don’t have to remove a cassette too often but when you do, you’ll be able to do it with ease.

How a Cassette Works

From the outside, a cassette just looks like a cluster of gears sandwiched together as one piece and that it’s just part of the wheel. The typical cassette however is made of a number of cogs that have key cutouts on them which line up and engage the underlying “freewheel” on the hub of the wheel. These cogs are then held in place by a threaded lockring that tightens down onto the smallest cog holding everything in place. Removing this lockring is how you remove a cassette.

When Do You Need to Remove A Cassette?

You shouldn’t have to remove a cassette very often but if you are racing or riding over vastly different terrain such as steep hills followed by a day of mostly flat, you will want to change the size cassette you are using for optimal gearing. Also, depending on how much you ride and how often you change your chain, you may need to replace your cassette from time to time.

Tools You Need

The first tool you are going to need is a Cassette Lockring Remover Tool. This engages the lockring on the cassette which must be turned counter-clockwise to loosen.


PARK TOOL FR-5 Cassette Lockring Remover Tool
Cassette Lockring Remover Tool


The second tool you will need is a Chain Whip or Sprocket Remover Tool which holds the cassette in place while you turn the cassette remover tool otherwise the cassette will just spin backwards.

Chain Whip/ Sprocket Remover

The third tool you will need is a wrench to turn the cassette remover tool. They also make an All In One Cassette Remover Tool which can be handy.

All in one Cassette Remover Tool

How To Remove a Cassette

  • Now that you have all the tools you need, first remove the skewer from the wheel.
  • Second, take the wheel and while standing, place it in front of you so the cassette is pointed out, away from you.
  • Thirdly, insert the cassette remover tool into the groves on the end of the cassette. Make sure the groves are fully engaged otherwise you can strip it. If you have the all in one Remover, place the handle so it’s at the 9’o’clock position if you’re looking at the wheel from straight on, or your right as you look down. If you’re using a wrench, place it on the Cassette Remover Tool in this position as well.
  • Fourth, place the Chain Whip so the loose chain end is drapped over the gears with the hanlde at the 2’o’clock position, your left as you look down. This will then hold the cassette in place when you turn the lockring otherwise it will just spin.
  • Finally now that you have everything engaged and in the correct position, press both handles down. This will turn the lockring counter-clockwise while holding the cassette in place.
  • Doing it this way gives you the greatest mechanical advantage in case of an extremely tight lockring.
  • Once the lockring is removed you can simply slide the cogs off from the freewheel.
  • Note: if any of the cogs become stuck, you can use a straight-bladed screw driver to insert between the cogs and rotate slightly to loosen it. Do it gently however and rotate around the cog if needed to avoid bending any teeth. Be advised on some cassettes as some of the cogs, if not all on newer ones, are once piece meaning it won’t slide off with the twist of a screwdriver. You’ll have to do it behind the next cog or whole cassette even.
  • And make sure you don’t loose the spacer behind the cogset if your wheel has one. If it does, use it behind the new cassette as well.
removing a cassette
You would be standing on the opposite side of this wheel looking down at it with the tools in these positions. Then just press both down to loosen and remove the lockring.

How To Install A Cassette

  • When installing a cassette, first make sure the spacer behind the cassette is installed if there was one when you removed it.
  • After that, take the cassette and line up the keys on the inside of the cassette with the groves on the freewheel of the hub. There is one larger one that makes it easy to line up. If you’re not sure which way is forward for the individual cogs, try it one way and if it doesn’t go on, flip it around. It will only go on one way. With the individual cogs also, make sure there is a spacer in-between each one.
  • Once you have all of the cogs on, double check that the last cog is lined up and engaged with the groves. It’s easy to have this one a bit off. It needs to be fully engaged and lined up with the other cogs.
  • Now take your cassette remover tool and insert it into the lockring. Add a dab of grease to the threads on the lockring to ensure it doesn’t seize. Now thread the lockring onto the end of the cassette by hand being sure not to cross-thread it. It should go on smoothly and straight. If it doesn’t, take it back off and try again. Turn it down snug by hand to avoid cross-threading.
  • Now take your wrench and put it on the Cassette Remover Tool, or if you have the All In One Tool, simply turn the handle clockwise to tighten down the lockring. It doesn’t need to be overly tight, just snug enough that it’s not going to come loose. If you over tighten this, it is easy to strip the threads.
  • Re-install the skewer and you’re good to go.

Things to Watch Out For When You Remove a Cassette

  • Stripping the grooves on the cassette lockring that the Cassette Remover Tool is engaged with.
    • Make sure the Remover Tool is pressed in all the way while turning.
  • Having the Chain Whip slip off the gears.
    • Place the loose end of the chain on a larger cog to engage more teeth.
  • The cogs are stuck after the lockring is completely removed.
    • Insert a screwdriver in-between the cogs and twist gently.
  • The cogs not reaching all  the way out to where the lockring can engage.
    • You forgot a cog or spacer or even the spacer behind the cassette close to the spokes if your wheel had one when you first removed the cassette.
  • The cogs reach too far over the end of the freewheel and the lockring won’t engage.
    • All of the cogs may not be properly aligned and pressed together or you took an extra spacer or cog from the cassette you just removed and accidentally installed it.
  • Cross threading the lockring when re-installing it.
    • Install it by hand first to make sure it’s lined up properly before tightening it with a wrench.
  • Facebook
  • Tumblr
  • Twitter

Latest Articles

JOIN Cycling: A New Training Platform for Cyclists

May 27, 2024 By Eric Lister

cold exposure

The Benefits of Cold Exposure for Cycling & Life

June 13, 2023 By Eric Lister

hill climb

The Ultimate Hill Climb Training Guide

May 31, 2023 By Eric Lister

shoulder pain cycling

How to Treat & Avoid Shoulder Pain While Cycling

April 12, 2023 By Eric Lister

psoas stretch

The Importance of the Psoas Stretch for Cyclists

April 6, 2023 By Eric Lister

cycling neck pain

The Ultimate Guide to Cycling Neck Pain: Causes and Solutions

March 21, 2023 By Eric Lister

Useful Info

  • Contact
  • Finally, A Global Cycling Club That Is Focused On Community And Love Of Cycling!
  • Privacy Policy
  • Share Your Story!
  • Terms And Conditions Of Use
  • Welcome to I Love Bicycling
  • What Happened When I Stretched Every Day For a Month

Recent Posts

  • JOIN Cycling: A New Training Platform for Cyclists
  • How to Hang Bikes in Your Garage: 4 Inexpensive Options
  • Gravel Bike Vs. Road Bike: Which One Is Better For You?
  • The 6 Types of Mountain Bikes & How to Choose the Best One for You
  • What Is a Touring Bike Good For? 5 Benefits We Know You’ll Love

Search I Love Bicycling

Connect with Us

  • Facebook
  • RSS
  • Tumblr
  • Twitter

Copyright © 2025 · Magazine Pro Theme on Genesis Framework · WordPress · Log in