• Training
    • Injury Prevention
    • Training Tips
  • How To
    • Bike Fit
    • Gear
  • Nutrition
    • Nutrition Tips
    • Weight Loss
  • Repair
  • Reviews
  • Stories
    • Funny Stories
    • Jokes
    • Quotes
    • Videos
    • Funny Videos

I Love Bicycling

I Love Bicycling is a website that is geared towards cycling for beginners with road cycling tips, training articles, nutrition tips, weight loss, how to’s and bike repair articles.

7 Essential Bike Tools Every Cyclist Should Have

October 10, 2019 by Sarah Lauzé

Working on your own bike can be satisfying, plus it can save you a bunch of money and trips to the bike shop. Having the essential bike tools for the job is necessary on both accounts. Seeing as you are the one who rides your bike all the time, only you really know what’s going on with it. If it’s making a certain noise, or feeling weird in a way, it can be tough to describe those smaller issues to a bike mechanic. With the right tools and general know-how, you can diagnose and fix the problems– and even have fun doing it!

That being said, botching a quick repair or making it worse because you’re trying to get through it with some multi-tools you had lying around can make for an embarrassing trip to the bike shop. Make sure the tools you have are up to the task, and ensure your also know how to use them. Seek out someone to teach you, watch videos online, read articles and practice on an old beater in a low-stakes repair before moving on to your top bike.

7 Essential Bike Tools

1. Floor Pump

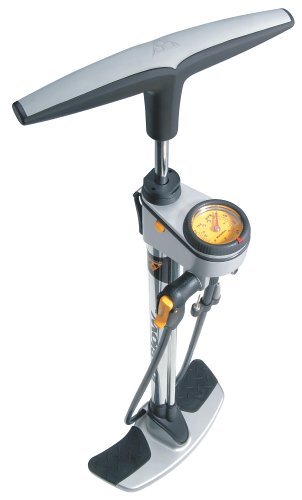
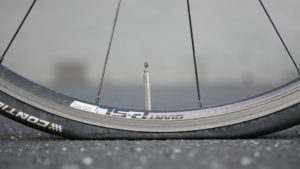
While a floor pump is not the most exciting bike tool, proper and regular use can avoid the most common bicycle repair: a flat tire. Correct inflation pressure for the rider/tire/rim/surface condition combination can lead to fewer flats, along with better handling for your bike. Pressure that is too low risks pinch flats and pressure that is too high can lead to more puncture flats. Finding the right pressure will keep your bike rolling, keep you more comfortable on the bike, and more confident in your bike handling.
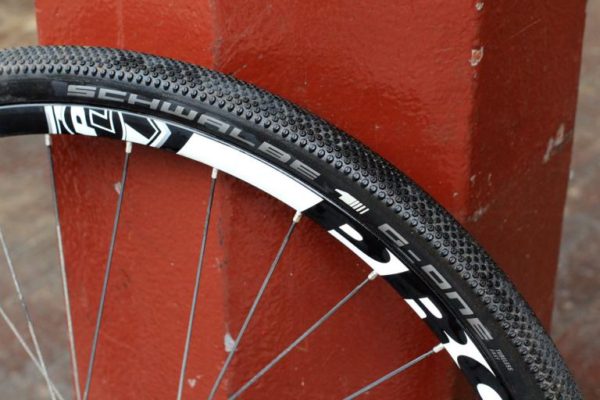
2. Tire Levers

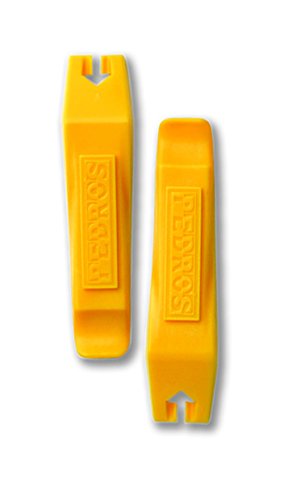
Bad tire levers are really frustrating. If you’re out on a ride and get a flat, struggling to get your tire off with your bare hands can be tough, so you reach for your tire levers. If they proceed to break, then you’ll most likely be ready to pull your hair out. Good tire levers are the difference between a simple fix and the above situation. It is not a huge investment, so get the good ones and they will last you.

3. Hex Keys/Torx Keys

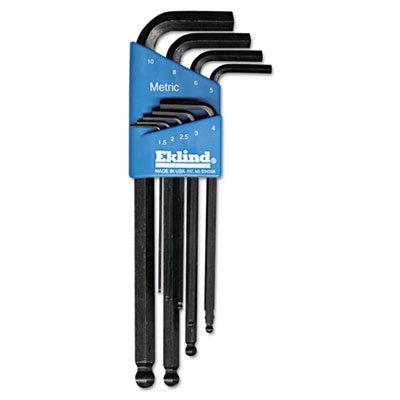
Most bolts on bicycles have metric hex bolts, so a good set of hex keys with ball-end drivers will make repairs a breeze. They will fit in your bolts securely, minimizing the chance of stripping the bolts. The ball end allows you to tighten and loosen hard to reach bolts at angles other then perpendicular. The set should have a full range of sizes to accommodate all of the bolts you will work on. Again, this is not a huge investment.

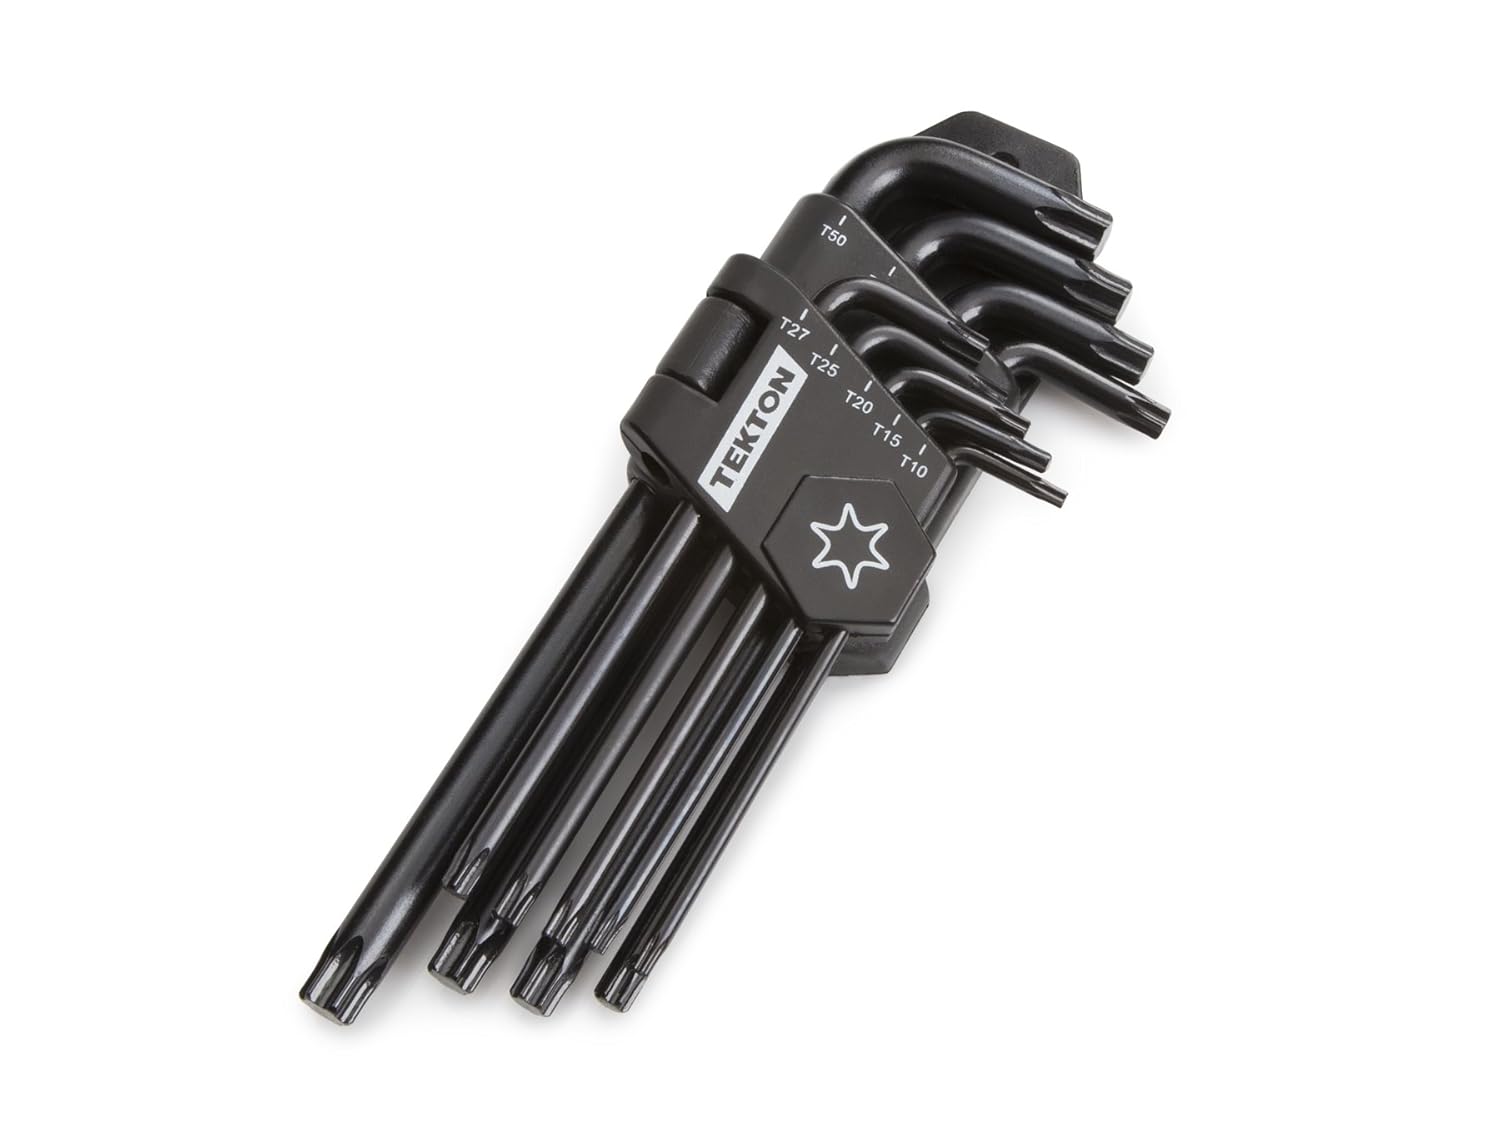
More and more bike parts have Torx bolts, six pointed star heads that give their wrenches more surface area, reducing the chance of stripping them. The same rules that apply to hex keys apply to Torx keys, except that they cannot accommodate ball-ends.

4. Cable Cutters

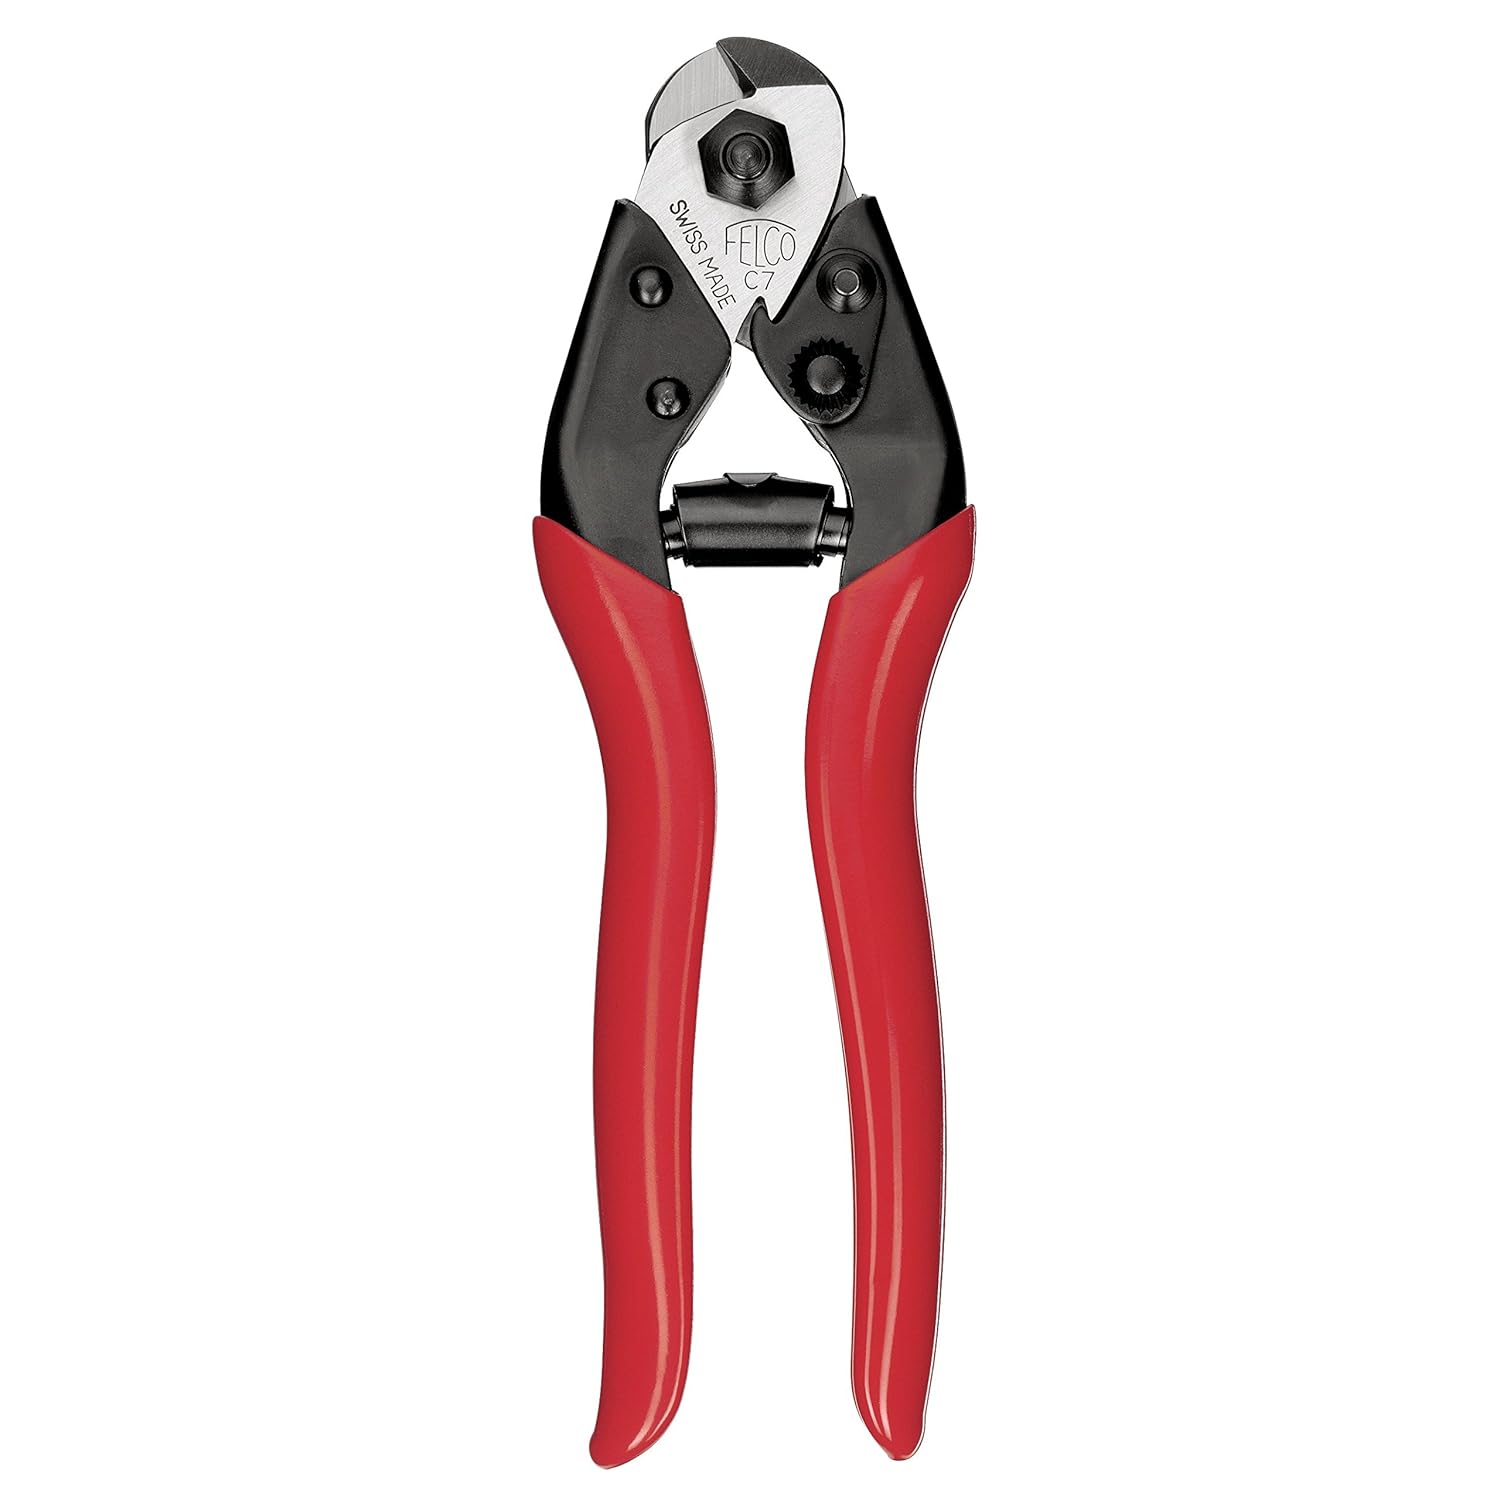
Replacing cables is not a complicated job with the right cable cutters. And there is only really one right cable cutter, which is often copied. With the wrong cable cutter, you risk fraying the cable or housing you are working with. A frayed cable is useless as the frayed section can spread and will not go cleaning through the housing, compromising its function.

5. Chain Tool

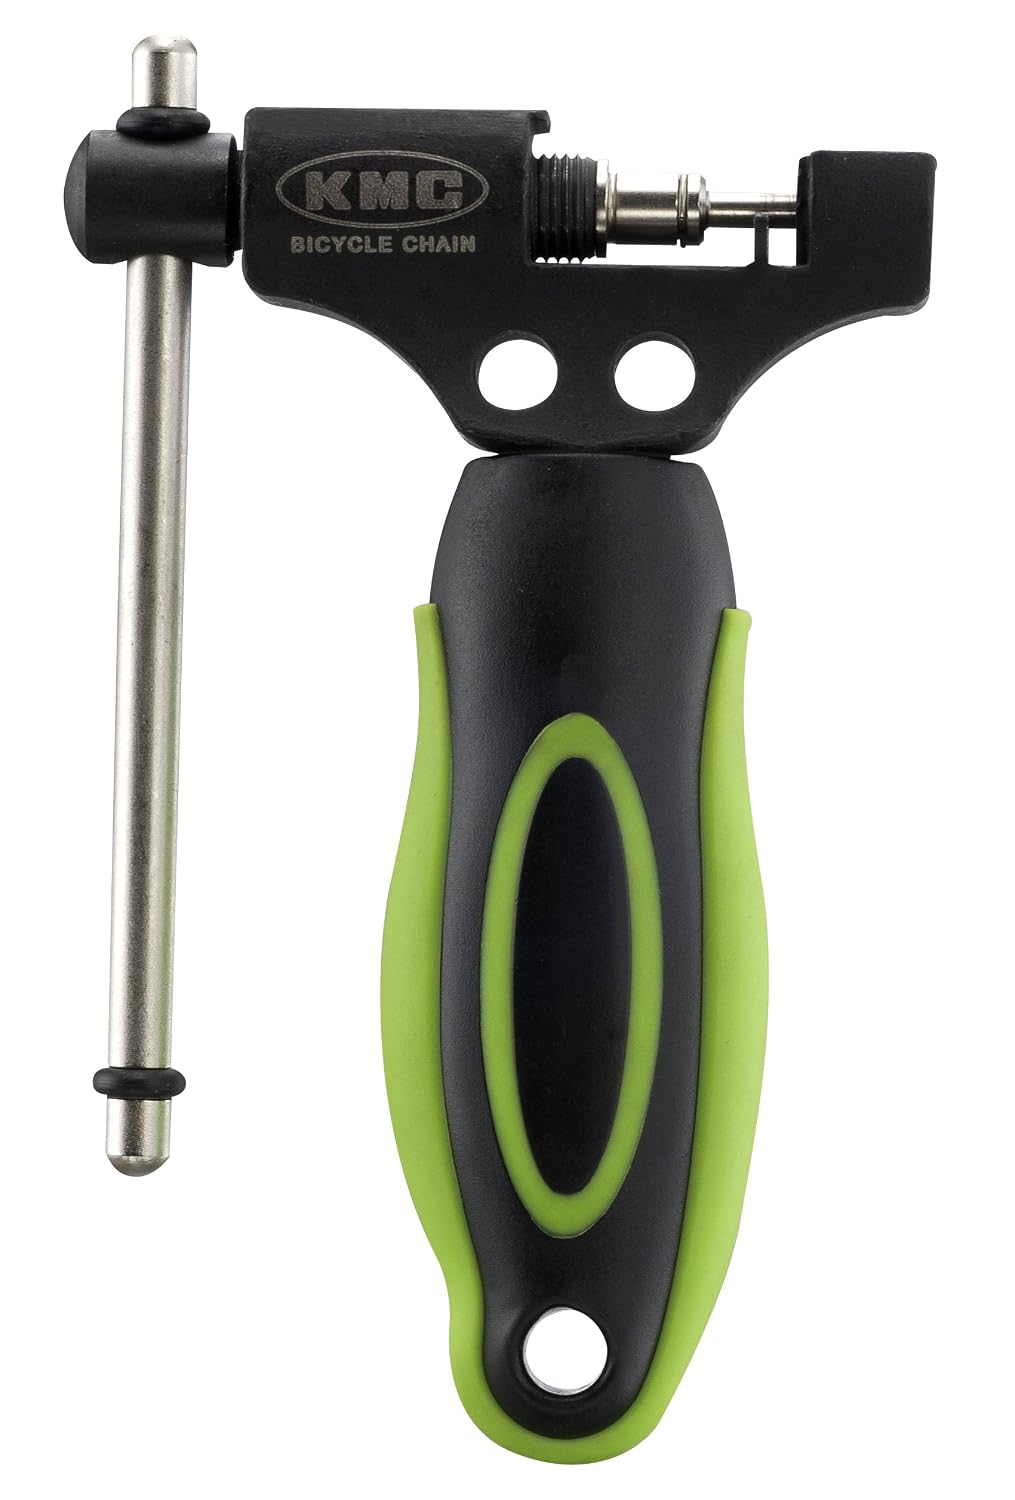
Cutting your a new chain to the correct length and installing it is one of the most satisfying repairs to do. It increases the longevity of your drivetrain if done at the correct intervals and makes it more efficient with crisper shifting. The only way to push the pins through a chain is with a chain tool.

6. Screwdrivers

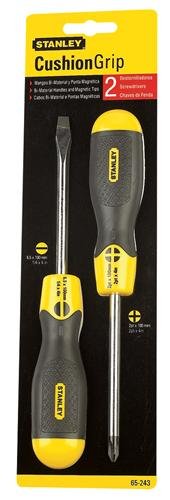
There are a few adjustment screws on bikes, usually for derailleur limits (although some have moved to small hex heads) and usually number two Philips heads. But not all screwdrivers are equal, a good fit goes a long way to preserving your screws. Additionally, you should have a flat head screwdriver around, but this is mostly for scraping clean derailleur pulleys and other hard to reach places.

7. Torque Wrench

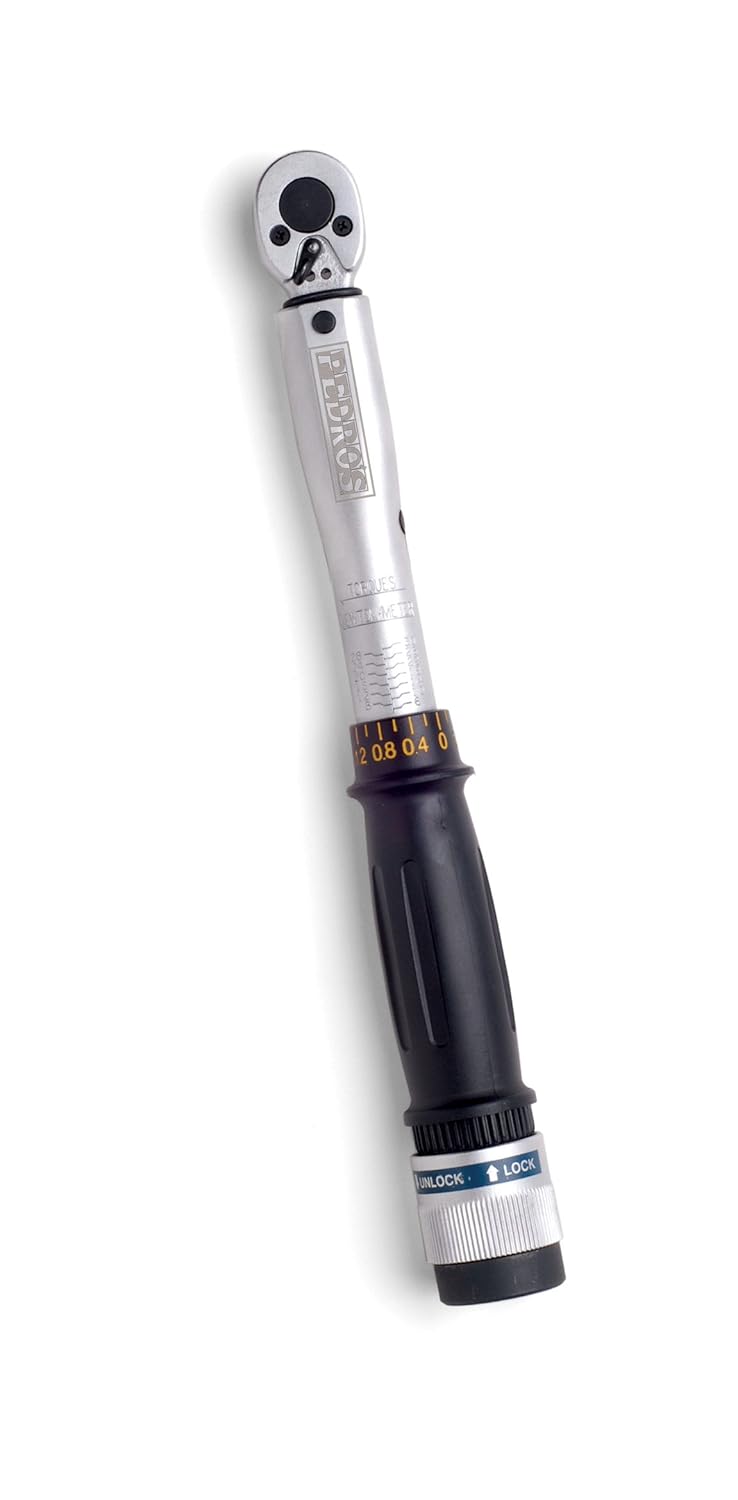
The last tool, the torque wrench, is a recent necessity. With the explosion of lightweight parts that require a certain torque to both hold fast and not fatigue prematurely, a torque wrench is the only tool for the job. Fortunately, most bike parts that require a certain torque have it printed right on them. Make sure you get the right bits for your bikes. Lots of people say they can do it by feel, but that has been proven wrong time and again.

Your own work is always more satisfying than relying on someone else’s, and it can also give you a sense of ownership of your bike. These bike tools should get you on your way to mastering most basic repairs. Remember to learn how to use a tool properly before attempting any repairs.

101 Best Bike Repair and Maintenance Tips

May 22, 2016 by Adam Farabaugh

bike repair

Bike maintenance is a difficult aspect of owning a bike, especially for beginners. We cover 101 different bike repair and maintenance tips that we think will help you maintain your bike and keep it rolling in pristine condition. We cover everything from cleaning your bike, to the pre-ride check, to on the road and at home fixes. We also cover a few of the higher end stuff that you may not wish to do on your own but always wondered how it was done. Without further ado:

101 Best Bike Repair and Maintenance Tips.

Table of Contents

Cleaning Your Bike

After The Wash – Lube

A Thorough Pre-Ride Check

Bolts to Check on Your Bike

Back to the Pre-Ride Check

On the Road Bike Fixes

Preventative Bike Maintenance

Mountain Bike Specific Maintenance

At Home Fixes

Cleaning Your Bike

cleaning your bike

#1 –      Spray it Down

Grab some clean rags, soap, water, brushes and solvents to clean your bike. First, spray down your bike with a hose making sure that you avoid (particularly with high pressure) any areas that contain bearings or shocks.

#2 –      Wipe It

Make sure most of the dirt and mud is off before you wipe everything down with soap and a rag (or a sponge). Then use the brushes to get in to the hard to reach areas such as the brakes, chain, and cassette. Lastly, use the solvent to remove any built up grease from your bike chain.

#3 –      Scrubbing the Cassette

Over time your cassette will develop gunk between the cogs. You can either take a long, sturdy bristled brush and scrub between each cog or you can fold a rag in half and slide it back and forth all the way around each cog.

#4 –      Cleaning the Chain

Chains get dirty quick. Use a degreaser such as Simple Green or Purple Power and spray it on the chain and let it set for a minute. Then take a soapy brush and scrub both the underside and top of the chain. Your chain should sparkle after you hose it off if you do it right.

#5 –      Cleaning Your Rims

Brake residue can form on rims and if simple scrubbing with soap and water doesn’t work, use rubbing alcohol on a rag and scrub the rim.

#6 –      Spray it Down Again

After scrubbing and using some elbow grease, spray the bike down again to get all the remaining dirt and soap off the bike. Also run the chain backwards spraying in the chain and cassette to get all the nooks and crannies.

#7 –      Wipe It… Again

With a clean dry rag, wipe down the frame, components, and wheels from any excess water. With a dry rag that can get dirty, wipe down the chain by holding it in the rag and running the pedals backwards.

#8 –      Cleaning Schedule

Obviously you aren’t going to clean your bike meticulously after every ride. Give your bike extra TLC when you ride in the rain or mud, but put your bike on a regular cleaning schedule. At the very least clean it once per month. It obviously depends on how often you ride, but if you want to keep your bike in smooth working condition, once a month is a bare minimum.

After the Wash – Lube

lube

#9 –      Lube Properly

If you do nothing else, make sure your bike is lubricated properly as it protects moving parts from excessive wear and tear. On the other hand, make sure not to go nuts as too much lubrication will attract dirt and cause just as much damage. Allow the lube to soak in and then wipe any excess off with a clean rag.

#10 –  What Lube to Use

Choose an appropriate lube for the riding conditions you’re in. If you’re riding in mud, rain, or snow, choose a thicker lubricant made specifically for that. For everyday riding use a thinner lube which can be found at any bike shop or online.

#11 –  How to Lube

With the correct kind of lube, spin your chain backwards about two times, ideally putting a drop on each link each revolution. Once you’ve gone around twice, stop applying lube but keep spinning the chain backwards a few more times to allow the lube to soak in.

#12 –  Wipe It

Once the lube has been absorbed, spin the chain backwards while running it through an old rag to remove any excess.

#13 –  Other Areas to Lube

Oil is also good for brake and derailleur levers, cables, and other moving parts on the bike. Don’t apply too much though as it will just get everywhere.

#14 –  Lube the Pulley Wheels

Putting a few drops of oil on both sides of both pulley wheels will ensure that they run smoothly and don’t squeak. Spin the chain backwards as you drop a few drips in.

#15 –  Lube the Derailleurs

Apply a few drops oil to the pivot points on both the front and rear derailleurs to keep them moving smoothly.

#16 –  Lube the Brakes

At first glance, this looks like a bad idea, but if you’re brakes have been through a lot, lubing the pivot points can help to keep them moving. Just put a rag underneath to make sure you don’t drip any on the brake pads or rim.

#17 –  Lube for Dummies

The general rule of thumb when it comes to lubing is that if something moves, it has to be lubed. Think of what would happen if you didn’t lube moving parts; metal against metal never sounds or feels good.

A Thorough Pre-Ride Check

tighten bolts

#18 –  Brakes

If you’re shifting doesn’t work, it’s not the end of the world. If your brakes don’t work, oh boy, you’re in for it. Always do a simple check of squeezing the brakes to make sure they grab and don’t slip.

#19 –  Steering

After making sure your brakes work, check the steering. Lift your front wheel off the ground and turn it make and forth. It should turn with little to no push but rather move under its own weight. If it doesn’t, the headset likely is too tight and needs loosened or new bearings.

#20 –  Headset Tightness

With the wheels on the ground, pull the front brake and rock the bike forward. There should be no movement of the steerer tube (where the stem connects to the fork) relative to the frame. If there is play in it, your headset is loose and your steering will be compromised.

#21 –  Tightening the Headset

Tightening a headset can be tricky. It can’t be too loose nor too tight. The key is to tighten down the top bolt before tightening the bolts on the stem. Here is a more detailed description on how to tighten a headset.

#22 –  Loose Bolts

If you have a loose bolt, screw or nut it can be a serious safety concern but it can also lead to wear and tear and inefficiencies while riding. Routinely check the tightness of the bolts with a torque wrench. DO NOT simply tighten every bolt as much as possible as this will also lead to similar issues as loose bolts. The owners manual of your bike should contain how much torque is required for each bolt.

Bolts to Check on Your Bike

tightening bolts with a tourque wrench

#23 – Using a Torque Wrench to Check Bolt Tightness

Using a torque wrench is the best way to tighten bolts and to be sure that they’re not under or over tightened. It’s typically labeled on each part for how much torque you should use, say on the stem itself. If there are other bolts, tighten them down evenly and then “click” the torque wrench when they’re all just about snug.

#24 –  Handlebar Bolts

Check the tightness of the bolts that attach the handlebars to the stem. They should all be tightened evenly and ideally with a torque wrench. If you don’t have a torque wrench, they should be snug but not overly tight by any means.

#25 –  Brake Bolts

Check the tightness of the brake bolt that cinches down on the brake cable itself; generally with a 5mm hex wrench. If a brake fails, this is most likely where it’s going to happen because the bolt wasn’t tight enough and the cable slipped through under heavy braking. Don’t strip the bolt but you can go fairly hard on this bolt. Make sure you check both the front and back.

#26 –  Brake Mount Bolts

While you’re at it with the brake, you may as well check the bolts that mount the brake. Behind the fork there will be a hole for a hex wrench. You will need a longer one and make sure you have the right size, normally 5mm. Again, don’t over tighten this but make sure it’s snug. The rear will be easily to get to and will be the same size. If the brake itself turns while you’re tightening, don’t worry, you can just rotate the brake back to center with your hand after the bolt is tight.

#27 –  Derailleur Cable Bolts

Normally with a 5mm allen key, make sure both the front and rear derailleur cables are tight.

#28 –  Derailleur Mount Bolts

Generally with a 5mm hex wrench, make sure the rear derailleur is tight to the frame as well as the front. If the front derailleur is mounted on a clamp around the seat tube, make sure that is tight also.

#29 –  Disc Brake Bolts

If you have disc brakes, make sure the two bolts on both the front and rear are tight. If you have cable actuated disc brakes, make sure that too is tight.

#30 –  Seat Post Clamp Bolt

Check the tightness of the seat clamp bolt that tightens down onto the seat post. This should be snug but not overly tight especially for carbon posts.

#31 –  Saddle Bolts

There are generally two bolts underneath the saddle that attach it to the seat post. If these are slightly loose, when you hit a bump, especially a big one, your saddle will tilt. Make sure they’re tight.

Back to the Pre-Ride Check

tire check

#32 –  True Wheels

Pick up the front of your bike and spin your tire, check for wobbles. If it wobbles, the wheel needs to be trued. Do the same check on the back wheel. (see #67 – Truing a Wheel below under At Home Fixes)

#33 –  Tire Check

Turn each wheel slowly looking for small cuts or wear spots that could end your ride short. Also look at the sidewalls as you spin the tire as small cuts can form and the tube can actually start to push through without yet popping. If there are any small tears, take the inner tube out and place a piece of electrical tape over the cut on the inside of the tire. If it is a larger tear, also place a rubber boot or other similar material that will ensure that the tube won’t push through or make the hole bigger. If there are a number of tears or any of them are simply too big, replace the tire. It’s not worth flatting on the side of the road and then not being able to fix it.

#34-  Pressure Check

With cycling tires, they generally loose air relatively quickly so you should pump up your tires every ride. They may only need one pump but doing that is better than pinch flatting on the road because you didn’t have too much pressure. Once you get good, you can feel with your thumb how much pressure there is and if you need more air or not.

#35 –  Proper Pressure

There is never one pressure fits all. You should change your tire pressure for the type of riding you’re doing and terrain you’re covering. Typically the larger diameter the tire, the lower the air pressure.

#36 –  Tire Pressure for Normal Road Conditions – Dry, No Gnarly Stuff

Riding 100 to 110 psi is about the ideal range. If you’re running tubeless, you can go down a bit from there and if you’re a bit heavier, up from there to avoid pinch flats. Remember the harder your tires are the harder your ride is going to be.

#37 –  Tire Pressure for Dirt Roads and the Like

A lot of people think you shouldn’t ride road bikes on dirt roads or otherwise; nonsense. Add 5 to 10 psi to your tires to help prevent pinch flats. Learn to ride gingerly and lightly choosing a good line and shifting your weight. Carry two extra tubes isn’t a bad idea and/or a patch kit. If you’re really out there, strap an extra tire to your saddle bad and seat rails. It’ll be a lifesaver if you need it.

#38 –  Tire Pressure for Wet Conditions

If the roads are wet and especially if you’re cornering a lot, take 5 to 10 psi out of your tires. This will allow your tire to compress more and have a larger contact patch with the road aiding in traction.

#39 –  Check the Chain

Before every ride you should make sure that your chain is properly lubed. A poorly lubed chain will not only squeak and be more inefficient but will also wear out quicker and need replaced.

#40 –  Lubing the Chain

First, take a rag and run the chain backwards through it to get off any gunk or road debris. Then, while spinning the pedals backwards, apply a light trickle of lube onto the chain for about two revolutions depending on how dry the chain was previously. Then stop apply lube but keep spinning the pedals backwards to work it in. Then spin the chain backwards through a rag removing any excess lube.

#41 –  Brake Pads

Quickly check the brake pads and make sure they are not too worn down. Then test the front and back brakes independently of each other to assess the braking power.

#42 –  Skewer Check

Check and make sure that both the front and rear skewers are tight. They should be firmly snug as to not rattle free on bumpy roads. And to make sure you don’t look like a newb, place quick-releases on the left side of the bike.

On the Road Bike Fixes

ride tools

#43 –  Tools to Bring for A Bike Ride

You should be prepared with the right tools on the road or trail and know how to use them should a mechanical or flat tire occur. The tools to bring are:

  • Spare Tube
  • Pump or CO2 Inflator with an extra cartridge just in case.
  • Tire Levers
  • Patch Kit
  • Multi-tool with a chain tool on it

#44 –  Fixing a Flat

If you ride a bike more than just around town you should know how to fix a flat. Fortunately it’s easy. This article will give a full breakdown on how to remove your tire and change the tube.

#45 –  Broken Chain

Broken chains don’t happen too often when riding but when they do, you’re not going very far until you fix it. A chain will either break completely or a link will become kinked. To fix it, all you need to do is to remove that link. Here is a complete guide to fixing a broken chain.

#46 –  Tear in Tire

A tear in a tire can end your ride. If it’s not extremely big however, you can fix it with a few little tricks. The first is the dollar bill trick where you fold up a dollar bill and place it between the tube and the tire where the hole is. This will only work if the hole is small enough. Once the hole is past a few millimeters in size, you are going to need a tire boot which should also be carried in your saddle bag. This rubber strip will be large enough to place over the hole and not allow the tube to poke out. The problem with both the dollar bill trick and the tire boot is that the tire can continue to split particularly if you’re on rough roads or terrain. Adding a piece of electrical tape in place of or in conjunction with, will help to hold the tire in place and not have the hole continue to grow.

#47 –  Broken Spoke

broken spoke

A broken spoke can also end your ride if you don’t know how to deal with it. Typically a spoke breaks at the nipple and leaves the rest of the spoke flopping around. The easy fix is to just remove it but your wheel could be too out of true to continue riding. This is how to fix it.

#48 –  Broken Front Derailleur Cable

With a broken front derailleur cable you are going to be stuck in the little ring for the rest of the ride. With a triple chain ring, you might be able to turn the limit screws enough to line up the derailleur up with the middle chain ring but it depends on your derailleur and set-up.

#49 –  Broken Rear Derailleur Cable

With a broken rear derailleur cable you are going to be stuck in your smallest gear, normally an 11 or 12 tooth. To get the chain up to a bigger, easier gear, turn the H or high speed limit screw in as far as it can go. This should push the derailleur up at least a cog or two. You may have to back it back out a tad if it doesn’t line up well.

#50-  Broken Brake Cable

It’s going to be rare that you have a broken brake cable as they’re made not to fail. If you’re riding anything other than perfectly flat roads without many intersections or traffic you might be able to gingerly make it home otherwise it’s best to get a ride and not risk needing to stop quickly and not being able to.

#51 –  Shifting Becomes Off

A lot of times, particularly after a new cable is installed, your rear derailleur shifting will become slightly off. This is because the cable stretched ever so slightly. To tighten it, simply turn the barrel adjuster on your derailleur counter-clockwise a quarter turn until the pulley wheel lines up exactly with the gear. You won’t have to turn it much unless it’s way off.

Preventative Bike Maintenance

checking a wheel

#52 –  Keep Your Bike Inside

The sun, water and dirt will cause more damage to your bike and cost you more in repairs if you keep your bike outside. If you’re in a humid climate, rust on certain metal components can also develop quicker.

#53 –  Check Tires For Debris Or Cuts

If your tire has debris in it make sure to remove it before it causes a flat tire. Also inspect your tires from time to time to make sure that there are no major cuts or gouges. If there is, replace the tire. Also, make sure you inspect the sidewalls as cuts can form here often as well.

#54 –  Checking a Chain for Wear

A chain will increase in length over time causing it to “skip” when under pressure from pedaling. Not only is it annoying when it happens, but it also will wear out the rest of your drivetrain. Check this with a chain wear indicator or if you know how you can use a ruler. This article gives a full run down on checking your chain length.

#55 –  Frame Inspection

inspecting a bike frame

Inspect the frame for cracks or serious dents that are more than just cosmetic. Specific areas to look at are the joints particularly around the head tube and bottom bracket. If there are any cracks, even if it looks like it’s just paint, take the bike to an expert as if the paint is cracked, there is likely a reason for it.

#56 –  Component Inspection

Also, it’s a good idea to look over your components and make sure they are functioning properly as well as are properly tightened. See the bolt check section earlier in this article.

#57 –  Spokes

Check for loose spokes. An easy way to do this is to simply grab two spokes part way between the hub and rim and squeeze them together. They should all flex about the same. If any are looser than the others, make sure to tighten them and also to make sure your wheel is true.

#58 –  Keep the Chain Lubed

Keeping your chain cleaned and adequately lubed will drastically lengthen its life. An under-lubed chain will sound horrible as well as begin to stretch eventually causing it to slip off the gears, or worse, break.

#59 –  Grease

Many beginner cyclists do not have grease in their essential bike tool kit. If you ever want to take your pedals off again, make sure to grease them. Grease is great for any threaded bolts such as the stem or derailleurs. Also, if you have any bearings apart, make sure they are well greased.

#60 –  Carbon Paste

Carbon paste should be used wherever there is carbon against carbon, or carbon against metal. The two places where this occurs is where the handlebar attaches to the stem and the seat post. Put a thin layer on each spot as it will help to make sure the carbon doesn’t slip.

#61 –  Replace Cables Before they Break

The key to not having anything break is to replace it before it has a chance to break. Cables will eventually break and if they don’t, will develop a lot of cable drag from dirt and debris. Replace them every six months to a year depending on how much you’re riding. If you’re really racking up the miles, even sooner.

Mountain Bike Specific Maintenance

mountain bike suspension check

#62 –  Suspension Check

Compress the shocks and then let them go. Do they appear to work as they should? Also check the sag of the shock by getting on your bike and seeing if the shock sags approximately 25%. Measure this with the small rubber ring, does it go down 25% of the entire length of the shock once you get off and look? If it is more than 25% – 30% add some air with your shock pump, if it less then let some air out. Your suspension will have exact recommendations also for what psi you should be using. Check this and dial it in that way as well.

#63 –  Oil Check

Look at your suspension to see if you are leaking any oil. If you start leaking a significant amount, so much so that you are attracting a lot of dirt on the forks, then it is time to do a little maintenance work on the shocks such as replacing the seals and oil.

#64 –  Hydraulic Disc Brake Check

hydraulic disc brakes

Alright, not just for mountain bikes anymore. Air can develop in your lines overtime. To check to see if you need a break bleed, stand the bike upright with the front wheel directly over the rear wheel, and pump the brakes. If they start to pull all the way to the bar, you’re in need of a brake bleed. Standing the bike upright allows any air bubbles to move in the line up toward the brake lever. If the levers don’t pull to the bars, you’re good to go.

#65 –  Dropper Post Check

Dropper posts may develop play in them over time. Check this regularly to see if yours develops an excessive amount. Also if your post doesn’t spring back up as quick, you may need to tend to your hydraulics and seals if it’s a hydraulic post.

At Home Bike Repair Fixes

bike repair tools

#66 –  Bicycle Repair Tools

The first thing you’re going to need to do any at home repairs are tools. The second thing you’re going to need is the know-how on using them. The following list is the short list of everything you need to do the basic stuff on your bike.

  • Allen Key/ Hex Wrench Set
  • Tire Levers
  • Straight Bladed Screwdriver
  • Philips Head Screwdriver
  • Chain Whip
  • Cassette Lock Ring Remover Tool
  • Crescent Wrench/Wrench Corresponding to Cassette Lock Ring Remover Tool
  • Cable Cutters
  • Chain Tool
  • Spoke Wrench – Size 0-2 and/or your specific spoke style
  • Electrical Tape
  • Pedal Wrench

# 67 – Keep Your Tools Organized

As with any workshop you should keep your tools neat and organized. If you have a full workshop with a peg board, keep all your tools in the same spot by outline where they go on the board with a sharpie. If you’re storing them in a toolbox, keep them organized and separated by type. And always, always, put your tools back where they belong after using them. It’s always a pain when you need a tool and can’t find it which just makes working on your bike stressful from the get go. Also, make sure you wipe down your tools before putting them away getting any dirt or grease off of them. No one wants to grab a tool and be immediately covered in grease.

# 68 – Making Your Own Bike Repair Stand

A bike repair stand makes it super convenient and easy to work on your bike and perform your own bike repair. It’s up in the air so you don’t have to bend down and work on it as well as it’s held firmly in place so it won’t fall over. It’s also not upside down leaving you with having to figure out which way things go when it’s right side up. If you don’t have a repair stand you can make one. One easy way is to simply hang a piece of rope and put a loop in it so you can just hook the saddle on it. Then with another piece of rope attach it to the stem so the bike isn’t constantly moving.

#69 –  Installing New Bar Tape

installing bar tape

There are a number of ways to wrap your road bars but the tried and true is to start at the end of the bar by overlapping the end by about half an inch. This is so you can stuff the excess inside the bar with a bar plug and be sure that it stays. Hold the end of the tape and make sure it’s a little bit taught when wrapping. Overlap the tape by about a 1/4 inch holding the exposed layer with your other hand until you wrap it in place. Your new bar tape should have came with a small strip of tape. Wrap this around the bracket of the shifter on the backside of the bar.  Continue wrapping up to the shifter. There are a number of ways to go around the shifter which you will have to play with to make sure that none of the bar is exposed, particularly behind the shifter. A simple way is to just wrap as far up to the shifter as you can and then wrapping around to the inside and up to the top of the shifter and continue wrapping. You will want to make sure you don’t overlap too much otherwise you will run out of tape before you get to about two to three inches from the stem. If you’ve gone long, you can simply trim the tape with scissors but make sure you cut it so it’s horizontal. Then take some electrical tape and wrap the very end of the bar tape a couple of times. You can then place the nicer tape that comes with the bar tape over top of this.

# 70 – How to Keep Bar Plugs From Falling Out

If you or whoever wrapped your bars, didn’t leave enough overextending the end of your bars, your bar plugs are likely going to fall out, especially if you have a crash. An easy way to make sure they stay in place is to wrap electrical tape about one centimeter around the plug before inserting it. Then double the tape back on itself so the sticky side is out. Do at least two layers and then cut it. Then press the bar plug into place.

#71 –  Truing a Wheel

We touched on truing a wheel before but not in a truing stand at home. Having a truing stand makes truing wheels way easier but it can be done by using the brake pads as guides. The simple premise is that you tighten a spoke by turning the nipple counter-clockwise to pull the rim further in that direction. And for every half-turn you make tightening a spoke, you loosen each spoke on either side a quarter turn to make sure the wheel stays round otherwise you risk making an oval. The full scope can be found in this article.

# 72 – How To Install Rim Tape

There are rubber rim strips that you can get for about a buck. Don’t fall for them as they will deteriorate over time and need replaced again. Instead get the cloth rim tape. First, completely remove your old rim tape and then line up the valve stem hole on the rim. As you hold the tape a bit taught and lay it, press it firmly in place with your other hand. Do this all the way around the rim being sure that all the nipple holes are completely covered. When you get back to the valve stem, overlap the tape a little bit and then cut it with scissors.

#73 –  Replacing Derailleur Cables

Replacing derailleur cables is super easy. You don’t always have to replace the housing with the cables but if it has been awhile or a lot grit has gotten into the housing you should replace that as well. For the cable, first shift into the smallest gear in the back and flip the hood cover up. Then push the cable back through the housing and out the shifter. Then simply just feed the new cable back through the same hole you just pulled the old cable out of. After you’ve pulled the cable tight and tightened the bolt down on it, give the cable a couple of tugs on the down tube. This pre-stretches the cable so you don’t have to adjust your shifting as much during the first ride. Then undo the cable bolt, pull it tight again, and re-tighten it. Adjust your shifting by turning the barrel adjuster on the back of the derailleur.

# 74 – How to Route Internal Cables

Internal cable routing can be a pain if you don’t know what you’re doing. Trying to fish a cable through a frame can be a nightmare. Save yourself the hassle and get inner cable housing to slide over the cable to slide through the frame so you can just simply slide the cable back through. And if you don’t want to buy it, you can simply take derailleur housing in splice it to remove the inner core.

#75 –  Adjusting Rear Derailleur Limit Screws

limit screws

The limit screws are to limit how far up and down the derailleur moves keeping the chain from hitting the frame or spokes. Shift all the way to the smallest gear. Then turn the H, for high, limit screw in until the chain lines up perfectly with the lowest gear. You may have to turn it counter-clockwise if it’s already turned in too far. And then a good way to check to see if it’s good is to spin the pedals, with the bike in a stand, and push the derailleur up to larger gears with just your finger. Then release it and it should slap back down to the smallest gear without any hiccups.

Once that’s good shift all the way to the larges gear but be careful not to push the derailleur into the spokes. Once you’re in the larges gear, take your finger and push the derailleur toward the spokes while lightly turning the pedals. The derailleur should not touch the spokes. If it’s too far toward the spokes, turn the L, for Low, screw in which pushes the derailleur back down. Just be sure not to turn it to far as you then can shift up to your easiest gear.

#76 –  Replacing Brake Pads

Cartridge brake pads are easy to change on a road bike. They can be changed with the wheel in but it’s easier if you take them out. With a small hex wrench, loosen the tiny bolt on the outside and back of the brake pad. Don’t turn it out all the way though as it can be a pain to get back in. Just do it enough so you can slide the brake pad back and out of the cartridge. If they’re stuck, this happens often, take the side of a larger hex wrench and press backwards on the front of the pad. This should easily push it out. Then with the new pads, make sure you get the left and right correct, simply slide them back in and re-tighten those small bolts on the outside of the pad. Now your wheel may not spin because of the extra pad on both sides. You’ll have to adjust your brake cable tension.

# 77 – How to Fix Brake Chatter 

Brake chatter on a cyclocross bike or bike with cantilever brakes can be a huge pain, not to mention degrading of your stopping power. Brake chatter occurs when the brakes are applied, thus flexing the fork backwards, which places more tension on the brake cable that is held by a brake stop typically above the headset. The elongated cable applies more pressure on the brake pads until either the wheel comes to a complete stop and you’re sent over the bars, or the pads slip free a bit only to then have the fork flex back again under the continued braking. This then draws more tension on the brake cable and thus tightens the pads down again and so the process continues, thus creating brake chatter. The easiest way to combat it is to toe your pads in to a fairly large degree. The narrower pressure point is going to allow the pads to slip free more easily. You can even shorten the length of your brake pads if you’re so inclined by cutting them. Using the right brake pad for your rim will also help as if your pads are too sticky, it will grab the rim too much. Aside from making adjustments to your current setup, you can shorten the length from the cable stop to the brake by using a fork-crown mount but you will need a normal brake mount on your fork which you likely don’t have. If these solutions don’t fix your problem you can put on a short pull or mini v-brakes. A typical v-brake will not work with your standard road levers as the pull length of the cable is too great but these short ones are designed to work together.

# 78 – Setting Up Cantilever Brakes Properly

setting up cantilever brakes

Cantilever brakes are a pain to set up. The first thing to do is to make sure your brake cable coming down is exactly in the center of the yolk (the Y that connect to either brake arm). Secondly, get the yolk as close to horizontal as you can while still allowing enough room for tire clearance. This will pull the brake arm more directly in increasing your stopping power. Pull the brake so the pad is on the rim before you tighten it so you can line up where it needs to go. Position the pad so the front touches the rim slightly before the rear does; toed in. Now you will need to position the pads on the rim so there’s about the width of a penny between the pad  and the rim when not engaged. This will take a few tries but be patient.

# 79 – Which Brake Pads to Use With Each Wheel and In What Conditions

You need to use the correct brake pad for the type of rim, aluminum or carbon, and for the conditions you’re riding in. Your average pad is going to be made for an aluminum wheel in most conditions but best in dry. If you have carbon rims, you need carbon specific pads otherwise you risk reduced braking power as well as taking the laminate off the rim. With both types of pads, you can get stickier ones for in the rain and mud. If you’re only ever in dry conditions, you can get pads for that. You best bet is to get a pad that does alright in all conditions so you’re not constantly changing them and of course specific to your rim type.

#80 –  Patching Tubes

Patching tubes is an easy, great way to save money with bike repair. There are few different kinds of patch kits but the most common is the simple one with glue. First find your hole by pumping up your tube and marking an X with a pen across the hole that goes out at least an inch in all directions. Then with the sand paper or scuffer, lightly scuff the tube an area greater than the size of the patch. Then apply a thin layer of glue also greater than the area of the patch. Let this glue dry for a couple of minutes. If you didn’t draw a mark on the tube, you’re going to have a hard time seeing the where the hole was so hopefully you did that. Center the patch over the hole and press it on flat and making sure you don’t have any air bubbles, A pro tip is to leave the clear piece of plastic on the patch as pulling it off can pull up one of the corners of the patch. It’s best to wait a bit to let the glue set up more but you’re probably fine to ride if you’re stuck on the side of the road.

#81 –  Installing a New Chain

removing a bike chain

To install a new chain, start by removing the old one and laying it next to the new one. Cut the new one to the exact same length. If the old one is stretched, just make sure they both have the same number of links. Then snake the new chain through the derailleurs and link it either with a connector pin or a master link. A full description of how to do this can be found in this article.

#82 –  Removing a Cassette

To remove a cassette you will need a chain whip, cassette lock ring remover tool, and a wrench. (either a crescent or the right sized closed or open-ended wrench or the right sized hex if your cassette remover tool accepts it) First, set the wheel at your feet with the cassette facing away from you. Place the chain whip at the two o’clock position with the long end of the chain going up and over the cassette. Then insert the cassette lock ring remover tool fully into the lock ring on the outside of the cassette. Then place your wrench at the ten o’clock position and then place it on the cassette lock ring remover tool. Then holding both the wrench and chain whip, press down. The cassette lock ring will loosen and you can then take it off all the way.

#83 –  What to do if there are gouges or groves on the freehub from the cassette digging in.

filing a cassette body

This can happen because the metal of the freehub is softer than that of the cassette. As long as your cassette can still slide on and off, it’s nothing to worry about. If you can’t slide the cassette off, use a straight bladed screwdriver and stick it between the cogs and lightly twist. Just make sure your removing and individual cog and not one piece that has three or more cogs on it. If you can’t easily slide the cassette back on, file down any of the large burrs and then slide the cassette on.

#84 –  Installing a Cassette

Installing a cassette is the reverse of moving it except you don’t need the chain whip since you’re not working with the freewheel. Thread the lock ring on by hand for the first couple of turns and then use a wrench to snug it down. Don’t over-tighten it though as you can strip the threads. Applying a light coat of grease on these threads also isn’t a bad idea.

#85 –  Replacing Cleats

Replacing cleats can be finicky because you want them in the exact same spot. Before removing the old ones, take a sharpie and go around the cleat outlining exactly where it is positioned. Then you can remove the bolts. Only do one shoe at a time. Once you get the cleat lined up with the washers where they belong, put a little bit of grease on the threads of the bolts. This is super important particularly if you don’t change your cleats very often. Then start all the bolts but don’t tighten them down all the way. Make sure your cleat is lined up perfectly with your stencil and then cinch the bolts down. They don’t have to be crazy tight as you don’t want to risk stripping them.

#86-  Changing Pedals

To change pedals you will either need a pedal wrench or a hex wrench of the appropriate size. The right, or drive side, is threaded normally meaning right-tighty, lefty-loosy. Position the pedal at the three o’clock position with the wrench at the nine o’clock position and simply press down, counter-clockwise using gravity as a friend. On the left, or non-drive side, position the crank and wrench in the same manner except on this side the threads are reversed meaning counter-clockwise tightens while clockwise loosens.

#87 –  Removing a Tire

To remove a tire first make sure all the air is out of the tube. Then with a tire lever, insert it on the opposite side of the valve stem underneath the bead of the tire and lever it up. If the tire is super tight, hook the lever on a spoke, and insert another one and do the same. Gradually work both levers away from each other. You should then be able to use your fingers to remove the bead the rest of the way around the rim and easily remove.

#88 –  Installing a Tire

changing a flat

Put on side of the tire on the rim all the way around. Then insert the tube through the valve stem hole and place the tube inside the tire all the way around the rim. Then start at the valve stem and work the bead of the tire over the rim and onto the tire ending opposite the valve stem with a small section waiting to be pulled up and over the rim. Insert a tire lever carefully under the bead of the tire being careful not to pinch the tube, and then lever the tire up and over the rim. You may need two tire levers starting at opposite sides and working toward the center of the remaining tire on particularly tight tires. Then go around the tire and make sure the tube is not pinched between the tire and the rim and that you can’t see it. Then simply pump it up.

#89 –  Squeaky Brakes

Squeaky brakes are annoying and often times not as effective as they should be. First, make sure your brake pads are slightly toed in on the front. If they still squeak, roughen up the brake pad with sand paper and wipe down the rim with rubbing alcohol. See this article for more details.

#90 –  Inefficient Brake Pads

Brake pads are ineffective for two reasons. One is the surface of the pad and two is the amount of force being exerted inward on the rim to slow it with friction. Take a piece of sand paper and roughen up the surface of the brake pad. This removes any residue or buildup on the pad. Second, make sure your brake pads are position so they have about the width of a penny between them and the rim. Make sure the pivot points on the brake are properly lubed and that the brake cable doesn’t need replaced.

#91 –  Installing Tubeless Tires

Installing tubeless tires can be a bit more of a hassle than regular clinchers but the effort is worth it for the added flat protection and riding ability. After you’ve installed the valve stem, install your tubeless ready tire like a normal tire except don’t put a tube inside it. When you get to the last couple of inches of bead to pull over the rim to finish installing the tire, stop. Take your sealant and pour the appropriate amount in. Then being careful not to spill it all out, finish putting the tire on.

#92 –  Pumping Up And Getting Tubeless Tires to Seat

The easy way to seat tubeless tires is to use an air compressor. Simply pump it up and the rapid filling of air should set the bead. You will hear a pop as the bead seats all the way around the rim. If the tire isn’t super tight and the air just comes out the sides, make sure the tire is centered all the way around the rim. Then take warm soapy water and a sponge and wipe around the rim getting the soapy water on the bead. This will help to hold the air as well as to provide a smooth surface for the bead to slide into place on.

If you don’t have an air compressor you might be able to get it to seat by pumping really fast but otherwise a CO2 cartridge will work. Another way is before you put any sealant in the tire, pump the tire up with a tube in it seating the beads. Then only take off one side of the tire being careful not to unseat the other bead. Then install the sealant and the other bead onto the tire. Then use the soap and water method and pump really fast. The tire should seat relatively quickly.

#93 –  Gluing Tubulars

gluing tubulars

Not everyone rides tubulars and even of those that do, even fewer glue their own. But regardless, it’s good to know how they go on and a valuable bike repair skill. There are multiple methods of gluing tubulars using varying number of layers of glue, and using or not using tape. The basic method starts with make sure the bed of the rim is void of any old, dried up glue that is not well adhered. You can remove any of this with a hard scraper of sorts and/or acetone. Then apply a thin layer of tubular glue to the bed of the rim being careful not to get it on the rim. Then apply a thin layer also to the tire. Let these dry overnight. Then add a second layer to both. Let them dry overnight. Then add a third layer to the rim only. Then start mounting the tire starting at the valve stem and working your way around. The final little bit is going to be hard to get on and you’ll need some umph. If you put glue on the tire at this point, it is going to get all over the rim when you try and mount the tire. Once you get the tire mounted, go around and make sure the tire is centered exactly all the way around. Once centered, still without any, or very much, air in the tire, roll the tire on the ground all the way around a couple times with a bit of weight on it to really press in the tire. An even better way to do this is to get a broom handle and roll the wheel on it so the handle pushed the tire down into the bed of the rim. Then pump the tire up and roll it again. Wipe off any glue from the rim with acetone as any glue on the braking surface will catch on the brake pad ever time around when braking.

#94 – Storing a Bike For an Extended Period of Time

If you’re storing your bike for an extended period of time it’s a good idea to do a few things to it first so when you return, it’s still in good working order. The first is to lube your chain. (Tip #9) The second is to drip a little bit of oil down the cables into the housing to prevent them from seizing up. Third is to drip a bit of oil on the pivot points of the derailleurs and brakes. Also, place your chain in the smallest rear cog and small chainring up front to take the pressure off the springs and cable. If you have a steel bike, and are leaving it someplace cooler where condensation can form, place a light coat of rust-proofing oil on it to prevent it from rusting. Finally, if you’re leaving your bike on a concrete floor, place a piece of cardboard under the tires to prevent them from dry rotting.

#95 – Removing a Crankset

There are a number of different styles of crankset and each one uses a different method. You need to first figure out which kind you have. On some you remove the cranks bolt and thread in a crank-puller to push the crank off the spindle of the bottom bracket. Others, particularly new models, simply just pull off by hand.

#96 – Removing a Bottom Bracket

As with cranksets, there are a number of different styles of bottom brackets, each requiring their own approach. Older, threaded bottom brackets require the use of a tool such as this or this. The big thing with threaded bottom brackets is that the right side is reversed threaded meaning that you turn clockwise to loosen and counter-clockwise to loosen. The left side is threaded normally. Other newer bottom brackets are pressed in and simply need tapped out from the opposing side. When reinstalling the new ones of these, make sure they are straight going in!

#97 – How to Service Cup and Cone Bearings

servicing cup and cone bearings

Cup and cone bearings are the old style bearings that tighten down into place as opposed to modern day cartridge style bearings which don’t need any adjusting. First loosen the outer nuts (normally threaded, ie. righty tighty, lefty loosey) then loosen the inner nuts and make sure you have enough grease on the bearings them selves. To tighten, take two wrenches and place on on each of the inner nuts and tighten them down so they’re just touching the bearings. If you over-tighten them, your wheel won’t spin. If you under tighten them, your axel will rock back and forth with play. It will take a couple of tries to get the feel. Once you have the inner nuts tightened to your desired tightness, place one wrench on the inner nut and the other on the outer nut on the same side. Tighten the outer down into the inner being sure the inner nut doesn’t move but is rather just held in place. You should go fairly snug. Then do the same on the other side. Now spin the wheel and see how tight the bearings are. If the wheel doesn’t spin smoothly, you’ve gone too tight. Undo it and loosen the inner nuts a bit. If there’s play you didn’t tighten the inner bearings down enough. A trick here is to place a wrench on either of the outer nuts and tighten them down. This will press everything in. If you go to far you will then have to undo everything and go back to the inner nuts.

#98 – How to Straighten a Bent Derailleur Hanger

If you crash on your right side, it’s likely that you bent the derailleur hanger. In this case it’s advised to replace it but that’s not always possible, especially in a short amount of time because each bike has their own specific hanger. (gotta love industry) To straighten it if it’s not bent too far, take the derailleur off and remove the hanger from the frame, typically with two little hex bolts. Then place frame end in a vice being carefully not to crush it, and then take a pair of pliers or vice-grips and carefully straighten the hanger. Aluminum does not do well with bending so don’t overdo it as it could easily break.

# 99 – When to Take Your Bike To a Professional

Knowing when to take your bike to a professional and when to do the bike repair yourself will save you time, money, and the expense of breaking something. First, if you don’t have the tools to do a bike repair properly, take it to a professional. If you kind of know what you’re doing you can use online resources (such as this) to help guide you but if it still doesn’t make sense, take it to a professional. If you don’t want to take your time and learn to do it properly, say in changing a bottom bracket, take it to a professional as if you try and rush through something, you risk stripping the threads of something or breaking it all together; take it to a professional.

# 100 – How to Do a Carbon Repair Job

bike carbon repair

This is another one of those bike repair things that you may not be inclined to do on your own but always wondered how it was done. First it’s difficult to repair a carbon frame into a joint without added know how. On a tube, say the top tube, it’s relatively straight forward. With some 120 to 150 grit sand paper, sand all of the clear coat and paint off the frame down to the raw carbon. You’ll know you’ve hit carbon when the dust on the sandpaper turns black. You will want to do it about an inch further than where the carbon will lay, typically two to four inches on either side of the crack.

You then want to cut your carbon sheet into the shape you want with it overlapping itself by about an inch. Then mix your two part epoxy, one hardener, one resin, and apply a thin coat to the frame just lager than your carbon sheet. Carefully apply the sheet (rubber gloves are essential here) with the seam being on the bottom so you can’t see it. Work out any bubbles and make sure it lies flat. Then, with electrical tape, tape about an inch on the dry frame and double the tape back on itself so the sticky side is out. Then tightly wrap the carbon all the way around to press it firmly against the layer beneath it. Then with a pin, go around and poke holes in the tape to let out excess resin. Then let it dry over night.

After drying, remove the tape and sand all of the resin off down to your new carbon layer. Again, you should get black dust on your sandpaper indicating your down to carbon. Then do the process again, typically three to eight times depending on how bad the break was. To finish you can either leave the last layer of epoxy on or sand it off and apply paint.

Bonus Bike Repair Tip 101 – Don’t Let Your Friends Work on Your Bike

Unless you know that your friend, or loved one, knows what they’re doing 100%, don’t let them work on your bike. They may make it worse and when you or a shop needs to fix what they did, you won’t even know what they did. Also if they, mess something up, or worse cause an accident, you don’t and they don’t want that blame placed on them. In addition, if they’re working on it, you’re not learning, so learn how to work on your bike yourself and do your own bike repair.

We don’t expect you to take every single item we mention to heart an implement it immediately; however, if you can pick up a few extra simple bike repair and maintenance tips and tricks and add them to your repertoire you will save money, time, and also be safer.

When Should You Replace Bike Tires?

March 25, 2016 by Wade Shaddy

Tires are one of the biggest contributors to bike handling performance. They could be considered the most critical component on your bike. They are also the most consumable item on your bike, but what makes tires wear out? When should you replace bike tires? In some cases it’s obvious — missing or smooth tread for example. In other instances, it might be that your bike handles or rides poorly.

When Should You Replace Bike Tires

The major cause of premature tire wear is prolonged use of the tire with low pressure — it’s just that simple. It’s because sidewalls of tires usually fail before the tread is worn out. Low pressure causes the sidewall to bend and flex over and over again much more so than it would if it were properly aired.

Signs You Need To Replace Bike Tires

Cracks

Cracks along the sidewall of road tires or mountain bike tires is a dead give-away you have sidewall damage and your tire needs replaced. Another indicator is uneven tread wear such as a smooth or bald band on the right and left side of the tire, with good tread in the middle. Checking and adjusting the inflation pressure before each ride with a pressure gauge is the most important thing you can do to prolong the life of your tires.

Frequent Flats

Frequent flatting is a red flag. Several flats in a week or multiple flats on longer rides likely means that your tire needs replaced. This is a no-brainer really. It happens because the tread is so thin it can no longer protect the tube from sharp objects. It happens to road tires and mountain bike tires alike.

Tread Wear

Worn out tires are obvious to a professional, but if your tires wear out gradually you might not notice it. The solution is simple — when your tires are new, make a mental note of how thick the rubber is on the contact point of the tire to the pavement, or how much tread they have, and visually monitor it over the miles. Keep checking it and you’ll see it disappear. When it does, consider replacing the tire.

Squaring Off

Even if the tread on your road bike tire seems fine, another indicator, squaring off, could also mean that your tire is history. Mountain bike tires often get a smooth center while the knobs on either side look fine. Squaring off happens mostly to rear tires because of the extra weight. Squared off tires handle poorly and aren’t as fast. It’s a sure sign that you need to replace the squared off tire as soon as you can.

Exposed Casing

Exposed casing is also very obvious if you look for it. This occurs on front and rear tires if you ride them long enough. If you keep riding on the tire, you’re asking for trouble because the only thing keeping the tube inside is a thin section of casing, which was not designed to contact the road and will wear much faster than the rubber tread. Exposed casing looks like a series of diagonal threads, typically on the side of the tire, but can occur almost anywhere on the tire.

Bulges and Bubbles

This one happens all the time. You’re riding along, and feel a regular bump. Or you might just notice a bulge in your tire before you get on your bike particularly on the sidewall of the tire. This is dangerous because the tire can burst at any time causing you to crash. If you have a bulge or bubble in your tire, fix it immediately with a tire boot if it’s small, or replace the tire altogether.

By Mileage

If you’re still not sure if your tires are worn out, there are a few guidelines applicable per mileage for road bike tires. Most road bike rear tires require replacement in the range of 1,500 to 3,000 miles. Front tires usually run upwards of 2,000 to 4,000 miles. Back tires wear more quickly than the front because about 60 percent or more of your weight is on that tire. Mileage data is not applicable for mountain bike tires because riding style (abuse) is too much of a factor.  Another part of the equation for both mountain and road tires; the lighter you are, the longer your tires will wear. The more you weigh, the faster they wear out.

Attrition by Age

Tires wear out even if you don’t ride the bike. If you store a bike for more than a few months be sure to check the tires. Wear is not always obvious because you haven’t been riding the bike. But rubber hardens over time and cracks. Even more serious is that the casing — sometimes referred to as the sidewall —  can rot, crack, and separate. Also known as dry rot, if you see frayed threads or cracks, or rotting of any type, don’t ride. The tire may appear to hold air just fine, but it won’t for long when you hit the road. Blowouts are common on aged tires. Blowouts scare the hell out of you and cyclists riding close to you —  and can lead to a crash.

Ride Quality

It might be that your tires pass the test for wear but you still hate them because your bike is slow, feels heavy, or cornering is twitchy or unstable. Poor handling is common on puncture-resistant, heavy tires made for flat protection, or even some of the all-weather tires. But they have their advantages. If you live in an area of inclement weather, bad roads or puncture weeds, they are worth their weight in gold. The choice is yours. Lighter tires handle and accelerate better but you’ll be fixing more flats and replacing them more often because they wear out faster.

Experiment With Tire Pressure

It’s been previously stated that proper pressure is important to your tire, but what good are rules unless you can break them. In the last decade it has become trendy to pump up tires as high as they will go. Or that the more pressure, the faster the bike will ride. At least one brand of tire actually requires 140 psi. That much pressure can make a bike ride harsh. Super high pressure can make the bike bounce depending on how heavy you are. It transmits road shock, fatigues the rider, causes the premature failure of bike frames and wheels and makes tires more prone to flats.

Stay at the lower end of the pressure zone for comfort and rough roads. Running lower pressure can yield a bike that corners better and gives a far nicer ride. Properly inflated tires roll over bumpy roads smoother and faster and get you home without shaking your teeth loose. On ultra-smooth roads however, when rolling resistance is crucial, such as in a time-trial or triathlon, go as high as 140 psi if your tires are rated to take it. The suggested inflation range is a good starting point but don’t be afraid to experiment with it. The point is, when should you replace your bike tires? Keep an eye on them and they will take care of you.

Bike Chain Maintenance

November 30, 2015 by Adam Farabaugh

Bike Chain Maintenance

What’s the one part of your bike that has the most individual pieces to it? Not many would guess the chain but today’s chain has eight parts per link which makes for a lot of moving parts with over fifty links in the average chain. Maintaining your bike chain will make it shift more smoothly and quieter, it will also last longer and help preserve the life of your cassette. With that many moving parts there’s more than one step to keeping it rolling like it should.

Bike Chain Wear

As with any other part on your bike, chains wear out, often quicker than we would like. Chains wear by ‘stretching’ and no longer lining up perfectly with the teeth of the cassette. This stretch is not the actual metal stretching but rather the pin in each link wearing against the inner and outer plates of the chain causing the hole in each to be ever so slightly larger. This happens the fastest when it is metal on metal when the pin rotates within the plates. To keep this from happening as much, oil keeps these contact points properly lubricated so the metal doesn’t grind into each other and wear out as quickly.

Measuring Chain Wear

A little bit of chain stretch over time is ok and will always occur. The problem becomes when it stretches too far and the teeth on the cassette begin to wear out as well. Before long you will not only have to replace the chain but the cassette as well.

There is a handy tool that measures if a chain is stretched but you can do the same with a tape measure. A full link measures one inch in length when brand new. To account for a number of links, measure one foot from the exact same point on the chain to see how much it has stretched. If the foot mark falls less than 1/16th of an inch from the same point on the link, the chain is still golden. If it’s over 1/16th of an inch you need to replace the chain but probably don’t have to replace the cassette.

The only real way to test if you have to replace the cassette as well is to ride the bike with the new chain and put pressure on the pedals in a few of the smaller gears. If the chain slips, they don’t line up enough, but if there are no issues, you’re good to go. If the chain measures over 1/8th of an inch off you will need a new chain and cassette.

Washing a Chain

There are a number of approaches to washing a chain including taking it completely off the bike, but the best and easiest way is to clean it while on the bike with a degreaser. Before washing your bike, spin the pedals backwards applying a degreaser (there are a number of good citrus-based solvents out there. I use Park Tool Citrus ChainBrite Cleaner).  Then with a sturdy bristled brush, scrub the chain to get the degreaser further into the links while also dislodging any grit and grime.

One added effective way to clean your chain is to use a chain cleaner mechanism that has a number of rotating brushes in a small plastic box that is filled with degreaser. Running your chain through this not only coats it with degreaser but also brushes a lot of the grit and old oil off of it easily.

After degreasing and brushing, wash the chain with regular soap and water as you would the rest of your bike and then follow it up with a good spray through the links to make sure all the grit is out of it as well as any leftover degreaser.

Wiping Your Chain

Following a thorough wash, spin the pedals backwards running the chain through a clean rag to get as much moisture out of the chain as possible. This should actually be done after every ride because when you ride, oil seeps onto the entirety of the chain while collecting debris from the road. If left on, this debris will eventually work its way into the moving parts of the chain causing it to wear out even faster. Plus wiping your chain leaves your it looking like new for every ride and not black which can cause a nice mark on your leg if you’re not careful.

A good trick is to leave a rag easily accessible next to where you leave your bike and whenever you finish a ride, give it a quick wipe down. And then any oil that does get on your hands can just be washed off as you go inside.

Lubing

Now that we’ve gotten all of the prerequisites out of the way – washing and wiping the chain, we can now apply bike specific chain lube. I use Triflow and just so you know chain lube isn’t just oil. Oil specifically for bikes is thin enough to get into the tiny spaces between the pins and links yet thick enough that it doesn’t wear off super quick. Don’t use motor oil as it contains detergent that washes away byproducts of an engine and is made to be constantly restored to the place it is needed. Household oils can become gunked up because they are too thick so the best and easiest is regular bike chain oil that you can get from your local bike shop or online.

Where To Lube and How Much

Now that you know what to put on your chain, you have to know where to put it and how much. The objective of oiling a chain is to get the oil inside the moving parts of the chain, not on the outside as it doesn’t do anything there. The best way to do this is to use an oil can that has a small nozzle that you can apply directly to the rollers of the chain in the center with a drop or two on each. Do this while spinning the chain backwards; once if you’re certain that you applied enough oil on the first go around, otherwise a second or third time. Once you stop dripping oil on the chain, keep spinning the pedals backwards. This will keep all the parts of the chain moving to get the oil further into the chain itself. You can even let it set a minute if you’re willing to wait.

After the oil has made its way inside the chain, take another clean rag and wipe off all of the excess by spinning the pedals backwards through the rag a few times. You need to do this because you don’t need oil on the outside of the chain as it can collect road grit more easily and get into the chain itself along with just being dirty in general.

If you keep your chain properly lubed as well as washed on a regular basis to keep grit from getting inside of it, your chain will last much longer and will shift and sound better. It doesn’t take a lot to keep your chain lubed and running smooth but it does take knowing how to do it. Just keep a rag and bottle of lube next to where you keep your bike and you’ll be sure to remember especially after now knowing exactly what causes your chain to wear out and stretch.

That Alarming Chain Skip

November 29, 2015 by Wade Shaddy

That Alarming Skip - Chain Issues

There’s never a good time for your chain to skip, but it almost always comes at the wrong time, typically under a load when standing or climbing. It can be a subtle click, or a body dropping tremor. It takes you by surprise, and just for a moment, you’re not exactly sure what happened.

Chain Skip Will Happen Again

It can happen once, or sound like a series of pops in your drivetrain. The harbinger of bad news, it’s a sure bet it will happen again and again, getting worse as you add the miles.

Shifting Skip

Some cyclists confuse chain skip with shifting issues caused by poor tension on the cable, causing the chain to miss its intended target, skips, and then grabs hold of consecutive teeth as it was supposed to do the first time. This type of skip can be easily fixed by using the barrel adjuster to add tension to the cable. It’s a shifting issue, not a chain skip issue.

True Skip

True chain skip happens when one component of a drive train has just been replaced, or the drive train has been used so much that the chain skips over the top edge of the cog teeth. The most common skip happens when you begin a climb in high gears, stand up on the pedals, and apply torque to the chain. The chain rides up the gear and slips up and over the tooth. It might skip one tooth or several before hooking up again.

Favorite Gear

Chain skip usually occurs in your favorite gear or gears, as these are the gears you use more than the others, and therefore wear out first.

Chain Stretch

Blaming skip on a stretched chain is misleading. Chains get longer when the holes in the links become elongated where pins pass through. Pins also wear to a certain extent, because pins do not have bearings that serve to reduce metal to metal friction.

Chain Specs

Every time you ride your bike, your chain gets longer. It might be minimal, but it’s there in theory. New chains typically measure exactly one pin for every half inch. A chain that has thousands of miles ridden on it should have pins that match up on every half inch mark, but by the time you get to twelve inches the twenty-fourth pin will likely be past that marker. How much it is past will indicate chain wear and determine if you require a new chain all together.

Shark Fins

As a chain elongates it wears the leading, top edge off of the cogs, because it doesn’t match up with them. Worn out gears look like shark fins or hook slightly on the worn edge, giving the gear the appearance of a table saw blade. In other words, the gears conform to the chain, resulting in the shark tooth sawblade appearance. Therefore, if you replace your chain regularly, gears shouldn’t wear out at a significant rate.

Chain Suck

You’ve probably heard the term “chain suck.” It is also a product of worn chains and gears. Chain suck is a condition where worn chains fail to disengage from the worn gears. The chain rides back up the gear. It’s more common on mountain bikes, often locking up the gear. It’s characterized by a noisy clatter on road bikes, when the chain rides up and then disengages with a noisy clatter. If you hear it consistently, you will likely be having chain skip issues to accompany it.

What Causes Chains to Wear

Chain wear is caused almost exclusively by road grit that enters the chain when it’s oily. Grit adheres to the oil. It’s the ugly black stuff that gets on your calf, causing the badge of honor, the chain ring tattoo. The black stuff is oil colored with steel particles, most of which come from pin and sleeve wear, which causes the elongation of the sleeves in the links. The rate of wear is mostly a result of how clean the chain is.

Cleanliness and Lube

Chain and gear wear depends almost entirely on cleanliness and lubrication. For example, chains and gears operated in clean conditions, such as timing chains on vehicles, last for years, spin around millions of times, and go the equivalent of hundreds of thousands of miles before skipping is an issue. So theoretically, if you kept your chain perfectly clean, it would run for thousands of miles without excessive wear or skipping. But it’s impossible to keep it spotless without removing it, submerging it in solvent, and putting it back on. Almost nobody wants to go to that much effort.

Chain Expiration Date

Chain life expectancy depends on who you talk to, but it typically falls in the range of between 1,000 and 3,000 miles. Anywhere in this range is considered safe on gears. Bike shops recommend replacing your chain at these recommended miles. If you’re inclined to change your chain that often then do it.

Gears Conform to Chains

If you do run your chain longer than it’s expiration date, it means that your gears are conforming to your elongated chain, and it won’t necessarily result in skipping. Worn chains and gears can run smoothly and efficiently together, and the fact that your chain is elongated doesn’t mean that your chain will skip. If your bike isn’t giving you any problems with skipping, you can keep riding it if you want to, without changing your chain. If you get more than three or four thousand miles on it don’t worry about it. Just be aware, that you are wearing down your gears, and instead of just replacing your chain, you may been to replace your bike gears as well.

Better Chains

If you’re running an Ultegra or Dura Ace drivetrain — they can take a real beating for years. If you’ve neglected to change the chain, keep riding it until it skips, and then change your cassette, front rings and chain all at the same time. They all wear out together. Switching to a new chain without replacing the gears is a recipe for skipping when the drivetrain has excessive miles. However some riders report 15,000 miles on a single drivetrain without skipping.

How to Repair a Broken Bike Chain

October 14, 2015 by Guest Post

How to Repair a Broken Bike Chain
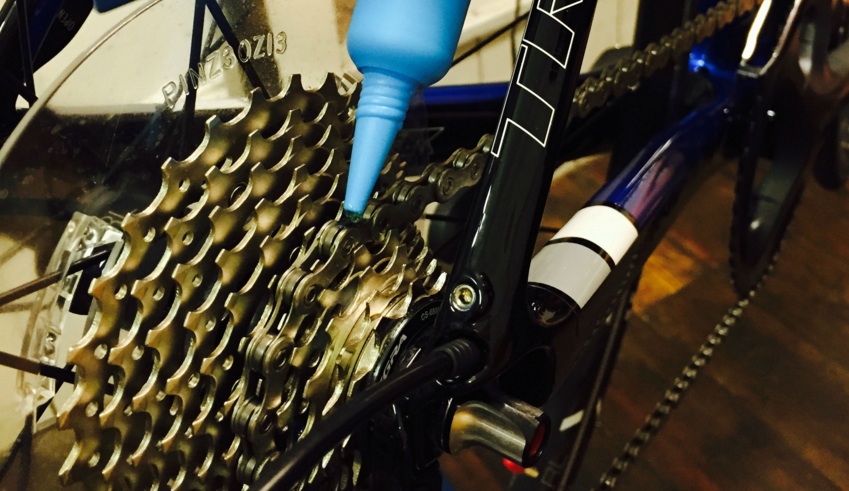
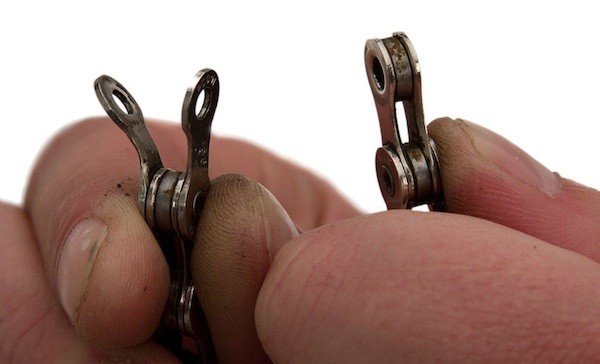
Whether you’re out on the road or at home in your garage, a broken bike chain can be a real bummer. Fortunately, fixing a broken chain really isn’t that difficult, as long as you have a chain tool (also called a chain breaker). This tool fits onto the chain and allows you to drive pins into or out of the chain to “cut” it to length or take out a broken link and then reattach it by screwing the chain tool’s pin against one of the pins of the chain.

A chain tool also known as a chain breaker comes is a pretty standard accessory for multitools. Read the best multitools to find one that works for you.

Now, let’s talk about how to repair a broken chain when you’re on a ride.

When Your Chain Breaks While You’re Out Riding

If your chain breaks while you’re on the road, chances are good that you’re going to need to take the broken link out. Fit your chain tool onto your chain at the next unharmed link next to the broken one. Push the pin almost all the way through but not all the way out of the chain. Then unscrew your chain tool and remove it from the chain. To get the broken link off of the chain, flex it sideways at the point where you’ve driven the pin out.

You may have to do the same process on the other side of the broken link. When you do, make sure that the two ends of your chain (left over after you’ve removed the broken link) are complementary. One should be an internal half of a link, and the other should be an external (with pin still attached).

Fit the chain tool onto the chain in the opposite direction from how you had it fitted before (so that the tool’s pin is lined up to push the chain’s pin back in). Then screw the handle of the chain tool in to push the pin into place and reconnect the chain.

At this point, the link you just reattached may be a little bit stiff. If you have some chain lube with you, put a drop on the link. If not, that’s okay, too. Just flex the chain from side to side a couple of times and then up and down a few times. The link should loosen, and you should be able to get home without any trouble.

Once you get home, you should take a look at your entire drivetrain and see if you can diagnose what happened to cause the chain to break. If you can’t find the cause and/or if it looks like something is wrong, take your bike to your favourite local shop and get a professional bike tech to take a look at it for you. Then you’ll know if you need to make more repairs or if your bike is good to go for a few thousand more miles.

How To Adjust Your Brakes

October 14, 2015 by Guest Post

How To Adjust Your Brakes
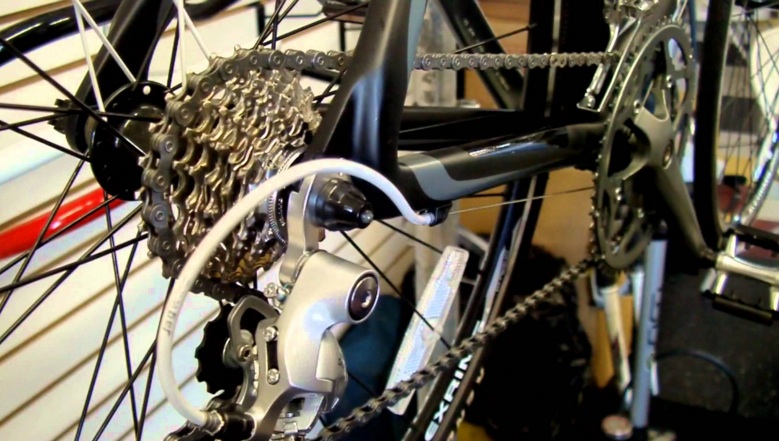
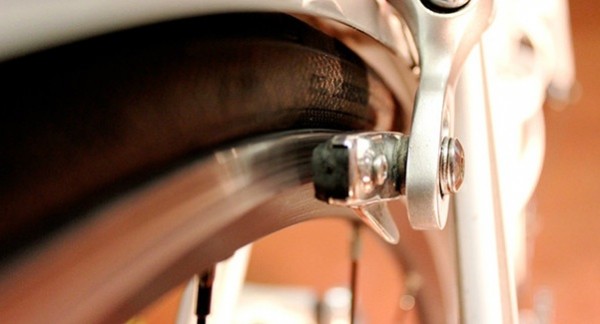
No matter what kind of bike you have, the tension on your brakes is controlled by one of two things: a brake cable or hydraulic fluid. If you have hydraulic disc brakes, there’s not a lot that you can do to adjust them, other than bleeding them, which is generally a job best left for professional mechanics. However, if you have rim brakes or cable-actuated disc brakes, adjusting your brakes is pretty simple and should be something you can do at home.

Make Small Adjustments With Your Barrel Adjusters

If you have a mountain bike, hybrid, or city bike, you’ll notice that there are screw-like adjusters on your levers where the brake cable housing meets the lever. If you have a road bike, you’ll notice a similar adjuster on the brake itself, again, where the cable housing meets the brake. These are called barrel adjusters, and they allow you to take up cable tension, which brings the brake arms closer to the rim of the bike (or the pads closer to the rotor in the case of disc brakes).

If your brakes are too loose, and you have to squeeze the levers all the way to the handlebar to get any kind of stopping power, you’ll want to loosen your barrel adjusters a few turns. This actually tightens the brake cables and therefore tightens the brakes. If your brakes are so tight that they don’t let your wheels turn, then you can tighten the barrel adjusters back down and make some room.

When You Need to Make Bigger Adjustments

These small adjustments don’t require any tools, and you can even do them while you’re riding your bike if you have good enough bike handling skills (but it’s much better to do it while the bike is not in motion). If you’ve already turned a barrel adjuster all the way out or all the way back in, though, you’re going to need to grab either a five-millimeter hex wrench or a ten-millimeter box-end wrench (depending on your brakes).

With your wrench, loosen the pinch bolt that holds the brake cable in place. Then roll your barrel adjuster about halfway out. Pull the cable tight and put enough tension on the brake that it lightly touches the rim. While you do this, tighten the pinch bolt down again. Then roll the barrel adjuster back in, and you should have a well-adjusted brake. If not, you can play with how far you roll the barrel adjuster out and/or how much tension you put on the cable as you tighten the pinch bolt back down. With a little bit of patience, you should be able to adjust your brakes without much trouble at all.

Good luck, and, as always, if you run into too much trouble, don’t hesitate to take your bike to your local bicycle shop for some professional care.

Dealing With Roadside Flats

October 8, 2015 by Lee Agur

With so many objects and pieces of debris littering our cycle paths – it’s inevitable that we’ll have to deal with a puncture at the road side at some point! Before setting out on your journey, whether it’s simply to work at the office, or for a more adventurous excursion over the weekend; you should always be sure to prepare your pack in case the worst should happen.

We’re talking a repair kit, a manual pump, a bike wrench and at least one spare inner tube. The essential bike tools! It’s better to have them on hand should they ever be needed!

So what can you do when the worst case scenario becomes a reality, and you find an object has damaged one of your tires? Even the sturdiest bicycle will lose functionality with a flat tire, but it’s really not the end of the world, especially if you have a repair kit handy. The main concern will arise from your location – especially if you’re near moving vehicles.

The Plan of Action

Dealing With Roadside Repairs Safely

As soon as you notice a puncture, safely dismount your bicycle and make your way to a quiet, safe spot away from danger. Avoid riding your bike if it’s suffered a puncture – especially if the cause of the puncture is still sticking out like a confident cage fighter.

As soon as you can, remove your wheel, and locate the scene of the crime. There are normally one of two typical discoveries at this point – either the cause of the damage has fled the scene, or it’s still embedded, daring you to check if it’s made a way into the inner tube.

Double Check for Safety

If you haven’t already done so, take a look at your location and make sure that you’re not standing in an active pathway. A repair will only take a short while depending on your level of expertise, but it’s not worth standing in harm’s way. Ideally you are able to change a flat tire in 5 minutes or less. This should be practiced before it is a necessity out on the road.

Dealing with Flat Tires

We know that external damage is a minimal concern, and it’s more about whether or not the inner tube has been punctured. If it has, no amount of pumping will keep it filled with air, so the next best thing is to tackle the puncture head on.

Some punctures are tiny, others are very obvious, and the latter event will normally need a replacement tube altogether. For smaller punctures however, it should be a simple matter of grabbing your repair kit, sealing the source and allowing the adhesive to dry. If you are dealing with a tiny puncture, then half the challenge is locating the hole itself!

If you are able to pump air in to the tube, then do so carefully and then run your fingertips along the outside of the tube. You’ll want to pay careful attention to any small gusts of air, as these will give away the location of the puncture. Once you’ve spotted the damage, you can apply your seal, secure it with adhesive and then allow it to dry, before re-assembling your bicycle tire.

Handling Tricky Punctures

The life of a cyclist is never simple, and if your bike has suffered a slightly more challenging puncture, then you may want to pull out the big guns – in the form of your replacement tube. The rubber tire itself is now your main priority, and you’ll want to check if it’s simply been punctured, or split. A split is a bad sign, and there’s not much that can be done beyond sourcing a replacement, but if the rubber seems okay, then the next step is to check the damage on your inner tube.

It’s not uncommon for the object to remain embedded within the tire, and as tempting as it might be to ride to your destination with the debris sticking out, it’s never a good idea as you may be causing more damage to the tire and tube.

A better idea would be to safely dismount your bicycle, remove the object, evaluate the damage, and then perform the same repair procedure as mentioned above! The worst case scenario? You’ll need to make your way to your destination on foot. The best? You’ll be back on your journey in less than 10 minutes!

5 minute DIY Bike Maintenance

February 24, 2014 by U.M.

bike knowledge to beard ratio - DIY bike repairNo matter what kind of bike you ride you will eventually have to give that bike some sort of maintenance. This keeps the bike in good working condition for longer no matter how often you use it. This maintenance is just small upkeep and repairs that you can do at home in minutes. Here are a couple of quick DIY bike maintenance tips: [Read more…]

  • Facebook
  • Tumblr
  • Twitter

Latest Articles

JOIN Cycling: A New Training Platform for Cyclists

May 27, 2024 By Eric Lister

cold exposure

The Benefits of Cold Exposure for Cycling & Life

June 13, 2023 By Eric Lister

hill climb

The Ultimate Hill Climb Training Guide

May 31, 2023 By Eric Lister

shoulder pain cycling

How to Treat & Avoid Shoulder Pain While Cycling

April 12, 2023 By Eric Lister

psoas stretch

The Importance of the Psoas Stretch for Cyclists

April 6, 2023 By Eric Lister

cycling neck pain

The Ultimate Guide to Cycling Neck Pain: Causes and Solutions

March 21, 2023 By Eric Lister

Useful Info

  • Contact
  • Finally, A Global Cycling Club That Is Focused On Community And Love Of Cycling!
  • Privacy Policy
  • Share Your Story!
  • Terms And Conditions Of Use
  • Welcome to I Love Bicycling
  • What Happened When I Stretched Every Day For a Month

Recent Posts

  • JOIN Cycling: A New Training Platform for Cyclists
  • How to Hang Bikes in Your Garage: 4 Inexpensive Options
  • Gravel Bike Vs. Road Bike: Which One Is Better For You?
  • The 6 Types of Mountain Bikes & How to Choose the Best One for You
  • What Is a Touring Bike Good For? 5 Benefits We Know You’ll Love

Search I Love Bicycling

Connect with Us

  • Facebook
  • RSS
  • Tumblr
  • Twitter

Copyright © 2025 · Magazine Pro Theme on Genesis Framework · WordPress · Log in