• Training
    • Injury Prevention
    • Training Tips
  • How To
    • Bike Fit
    • Gear
  • Nutrition
    • Nutrition Tips
    • Weight Loss
  • Repair
  • Reviews
  • Stories
    • Funny Stories
    • Jokes
    • Quotes
    • Videos
    • Funny Videos

I Love Bicycling

I Love Bicycling is a website that is geared towards cycling for beginners with road cycling tips, training articles, nutrition tips, weight loss, how to’s and bike repair articles.

Repair

5 Best Bike Chain Cleaning and Degreasing Products

January 4, 2016 by Adam Farabaugh

Oil and grit can be hard to remove from a bike chain and is nearly impossible to do with just water. Using a degreaser in conjunction with a chain cleaner tool or brush will help to easily get your chain sparkling clean. There are a lot of products out there that can all do the job but these are the best bike chain cleaning ones that are also good for other dirty parts of your bike.

Best Bike Chain Cleaning Degreasers

There are varying strength degreasers but for a bike you don’t need the most invasive. Getting too strong of a degreaser can cause coatings on your frame and parts to wear off as well as can be harmful to breath and touch. These few cleaners and degreasers are strong enough to get the job done but are also safe enough for you and your bike to handle.

Simple Green

This is available in many places from your hardware store to bike shop. It is a great option that is environmentally friendly as well as isn’t overly strong so you can spray it on any part of your bike without worry.  It conveniently comes in large, economically sized jugs or bike specific spray bottles that are handy on the go on any part of your bike.

Finish Line Citrus Bike Chain Degreaser

Citrus based solvents are known for their grease cutting power and non-harmful qualities. Finish Line was one of the fist citrus based cleaners and uses citrus based extracts to remove oil, grit, and grime. This one has a fresh citrus smell that will soon be associated with washing and cleaning your bike. This one also comes in an aerosol for exact placement and minimal waste.

Purple Power

Purple Power Industrial Strength Degreaser - 32 fl oz.

Purple Power isn’t bike specific but is one of the top cleaners/degreasers on the market. It is a bit stronger than the other two above but is still biodegradable and mellow enough to use on your bike without adverse effects. Because of its extra strength it can be diluted to your exact needs as well as to last longer. A great option with this is to buy the big economically sized gallon jug and continually refill a smaller Purple Power spray bottle.

Best Bike Chain Cleaning Tools

Having a good degreaser is only part of the equation to cleaning your chain. The degreaser will help dislodge oil and grit but to get it completely off the chain you are going to have to scrub it. There are few different approaches that use some innovative tools as well as the old-school method of using a good brush and some elbow-grease.

Finish Line Pro Chain Cleaner

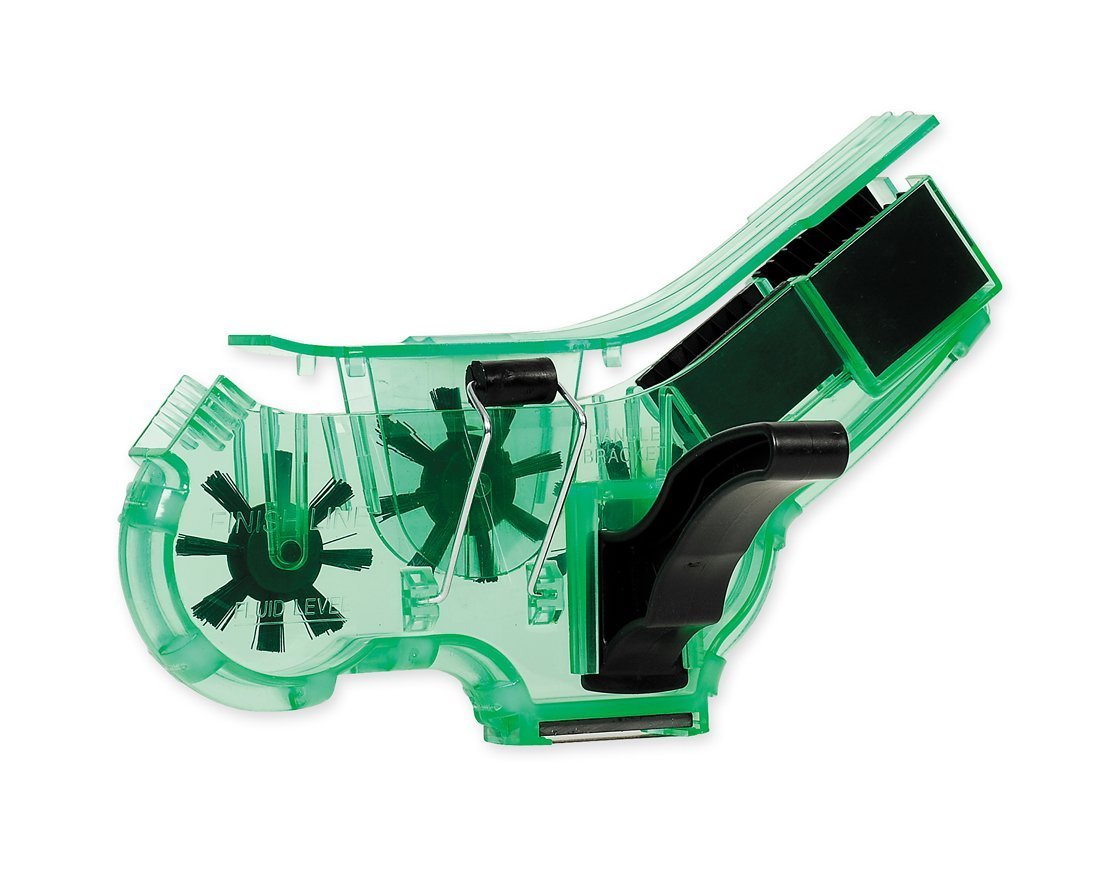
The best way to clean a chain thoroughly is to remove it from your bike and place it in a heavy strength degreaser but who wants to take their chain completely off the bike every time they want to clean it. This chain cleaner is a plastic box that snaps around the chain while on the bike. It has a number of rotating bristles in it that scrub the chain while you spin the pedals backwards thus pulling the chain through. The rotating bristles in conjunction with filling the box with degreaser scrubs the chain thoroughly which leaves it about as clean as you could get a chain without taking it off the bike.

Park Tool Chain Gang Cleaning System


This Park Tool package is a good all-in-one system that includes a chain scrubber, like the one mentioned above, as well as a sturdy-bristled brush and small bottle of degreaser. The bottle of chain specific degreaser won’t last you too long but the brush and chain scrubber are valuable additions to your bike cleaning set-up.

Best Bike Chain Cleaning Rag and Brush

Of course you don’t need a fancy tool to get your chain clean. You can just use a sturdy-bristled brush that can forcefully get into the nooks and crannies of the chain and dislodge grit and grime. The best way to do this is to spray or apply degreaser directly to the chain. Make sure it is fully coated to remove oil residue. Then with a brush, scrub both the top as well as the bottom of the chain. If you’re diligent, you can also scrub the sides of the chain getting the inner plates nice and clean as well.

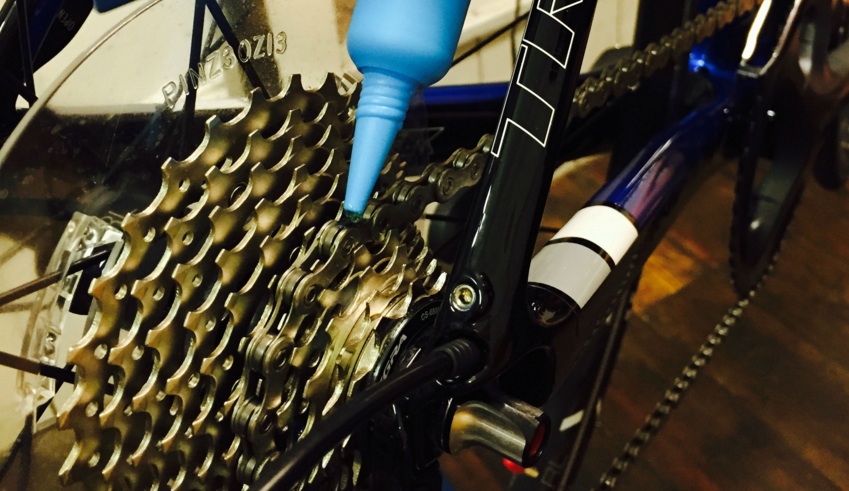
Following this, use a spray-hose or bucket of water to thoroughly remove the remnants. Then run the chain through a clean rag a couple of times to get as much moisture off the chain as possible. Don’t forget to immediately lube the chain after as even if left overnight, rust can begin to develop. You can learn more here about how to properly lube and maintain your chain.

Cleaning your bike can be a hassle but with the right cleaning products and tools it can be a breeze. And there’s a feeling that goes with having a bike that is clean and dialed. And to top it off, you have a brand new looking machine due to your own doing. Clean it often and clean it smart. Don’t forget to lube the chain.

Bike Chain Maintenance

November 30, 2015 by Adam Farabaugh

Bike Chain Maintenance

What’s the one part of your bike that has the most individual pieces to it? Not many would guess the chain but today’s chain has eight parts per link which makes for a lot of moving parts with over fifty links in the average chain. Maintaining your bike chain will make it shift more smoothly and quieter, it will also last longer and help preserve the life of your cassette. With that many moving parts there’s more than one step to keeping it rolling like it should.

Bike Chain Wear

As with any other part on your bike, chains wear out, often quicker than we would like. Chains wear by ‘stretching’ and no longer lining up perfectly with the teeth of the cassette. This stretch is not the actual metal stretching but rather the pin in each link wearing against the inner and outer plates of the chain causing the hole in each to be ever so slightly larger. This happens the fastest when it is metal on metal when the pin rotates within the plates. To keep this from happening as much, oil keeps these contact points properly lubricated so the metal doesn’t grind into each other and wear out as quickly.

Measuring Chain Wear

A little bit of chain stretch over time is ok and will always occur. The problem becomes when it stretches too far and the teeth on the cassette begin to wear out as well. Before long you will not only have to replace the chain but the cassette as well.

There is a handy tool that measures if a chain is stretched but you can do the same with a tape measure. A full link measures one inch in length when brand new. To account for a number of links, measure one foot from the exact same point on the chain to see how much it has stretched. If the foot mark falls less than 1/16th of an inch from the same point on the link, the chain is still golden. If it’s over 1/16th of an inch you need to replace the chain but probably don’t have to replace the cassette.

The only real way to test if you have to replace the cassette as well is to ride the bike with the new chain and put pressure on the pedals in a few of the smaller gears. If the chain slips, they don’t line up enough, but if there are no issues, you’re good to go. If the chain measures over 1/8th of an inch off you will need a new chain and cassette.

Washing a Chain

There are a number of approaches to washing a chain including taking it completely off the bike, but the best and easiest way is to clean it while on the bike with a degreaser. Before washing your bike, spin the pedals backwards applying a degreaser (there are a number of good citrus-based solvents out there. I use Park Tool Citrus ChainBrite Cleaner).  Then with a sturdy bristled brush, scrub the chain to get the degreaser further into the links while also dislodging any grit and grime.

One added effective way to clean your chain is to use a chain cleaner mechanism that has a number of rotating brushes in a small plastic box that is filled with degreaser. Running your chain through this not only coats it with degreaser but also brushes a lot of the grit and old oil off of it easily.

After degreasing and brushing, wash the chain with regular soap and water as you would the rest of your bike and then follow it up with a good spray through the links to make sure all the grit is out of it as well as any leftover degreaser.

Wiping Your Chain

Following a thorough wash, spin the pedals backwards running the chain through a clean rag to get as much moisture out of the chain as possible. This should actually be done after every ride because when you ride, oil seeps onto the entirety of the chain while collecting debris from the road. If left on, this debris will eventually work its way into the moving parts of the chain causing it to wear out even faster. Plus wiping your chain leaves your it looking like new for every ride and not black which can cause a nice mark on your leg if you’re not careful.

A good trick is to leave a rag easily accessible next to where you leave your bike and whenever you finish a ride, give it a quick wipe down. And then any oil that does get on your hands can just be washed off as you go inside.

Lubing

Now that we’ve gotten all of the prerequisites out of the way – washing and wiping the chain, we can now apply bike specific chain lube. I use Triflow and just so you know chain lube isn’t just oil. Oil specifically for bikes is thin enough to get into the tiny spaces between the pins and links yet thick enough that it doesn’t wear off super quick. Don’t use motor oil as it contains detergent that washes away byproducts of an engine and is made to be constantly restored to the place it is needed. Household oils can become gunked up because they are too thick so the best and easiest is regular bike chain oil that you can get from your local bike shop or online.

Where To Lube and How Much

Now that you know what to put on your chain, you have to know where to put it and how much. The objective of oiling a chain is to get the oil inside the moving parts of the chain, not on the outside as it doesn’t do anything there. The best way to do this is to use an oil can that has a small nozzle that you can apply directly to the rollers of the chain in the center with a drop or two on each. Do this while spinning the chain backwards; once if you’re certain that you applied enough oil on the first go around, otherwise a second or third time. Once you stop dripping oil on the chain, keep spinning the pedals backwards. This will keep all the parts of the chain moving to get the oil further into the chain itself. You can even let it set a minute if you’re willing to wait.

After the oil has made its way inside the chain, take another clean rag and wipe off all of the excess by spinning the pedals backwards through the rag a few times. You need to do this because you don’t need oil on the outside of the chain as it can collect road grit more easily and get into the chain itself along with just being dirty in general.

If you keep your chain properly lubed as well as washed on a regular basis to keep grit from getting inside of it, your chain will last much longer and will shift and sound better. It doesn’t take a lot to keep your chain lubed and running smooth but it does take knowing how to do it. Just keep a rag and bottle of lube next to where you keep your bike and you’ll be sure to remember especially after now knowing exactly what causes your chain to wear out and stretch.

That Alarming Chain Skip

November 29, 2015 by Wade Shaddy

That Alarming Skip - Chain Issues

There’s never a good time for your chain to skip, but it almost always comes at the wrong time, typically under a load when standing or climbing. It can be a subtle click, or a body dropping tremor. It takes you by surprise, and just for a moment, you’re not exactly sure what happened.

Chain Skip Will Happen Again

It can happen once, or sound like a series of pops in your drivetrain. The harbinger of bad news, it’s a sure bet it will happen again and again, getting worse as you add the miles.

Shifting Skip

Some cyclists confuse chain skip with shifting issues caused by poor tension on the cable, causing the chain to miss its intended target, skips, and then grabs hold of consecutive teeth as it was supposed to do the first time. This type of skip can be easily fixed by using the barrel adjuster to add tension to the cable. It’s a shifting issue, not a chain skip issue.

True Skip

True chain skip happens when one component of a drive train has just been replaced, or the drive train has been used so much that the chain skips over the top edge of the cog teeth. The most common skip happens when you begin a climb in high gears, stand up on the pedals, and apply torque to the chain. The chain rides up the gear and slips up and over the tooth. It might skip one tooth or several before hooking up again.

Favorite Gear

Chain skip usually occurs in your favorite gear or gears, as these are the gears you use more than the others, and therefore wear out first.

Chain Stretch

Blaming skip on a stretched chain is misleading. Chains get longer when the holes in the links become elongated where pins pass through. Pins also wear to a certain extent, because pins do not have bearings that serve to reduce metal to metal friction.

Chain Specs

Every time you ride your bike, your chain gets longer. It might be minimal, but it’s there in theory. New chains typically measure exactly one pin for every half inch. A chain that has thousands of miles ridden on it should have pins that match up on every half inch mark, but by the time you get to twelve inches the twenty-fourth pin will likely be past that marker. How much it is past will indicate chain wear and determine if you require a new chain all together.

Shark Fins

As a chain elongates it wears the leading, top edge off of the cogs, because it doesn’t match up with them. Worn out gears look like shark fins or hook slightly on the worn edge, giving the gear the appearance of a table saw blade. In other words, the gears conform to the chain, resulting in the shark tooth sawblade appearance. Therefore, if you replace your chain regularly, gears shouldn’t wear out at a significant rate.

Chain Suck

You’ve probably heard the term “chain suck.” It is also a product of worn chains and gears. Chain suck is a condition where worn chains fail to disengage from the worn gears. The chain rides back up the gear. It’s more common on mountain bikes, often locking up the gear. It’s characterized by a noisy clatter on road bikes, when the chain rides up and then disengages with a noisy clatter. If you hear it consistently, you will likely be having chain skip issues to accompany it.

What Causes Chains to Wear

Chain wear is caused almost exclusively by road grit that enters the chain when it’s oily. Grit adheres to the oil. It’s the ugly black stuff that gets on your calf, causing the badge of honor, the chain ring tattoo. The black stuff is oil colored with steel particles, most of which come from pin and sleeve wear, which causes the elongation of the sleeves in the links. The rate of wear is mostly a result of how clean the chain is.

Cleanliness and Lube

Chain and gear wear depends almost entirely on cleanliness and lubrication. For example, chains and gears operated in clean conditions, such as timing chains on vehicles, last for years, spin around millions of times, and go the equivalent of hundreds of thousands of miles before skipping is an issue. So theoretically, if you kept your chain perfectly clean, it would run for thousands of miles without excessive wear or skipping. But it’s impossible to keep it spotless without removing it, submerging it in solvent, and putting it back on. Almost nobody wants to go to that much effort.

Chain Expiration Date

Chain life expectancy depends on who you talk to, but it typically falls in the range of between 1,000 and 3,000 miles. Anywhere in this range is considered safe on gears. Bike shops recommend replacing your chain at these recommended miles. If you’re inclined to change your chain that often then do it.

Gears Conform to Chains

If you do run your chain longer than it’s expiration date, it means that your gears are conforming to your elongated chain, and it won’t necessarily result in skipping. Worn chains and gears can run smoothly and efficiently together, and the fact that your chain is elongated doesn’t mean that your chain will skip. If your bike isn’t giving you any problems with skipping, you can keep riding it if you want to, without changing your chain. If you get more than three or four thousand miles on it don’t worry about it. Just be aware, that you are wearing down your gears, and instead of just replacing your chain, you may been to replace your bike gears as well.

Better Chains

If you’re running an Ultegra or Dura Ace drivetrain — they can take a real beating for years. If you’ve neglected to change the chain, keep riding it until it skips, and then change your cassette, front rings and chain all at the same time. They all wear out together. Switching to a new chain without replacing the gears is a recipe for skipping when the drivetrain has excessive miles. However some riders report 15,000 miles on a single drivetrain without skipping.

How to Repair a Broken Bike Chain

October 14, 2015 by Guest Post

How to Repair a Broken Bike Chain
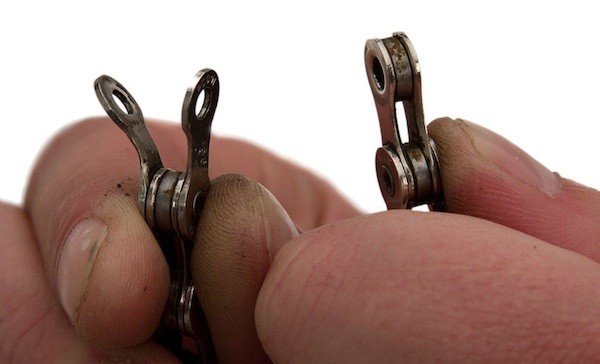
Whether you’re out on the road or at home in your garage, a broken bike chain can be a real bummer. Fortunately, fixing a broken chain really isn’t that difficult, as long as you have a chain tool (also called a chain breaker). This tool fits onto the chain and allows you to drive pins into or out of the chain to “cut” it to length or take out a broken link and then reattach it by screwing the chain tool’s pin against one of the pins of the chain.

A chain tool also known as a chain breaker comes is a pretty standard accessory for multitools. Read the best multitools to find one that works for you.

Now, let’s talk about how to repair a broken chain when you’re on a ride.

When Your Chain Breaks While You’re Out Riding

If your chain breaks while you’re on the road, chances are good that you’re going to need to take the broken link out. Fit your chain tool onto your chain at the next unharmed link next to the broken one. Push the pin almost all the way through but not all the way out of the chain. Then unscrew your chain tool and remove it from the chain. To get the broken link off of the chain, flex it sideways at the point where you’ve driven the pin out.

You may have to do the same process on the other side of the broken link. When you do, make sure that the two ends of your chain (left over after you’ve removed the broken link) are complementary. One should be an internal half of a link, and the other should be an external (with pin still attached).

Fit the chain tool onto the chain in the opposite direction from how you had it fitted before (so that the tool’s pin is lined up to push the chain’s pin back in). Then screw the handle of the chain tool in to push the pin into place and reconnect the chain.

At this point, the link you just reattached may be a little bit stiff. If you have some chain lube with you, put a drop on the link. If not, that’s okay, too. Just flex the chain from side to side a couple of times and then up and down a few times. The link should loosen, and you should be able to get home without any trouble.

Once you get home, you should take a look at your entire drivetrain and see if you can diagnose what happened to cause the chain to break. If you can’t find the cause and/or if it looks like something is wrong, take your bike to your favourite local shop and get a professional bike tech to take a look at it for you. Then you’ll know if you need to make more repairs or if your bike is good to go for a few thousand more miles.

How To Adjust Your Brakes

October 14, 2015 by Guest Post

How To Adjust Your Brakes
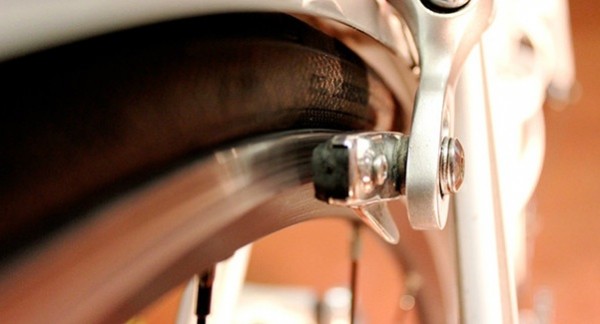
No matter what kind of bike you have, the tension on your brakes is controlled by one of two things: a brake cable or hydraulic fluid. If you have hydraulic disc brakes, there’s not a lot that you can do to adjust them, other than bleeding them, which is generally a job best left for professional mechanics. However, if you have rim brakes or cable-actuated disc brakes, adjusting your brakes is pretty simple and should be something you can do at home.

Make Small Adjustments With Your Barrel Adjusters

If you have a mountain bike, hybrid, or city bike, you’ll notice that there are screw-like adjusters on your levers where the brake cable housing meets the lever. If you have a road bike, you’ll notice a similar adjuster on the brake itself, again, where the cable housing meets the brake. These are called barrel adjusters, and they allow you to take up cable tension, which brings the brake arms closer to the rim of the bike (or the pads closer to the rotor in the case of disc brakes).

If your brakes are too loose, and you have to squeeze the levers all the way to the handlebar to get any kind of stopping power, you’ll want to loosen your barrel adjusters a few turns. This actually tightens the brake cables and therefore tightens the brakes. If your brakes are so tight that they don’t let your wheels turn, then you can tighten the barrel adjusters back down and make some room.

When You Need to Make Bigger Adjustments

These small adjustments don’t require any tools, and you can even do them while you’re riding your bike if you have good enough bike handling skills (but it’s much better to do it while the bike is not in motion). If you’ve already turned a barrel adjuster all the way out or all the way back in, though, you’re going to need to grab either a five-millimeter hex wrench or a ten-millimeter box-end wrench (depending on your brakes).

With your wrench, loosen the pinch bolt that holds the brake cable in place. Then roll your barrel adjuster about halfway out. Pull the cable tight and put enough tension on the brake that it lightly touches the rim. While you do this, tighten the pinch bolt down again. Then roll the barrel adjuster back in, and you should have a well-adjusted brake. If not, you can play with how far you roll the barrel adjuster out and/or how much tension you put on the cable as you tighten the pinch bolt back down. With a little bit of patience, you should be able to adjust your brakes without much trouble at all.

Good luck, and, as always, if you run into too much trouble, don’t hesitate to take your bike to your local bicycle shop for some professional care.

Dealing With Roadside Flats

October 8, 2015 by Lee Agur

With so many objects and pieces of debris littering our cycle paths – it’s inevitable that we’ll have to deal with a puncture at the road side at some point! Before setting out on your journey, whether it’s simply to work at the office, or for a more adventurous excursion over the weekend; you should always be sure to prepare your pack in case the worst should happen.

We’re talking a repair kit, a manual pump, a bike wrench and at least one spare inner tube. The essential bike tools! It’s better to have them on hand should they ever be needed!

So what can you do when the worst case scenario becomes a reality, and you find an object has damaged one of your tires? Even the sturdiest bicycle will lose functionality with a flat tire, but it’s really not the end of the world, especially if you have a repair kit handy. The main concern will arise from your location – especially if you’re near moving vehicles.

The Plan of Action

Dealing With Roadside Repairs Safely

As soon as you notice a puncture, safely dismount your bicycle and make your way to a quiet, safe spot away from danger. Avoid riding your bike if it’s suffered a puncture – especially if the cause of the puncture is still sticking out like a confident cage fighter.

As soon as you can, remove your wheel, and locate the scene of the crime. There are normally one of two typical discoveries at this point – either the cause of the damage has fled the scene, or it’s still embedded, daring you to check if it’s made a way into the inner tube.

Double Check for Safety

If you haven’t already done so, take a look at your location and make sure that you’re not standing in an active pathway. A repair will only take a short while depending on your level of expertise, but it’s not worth standing in harm’s way. Ideally you are able to change a flat tire in 5 minutes or less. This should be practiced before it is a necessity out on the road.

Dealing with Flat Tires

We know that external damage is a minimal concern, and it’s more about whether or not the inner tube has been punctured. If it has, no amount of pumping will keep it filled with air, so the next best thing is to tackle the puncture head on.

Some punctures are tiny, others are very obvious, and the latter event will normally need a replacement tube altogether. For smaller punctures however, it should be a simple matter of grabbing your repair kit, sealing the source and allowing the adhesive to dry. If you are dealing with a tiny puncture, then half the challenge is locating the hole itself!

If you are able to pump air in to the tube, then do so carefully and then run your fingertips along the outside of the tube. You’ll want to pay careful attention to any small gusts of air, as these will give away the location of the puncture. Once you’ve spotted the damage, you can apply your seal, secure it with adhesive and then allow it to dry, before re-assembling your bicycle tire.

Handling Tricky Punctures

The life of a cyclist is never simple, and if your bike has suffered a slightly more challenging puncture, then you may want to pull out the big guns – in the form of your replacement tube. The rubber tire itself is now your main priority, and you’ll want to check if it’s simply been punctured, or split. A split is a bad sign, and there’s not much that can be done beyond sourcing a replacement, but if the rubber seems okay, then the next step is to check the damage on your inner tube.

It’s not uncommon for the object to remain embedded within the tire, and as tempting as it might be to ride to your destination with the debris sticking out, it’s never a good idea as you may be causing more damage to the tire and tube.

A better idea would be to safely dismount your bicycle, remove the object, evaluate the damage, and then perform the same repair procedure as mentioned above! The worst case scenario? You’ll need to make your way to your destination on foot. The best? You’ll be back on your journey in less than 10 minutes!

How To Properly Maintain Your Bike Chain

September 21, 2015 by U.M.

How To Properly Maintain Your Bike Chain
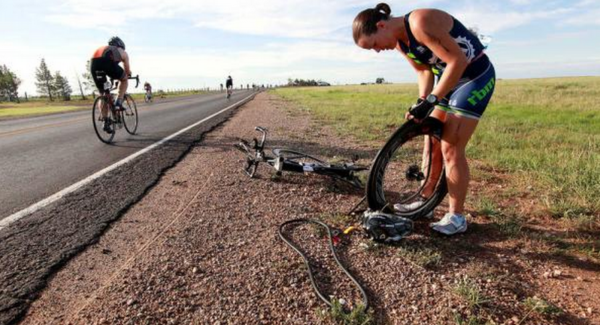
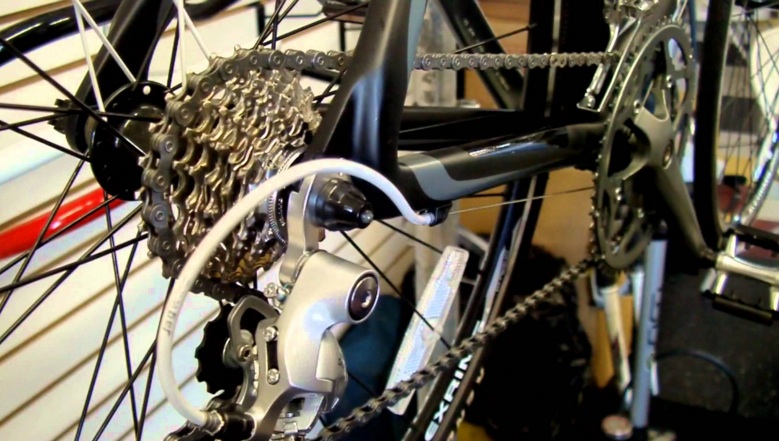
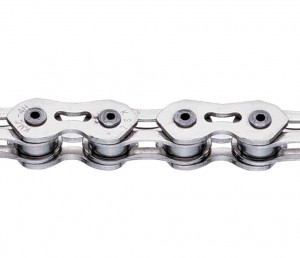
Your bike chain is one of the most important parts of your bike. After all, without it you simply won’t be able to ride. Unfortunately, it is also one of the parts of your bike that is going to be subject to the most wear and tear, as it is constantly exposed and will likely get dirty and less efficient over time.

As such, properly maintaining your bike chain is crucial if you want to ensure that your bike performs to the best of its abilities. If you are interested in competitive cycling, you will need to know what should be done to keep it in good condition at all times, so that you have an edge over the competition.

How Does Riding Affect Bike Chain Performance?

Your bike chain is going to decrease in effectiveness every time you head out for a ride, assuming you don’t maintain it properly. Chain wear and reduced flexibility in the chain links themselves result from dirt clogging up the system, and all of this can combine to create added wear on drivetrain cogs and other aspects of the bike, affecting overall performance and occasionally causing you to have to spend more money on repairs.

Furthermore, when it comes to competitive cycling you will find that a poorly maintained bike chain will affect your ability to shift between gears, which is vital when you need everything to be at the optimum level to place well in the race.

How To Maintain Your Bike Chain

You should aim to check your bike chain on a regular basis by standing to the side of the bike and lifting the rear wheel off the ground. Rotate the pedals slowly and inspect each link in the chain to check for signs of dirt or debris that could affect performance. You also need to check for links that don’t bend particularly well and listen out for squeaks as the chain rotates.

If you spot any of these issues, you should carry out a spot clean by brushing the links with a form brush and lubricating the chain with a good bike lubricant. Wipe off any excess with a clean rag, as too much lubricant can actually cause more issues.

You will also need to periodically remove the chain from the bike to give it a full clean. Usually you can do this every month, though you might want to increase the frequency if you have a mountain bike. Use a chain-removal tool to safely get the chain off the bike and immerse it in a chain solvent so that you can rid the chain of the dirt that you are unable to get to with brushing alone. Clean it with a dry rag and relubricate before placing the chain back on the bike.

Things To Look Out For

Tight Links – These can be spotted by looking out for links in the bike chain that don’t bend easily. Usually this is because there has been some corrosion between links, or there is a particularly difficult chunk of dirt clogging up the system. Clean lubricate and flex the link lightly back and forth to gain back the flexibility that the link needs to allow for proper performance.

Chain Stretch – No matter how regularly you clean your chain, all of them are subject to what is known as chain stretch. This is caused by wear between the rollers and link pins and leads to the chain becoming less effective. If you have noticed that your bike is slipping gears, the likelihood is that your chain has stretched. Unfortunately, this is not something that can be cleaned or remedied, so use a wear-indicator to find out if the chain is usable. If the prong doesn’t fit in the chain gap, you should replace the chain rather than run the risk of it causing further damage to the bike.

Also Read: 20 Essential Bike Repair Tools

Roadside Maintenance Tips

September 19, 2015 by U.M.

tips for bike maintenance

If you’re an avid biker you’ll eventually experience some sort of mechanical failure while you’re riding. If you’re close to home you can simply wheel or even carry your bike back to the garage for repairs. However, if you’re on a longer bike ride you’ll need to know how to repair your bike well enough to get you home. Here are some tips for bike maintenance on the road.

The Essential Tools

In order to fix a problem you have to have the right tools. When you’re on a bike ride you’ll want to pack some essential tools to get you through your roadside maintenance. Such tools include:

  • spare inner tubes (2 minimum)
  • self-adhesive patches
  • pump
  • tire levers
  • multi-tool with allen key, screwdriver, chain tool, etc.
  • zip ties
  • money – preferably bills
  • phone

This is just a list of the absolute essential – don’t leave home without for any reason tools. Additional tools are recommended.

Tricks of the Tires

Your tires will likely be the most problematic area on a long bike ride because they encounter the most debris. Punctures, gashes, or just a plain old flat tire can end a bike ride before it really gets going. If the inner tube of your tire is punctured it needs to be replaced before you go on.

Inspect the outside of the tire for long tears. If you have a large tear or big puncture you run the risk of puncturing the new inner tube as well. In order to avoid that you can patch up the hole by grabbing any bill (preferably a $1 bill or a small denomination) and sliding it into the inside of the wheel to cover the hole.

Also inspect the inside of the tire to ensure there is nothing sharp that will instantly cause another flat by running your fingers along the whole inside of the tire. Remove any sharp debris.

If your bike ride is being particularly rough on your tires and you run out of inner tubes (or just don’t want to replace an inner tube on the side of the road) then a self-adhesive patch should get you home. Just pump the tire back up and continue on your way.

How to Pick Your Tools

The pump that you buy for roadside maintenance is important. You’ll find that there a wide variety of bike pumps that come in nice pocket sized versions and generally have good prices. However, be aware that the smaller bike pumps do not have as much power and are not always capable of reaching higher pressures. Prepare to be pumping for quite a long time with a smaller pump.

As for your tire levers, multi-tools, and zip ties, your own personal choice is all you have to take into account. You want tools that are sturdy but small enough to fit in a saddle bag. You can find high quality tool kits at most bike shops.

Safety Precautions

Never do your roadside maintenance directly at the roadside. Unless the road has a very wide shoulder, you don’t want to be there. If a car swerves even a little you run the risk of being hit. When you have to get off your bike, move the bike a good ten to twenty feet from the road. The busier the road is, the further you want to be. Also never do maintenance with your back to the road. You always want to be facing the road so that you can see oncoming traffic and therefore any danger.

These quick tips for bike maintenance on the road should help you finish your ride even with tire punctures. Zip ties are always great for fixing loose parts in a pinch and your multi-tool will help you adjust many of the parts on your bike should they come out of alignment or feel loose. Any other kind of maintenance usually requires tools not easily packed into your handy saddlebag. Are there any other essential tools that you’ve found useful on a bike ride?

Tips For Preventing a Flat Tire

September 3, 2015 by U.M.

Tips For Preventing a Flat Tire
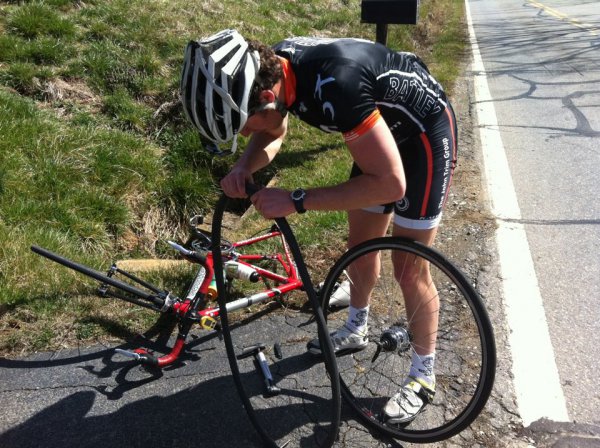
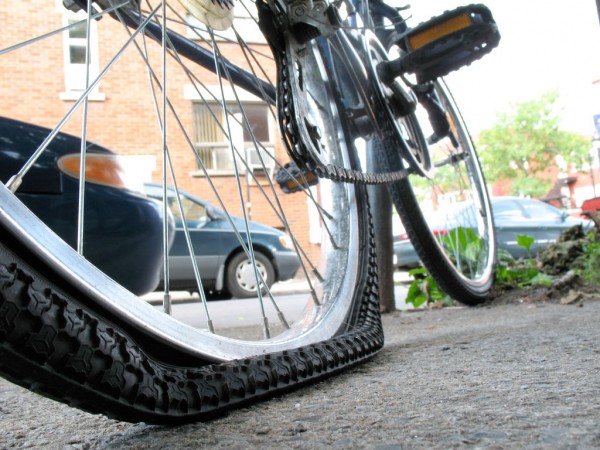
If you have been cycling for a reasonable amount of time then the odds are fairly good that you have encountered a flat tire or two in your time. In many cases you can usually repair the tire with a decent puncture repair kit, but that doesn’t mean that they aren’t still an annoyance that most cyclists would be more than happy to do without.

While some flat tires are unavoidable, there are measures that you can take to ensure that there is less chance of one occurring when you are out on a ride. Here we look at a few ways to prevent a flat tire from ruining your ride.

Proper Tire Pressure

First and foremost, the proper tire pressure is the key to making sure you do not get a flat. Over inflating is just as big of a problem as under inflating.

Over Inflation – Many people are guilty of pumping their tires too much thinking that hard tires are going to make them faster. What can end up happening is as the day heats up it will make the air in the tires expand and literally burst.

Under Inflation – Pinch flats are one of the leading causes of flat tires. If you get something that looks like a snake bite in your tube it was likely caused by a pinch flat. This occurs because the rim hits the tire and pinches the tube in between.

Pro Tip: Pump your tires to the ideal psi before each and every ride.

Talcum Powder

While many flat tires are caused by something on the road, general wear and tear on the tire itself can also become an issue over time. In particular, friction between the inner tube and the tire can lead to a hole being created that will cause the tire to deflate over time.

To prevent this, you should aim to make the rubber of the inner tube a little slippery so that the effects of that friction are reduced. Whenever you get a new inner tube, be sure to dust it with a healthy coating of talcum powder so that you can reduce the effects of friction and mitigate the issue.

Careful Riding

In many cases your tire won’t immediately puncture when it has picked up a piece of debris on the road. Sometimes, said debris simply gets caught in the tire and keeps rotating with it until the weight placed upon it leads it to penetrating and causing a flat tire.

This means that, with a little careful riding, you can prevent the sorts of punctures that sneak up on your like this. If you have just cycled through an area that had a less than optimal surface, be sure to take a little bit of time to check your wheels. Simply hop off the bike and slowly rotate each one of your wheels. If you notice any debris there get rid of it and check the area to make sure that it hasn’t punctured the tire. If you’re lucky there will be no problem, but if there is a puncture you will have at least caught it early enough for you to repair it without any issues.

Tire Wipers

Tire wipers are becoming increasingly rare in the modern cycling environment, but if you look hard enough you should still be able to find them around.

These nifty little devices will connect to your brakes or fenders and will work to get rid of any debris that has attached itself to the tire while you ride. It does this through the use of a rubber coated metal bar, which brushes against the tire as it rotates and knocks off any debris. This should mean that the debris doesn’t have the chance to penetrate into the tire during the next wheel rotation, reducing the risk of a puncture.

Choose Your Route Carefully

If you are simply cycling for the sake of fitness and aren’t interested in mountain biking or going off-road, a little bit of route planning will ensure that you avoid areas that present a potential danger to your tires, thus allowing you to avoid causing issues.

In most cases riding on tarmac or asphalt is much safer for your tires than going off road, so try to stick to good surfaces as much as possible. Of course, this doesn’t mean you can get careless, so always have your eyes open when you are riding so that you can avoid any hazards.

Pinch Flats

September 2, 2015 by U.M.

A detailed look at pinch flats, including: what is a pinch flat, what causes pinch flats, how to prevent pinch flats and what to do when you get a pinch flat.A flat tire is something that practically every cyclist has to deal with at some point or another, but many novices may be unaware that there are actually a number of different ways that you can get a puncture, each of which requires a slightly different method to deal with or prevent.

Pinch flats, which are known as Snakebites in some corners of the cycling world, are perhaps the most irritating of all flat tires because they can cause damage that a puncture repair kit will struggle to fix and often result from fairly innocuous riding. As such, it is possible to get a pinch flat if you are a road cyclist, meaning that even ensuring your route is as flat as possible isn’t always going to help you. As such, you need to take the proper precautions with your route before you ride.

What Is A Pinch Flat?

A detailed look at pinch flats, including: what is a pinch flat, what causes pinch flats, how to prevent pinch flats and what to do when you get a pinch flat.
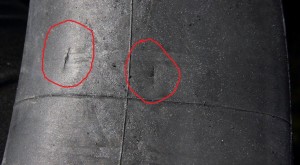
A pinch flat most commonly occurs when you run over something with your bike that causes the inner tube to punch against the wheel rim, resulting in a flat tire. In the worst case scenarios they will require you to replace the inner tube and, in some cases, may even lead to dents forming in the rim itself. However, in many cases, you should find that the tire itself is unaffected.
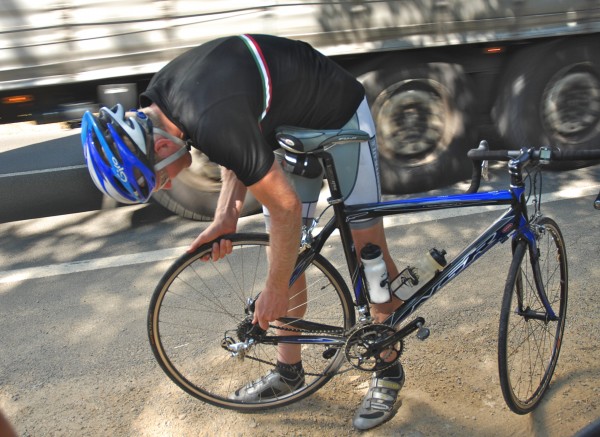
This type of flat is distinguishable because of the unique pattern that develops on your inner tube. You will notice two small holes that are side by side when you check the tube, creating a snakebite pattern that gives this type of flat its alternative name.

How Are Pinch Flats Caused

Pinch flats are caused by riding over something with your bike that is big enough to give your wheel a bit of a jolt. For example, stones and manhole covers are both capable of causing a pinch flat.

This is because what you hit isn’t what punctures the inner tube. Instead, it is the pinch between the tube and the rim that causes the damage. That means that any object, whether sharp or blunt, is capable of causing a pinch flat if the jolt to your wheel is big enough.

What To Do When You Get a Pinch Flat

In some cases you will be able to repair a pinch flat using a puncture repair kit, however this can only be done if the kit contains a patch that is big enough to cover both holes. It also doesn’t remedy the issue entirely, so you will probably have to do a little extra work on your bike when you get back.

Even if you have managed to patch the inner tube up, it is still advisable to replace the tube as soon as possible so that you can ensure that the bike continues to ride well and you don’t have to keep bringing puncture repair kits along with you.

How To Prevent Pinch Flats

One way to avoid a pinch flat is to be really careful with your riding so as to ensure you don’t ride over anything that could jolt the wheel. However, this is not always possible, especially if you are pushing yourself to your limits and need to focus on that aspect of the ride.

It is important to note that pinch flats are more common in bikes where the tires have fairly low air pressure. This allows for more room for the inner tube to slip and get caught against the rim, so if you want to give yourself the highest chance of avoiding the issue then it is a good idea to pump up your tires regularly and ensure that they have the proper air pressure. For mountain biking you want to ensure that you have a minimum of 25psi and road biking a minimum of 85psi.

If you continually find you are getting pinch flats, make sure to increase the air pressure in your tires.

« Previous Page
Next Page »
  • Facebook
  • Tumblr
  • Twitter

Latest Articles

JOIN Cycling: A New Training Platform for Cyclists

May 27, 2024 By Eric Lister

cold exposure

The Benefits of Cold Exposure for Cycling & Life

June 13, 2023 By Eric Lister

hill climb

The Ultimate Hill Climb Training Guide

May 31, 2023 By Eric Lister

shoulder pain cycling

How to Treat & Avoid Shoulder Pain While Cycling

April 12, 2023 By Eric Lister

psoas stretch

The Importance of the Psoas Stretch for Cyclists

April 6, 2023 By Eric Lister

cycling neck pain

The Ultimate Guide to Cycling Neck Pain: Causes and Solutions

March 21, 2023 By Eric Lister

Useful Info

  • Contact
  • Finally, A Global Cycling Club That Is Focused On Community And Love Of Cycling!
  • Privacy Policy
  • Share Your Story!
  • Terms And Conditions Of Use
  • Welcome to I Love Bicycling
  • What Happened When I Stretched Every Day For a Month

Recent Posts

  • JOIN Cycling: A New Training Platform for Cyclists
  • How to Hang Bikes in Your Garage: 4 Inexpensive Options
  • Gravel Bike Vs. Road Bike: Which One Is Better For You?
  • The 6 Types of Mountain Bikes & How to Choose the Best One for You
  • What Is a Touring Bike Good For? 5 Benefits We Know You’ll Love

Search I Love Bicycling

Connect with Us

  • Facebook
  • RSS
  • Tumblr
  • Twitter

Copyright © 2025 · Magazine Pro Theme on Genesis Framework · WordPress · Log in