• Training
    • Injury Prevention
    • Training Tips
  • How To
    • Bike Fit
    • Gear
  • Nutrition
    • Nutrition Tips
    • Weight Loss
  • Repair
  • Reviews
  • Stories
    • Funny Stories
    • Jokes
    • Quotes
    • Videos
    • Funny Videos

I Love Bicycling

I Love Bicycling is a website that is geared towards cycling for beginners with road cycling tips, training articles, nutrition tips, weight loss, how to’s and bike repair articles.

Cycling Rain Jacket – The Best 5

June 14, 2016 by Josh Friedman

cycling rain jacket

A cycling rain jacket is an indispensable garment that will keep you comfortable and on your bike when the weather goes bad. It is not only rain that a cycling rain jacket can protect you from, but wind and cold too. It is a convenient garment that you can slip into a jersey pocket and keep there in case of emergency.

Changing Weather Conditions

If you are heading out in variable weather you should carry a cycling rain jacket in your pocket. Variable weather covers not only rain moving in where you are now, but also elevation changes along with riding at dusk when the temperature drops quickly.

Riding in the mountains where temperature can fluctuate greatly and weather can move quickly requires a cycling rain jacket almost every day. Climb to the summit and you will be overheating but on the way down you are likely to get chilled to the bone because you are covered in sweat and not working very hard while coasting.

Heading out for a ride that will go past dusk is also a great time to have a cycling rain jacket. Once the sun moves below the horizon, expect temperature to drop, especially if you live somewhere that does not retain heat, like the desert or coast. You will be glad you packed it for the ride home.

A cycling rain jacket will also prove useful if you have to stop to change a flat or for some other unforeseen circumstance. Standing on the side of road and shivering is no way to quickly change a flat. Put on your jacket and you can stay comfortable until it’s changed or your ride arrives.

Necessary Features In A Cycling Rain Jacket

Needless to say, the most important feature of a cycling rain jacket is that it is waterproof. If it is not waterproof, it is a mislabeled wind jacket. Read reviews and talk with people that are familiar with a specific cycling rain jacket to determine how waterproof it is.

When riding in the rain and other low light conditions, it is nice to have extra visibility for drivers. A cycling rain jacket should have reflective patches to make you more visible to traffic. This does not replace having good lights but additional help is always a plus as if it’s raining, visibility is also reduced for drivers.

The rear of a cycling rain jacket should extend down past where a normal jacket would to cover your backside from road spray. You will still get wet because your bibs are not waterproof; the tail is there to protect you from direct spray from your rear wheel.

A quality zipper goes a long way to making your cycling rain jacket easy to use. When the rain comes pouring down or you are wearing full finger gloves, a good zipper will make it easier to get your jacket on quickly and easily.

Storing your cycling rain jacket in a jersey pocket is a must. The jacket has to compress down and be light enough that it is not cumbersome otherwise you won’t want to take it with you on a regular basis. Bonus points to the jacket if it is small enough to go in your pocket and still fit other essentials in the same pocket.

A Note On Breathability

Cycling is an energy intensive activity; ideally your cycling rain jacket will allow your sweat to evaporate so you can stay dry inside. It is a tough balance to strike. Your expectations are too high if you expect to be perfectly dry and cool inside your jacket while keeping the precipitation at bay. Claims of cycling rain jackets (or any rain jacket) being waterproof and breathable are usually overblown.

The bottom line is expect to get clammy inside your cycling rain jacket, but remember that it will not be nearly as bad as if you were riding without a jacket at all.

The 5 Best Cycling Rain Jackets

Here are a range of 5 cycling rain jackets that may work for your needs and budget.

Showers Pass Men’s Spring Classic Jacket
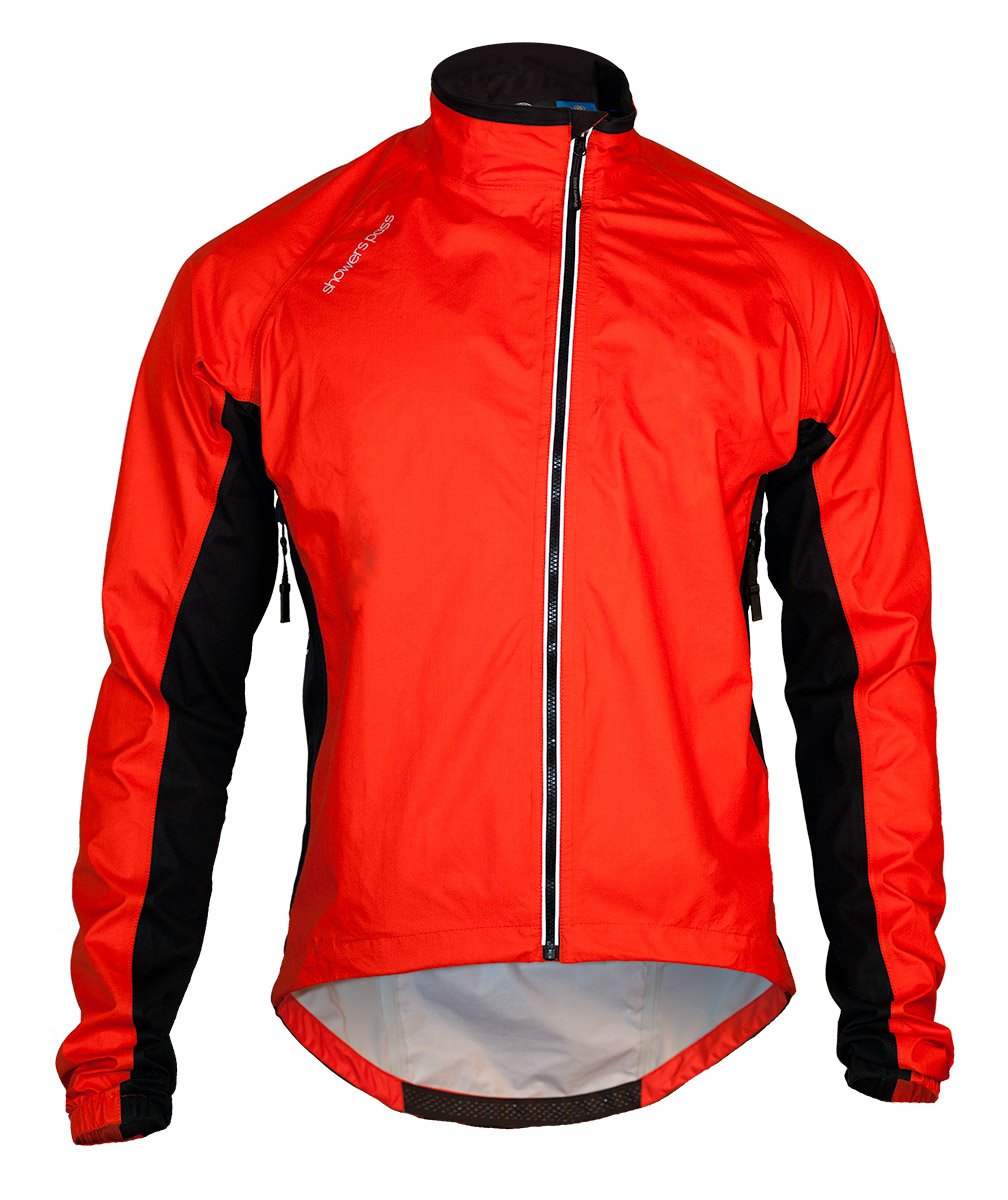
Price: $289

Showers Pass is a relatively recent arrival on the cycling scene but they have made a great impression with their rain gear. Their Spring Classic Jacket sets a high bar that other cycling rain jackets should aspire to. It has all of the necessary features mentioned above packed into a well tailored cut. As you would expect from a nearly perfect jacket, this is the top end of the price range.

Castelli Sottile Due Jacket – Men’s

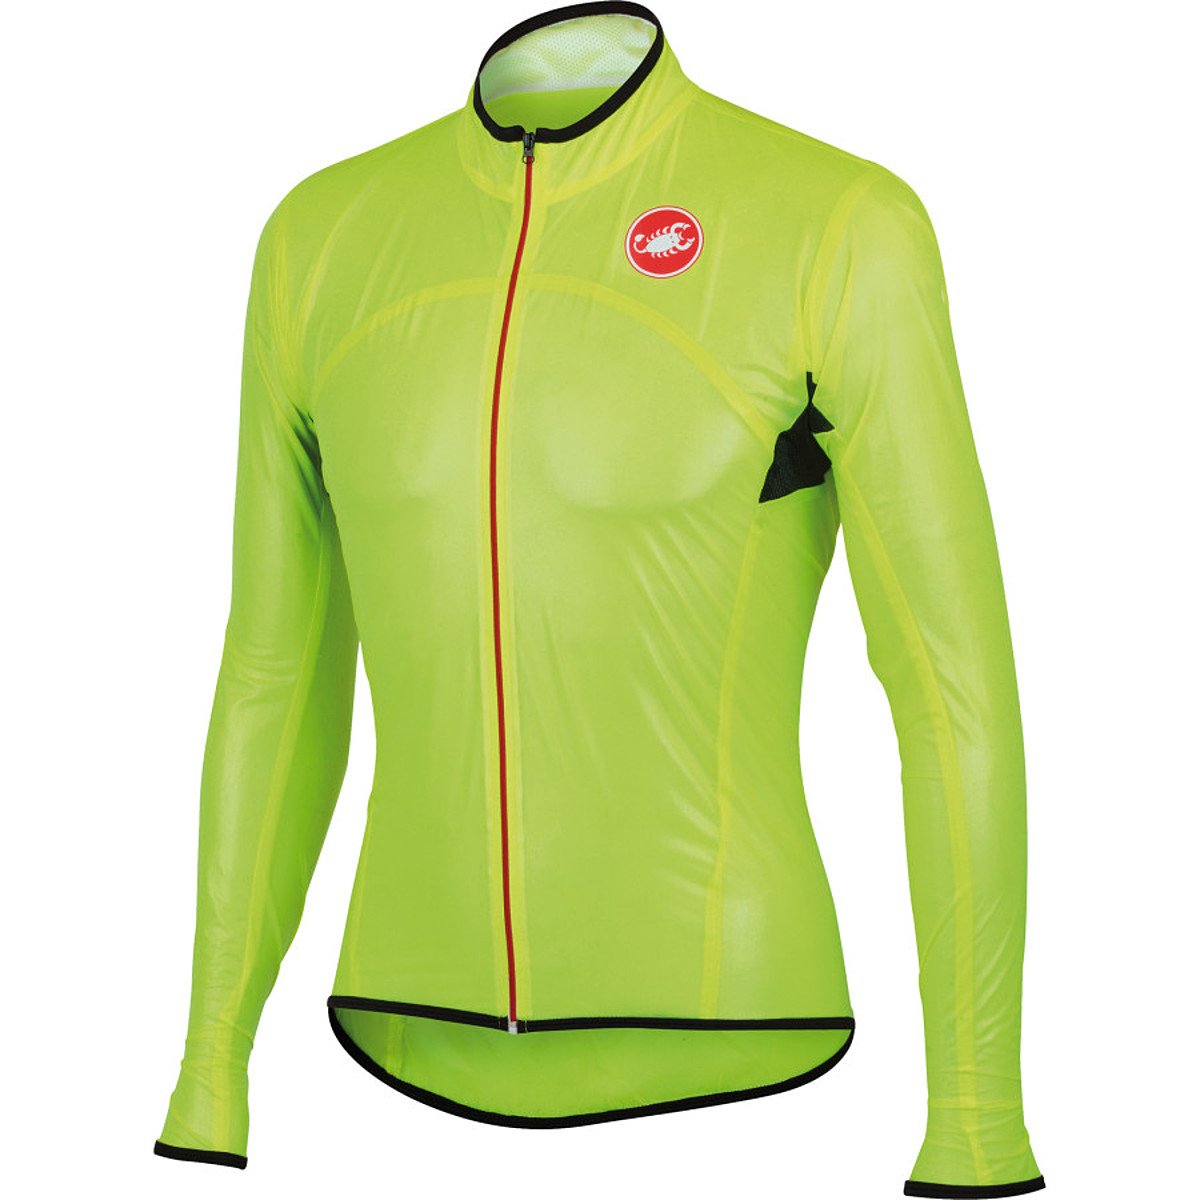
Price: $38 (sale item) – $90

The Castelli Sottile Due Jacket is a very lightweight package that will prove itself useful while allowing you to forget it’s even there with its small size. At just under six ounces, it is easy to tuck in your pocket in case of bad conditions. An bonus feature of the jacket is a zipper at the back so you can access your jersey pockets.

Louis Garneau Men’s Commit Waterproof Cycling Jacket

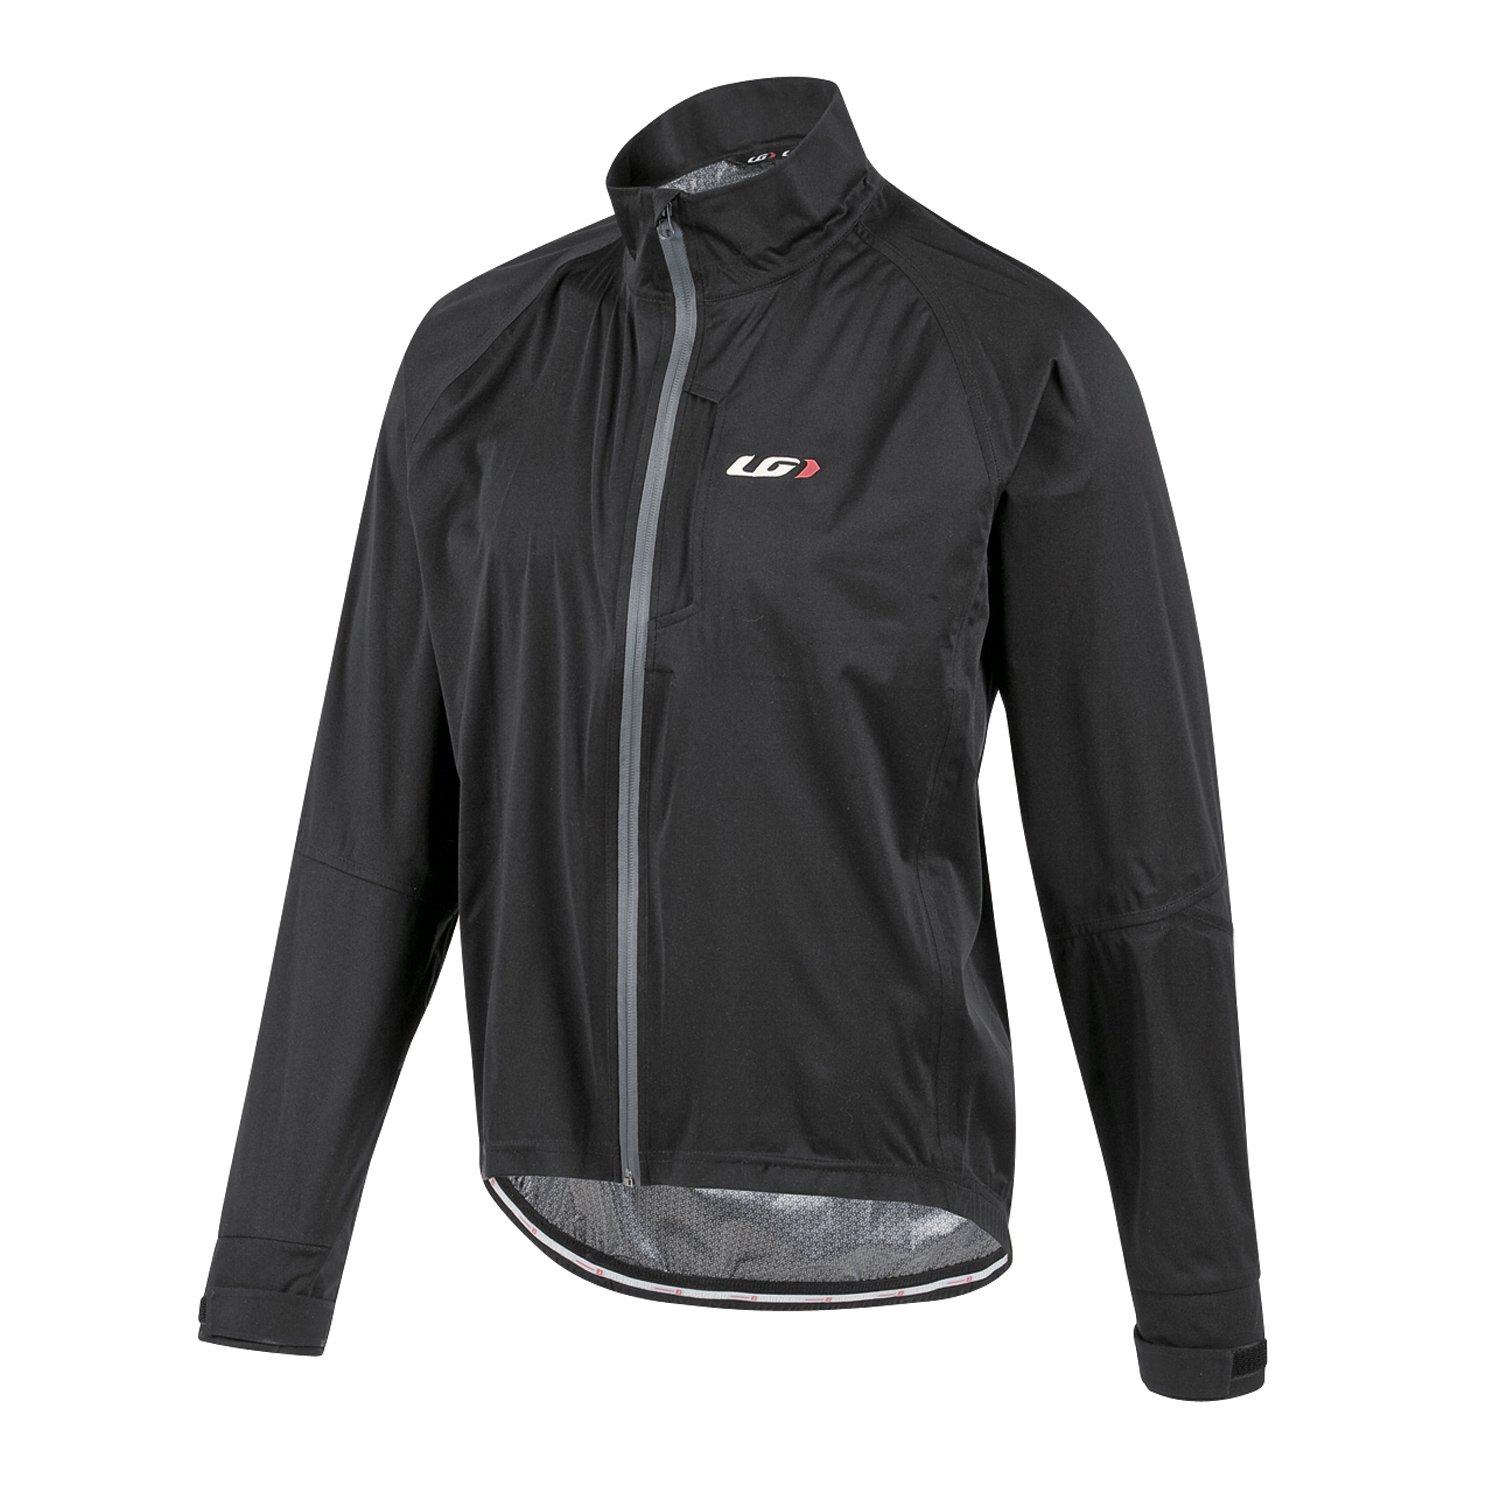
Price: $85 – $150 depending upon size/color

Louis Garneau’s Commit Waterproof Cycling Jacket has more features than the average cycling rain jacket. It has additional pockets and adjustment points to tailor the jacket to your needs. It will not pack down as tightly as the previous two jackets, but if you are going to spend a lot of time in the rain, this is a good choice.

Pearl Izumi Men’s Pro Barrier Lite Jacket

Price: $65 – $125 depending upon size/color

Pearl Izumi’s Pro Barrier Lite Jacket is what you expect when you think of a cycling rain jacket – translucent, lightweight and not quite waterproof. It will keep you warm and dry under light precipitation, but once it starts pouring, you are going to get wet. It has a race inspired cut to keep the jacket from flapping while you are ripping down the mountain. 

Cannondale Men’s Clear Rain Shell
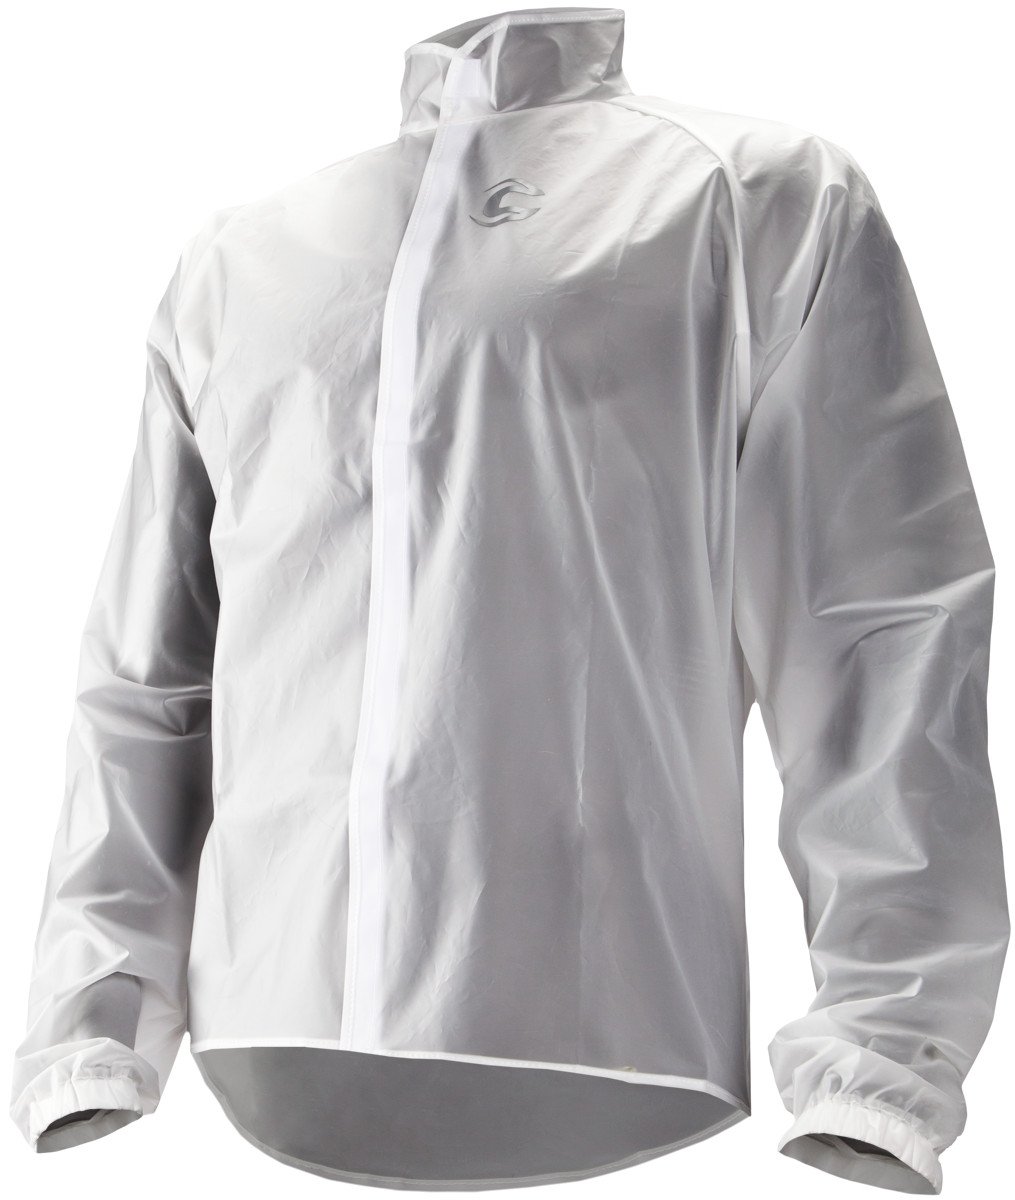
Price: $15

Cannondale’s Clear Rain Shell is about as basic as a cycling rain jacket gets. Until recently, jackets like this were all that existed. It makes no claims of breathability but it will shed the rain. A nice feature to keep the bulk down along with making it easier to put on is instead of using a zipper it has a velcro strip.

Now that you know a bit more about cycling rain jackets, you can head out in less than ideal conditions and still have a comfortable ride.

If you’re looking for Women’s Specific Cycling Rain Jackets check out our article – 5 Great Women’s Cycling Rain Jackets

Bicycle Insurance – What You Need To Know

June 10, 2016 by Josh Friedman

bicycle insurance

Cycling equipment can be expensive and mishaps occur – crashes, theft, driving into your garage with your bike on the roof of your car… Bicycle insurance can help cover the cost of replacement of your damaged equipment and the equipment of others. This article is meant to get you thinking about insurance possibilities and is not meant to be insurance, financial, or legal advice.

What Most Cyclists Do

Most cyclists do not have any specific insurance to cover any sort of loss. They will cover whatever loss they incur out of pocket with no insurance; this is called self insurance. And most of the time it works – a dented rim here, a broken handlebar there is not a big deal. But what happens when the damage is more significant?

Start With Your Homeowner’s Insurance

Check what your homeowners insurance will cover. Chances are it will only cover your bike if it is stolen from your home. And even then, homeowner’s insurance may only cover the bike if it has its own rider and it is below a certain value, while possibly increasing your premium. If you find that the homeowner’s insurance is not enough and you would like coverage, specific bicycle insurance may be right for you.

Renters Insurance

If you’re not a home owner, renters insurance can offer similar coverage to that of a homeowners policy including theft of your bike. You need to read the details of the specific policy to ensure the coverage meets your expectations.

Bicycle Insurance Companies

Two main companies that offer bicycle insurance in the US are Velosurance and Markel Bicycle Insurance. Both offer comprehensive insurance on your material cycling goods – bicycle and clothing – and additional medical coverage if you choose it. There are many a la carte options; if you do opt for bicycle insurance, think ahead about what you would like to cover. The basic policy will cover your bicycle in the US. If you are traveling abroad, you may want additional coverage. You may have additional bikes or equipment to cover as well. The insurance can cover most things cycling related as long as you are willing to pay the premium. Read the details of whichever policy you are considering so you are certain that it meets your needs and expectations.

Other Options That Can Include The Bike

There are also other options that can include forms of bicycle insurance. Depending upon your local cycling association, they could offer a policy or could be associated with a company that does so. If you are traveling, abroad specifically, finding a travel insurance policy could meet your needs from airline damage to if an accident happens. Some motor vehicle policies may also offer coverage for your bicycle but potentially only if a bike was stolen from the vehicle itself. Read your policy to find out if you would be covered. In addition to covering your bike, you may want coverage for if something happens such as damage or injury to another persons property or self. Personal liability insurance can be an option in addition to an umbrella policy which covers past what your general insurance would cover. Again read your specific policies details to see if it meets your needs.

Read the Fine Print

Like any policy, read the fine print to ensure that you have the coverage you need for bicycle insurance. If necessary, enlist a professional with experience in bicycle insurance to help guide you. Choose the right policy with the right additions and it could save you a lot of money in an unfortunate event. The opposite is also true; you could end up wasting money if you chose the wrong policy.

Cycling In Fog – How To Make It Safe

June 2, 2016 by Adam Farabaugh

cycling in fog

Depending upon where you live, morning fog and fog in general can be a regular occurrence that you have to deal with whether commuting or getting a training ride in. Driving in the fog can be hazardous but cycling in fog can be even more so. The best approach is to avoid it if you can; ride later in the day, choose a different route, etc.,  but those aren’t always options. If you do have to ride in fog, make sure you know how to and know what to wear. It can save your life.

Avoiding Fast, Busy Roads While Cycling In Fog

Obviously in heavy fog, visibility is drastically reduced. Under normal conditions, drivers may not see you but in foggy conditions, the chance is even greater. The best way to make sure that a driver doesn’t come up behind you suddenly is to simply avoid roads where they can do so. Choose a route with little to no traffic such as a bike path, back roads, or neighborhood roads even. Removing one of the variables will make your ride extraordinarily safer.

Riding Defensively

If you do have to cycle on a road that receives more traffic, you must ride like you are invisible because, well, you pretty much are. As a car approaches, you will be able to hear it, slide to the side of the road completely out of the cars path. This way if they don’t see you, they miss hitting you. When approaching intersections you must be very aware of traffic coming from every direction. Never assume that they see you, particularly vehicles that are turning or pulling out. If you must, slow and stop to avoid crossing the intended path of a car.

Be As Visible As Possible While Biking In Fog

While riding, you should always wear things that are visible but must do so even more when riding in fog. This includes things such as the following:

  • Bright colored jersey/jacket.
  • Rear flashing red light. The brighter the better.
  • Front flashing head light. Again the brighter the better.
  • Reflectors on your feet/ankles. The movement of your feet will catch an eye more easily. Some cycling shoe covers also have reflectors on the rear of them giving you more visibility as well as toasty toes.

Staying Warm

With fog comes moisture. With moisture comes a chilling effect due to the heat transfer properties of water. If you are riding with bare skin on your legs and/or arms, moisture will develop on the surface causing you to become cold very quickly. In addition, fog often forms at lower temperatures so the combined cooling effects of moisture on the surface of your skin and the outside ambient air temperature create the conditions for a bone chilling ride. Treat cycling in fog like riding in the rain; meaning wear a rain jacket or at the very least, arm warmers and leg warmers.

Glasses Fogging Up

With the added moisture in the air, your glasses will likely fog up much easier or at the very least, get water droplets on them. Keeping them clear will be a huge help as not being able to see through the fog itself is bad enough. You don’t need to add another barrier to seeing well. If you take your glasses off, riding with a cycling cap can be a good option as it keeps some of the wind and any rain out of your eyes.

Why Do You Get A Sore Butt Biking?

May 31, 2016 by Adam Farabaugh


You went out for your first ride in quite awhile this past weekend. It was great. You enjoyed the ride and the places you went except for one thing; you had a sore butt while you were riding and then after as well.

sore butt

Getting a sore butt while riding can be a barrier that keeps you from riding more. Beginner cyclists all the way to experienced riders will get a sore butt from time to time. There are a few different factors that contribute to it and with the right know how, you can be riding without your butt hurting at all before you know it.

Why You Get A Sore Butt When You First Start Riding

When you first start anything new that is physical, your body takes some time to adapt to it and before it’s fully adapted, you might be a little sore in areas. The same premise applies to riding and sitting on a bike seat. Your butt wasn’t made to sit exclusively on a bike seat but the human body is pretty adept at adapting to things.

Getting Your Muscles And Tendons Used To A Bike Seat

When you first start riding and sitting on a bike seat, your muscles and tendons within your butt won’t be used to the pressure. This will happen regardless of if you have the right fitting seat or not. This can even happen if you have been a regular rider in the past but took some time off. Everything will take a ride or two to tighten up and get used to the demands of supporting your body weight on a bike seat.

Why Your Butt Hurts Cycling Even After You Have Been Riding

After a few rides, if your butt is still hurting, you likely have something wrong with the bike seat. It would be wise to make sure these things are correct before you suffer through a few rides to see if your butt will just adapt to the seat.

Saddle Width

When you sit on a bike seat your sit bones are what supports you. These are the two bony knobs that you can feel on the bottom of your rump. You want these to be firmly positioned on the saddle so they can support your weight. Some people have sit bones that are narrower together while some have wider sit bones, particularly women. If the sit bones are off the sides of the saddle, you are going to have a very uncomfortable ride as your sensitive area between your sit bones will be taking all of your weight. You need to find the width of your sit bones and find a correlating saddle. Your local bike shop will likely have an assortment to try.

Saddle Softness

In addition to having the right width saddle, you will also want a saddle with the correct hardness. It is a bit contrary to what you might think, but a super soft saddle is going to be uncomfortable. This is because your sit bones press down into the foam allowing the sensitive area between your sit bones to receive a lot more pressure. You want a saddle that is soft enough for your sit bones to be comfortable when absorbing your weight but not too soft that they press down into the saddle displacing your weight to other more sensitive areas.

Saddle Shape

The shape of your saddle can also influence how sore your butt gets while riding. Some are longer and thinner while others are shorter and fatter. Typically, the wider your sit bones, the more you will want to go with the latter. In addition, saddles can come with cut outs that relieve even more pressure off your sensitive areas. Some people like these and can’t ride anything else while some riders prefer not to use them. Try them out and see what works best for you.

Saddle Position

Another factor that can contribute to a sore butt while cycling is how your saddle is positioned. If it’s too far forward or backwards, you might be sitting on the wrong part of the saddle. You should be sitting on it where your sit bones firmly come into contact with it. Getting a bike fit can be a good idea to ensure this if you are riding long distances. Additionally, if your saddle is tilted to far forward or back, you can experience a sore butt. Typically you want to start with a level seat and see how it is. If you need to, you can adjust it a degree or two up or down but ideally you shouldn’t have to.

How To Prevent A Sore Butt Biking

So now that you know what causes a sore butt, how do you prevent getting one? For the first few rides after not riding for awhile, you will probably have one. But after that you should make sure you don’t so you can keep riding ’till your hearts content.

The Right Saddle

Getting the right saddle for you, as outlined above, is the most important part of not getting a sore butt while biking. If you don’t have the right saddle for you, you simply are never going to be comfortable on the bike and aren’t going to fully enjoy the ride.

Cycling Shorts

If you are riding longer distances, you should most definitely have a pair of cycling shorts. These are skin tight shorts that have a chamois, or padded material, in them to give you a softer, more comfortable ride.

Chamois Cream

If you experience chaffing, using chamois cream will help alleviate as well as prevent your discomfort. If it’s super hot out and you are going to be sweaty or if it’s raining, chamois cream is a very good option.

Standing Frequently

Regardless of if you’re riding around town or out for a long ride, you should stand and take some pressure off your butt every now and again. This will help ensure that there’s a constant blood flow and that your butt muscles don’t get too tight. Any time the road goes uphill is a good time to get out of the saddle. If you live in a flat area, you will have to make a conscious effort to get out of the saddle on a regular basis.

Glasses Fogging Up? – Here’s How To Fix It

May 29, 2016 by Adam Farabaugh

glasses fogging up

You’re about a minute or two into a climb and you’re just starting to get uncomfortable. You unzip your jersey a bit to get a bit more air. Your glasses then start to fog up allowing you to see basically nothing. You’re focused on the effort and now you’re irritated with your glasses. You try wiping them with a finger and now you can’t see anything. With your glasses fogging up it can be irritating as well as dangerous. Keeping them from fogging up in the first place can save you a lot of hassle.

Reasons For Glasses Fogging Up

Glasses fog up because they are at a lower temperature than the heat emitted by your face. When the air from your face hits your glasses, the lower temperature causes the air to condensate, or in simpler terms, the moisture in the air turns to a liquid on your glasses. This is physics and the amount at which it occurs is determined by temperature differences and how much moisture is in the air which is also increased because of the moisture coming off your face as well.

Cold Outside

The colder the temperature outside, the easier it will be for your glasses to fog up. The large temperature difference can cause your glasses to fog up even if there is a lower amount of moisture in the air.

Humid Outside

A high humidity, such as when it’s foggy, causes droplets of water to form at lower temperature differences which is why your glasses almost always fog up in this scenario.

Raining

When it’s raining is similar to when it’s humid out. There is a lot of moisture in the air and the rain on the glasses themselves can also cool them down slightly upping the temperature difference.

Glasses Too Close To Your Face

In combination with all of the factors above, having your glasses too close to your face decreases the amount of air flowing through to dissipate the heat thus resulting in a higher likelihood of you glasses fogging up.

How To Stop Your Glasses From Fogging Up

Unfortunately with cycling you are always going to run the risk of fogging up your glasses. It’s simple physics but there are things you can do and use to lower the likelihood that they fog up.

Using Your Breath or Saliva and Wipe

The simplest and easiest way to lower the amount that your glasses fog up is to fog them up with your breath and then wipe them clean with a clean fabric such as your shirt. (Jersey material is often a poor choice but t-shirt material, cotton, works well.) If your glasses tend to fog up a lot you can take this one step further and spit on them, mainly the inside of the lenses. Wipe them with your finger to evenly disperse the saliva and then wipe them clean.

Anti-Fog Wipes or Spray

Another solution to glasses fogging up is to use anti-fog wipes  or spray. These use compounds that prevent the forming of water droplets on a surface. They are easy to use as long as you have them readily available. Chances are you won’t have them in your jersey pocket should you need them mid-ride.

Shaving Cream

A home remedy to glasses fogging up is to use shaving cream. Simply put a light dab on your finger and rub the lenses and then wipe clean with a clean fabric.

Positioning Them Further From Your Face

In addition to the above fogging solutions, you should also position the glasses so they sit a bit further away from your face. This will allow air to flow more easily between your lenses and skin to lower the heat difference. Some glasses are better for preventing fogging while some are worse. When looking for a pair of glasses, make sure they fit your face well and aren’t too close. A good option is to get a pair with an adjustable nose piece to position them where you want them.

Taking Them Off

In some conditions keeping your glasses from fogging simply isn’t going to happen. The best solution here is to simply take them off as they start to fog. This will keep them from completely fogging over as well as you wiping them to keep them clear which then leaves marks for you to look through the rest of the day. Then when you’re done with the climb, just put them back on.

Having glasses fogging up can be a real pain but with these solutions you should be riding with much better vision whether prescription glasses or just sunglasses.

How To Cross Railroad Tracks On A Bike

May 28, 2016 by Adam Farabaugh


cross railroad tracks on a bike 2

Railroad tracks can be one of the most difficult things to learn to maneuver on a bike. If you occasionally cross railroad tracks on a bike, chances are that you’ve crashed on a set before. It is very easy to do especially if they’re wet. Even experienced riders crash on them but you don’t have to if you know what to do.

The Dangers of Crossing Railroad Tracks

Railroad tracks are dangerous to cross on a bike for a few reasons. The largest one is that when they are wet, they are as slick as ice. If they’re even at a slight angle, your bike is not straight up and down while crossing, or you try to accelerate or brake, you are very likely to have your wheels slide out from under you. The thing with all of these scenarios as well is that it happens very fast and the next thing you know you’re sitting on the ground. Another danger is getting your tires sucked into the crack which can cause a nasty fall. This occurs more often when the tracks are running with you such as with a trolley line.

When Tracks Are Perpendicular

perpendicular railroad tracks

The easiest type of railroad tracks to cross on a bike are ones that are perpendicular to you as you cross them. (like the image above) When crossing any set of tracks, do not turn your front wheel. Keep it straight with a firm grasp so your handlebars don’t turn on you when you hit the bumps. When crossing perpendicular tracks, slow a bit and lift your butt slightly off the saddle to absorb the bumps. Also, stop pedaling and coast over keeping your bike straight up and down. A lot of these railroad track crossings can be old and can easily cause a flat tire from the rail or supporting wood, metal, or concrete structure. Taking your butt off the saddle and absorbing any bumps with your legs and arms will help avoid flatting. Another alternative to crossing railroad tracks on a bike is to bunny hop over them. With this you won’t need very much height but you will need speed as the distance to stay in the air is quite large. Also if you don’t make it all the way and your rear wheel comes down on the track, it can very easily puncture.

When Tracks Are at an Angle

angled railroad tracks1

This type of crossing is likely the type that may have brought you down on a bike. If you were to try and ride across them at an angle, particularly while wet, the wheel will be in contact with the track for longer which combined with the track going in your direction of travel, will cause your wheels to easily slide out. There are three ways to cross these types of crossings with the first one being your standard go-to.

Cross Perpendicular

The first, and safest way, to cross angled railroad tracks is to not cross them at an angle. Simply ride further to the right or left so you can approach them at a 90 degree angle. Then cross them as you would a normal set of tracks perpendicular to you. The one thing to watch for here is that there is no traffic coming up behind you as depending upon the road, you could be in the center of the lane. Most drivers typically recognize the danger you are in and what you are trying to do so will give you space. Don’t count on it though so ride defensively.

The Double Hop

If you are a much more experienced bike rider and you can’t ride wide to cross the tracks at a 90 degree angle and don’t want to slow down, you can employ the double hop. You need to slow down a little bit to give enough time in-between the tracks. What you do is as your front wheel approaches the first track, lift it off the ground slightly so it doesn’t touch the track. As it’s coming back down, lift your rear wheel over the first track but while doing so you will have to lift your front wheel over the second track. And then again, as your front wheel is coming down, lift your back wheel over the second track. You have to be very quick to do this and the slight angle of the track gives you a bit more space in-between the tracks to employ it. If the tracks are running even more parallel with you, it will be slightly easier although not hitting any of the tracks becomes even more important. As the tracks come closer to perpendicular, it can be very difficult to not hit one of the rails.

The Full Bunny Hop

If you have the speed and skill, the best way to avoid crashing on railroad tracks is to simply not even touch them. Just air it out. This can be somewhat easier on perpendicular tracks but as the tracks turn at an angle, the distance you need to go increases so it can be hard to make it all the way. In particular, if you try to bunny hop over angled tracks, especially if they’re wet, and you have your rear wheel come down on the last track, you are very likely to crash.

When Tracks Run with you – Ie. Trolley Tracks

parallel tracks

In some cities, particularly in Europe, you will encounter trolley tracks that run parallel with you down the street. These can be a nightmare if you don’t know how to handle them as not only do you have navigate the parallel tracks, you have to navigate the above scenarios as well when you come to intersections. The best rule to avoid crashing is to simply only ever cross tracks at a 90 degree angle. If you find yourself trapped, simply stop and put a foot down to get over them safely. It can be quite embarrassing to crash on these because there are often a lot of people around in a city where these are located. If you are a more experienced rider and are riding clip-less pedals, you can employ two different techniques to move laterally over parallel tracks.

The Improvised Double Hop

The first one is to be used when you are riding a bit slower. First, lift your front wheel off the ground and move it laterally over the track. Make sure you get it high enough as if you don’t and it catches on the track, it can bring you down. As soon as the front wheel comes back to the ground, do the same with the rear wheel. A good way to practice this is to go to an empty parking lot and practice it over the parking lines that way you don’t have to risk crashing if you don’t get it the first time.

The Lateral Bunny Hop

The second way to move laterally over tracks is to bunny hop them laterally. This is for when you’re going a bit faster. It’s fairly close to the improvised double hop but while your front wheel is still in the air you bring your back wheel up. Again, a good way to practice this is in an empty parking lot over the parking lines.

Slowing Down To Cross Railroad Tracks on a Bike

The simplest, most effective way to stay safe while you cross railroad tracks on a bike is to cross them slowly. This gives you time to approach them at a 90 degree angle, unless you’re an expert and employing one of the other above techniques, and if you do happen to fall, you are not going very quickly. If you are still not comfortable crossing railroad tracks, even at a 90 degree angle, it’s okay to stop and get off your bike and cross them on foot. It’s always better than crashing. Happy crossing.

Going To Work On A Monday?

May 16, 2016 by Adam Farabaugh

going to work on a monday

Mondays… fun for some, not so much for others. One way to at least make part of the day fun; ride your bike there. You’ll arrive more excited about your job regardless of what it is and you will have a sense of accomplishment before you even start your workday. Give it a try at least once and see what differences you feel. Commute too far or dangerous? Drive part way on quick, traffic free roads and then ride a route that’s ideal for cycling. It will give you good roads to ride on to make for a stress-free, enjoyable ride before the workday.

Where To Ride A Bike On The Road

May 15, 2016 by Adam Farabaugh

where to ride a bike on the road

Riding a bike in the middle of the lane on one road could get you killed while riding in the same spot on a different type of road could keep you alive. Knowing where to ride a bike on the road with differing road and traffic situations is a must know for bike riders of any level.

Which Side Of The  Road Should You Ride On?

You should always, always, always ride with traffic, never against it. This means on the right-hand side of the road in the majority of countries in the world. Riding against traffic puts you and the vehicle in greater danger as there is a much greater difference in speed as two object approaching each other will meet much quicker than two objects traveling in the same direction at the general speed of bicycles and vehicles. This reduces the time a driver has to react as well as a cyclist. Also, if a collision were to occur, it would be much worse head-on than if both objects were traveling in the same direction. Also, navigating intersections is much easier and safer when taking the same path as a vehicle.

Where On The Shoulder and When?

Now that you know roughly where to ride a bike on the road, how far to the right should you ride? This depends upon the road and the traffic. Being in one place on a certain road will keep you safe while that same place on another can be very dangerous.

Right Of The White Line

If a road has a lot of traffic, more than ten or so cars passing in a minute, you should ride on the right side of the white line. This is because when vehicles are behind one another they often can’t see past the vehicle ahead of them. If a rider were to ride further into the lane to force the vehicle to move over into the other lane to pass, it could create a more dangerous situation with the potential for a head-on collision. Additionally, as the vehicle moves over, the vehicle behind may not have time/be paying close enough attention to slide over around you resulting in being rear-ended. Staying to the right of the white line avoids this. While being out of the travel lane, you still want to glance over your shoulder to make sure no drivers are texting and drifting over to hit you.

Left Of The White Line

When there is less traffic than described above, you will want to ride just to the left of the white line by one to six inches. This places you in the field of vision of the driver as they may not be looking down the side of the road to see if a cyclist is there. This then forces them to slide over and around you while also making sure there is no traffic coming in the opposing direction. As the vehicle begins to pass you, you should then slide to the right of the white line to give even more space for them to pass.

If There Is No Line

On many roads there is no white line. In this situation you should ride roughly on the right side of the right most tire track when there is little traffic. With more traffic you should ride further to the right where traffic can pass you safely without hitting you while you are still on the road.

Where To Ride A Bike On The Road When There Is No Shoulder?

In many places there isn’t a shoulder wide enough to safely accommodate cyclists while vehicles pass. These roads are often built just wide enough for two vehicles to pass and that’s it. To the right of this is a ditch, grass, woods, you name it. Whether there is little or a lot of traffic you need to ride on the right side of the right most tire track. This will force the vehicles behind you to slow and move into the other lane to pass when there is no opposing traffic. If there is opposing traffic or a corner that they can’t see through, they have to wait behind you as the lane is not big enough accommodate the both of you. In some areas (particularly rural, low cyclist populated areas) drivers will get mad at you but this is the safest option for both you and the vehicle. In this situation you must keep an eye on vehicles approaching from behind and if they don’t see you or attempt to squeeze by anyway, you need to hightail it off the road regardless of what’s there. Crashing on your own will always turn out better than being hit by a car.

When Turning Where Do You Go?

As stressful as knowing where to ride a bike on the road can be, intersections can be just as stressful if you don’t where to go and when. The key is to approach them exactly as you would as a vehicle. This means that when you approach a traffic light and want to turn left, begin to slide left into the lane before the intersection and then into the turning lane if there is one. If you’re turning right, you can just stay to the right and proceed when clear of traffic from the other directions.

Runs On Fat And Saves You Money

May 15, 2016 by Adam Farabaugh

runs on fat saves you money

Which side of the equation do you prefer to be on? As cyclists we know which side we would prefer to be on but it doesn’t always happen for far too many reasons: poor weather, kids to pick up from school, too far to commute to and from work, laziness, you name it, it’s an excuse. Some things we can’t change but a lot of them we could make small alterations to for them to work. What’s one thing you could change to your normal transportation regime to include one extra bike ride and one less car ride? A trip to the grocery store? A  short or long ride to work in the morning or evening? Make this a goal once a week and plan ahead to make it happen; you will burn fat and save money. Let us know your plans on riding more and driving less in the comments below.

So You’re Going To Get Into Cycling…

May 10, 2016 by Adam Farabaugh

get into cycling

So you want to get into cycling? You found the itch and maybe have an idea of the benefits riding can bring. Starting out and having a good time from the get go without a lot of trial, fails, and errors will help to ensure that you have a pleasant entry into riding whatever style that constitutes: road, trails, city-paths, around-town, whatever your desires. We want you to try and stick with the sport and experience all its benefits. Ask other riders around and you’ll find that they have been riding for sometime and wish they had found the sport earlier. So don’t wait, get into cycling now. You’re future self will thank you.

First Up – Do You Have a Bike Yet?

To get into cycling you first need a bike. What you don’t need however is a high-end, expensive bike which can be a large barrier to entry. Any bike at the start will do just fine. A few things you want to make sure of though is that it is functional and safe to ride. This means that everything works on it; ie. the wheels turn and are true, the gears work, the brakes work, and it’s something that fits you well and is not a struggle to ride. It can be a hybrid bike, mountain bike, or road bike. After starting out and getting a few rides in, you’ll find what you like and don’t like and can begin the process of choosing a more appropriate bike for you.

Do You Have Any Cycling Clothes?

When you first get into cycling, wear what you have. A t-shirt and gym shorts work just fine but as your rides begin to increase in length and frequency you’ll want to upgrade your shorts first to skin tight, padded shorts specific to cycling and then to a cycling jersey. Prior to this, men should try and wear tighter and more supportive athletic underwear to keep things in place. Women will want to wear an athletic type of underwear. For socks you will also want to wear something more athletic and not made of cotton.

How About Cycling Shoes?

Starting out, you can wear sneakers when you ride with platform pedals or pedals with straps to hold your feet in place. This will allow you to be able to focus on the riding and not have to worry about clipping in and out…yet at least.

Starting On Your Own

Depending on how much experience you have on a bike, you will want to start out getting the basics down. Turning, braking effectively, and then shifting. Then graduate to going up and down hills and through corners. Getting the feel for the bike and being able to ride on your own will then allow you to ride safely around other people and in the road and traffic where your attention needs to be on the cars around you and not just riding the bike. Safety is number one.

Finding Someone To Teach You A Thing Or Two

After you can safely and effectively ride, finding someone to ride with who is an experienced rider will help you improve tremendously in all things cycling not to mention give you company to ride with. Maybe someone you already know rides and you can ask them if they can take you on a ride or two. If you don’t know anyone who rides, ask around at your local bike shop or put an email out to your local cycling club, if you have one in your area. If you still can’t find someone, keep improving your riding on your own and with cycling “how-to’s” such as this and then see if you can find a local group ride.

Finding A Local Group To Ride With

With riding in a group you will want to be extremely comfortable on the bike and not have any issues cornering, riding a straight line, shifting, braking, et cetera. Searching online for local rides is a good first option and then hitting up your local bike shop can give you the inside scoop on local rides. Here you will be able to learn a lot from other riders just by watching and doing what they do along with them being able to give you advice on your riding.

How To Improve Your Riding

One thing with getting into riding is that whether you are just starting out or have been riding for decades, there is always something to improve upon. It’s a sport that’s never “learned” and done. Keep riding more and more and you will not only get better physically but in all things cycling related. You will have blunders as you go but you will learn from them and correct them. Reading up on all things cycling will continue to develop your knowledge base. (It’s been said that ILoveBicycling.com has nearly everything you need to know to be a better rider.)

The Most Important Part When You Get Into Cycling?

And of course the most important part when you get into cycling is to have fun. Cycling is going to give you an endless amount of new experiences, new friends, a great body, and a fantastic time all in all for the rest of your life. Embrace it, share it, and enjoy it.

« Previous Page
Next Page »
  • Facebook
  • Tumblr
  • Twitter

Latest Articles

JOIN Cycling: A New Training Platform for Cyclists

May 27, 2024 By Eric Lister

cold exposure

The Benefits of Cold Exposure for Cycling & Life

June 13, 2023 By Eric Lister

hill climb

The Ultimate Hill Climb Training Guide

May 31, 2023 By Eric Lister

shoulder pain cycling

How to Treat & Avoid Shoulder Pain While Cycling

April 12, 2023 By Eric Lister

psoas stretch

The Importance of the Psoas Stretch for Cyclists

April 6, 2023 By Eric Lister

cycling neck pain

The Ultimate Guide to Cycling Neck Pain: Causes and Solutions

March 21, 2023 By Eric Lister

Useful Info

  • Contact
  • Finally, A Global Cycling Club That Is Focused On Community And Love Of Cycling!
  • Privacy Policy
  • Share Your Story!
  • Terms And Conditions Of Use
  • Welcome to I Love Bicycling
  • What Happened When I Stretched Every Day For a Month

Recent Posts

  • JOIN Cycling: A New Training Platform for Cyclists
  • How to Hang Bikes in Your Garage: 4 Inexpensive Options
  • Gravel Bike Vs. Road Bike: Which One Is Better For You?
  • The 6 Types of Mountain Bikes & How to Choose the Best One for You
  • What Is a Touring Bike Good For? 5 Benefits We Know You’ll Love

Search I Love Bicycling

Connect with Us

  • Facebook
  • RSS
  • Tumblr
  • Twitter

Copyright © 2026 · Magazine Pro Theme on Genesis Framework · WordPress · Log in