• Training
    • Injury Prevention
    • Training Tips
  • How To
    • Bike Fit
    • Gear
  • Nutrition
    • Nutrition Tips
    • Weight Loss
  • Repair
  • Reviews
  • Stories
    • Funny Stories
    • Jokes
    • Quotes
    • Videos
    • Funny Videos

I Love Bicycling

I Love Bicycling is a website that is geared towards cycling for beginners with road cycling tips, training articles, nutrition tips, weight loss, how to’s and bike repair articles.

Cool Bike Helmets for Your Type of Riding

November 13, 2016 by Emma Lujan

bike-helmet

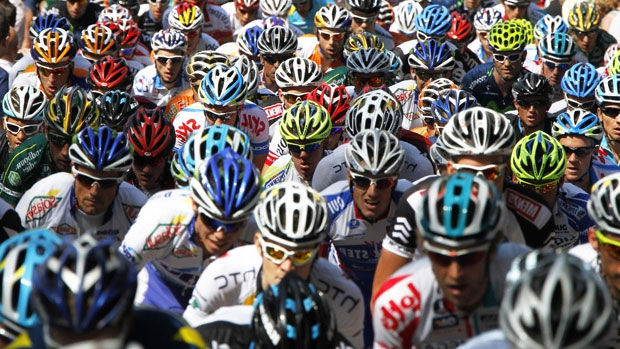
Nowadays it is hard to justify not wearing a helmet because you think it makes you look dorky.  There are a lot of different cool colors, styles, and accessories in the helmet line to assist in making you look super cool while on your bike.  Helmets should fit snug, but without any pressure points, should have an easy to adjust tension system, fit your budget, and you should enjoy the way it looks.  There are three main types of helmets: road, mountain and urban.  Below are some cool bike helmets from each of these categories.

Cool Bike Helmets to Consider per Your Riding Type

A bike helmet is not just a bike helmet. The full face helmet a downhill mountain biker wears is built for different impacts than what a road helmet is designed for. Functionality wise, they are also a bit different because the riding conditions are different from road riding compared to mountain biking compared to a helmet for around riding around town. Having the correct type of helmet for the type of riding you’re doing is very important. Plus you don’t look as cool wearing a road helmet on the trails or vice versa.

Cool Road Bike Helmets

Road helmets are designed to have a lot streamlined vents, be aerodynamic, and they do not come with visors.  The high-density foam in road helmets is built up on the temple as well as the front of the helmet since that is where the majority of impact occurs when crashing on the road.
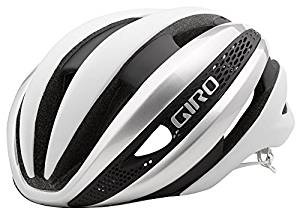
Giro Synthe

The Giro Synthe is top of the line for road bike helmets.  It is the most aerodynamic well-ventilated helmet on the market today.  The Synthe is sleek, light-weight, very breathable, and a very cool bike helmet.  Giro Synthe
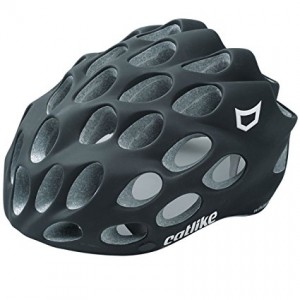
Synthe

Catlike Whisper 

The Catlike Whisper is one of the most recognizable helmets out there.  It comes with upward of 30 vents, and has a unique look similar to that of a beehive.  While it is not as aerodynamic as other road helmets, it makes up for it in comfort, light-weight and mad style points.  It is also the official helmet of the Movistar Professional cycling team.  Black Catlike Whisper

catlike-whisper

Cool Mountain Bike Helmets

Mountain bike helmets are different from road helmets in several ways.  There are usually fewer vents in comparison to road helmets, but they are deeper because the average speed in mountain biking is slower than on the road, so the air will flow up and out of the helmet versus through.  Mountain bike helmets come with a visor, and the foam is more built up at the back of the helmet since it is much more common to fall backward while riding on the trails versus the road.
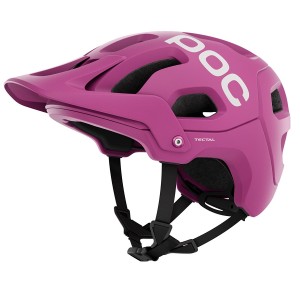
POC Tectal Race

POC is a Swedish company that manufactures some of the coolest helmets around.  The Tectal Race from POC is highly ventilated, offers exceptional coverage for the temple and rear of the head and is built specifically for the extreme cross-country and enduro mountain bike rider. POC Pink Tectal Race
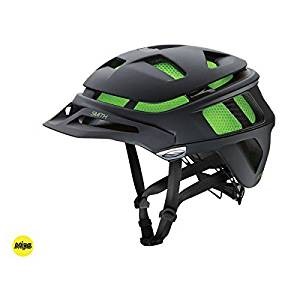
poc-tectal

Smith Forefront

The Smith Forefront helmet offers a full coverage helmet that is designed for all-mountain racing and shredding.  It is a low-volume helmet and is very well ventilated and comes with a mesh covering the many vents to protect from dirt and bugs falling into the helmet.  Smith Forefront (MIPS)

smith-forefront

Cool Urban Helmets

Urban helmets will often come equipped with a light mount, a removable visor, and really tough outer shells.  They often look more like hats than road and mountain bike helmets do, and therefore it is easier to match to your outfit.
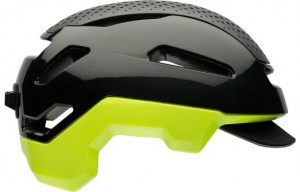
Bell Hub

The Bell Hub comes equipped with a light mount, a soft-brimmed visor, reflective trim and an easy to adjust tension system.  The HUB also comes in a variety of colors both bright and sleek making it a versatile cool bike helmet option.  BELL HUB

bell-hub

Giro Sutton

The Sutton from Giro comes in a variety of colors and has a soft removable visor which gives is a very cool Euro look.  Plus one of the vents in the helmet is reinforced and can double as a lock port so you can lock the helmet to your bike.  Giro Sutton (MIPS)

giro-sutton

MIPS

Lots of helmets these days, both road, mountain and urban, have an extra safety feature built into them called MIPS.  MIPS stand for multi-directional impact protection system.  The technology behind MIPS uses two layers inside the helmet to help the head rotate slightly upon impact with the purpose being to reduce the severity of concussions.  Purchasing a helmet with MIPS adds a bit to the cost, but it is an excellent extra safety feature to have.

Wearing a helmet every time you ride a bike is super important.  With so many cool bike helmets for sale today, it is easy to find one to suit your color preference, style of riding and budget.

5 Of The Best Bike Repair Stands

August 23, 2016 by Josh Friedman

bike repair stand

Repairing a bike while it’s on the floor, or worse, upside down on the floor, is a difficult task. If you work on your bike with any frequency a repair stand will make the work significantly easier to complete. Your body will also thank you; all that bending will eventually give you a backache. Bringing the bike up to eye level with a bike repair stand is the ergonomically proper way to repair your bike.

What to Look for in a Bike Repair Stand

The most significant element of a bike repair stand is its clamp. A modern bike repair stand will have a specialized clamp that is easy to engage while you are lifting the bike. It should also limit how much pressure you can apply to your frame’s tubes or seatpost as not to crush it. Some stands hold the bike by the fork, requiring you to remove the front wheel and clamping the fork. An option to ensure that you do not damage your bike in the clamp while being able to work on the front wheel is the Hirobel Carbon Frame Clamp. Look for a review on ILB in a few weeks.

The legs of a bike repair stand should be stable, both under load of your bike and without your bike, and also out of the way. If the legs protrude too much you will trip over them as you are working on your bike.

If you have a lot of dedicated space to work on your bike, this will not be a concern, but a folding stand would be nice otherwise. It is also a bonus if you travel and need to bring a bike repair stand.

The Bike Repair Stands

Park Tool PCS-10 – Park Tool is a long-time tool maker. Their experience contributed to the updated clamp with easy pressure manipulation. The long legs spread around your work area in front of the bike while providing stability. The stand folds up with quick release levers so you can store and travel with the stand.

Topeak PrepStand Pro Bicycle – The Topeak stand has an extremely stable base and a dial clamp to fine tune pressure. An additional bonus is a small scale integrated into the arm for all the weight weenies out there. 

Feedback Sports Classic – Feedback Sports sets the standard for bike work stands. Smart designs that fold up easy, work well and are lightweight set their stands apart. The anodized aluminum should resist corrosion from solvents and dirt from repairing bikes.

Tacx Spider Team – Tacx stands are a mainstay of the pro peloton’s mechanics. This stand clamps the fork dropouts to ensure your frame tubes stay pristine. The bike can spin on the stand so you do not have to walk around it.

Pedro’s Folding Repair Stand – Along with the standard features of a good bike work stand, the Pedro’s stand has a trigger activated clamp so you can easily clamp your bike with one hand. It also has a carrying bag to make travel easier.

DIY Bike Repair Stand

It may not be pretty, but you can make your own repair stand too. There are a number of ways to do it. Hanging an old tire from rafters or pipes in your garage or basement ceiling and hooking the saddle through is probably the easiest way. The bike will swing around a little but put a tube or another tire around the stem to hold it a bit more firmly. It will do in a pinch.

Building two supports into a wall (make sure the bike sits far enough away from the wall to spin the pedals) is also a pretty simple method. Think of how a trunk rack for a car cradles the bike. That’s the idea behind this. Tie down the bike to the rack to stabilize it and to keep it from jumping off.

Get to Work

A bike work stand will make repairing your bike easier. If you are not strained while working, you will work with more precision. You will also be able to clean and repair places that were once hard to reach while the bike was on the floor. Everyone knows that a clean bike in good repair is a fast, fun bike to ride, so get to work.

Confessions of a MTB Dirtbag: SingleTrack 6 Review: Day 6 Golden

August 1, 2016 by Ryan Taylor

Great views today!
Great views today!

Well thats it folks! Im Done! Im a day or so late posting the final review, but real life obligations pulled me back home. I was also looking forward to seeing my cats, and sleeping in my own bed.

The final day of SingleTrack 6 was amazing. I think they saved the best for last. The majority of the day was all single track of various types. There were dry, dusty, rocky trails and also very wet loamy -cedar trails, similar to the North Shore of BC. The trail variety within this one ride was amazing.

The majority of the day was flowy single track with slight ups and downs. You were constantly working hard(especially after 5 days of fatigue to deal with) but to be honest it felt easier and more fun than the previous day.

Maybe because each pedal stroke brought you closer to beer and burgers…….

The Best Days

Ive been getting a lot of questions about what I would cut out if I were to do this ride for fun with some friends. It is incredibly easy to find these trails with Strava and Trail forks. I posted every day here: So if people wanted to do their own mini S6 they could.

For me the best days were day 1 and 6. Fernie and Golden. They had the most single track, varied terrain…LOTS of flow and the climbing wasnt as horrible as other days. If you followed these loops it would be a great day in the saddle. Obviously if this is on your mind, check in with the local bike shop to see if they would recommend some other options as there is always ‘locals only’ trails that Im sure S6 couldn’t touch.

Remember that aid stations pulled me home from death during these days so pack a lot of food!

Lodging

IMG_0096

If you wanted to re-trace the S6 experience or simply ride in these great towns, I am a big fan of hosteling. They tend to be cheaper than hotels and offer a better community experience, and trail advice as most of the staff ride in these towns. Ive stayed in the DreamCatcher hostel in Golden many times, and they are very bike friendly and offer a great time. If your looking for more private accommodation I would check out AirBnB in these smaller towns. Usually you can get a cabin or house for a great rate.

The Singletrack 6 experience has been great not only because of the trails, but also because of the time spent in these great little Canadian towns. EVERY single morning I cursed the early starts, but later it was nice as you had most of the day to check out these little places that have a lot to offer. SingleTrack 6 is very family friendly if you think about it like that. Usually the riding part is over before the family really gets going for the day. It leaves you options to take in what the rest of the location has to offer.

The Bike

My ride for the week of Singletrack 6.

Singletrack 6 has some of the best singletrack Canada has to offer. With this in mind, and the knowledge that my beer gut will prevent me from winning, I chose my weapon with fun in mind. The Intense Carbine is a 29er that offers 140/127 rear suspension travel, and 160mm up front. I choose this bike as my everyday bike in the interior of BC as the trails tend to get a little knarly. Despite it being a lot of bike for an XC marathon bike, it is a lot of fun, and pedals very well.

If I were to do S6 again I would choose a much different bike. The reality is that there is so much climbing your behind the 8 ball from the start if your over-biked. Its better to take a smaller bike and make it feel bigger, than take a big bike and make it feel smaller.

For example. I think the perfect bike would be something like a Rocky Mountain Thunderbolt, or Instinct, or a Santa Cruz 5150/Tallboy, or a Trek Top Fuel. Something around 25lbs, with 120-130mm of travel that pedals well. Ideally a 20er. With that platform I would add bigger tires(2.35ish) a dropper post and maybe a wider bar. For me the Carbine was too big. Although it performed perfectly, it was just a bit heavy and was too much bike for all the climbing.

Tire selection depends on the courses year to year, but this year the Maxxis Ikon in a 2.35 3C EXO was perfect. There was only 1 section that was slightly wet that I wanted more tire. I didn’t flat once, and they were performed better than expected in the rough. I would also recommend the Ardent Race, or Ardent, and maybe the new Schwalbe Nobby Nic on the front paired with a Racing Ralph on the rear. Everyone is different but that is what I would go with.

Kudos!

With that I am out. Singletrack 6 was a fantastic experience for me. Would I do it again? Ask me in a day or so. The event organizers were amazing and provided a great experience on and off the trails. I couldn’t ask for more, and cant fault them on anything……maybe a little less climbing!

Great Job!


Treadmill For Bikes!

May 4, 2016 by Adam Farabaugh

treadmill for bikes

Riding a trainer is boring, rollers are a bit better, E-Motion Rollers can be fun for awhile, but a treadmill for bikes!? Now that would be fun! Rainy days and long winters no longer have to take their toll on your fitness. Maybe by next winter…

Treadmill For Bikes!

What is Periodization In Cycling

April 28, 2016 by Josh Friedman

what is periodization

Every competitive cyclist is always pushing for the best fitness at important points in the season. The key to achieving that fitness is a training plan based on periodization. What is periodization? How can you use it to become as strong and as fast as possible for the most important events?

Old School versus New School

Eddy Merckx was able to race whenever, wherever, and still win. Race into shape, get behind the derny (moto) and will your body into fitness. Those days are long gone. Today’s cyclists choose their races and build up peak fitness to targeted times in the season. Now it is rare to see the superstars of the sport very much before their key events. They race a few carefully selected races that fit in with their periodized program. What are they doing between the infrequent races? Training meticulously to the demands of their chosen races.

What is Periodization?

Periodization in cycling is a series of micro and mesocycles that allow the body to build fitness and then recover from the workload that it went through. Without that recovery, training is useless. Recovery is when the body overcompensates for the training stress and makes the body stronger. Without a high enough workload that over-stresses the body, it does not need to compensate for the work that the rider has done. Periodization strikes a balance of work and recovery in a systematic plan throughout the season to make the body stronger.

Throughout the periodized training plan, the rider will build upon work done in previous cycles. There is no plateauing because of the differing training from week to week. Every few weeks, there are higher levels of intensity and/or volume included.

There are different approaches to periodization. All methods aim to achieve peak fitness at key points in the season. This article will cover the most common form, put forth by Joe Friel, one of the leaders in methodical training.

Planning Your Calendar – The Macrocycle

Take a look at your season’s calendar. Fill in every race you would like to do. Now assign a priority to them; 3 for low priority races that you will train through, 2 for medium priority races that you will come to with a bit of freshness, and 1 for highest priority races that you will be fresh and super-fit for. You should have a lot of 3’s, some 2’s and a few 1’s. Ideally the priority 1 races are within a few weeks of one another. This will allow you to have peak fitness without all of your hopes for the season riding on one race. If you have an inopportune flat or mechanical, you will still have a few races where you have great fitness.

Mesocycles

Now that you have the key 3 or 4 weeks of the season that you want to be super fit for, you can work backwards to fill in your mesocycles. The week before your first priority 1 race will be a PEAK period and so will the next 2 or 3 weeks after with the next few priority 1 races. Your goal in the PEAK period is to maintain your sharp fitness with a few very hard intervals with plenty of recovery.

Now block off the 22 weeks leading up to your first PEAK week. That first week is the beginning of your training block. Each of the next five cycles is four weeks long, with building volume and/or intensity until you get to the final week, which is a rest week. In that week you knock down the volume and intensity and allow your body to recover. Each one of these weeks are your microcycles.

BASE 1

In BASE 1 you lay the foundation for the whole season. You should do a lot of cadence work, both low rpm’s to build strength, and high rpm’s to build muscle memory, along with a bit of max rpm work. The max rpm work will lay the foundation for a good sprint later in the season. You also do a lot of work at endurance pace to rebuild the capillaries for good oxygen transport to the muscles.

BASE 2

You will continue working on everything you did in BASE 1 and add in some tempo work. Additionally you will start to do some sprinting beyond the max rpm workouts to really develop that snap that many, many cyclists lack. Volume also goes up if you can fit it into your schedule.

BASE 3

This is when you start to get some intensity with work at threshold. The highest training volume of the season happens during these three weeks of work. Generally racing starts around this time too, but that also depends when your PEAK is. Be sure to plan your training accordingly and account for the training load of whatever races you may have.

BUILD 1

The BUILD 1 period is when you start focusing in on your high-intensity limiters as a cyclist. Could your sprint use a lot more work? Do you get dropped from breakaways? Are your time trials weak? Work hard on your weaknesses here while building up your high intensity zones.

BUILD 2

Continue with the work you have done in BUILD 1 with higher intensity and more interval volume. These last two blocks are very demanding. Make sure you get enough recovery.

PEAK

The last mesocycle of the macrocyle is the PEAK. You transition from working on your weaknesses to working on your strengths at a very high intensity. This will be your final preparation before you hit your key events and your RACE period.

Putting it Together

There are a lot of different workouts to do in each mesocycle. Knowing “what is periodization” in cycling gives a great outline to get started and not plateau during the season, helping you to achieve optimal fitness at the right time for your key events.

Video – Riders Blown Off Bikes Due To High Winds

February 11, 2016 by Adam Farabaugh

windy ride

It’s not often that you see races cancelled because of wind but the Volta a La Marina in Benidorm, Spain had winds so high that they had to do exactly that. This takes riding in the wind to a totally new level. How windy was your ride today? Let us know in the comments below.

You quite often hear about competitors 'being blown away' in sport but it actually happened on Sunday to cyclists in Benidorm. Local Spanish media were reporting gusts of up to 90 mph. Cyclists, trees… even motorbikes were being blown sideways. The race had to be abandoned by organisers.

Posted by BBC Breakfast on Tuesday, February 9, 2016

Merry Christmas from I Love Bicycling

December 23, 2015 by Adam Farabaugh

Merry Christmas Everyone!

Merry ChristmasEveryone at I Love Bicycling hopes that you have a very Merry Christmas and a Happy New Year!

We hope you receive all of the cycling gear that you had hoped for!

Over eat and spend some quality time with your family and friends while enjoying some rum and eggnog.

Happy Holidays.

The I Love Bicycling Team.

Life Behind Bars – Handlebar Fit

November 6, 2015 by Wade Shaddy

You see them all the time. Cyclists who appear uncomfortable on their bike, hunched over, or sitting straight up like they have a back injury. You might even find yourself doing it, placing your hands on the hoods, down in the drops, or a combination of both, trying to get comfortable. Handlebars influence handling, stability, comfort and reliability of your bike. Lots of cyclists simply adjust their riding style to the handlebars that came on the bike, but that’s not always the best option.

Life Behind Bars -- Handlebar Fit

Drop Bars

The majority of road bikes are equipped with drop bars. The anatomy of the drop bar is designed to give you options for hand positions. You might have heard other cyclists describe parts or features on handlebars: The horizontal part is called the top, or flat. The two portions on each side that turn 90-degrees toward your body and begin to curve down are the ramps. As the ramps curve down they turn into the hooks, the most radical curved part. Finally, the horizontal end of the bar, where you place your hands, are the drops. The two pistol-like handles where riders commonly rest their hands are commonly referred to as the brake hoods, or sometimes, the grips.

Handlebar Fit

Selecting the right handlebar requires some trial and error, but it’s easier than you might think. Assuming your frame is the right size, your bar should allow you to comfortably reach the brake hoods, with only a slight bend at the elbow. When your hands are on the hoods, or down in the drops, your wrists should be at a comfortable angle, if it feels like it’s tweaking your wrist, the fit is not good. You should be able to easily reach the brake levers from the hoods or drops.

Bar Height

The key to proper bar height is the range of motion of your neck. While riding in the drop position, you should be able to look comfortably ahead, using no more than about 80-90 percent of your range of motion in your neck. In other words, if it hurts, or no matter what you do, you can’t get used to it, the bar is too low.

Listen to Your Body

Excessive pressure in your crotch, back pain or tension after a ride, hand numbness or soreness, or even pain in the front of the hip, can indicate that your handlebars may be too low. Handlebars that are too high, won’t typically make you sore, but instead, makes you work harder, and your bike less efficient.

The Awesome Stem

Most road bikes run a threadless stem, which is the biggest asset to handlebar height adjustment. There’s a certain amount of adjustment by removing or adding spacers to the stem. But the biggest advantage is that most stems are reversible, and if you’re lucky, you’ve got a stem that angles up or down. If it’s flat or horizontal you’re out of luck. By reversing the stem and angling it downward, it places the handlebar in the aggressive riding position. Reverse the stem to pitch it upward for a more upright, passive riding posture.

Use Your Multi-Tool

This procedure is simple, it can even be done on the highway. Use the multi-tool that you should have in your underseat pack. Loosen three bolts on the stem, and four bolts on the front of the handlebars. Let the handlebars hang loosely by their cables while you flip the stem upside down, and then reinstall it.  It only takes a few minutes. If you’re curious, just try it, it’s easy, if you don’t like it, change it back.

More on Stems

If you can’t get what you need out of the stem reversal, there’s hundreds of different stem lengths and pitches out there, specifically for making your handlebars and overall bike fit more comfortable. Visit your local bike shop and find one you like.

If All Else Fails

If all else fails, and you still get sore, or you feel like you’re riding in the wind all the time because you’re sitting up to high, it might be time to get a different handlebar. Switching out handlebars is not a big deal, but it’s more complicated than the stem reversal, because the brake hoods have to come off, and then there’s the tape, which is a procedure in itself.

Bar Width

Your hands should be straight out from your shoulders when riding on the hoods, or just slightly wider. If your hands are narrower than your shoulders, your bike can feel unstable, and closely-spaced hands makes it harder for you to breath properly.

Shape Implications

Two of the most common shapes are standard drop bars, and ergonomic bars. Standard drop bars have the traditional hook curve. Ergo-bars have a flat spot on the hook shape. It’s designed for your hand, so that it doesn’t bend when you’re in the drops. The ergo bar has revolutionized comfort for some cyclists, while others hate it.  Other options for reach, deeper drops, or almost any other configuration you can dream up are all out there, waiting for you. It’s a personal choice. Decide for yourself which one you like best.

Bar Material

The majority of handlebars are still made with aluminum. It’s lightweight and strong. Aluminum does transfer vibration though, and some cyclists claim it has a harsh feel. Carbon-fiber bars are expensive, but they reduce vibration like nothing else. Claims that carbon shatters shouldn’t be taken too seriously. Carbon handlebars are strong, reliable, comfortable and lighter than aluminum. One big advantage — it’s easy to form carbon bars into a wing-shape, allowing for a bigger, more comfortable hand position when riding. If you need to take a break and just cruise for a while, resting your palms on the wing brings back blood flow. Plus that, carbon handlebars just look cool.

Top Bike Trails You Should Ride

September 21, 2015 by U.M.

Top Bike Trails You Should Ride
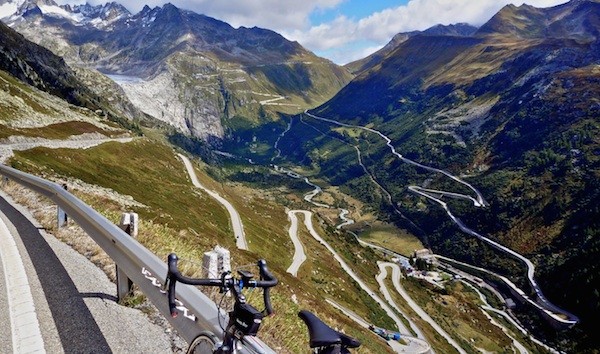
Bike paths are a fantastic activity for leisure, training, travel, and more. Many bike trails are surrounded by nature, including rivers, forests, and plants. Some are a few miles long, while some are hundreds or thousands of miles long. The prevalence of trees and plants on bike trails improves air quality, decreases the amount of carbon dioxide in the air, and helps reduce the air temperature on hot days. Bike paths generate income for nearby businesses, and can be used to attract tourists to an area. They give some people a healthy hobby, and are great for your health and for the environment. There are bike trails around the world to fit anyone’s needs, and everyone should make it their goal to bike at least one of their dream trails during their lifetime. Here are some of the most exciting bike trails around the world.

  • The Swiss Alps: Trails in the Alps offers an amazing view of the mountains, and are most often traveled in the summer months. There are tours throughout this time, lasting from anything from a couple of days to several weeks. Cyclists often cross into Italy at one point during the trail, and the tours usually cover anywhere from 50 to 100 miles per day.
  • The Great Ocean Road: Located in Victoria, Australia, this path runs along the coast, giving you views of oceans, mountains, farmlands, wetlands, and more. The entire path is 243 kilometers, and there is a 60-kilometer stretch (Torquay to Bells Beach) that has flat land for an easier ride.
  • Marvin Braude: Located in Los Angeles, this path is 22 miles of beautiful ocean views. This path branches off at Hermosa Beach, so riders can choose where they want to cycle at that point.
  • The Yucatan: This path is about 380 miles and goes along the coast of Mexico. You get views of the beaches and the beautiful Caribbean, and some unique features like ancient ruins. It’s smartest to bike this path when it is not during the summer, though you can easily stop as needed for scuba diving or cooling off on the beach.
  • Udaipur City: Located in India, this beautiful trail shows you a taste of many aspects of culture. You’ll see palaces, herds of goats, romantic architecture, and many rural sights.
  • Ireland’s West Coast: This trail goes on for up to 300 miles, allowing you to experience the rocky coast, hills, farms, and countryside of Ireland’s coast along the Atlantic Ocean.
  • The Karakoram Highway: This highway goes through Pakistan and China, reaching altitudes of about 4,700 meters at its highest point. The trail is about 1,200 kilometers, and cyclists will get to see glaciers and the snow-capped Karakoram Mountains.
  • German Apline Road: This path goes through Germany and Austria, and is very well travelled. You’ll get to see mountains and valleys, lakes and rivers, and even castles if you so choose. This path is well marked and it’s easy to plan your trip in advance.

What to Wear When Cycling Guide

August 24, 2015 by Adam Farabaugh

what to wear when cycling
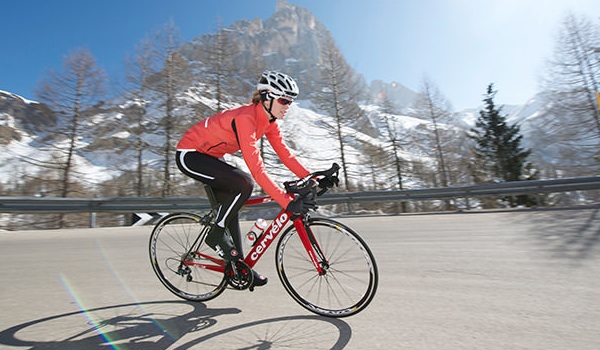
Cycling can be an extremely fun and exciting activity but not wearing the proper clothing can make a ride uncomfortable and less enjoyable. Finding what is a good fit for you and the style of riding that you are doing will ensure that your legs are your limiter and not your comfort level.  You should choose jerseys, shorts, and other apparel that is comfortable, functional, as well as versatile soon after you start riding one hour or more.  Along with being more comfortable on the bike, you will also be more aerodynamic, as well as able to stay cooler or warmer depending upon the weather, and have the look you want as a cyclist.

What to Wear When Cycling

Choosing Shorts

Cycling shorts are the biggest thing that is going to add comfort to your ride since that is the largest contact point with the bike.  They are designed exclusively for cycling.  Their first attribute is that they are skin tight.  This is for three reasons.  One is that they won’t get caught on the seat or on your knees if they are long.  Second is that they are more aerodynamic and won’t flap in the wind.  And third is comfort, keeping everything where it should be.

The second attribute is that they have padding, better known as the chamois, which gives you extra cushioning between your sit-bones and the saddle.  This will allow you to ride far longer without getting a sore bottom.

When choosing cycling shorts your first decision is if you want waist band shorts that only come up to your hips like regular gym shorts, or if you want bib shorts, which have suspender like extensions that stretch up and over your shoulders.  Most riders start with waist band shorts and then graduate to bib shorts.  Bib shorts tend to be a bit more expensive but more comfortable and are the choice of every professional cyclist.

The second choice in selecting shorts is how thick or thin you prefer your chamois.  Thicker is not always better as more material can bunch up where it’s not needed.  A chamois with medium thickness is a good place to start and then your second pair can be chosen accordingly.

The next choice in choosing cycling shorts is if you want “leg grippers” and what style.  Most shorts today come with some sort of leg gripper that keep your shorts from riding up.  As long as your shorts have one style of leg gripper or are a pair of shorts designed to stay in place without leg grippers, you are set.  With choosing leg grippers you need to decide how long you want your shorts.  Some prefer them longer, almost reaching their knee, while others prefer a shorter short.  In the middle of your thigh or an inch or two toward your knee is a good place to start.

A final point about choosing shorts is getting the fit right.  They are designed to fit snug and not bunch up anywhere.  You don’t want them so tight that they are constricting around your quads but you don’t want them so loose that they are not snug around your nether region, both for men and women.  A snug but not overly tight fit at three points, your quads, your nether region, and your buttocks will give you a quality pair of cycling shorts that will make your riding much more enjoyable.

Jersey Selection

Your second selection in choosing your cycling apparel is what jersey to wear.  This is less important than what shorts you wear but still an important piece of riding.  A cycling jersey is going to be made from a material that is sweat wicking as well as form fitting.  It will also have a zipper in the front that can be unzipped to take on and off as well as to offer some more ventilation while riding.  They also have pockets in the back to carry your phone, food, or anything else that you may need.

The first choice in jersey selection is what type of riding you will be doing.  If you are racing or doing more group rides you will want a jersey that is more aerodynamic.  If you are just riding casually you can have a jersey that is a bit more baggy and “club cut”.  It just depends upon personal preference.

Jersey’s these days come in many types of material.  Each company has its own style of material ranging from thicker standard jersey material to tightly woven material for aerodynamics to lightweight, loosely woven material for hot weather.  Again, this is personal preference and should be chosen based upon what type of riding you are doing.

Another selection in picking the right jersey is how long the zipper is.  They range from quarter zip to full zip jerseys that can be taken on and off without having to pull over your head.  Higher end jerseys typically are full zip but not everyone needs a full zip jersey.  Choose what is right for you.

Sock Selection

Shorts and jersey selection are the first and most important parts of getting your riding clothing dialed in.  The rest are smaller details that will still add to your comfort level.  Any sock will be ok for riding less than one hour but as you start to ride longer and longer how those socks wick sweat as well as stay in place is important.  Having a sock that is thin and made from a material like polyester will help keep your feet cool as well as wick sweat away from your skin.  Having them form fitting will help ensure that they don’t bunch up after a long ride and fall down if they are a sock that goes higher up toward your calf.

Choosing Cold Weather Clothing

Another important piece of apparel, especially depending upon where you live, is a rain jacket.  A cycling rain jacket is small and lightweight so it can be easily stuffed into a jersey pocket so you can take it with you on your rides.  They are also closer to form fitting so they don’t catch as much wind.  Also, more expensive cycling rain jackets come with built in vents that help keep you cool if it’s a warm rain.

When the weather turns cold you can’t continue wearing exactly the same clothing but can make additions to help keep you warm.  Dress in layers so you can remove and add clothing depending upon temperature throughout the ride.  This starts with your base layer.  If it’s marginally cold you can wear a short sleeve base layer that is made pretty much of anything but cotton.  And then for your arms and legs wearing arm warmers and leg warmers will help keep you warm.  These are essentially just sleeves that are designed to be slipped over your hands or feet and pulled up to your upper arm or quad.  They can then easily be removed, even while riding if you are good.

For colder weather, getting cycling specific winter thermal tights will be a good investment to keep you warm.  A cycling winter jacket, which is the same construction as a jersey with pockets and all, just made long sleeve with thicker material, will help keep your upper body toasty.  Shoe covers or cycling booties will help keep your feet warm which slip over your shoes.

Choosing the right clothing for cycling will make your riding more enjoyable and comfortable particularly when riding longer and longer distances.  Having the proper clothing while riding in weather that is less than ideal, such as heat, cold, or rain, will make it much more manageable and not bring you to a grinding halt.  The right clothing will expand your riding windows in terms of whether as well as the length that you can comfortably ride.  The biggest thing in riding is having fun and your comfort contributes to that so get the right gear and enjoy your ride.

« Previous Page
Next Page »
  • Facebook
  • Tumblr
  • Twitter

Latest Articles

JOIN Cycling: A New Training Platform for Cyclists

May 27, 2024 By Eric Lister

cold exposure

The Benefits of Cold Exposure for Cycling & Life

June 13, 2023 By Eric Lister

hill climb

The Ultimate Hill Climb Training Guide

May 31, 2023 By Eric Lister

shoulder pain cycling

How to Treat & Avoid Shoulder Pain While Cycling

April 12, 2023 By Eric Lister

psoas stretch

The Importance of the Psoas Stretch for Cyclists

April 6, 2023 By Eric Lister

cycling neck pain

The Ultimate Guide to Cycling Neck Pain: Causes and Solutions

March 21, 2023 By Eric Lister

Useful Info

  • Contact
  • Finally, A Global Cycling Club That Is Focused On Community And Love Of Cycling!
  • Privacy Policy
  • Share Your Story!
  • Terms And Conditions Of Use
  • Welcome to I Love Bicycling
  • What Happened When I Stretched Every Day For a Month

Recent Posts

  • JOIN Cycling: A New Training Platform for Cyclists
  • How to Hang Bikes in Your Garage: 4 Inexpensive Options
  • Gravel Bike Vs. Road Bike: Which One Is Better For You?
  • The 6 Types of Mountain Bikes & How to Choose the Best One for You
  • What Is a Touring Bike Good For? 5 Benefits We Know You’ll Love

Search I Love Bicycling

Connect with Us

  • Facebook
  • RSS
  • Tumblr
  • Twitter

Copyright © 2026 · Magazine Pro Theme on Genesis Framework · WordPress · Log in