• Training
    • Injury Prevention
    • Training Tips
  • How To
    • Bike Fit
    • Gear
  • Nutrition
    • Nutrition Tips
    • Weight Loss
  • Repair
  • Reviews
  • Stories
    • Funny Stories
    • Jokes
    • Quotes
    • Videos
    • Funny Videos

I Love Bicycling

I Love Bicycling is a website that is geared towards cycling for beginners with road cycling tips, training articles, nutrition tips, weight loss, how to’s and bike repair articles.

Training Tips

  • Injury Prevention
  • Training Camps

Train Your Brain and Improve Your Mental Toughness

March 6, 2020 by Sarah Lauzé

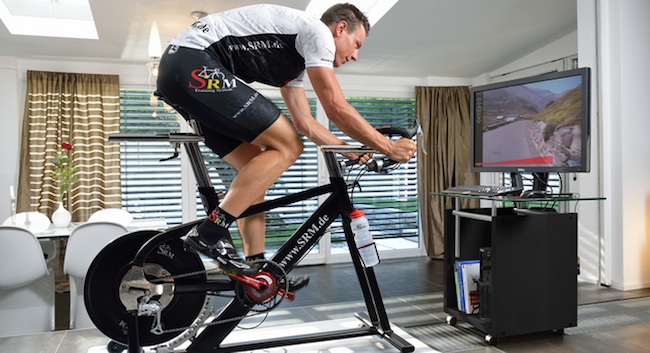
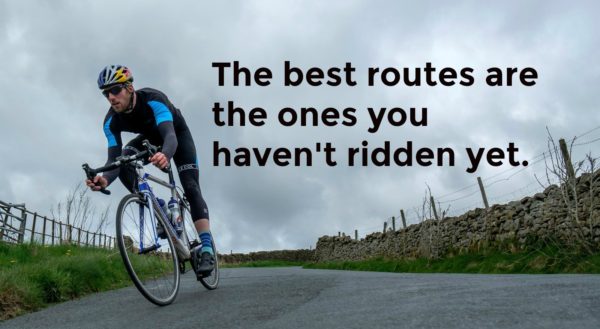
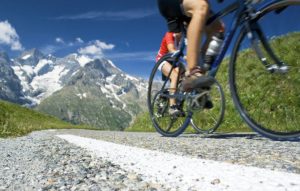
Cyclists are known for being tough, both physically and mentally. So you put in the miles, you push yourself to the limits of what your body will put up with, and over time, you improve. This is what being a cyclist is all about, but one important factor is often left out of the average training plan – your mental toughness.

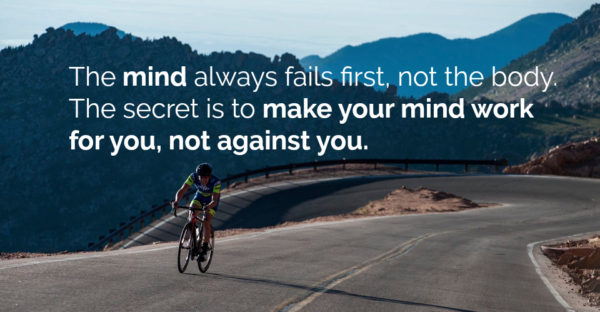
Mastery over the mind is essential in a tough, endurance sport like cycling. When your legs are screaming and lungs burning, your mind can quickly become your enemy. It all comes down to mental toughness, and luckily it can be learned, but it takes practice to tame the mind and turn it into a force that works for you rather than against.

Step 1: Tame Your Mind

You know when you’re on your bike, and you carry on a conversation with yourself throughout the entire ride?  The human mind is naturally restless and unsettled, so it’s perfectly normal that your thought process is jumping around.

The first step is taking control of that conversation and using it to your advantage. You’re never going to truly silence your mind (unless you’re a zen mater), so try to slow down the flow of thoughts to reduce any anxiety and help bring focus. Next, implant your ‘power thought.’ Okay, that may sound cheesy, but it works! It’s different for everyone, it could be a phrase, an image, an entire video sequence you play over and over. Just make sure it’s positive, focused, and loud enough to drown out any negativity.

Step 2: Change Up How You Measure Distance

Sometimes a mile can feel like an eternity, so try switching up your focus. Rides that include a lot of climbing can be daunting as you watch your distance creep along, so track time instead. Getting through it, minute by minute, can help you focus on what’s right in front of you rather than the long-term goal, which can seem daunting halfway through a ride.

Step 3: Breathe

Easy enough, right? We can all suffer from pre-race jitters or stress, but taking a few moments to practice just breathing can erase them almost entirely. A common practice for racers is ‘circle breathing,’ which is just very intentional and controlled breathing.

Take a deep breath in through your nose, feeling your chest expand to its capacity and pushing your abdomen outward, and hold. Then steadily exhale through your mouth, pushing every last bit of air out. Repeat this cycle 5-10 times and you will be able to feel both your body and mind relax. Ensure you are also using proper breathing techniques while you are on you bike.

Step 4: Mental Toughness

Mental toughness comes down to acknowledging pain or discomfort and moving past it. There are a lot of ways you can do this, so you’ll have to find what works for you. You can come up with your own fighting talk, like the classic “Shut up legs! Do what I tell you to do.” Or, you can visualize yourself winning the Tour de France to stay focused.

Personally, I use images or visual queues to tackle those tough moments. Reeling in the rider ahead is one of the most effective ways I’ve found to push myself. Picture a fishing line between the front of your bike and the back of theirs, then slowly reel them in. There’s nothing more rewording then when you finally do!

Step 5: Get Into The Zone

‘The zone’ is more often used to describe the state that runners enter in connection with the runner’s high, but it exists for cyclists as well. It can be described as the state of flow in which a rider is 100 percent absorbed in the task at hand, or pure concentration. Some descriptions of ‘the zone’ from various athletes are:

  • You can feel that you are being challenged, but you also know you have the skills to meet that challenge.
  • You can picture clearly what you need to do, and how you’re going to do it.
  • A feeling of being one with your actions.
  • A sense of being able to do anything without feeling like you have to try. You are in total control of your body and mind.
  • No worries, concerns, or fears of failure.
  • A feeling that time speeds up or slows down.

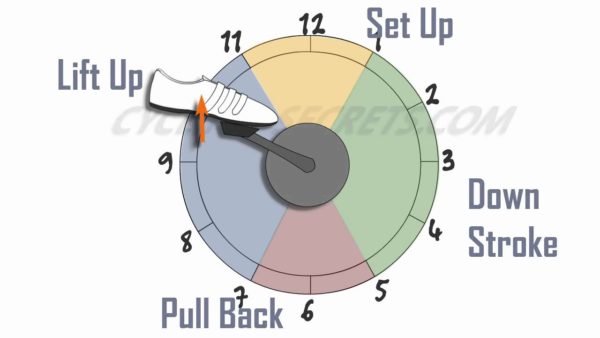
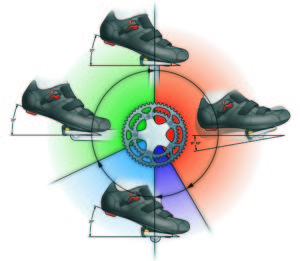
A technique to try and enter the zone is to bring your concentration down to a precise moment. Focus on your pedalling efficiency, the motion of pulling up and pushing down as seamlessly as you can. Concentrate on the sound of your bike, the wind, or your tires on the road.

At the beginning stages, it is definitely the total physical development that is important. Later on you develop more mental concentration, mental preparation to main maintain the physical capacity.” – Eddy Merckx

How To Improve Pedaling Efficiency

February 26, 2020 by Sarah Lauzé

Cycling is all about pedaling. No matter the bike, kit, and all the other bells and whistles, if you don’t start moving your legs you’re not going anywhere. In fact, the pedaling motion comes so naturally to most of us that we don’t even give it a second thought. With all the focus on cadence, a lot of times pedaling efficiency gets left behind.

Yes, cadence is important and has a large effect on how efficient your pedaling is, but it’s not the whole story. If you’re completing 90 revolutions a minute for a two hour ride, that’s over 10,000 revolutions. So, just think about the effect it could have on your riding if you made each one of those revolutions everything it could be.

Check Before You Start

The hip, knee, and angle should all be in as straight of a line as possible when pedaling.

Before your start working on your pedaling technique you’ll want to ensure your bike is setup properly for you. The first thing to look at will be your saddle height. If the saddle is too low you’ll restrict the pedal stroke where you can produce the most power. If it’s too high your hips will start to rock side to side.

You may also want to take a look at crank arm length, as having the right fit for you can help improve your pedaling efficiency. The correct crank length puts your knee in the correct position at the top of the pedal stroke, and still leaves space between your knees and your stomach.

Watch Your Alignment

We’ve all seen bow-legged cyclists (or maybe you are one of them). Although it can be difficult to keep your hip, knee, and ankle in a straight line, this is the goal. Bowing your legs out is not only less efficient, but it can also lead to knee injuries.

Pedal in Circles

Running in circles may not be the way to go, but pedaling in circles definitely is. The first thing you need to do is start looking at pedaling as a complete revolution, made up of different angles, muscle groups, and power (much more than just the downstroke). Efficient pedaling technique is something that can come with time in the saddle, but you can speed up the process by focusing on each part of the movement and applying force around the pedal stroke.

1. The Down Stroke (1 – 5 o’clock)

This is the most natural feeling part of the pedal stroke, and where most of your power comes from. If you think of a single revolution as a clock face, the downstroke happens at about 1 to 5 o’clock. You are pushing down with your heel level to the ground or even about 20 degrees below your toe.

2. The Pull Back (5 – 6 o’clock)

This motion at the bottom of your pedal stroke should feel like scraping your foot back. You should feel the movement in your calf, with your heel lifting slightly. Imagine you have mud on the toe of your shoe that your are trying to scrape off on the pavement.

3. The Lift Up (7 – 11 o’clock)

The goal of the lift up is not so much to produce a ton of power, but to lift the weight of your leg so your opposing leg is not lifting it up with the downstroke (especially at a fast cadence). Your ankle should be at about a 20 degree angle with the movement, and be sure to keep your knee from bowing out. This is when you want to engage your core and glutes to stabilize your legs and make for a smooth motion.

4. The Set Up (11 – 1 o’clock)

The biggest mistake a lot of cyclists make is not initiating the downstroke early enough. The set up is a very short transition, with the feeling of lifting your knees, involving your hip flexors, and getting into the downstroke as soon as possible.

The Upper Body

While pedaling, the upper body should be as quiet (motionless) as possible. Upper body movement may make you feel like you’re putting a little something extra in, but it’s a complete waste of effort. Instead, you want to isolate the upper body from the motion of the legs. This will take a conscious effort at first, but will become second nature over time.

Exercises to Improve Your Pedaling Efficiency

Slow It Down

Find a hill and try climbing at a much higher gear and lower cadence (around 40 rpm) than you normally would. Focus on keeping your upper body still, while taking note of where your naturally strong surges and dead spots are. From there you can work on each aspect of the pedal stroke to get the feel of it being one smooth motion.

Mountain biking is also great for this. If you have large power surges on loose ground, you’ll lose traction, which teaches you pretty quickly not to stamp down on the pedals.

Try a Fixed Gear Bike

Fixed gear bikes force you to pedal in circle, or else you’ll be bouncing around and looking really awkward. This is why track cyclists have some of the most efficient pedaling technique out there. So, if you can get your hands on a fixed gear bike, take it for a spin and focus on making the pedaling as smooth as possible.

One Leg Pedaling

This is exercise is easier on a stationary bike or trainer then out on the road, but it can be done. Start by unclipping one foot from the pedals, while keeping both hips in the normal riding position. Pedal using the clipped in leg for 30 seconds, then clip the other one back in and spin for 15 seconds. Then repeat with the other leg.

This exercise will help you figure out the location of your stroke inefficiency. Pay attention to any part of the movement that is jerky or uneven, then you can start focusing on those areas and making them as smooth as possible.

Tips for Finding New Bike Routes

February 24, 2020 by Aaron Robson

Maybe you’ve just moved to a new city and have no idea where you can get a good ride in, or you might just be looking for a change of scenery from your tried and true routes. How do you go about finding suitable pavement? Anyone that has ever found themselves riding on a narrow highway with no shoulder and trucks passing you at 60 mph will know that it isn’t always as simple as checking out Google Maps.

Your LBS

If you are in a new area, probably your best resource for finding good routes will be the local bike shop (LBS). These guys have usually been a part of the local cycling scene for a while, and every one I’ve been in has been super helpful suggesting the best places for a ride. Many of them will even have maps that you can take with you, or rides posted on a bulletin board. Whenever I’m traveling and have just a couple days in an area, the LBS is my first stop.

The Guided Tour

finding new bike routes

However, for those of you who aren’t the best navigators, striking out on your own with a vague set of directions might not be your cup of tea. For a little bit more guidance, you will want to hook up with one of the local clubs. Many clubs will hold weekly group rides with a range of distances and paces to suit just about anyone. Our friendly LBS might be able to give you the contact info for some of the club, or a quick search on Google should bring up at least a couple clubs in your area. Once you’ve been to a couple rides, you can start asking around for other options – many of the riders will ride together informally in addition to the organized weekly rides.

Link Up

Sometimes, though, you just want to get out there on your own, without having to worry about group riding etiquette, or holding casual conversation. If you’ve exhausted the suggestions of the LBS and the club, where do you turn? The answer, of course, is the magical internet. There are a bunch of good websites out there for tracking, recording, and sharing cycling routes. The two biggest are Strava and MapMyRide. In a few clicks, you can be browsing through rides that other people have put up in your area. These sites generally allow users to rate routes, and tag them with various characteristics, like ‘gravel sections’ or ‘great pavement’.

Strava

Here is a global heat map on strava, the more travelled that particular route is the more intense the colour becomes! Using the heat map feature, you can also plot where you typically ride and how many times you’ve ridden it. Take a look at all the areas you’re not riding and start taking in some new scenery. You can also check out other user’s heatmaps in your area. Using the Route Builder, you can piece together a new route from some popular roads and segments mapped by cyclists in your area.

Hopefully these suggestions will help you find some new routes if you’ve been looking to mix up your riding routine, or get you started in an unfamiliar area. Happy riding!

What To Look for in a Cycling Training Plan

February 21, 2020 by Sarah Lauzé

What is the purpose of a cycling training plan? When you boil it down, it comes down to setting goals and measuring progress. A training plan serves as your road map to get you to a certain place, but what are some important things to look for? Just as you wouldn’t start trying to navigate the streets of a foreign city without a detailed map, you want to establish what aspects you need included to see success.

There are a lot of options when it comes to training plans, and also the means to how you access them. Some will choose to spend a little more and hire a personal coach to build their plan for them. Others will use online resources or join a certain challenge. The issue here is that these are not personalized to you. What happens when the timeline set up in a certain plan doesn’t match your life in a realistic way? You need to be able to understand the basics, so that you can take certain aspects of a cycling training plan into your hands.

Cycling Training Plan

Why You Need a Training Plan

Establishing a cycling training plan eliminates the danger of becoming complacent or falling into the “I will do it tomorrow” thought pattern. It makes you accountable as you follow the plan. It motivates you to change your habits and manage your time more efficiently to finish your first century ride or sign your name to that first Gran Fondo event.

Another great aspect of a training plan is to avoid the dreaded ‘plateau’ that is so common with athletes. As an active lifestyle becomes part of who you are, it’s easy to reach a certain point and stay there. There’s nothing wrong with maintaining a healthy fitness level, but if you want to continue to see changes, then you have to keep pushing yourself.

Cycling Training Plan Options

  • Personal Coach – A personal coach will not only create a training plan tailored to you and your goals, but they will also help keep you accountable. They will be checking in on your progress, and have the knowledge to make necessary changes to get you to where you want to be as quickly as possible. The downside? They are, in most cases, the most expensive option.
  • Pre-Prepared Training Plans – There are a ton of resources available online that can serve as a general outline or starting point for your training plan. In some cases they can be difficult to follow because it will not take into account your lifestyle, starting point, or your specific goals.
  • Build your own – It’s always better to understand why you’re doing something, rather than simply doing it because someone tells you to. So, if you have the time to do the research and put together a comprehensive training plan for yourself, by all means do it! This can not only work well, but it help you come to understand your own body a whole lot better.

Start at the end

No matter what option you go with for coming up with a training plan, you will need to define your goals. It may sound counterintuitive, but starting from your overarching goal and working backwards is actually a great idea. This may be weight loss, completing a century ride, or doing a multi-day Gran Fondo. Once you’ve defined this goal, you can break it down into tangible “check points.” These could be  various distances, target weights, or a certain number of hours spent on the bike.

Measure your progress

Now you need to take a look at where you are right now. This may include testing yourself to find your mental and physical limits. What can your body handle? This can be done a number of ways.

  • Power Meter – A power meter is a great tool as it make comparisons easy. It can give consistent feedback on your effectiveness, and is a great training tool. Power is ultimately a measure of how hard you are working, and by using a power meter on your bike, you can more precisely monitor your effort. That being said, it’s not a must-have.
  • Heart Rate – Using a heart rate monitor is a great way to structure workouts, and a lot of training plans include heart rate zone training. Heart rate training is a valuable tool for all athletes, as it helps bypass your brain to listen directly to what your body is telling you.
  • Your Brain! –  You don’t really need anything but a bike to complete a cycling training plan. You can make your own intensity scale (as long as you’re honest with yourself) from 1 – 10. 1 would be “I could do this all day,” and 10 would be “this is everything I’ve got in me.” The issue, of course, is that it takes a special kind of person to be that disciplined with themselves.

One of the greatest things about a training plan is being able to track your progress in a tangible way. Once you sign up for a cycling training plan you will see your body, mind, and outlook improve over the next few days, weeks, and months. You will continuously break your own personal records and the records of your friends, as you monitor your own fitness. Keep track of each ride you do, even if you just write down the basics like distance and time. Keeping a food diary can also be a great way to look at why you may feel great some rides, and then not so much on others.

Not only will this show you how much you can achieve, but it also gives you some serious bragging rights. There’s nothing more satisfying than looking at your year end totals, whether it be distance or time in the saddle, and seeing some huge numbers.

Off the Bike

A good cycling training plan helps you to keep track of less-obvious issues of fitness such as sleep and recovery, nutrition and hydration, and strength and stretching. You’re more likely to meet your fitness and weight loss goals if you’re looking after every one of these aspect. A detailed cycling training plan helps you keep track of these small details and makes you more conscious of them on a day-to-day basis.

  • Strength / Cross Training – Strength training for cyclists further develops tendons and supporting muscles which can help treat and prevent overuse injuries. Your training plan should include some strength training, whether through some basic weight training or cross training.
  • Stretching – Stretching can aid in aligning the thick and thin muscles back into their ordered state after rides, as well as remove the lactic acid buildup that causes soreness. Maintaining flexibility will also help you stay in the correct posture while riding, which can prevent injury.
  • Nutrition & Hydration – Eating right can be hard at the best of times, especially for those of us who like to exercise as a hobby. With a passion for cycling often comes a need for a balanced diet – and this is even more true when you opt to cycle for long periods of time, or working towards a goal. Having a cycling training plan that includes a detailed nutrition plan can make sure you are properly fuelled for each ride, and will help you get to those goals faster.

Stay Flexible and Adapt

As with mapping out anything, whether it be a road trip or your cycling training plan to success, you need to remain flexible. If you have a rough night’s sleep, or feel like you’re coming down with a cold, then ignore what your plan says and take a rest day. There’s no point in half-hearted training, and at that point taking a rest day is probably more important. You have to be able to have the freedom to switch around training days, because things will come up. Having structure to your training is important to ensure it happens, but you also need to remain flexible enough to have a life!

Cycling With Your Partner: Why you should ride together

February 14, 2020 by Sarah Lauzé

You may think of cycling as a solitary sport with the occasional group or club ride. However, there are a ton of couples that use cycling as way to spent time together, for better or worse. Cycling with your partner can strengthen your relationship (when done right), and it can become something that brings the two of you together. Exercise has been proven to benefit your own health and mental well-being, so why not bring you relationship into it!?

For some couples, it can become a running joke that the bike always comes first. Or, if one is a stronger cyclist than the other, it can become a source of tension.  You’ll want to make sure you’re on the same page before heading out on a ride together, so that it can be enjoyable for both of you. Once you figure out what works best for the two of you, the benefits will far outweigh the downsides.

Cycling With Your Partner

Cycling With Your Partner: Couples that ride together, stay together.

Shared Interest & Goals

Regular rides with your partner will result in shared experiences. When your interests and goals begin to align, it can remove tension and stress. When the weekend rolls around one of you won’t be trying to sneak in a ride while leaving the other at home, but instead it can be something you plan to do together. Sign up for a race or choose a goal that would be achievable for both of you, and start working towards it. Once you get there, you’ll be side-by-side and all the better for it.

Quality Time Together

Between work, family time, and everything in between, it can be tough to find time to spend together. Combining your hobby or exercise routine with time spent with your significant is not only efficient, but it can increase your emotional bond. When you ride together, you are in a way coordinating your actions. You’re moving in the same direction, with the same movements, and matching your pace can create a connection that goes beyond you time spent in the saddle.

Gifts made easy

It’s easy to buy gift for someone that you share interests with, because you can get something that you would like! If you’re riding together regularly, you’ll know just what they’ll want for that birthday or anniversary present, making your life a whole lot easier.

Accountability and Better Rides!

When you care about each other’s fitness, it’s a whole lot easier to keep each other motivated. Not only will you be more likely to get out riding, but once you’re out there you have accountability in the form of your partner. You can cheer each other on to push to the top of that hill or keep those legs spinning when all you want to do is quit. If you know each other’s goals, then you can not only have mutual support, but respect as well.

Knee Pads & Roses – A Singletrack Valentine from Pivot Cycles on Vimeo.

If your partner doesn’t cycle, but has expressed interest, then now is your chance to cash in on all these benefits. Cycling with your partner can be a great way to spend time together, maintain fitness, and even challenge each other. If you’re not sure how to get your partner into cycling, check out “How To Get Your Spouse Into Cycling,” for some tips.

Waterproof Cycling Gear: The Best Gear for Rainy Rides

February 2, 2020 by Sarah Lauzé

As we slowly inch closer to spring, you may be itching to get back out on the road. This time of year weather is unpredictable, and when it rains it pours. One of the best things you can do to make your spring rides a success is to be prepared with the proper waterproof cycling gear. Having the right gear for rainy rides can actually make pedaling through the downpours a lot of fun.

One of the tough things about finding the right waterproof cycling gear is that it needs to keep you dry, but also breath enough to allow sweat vapor to escape so you’re not getting soaked from the inside out. Here are some of the necessities, from your head to your toes.

Things to Look for in Waterproof Cycling Gear

Look at the seams

Seams are the weak point in most garments, as the stitching holes in the fabric can let water in. Check to see if there is waterproof rubber backing to seal these holes, or if the seams are glued rather than stitched, eliminating the holes altogether. This will be the lightweight option, and more expensive, but may be worth it if you find yourself out in the rain a lot.

Water Proof vs Water Resistant

Water resistant clothing is a great option for light showers and to keep the chill at bay, but will not hold up in a full downpour. These are made from less advanced fabric with no waterproof membrane, making them the cheaper option (and more versatile).

Waterproof garments will  be cut from a fabric with multiple layers, including a waterproof membrane, and will have sealed seams and a waterproof zipper. These will keep your dry from the outside, but need to have proper ventilation to allow sweat to escape. Look for vents under the arms, in pockets or on the back. These will also be treated with a Durable Water Repellent (DWR) coating, which will cause the water to bead and roll off rather than soak into the fabric. This coating will degrade over time naturally, but you can always retreat it to renew it’s waterproof life.

The Best Waterproof Cycling Gear

GORE WEAR Men’s  C5 GORE-TEX Jacket

$194

Perhaps the top of the line, GORE-Tex Active fabric is waterproof, windproof, and extremely breathable. This jacket will both keep you warm during breaks, and cool enough when you’re pushing up a climb. This jacket offers a tighter fit than most to keep the fabric close to the skin, and avoid any flapping when you’re on your bike.

Showers Pass Storm Pant

$65

Great for slipping on over shorts or bib tights, the Showers Pass Storm Pant is waterproof and rugged, made with a 3-layer waterproof breathable Artex material. A generous helping of reflective trim keeps you visible during low light hours. Ankle zippers help these rain pants slide on and off over shoes easily. Includes a mesh stuff sack for commuters looking for something easy to carry with them.

For more waterproof pant options, click here.

Fi’zi:k Shoe Cover

Fi’zi:k Shoe Covers  are designed in collaboration with professional cyclists and offer the highest performance in whatever conditions you find yourself in. Tackle the wet and cold without getting frozen toes and soggy feet! Whatever the weather, Fi’zi:k shoe covers provide you with professional grade coverage so you can focus on what really matters; performance.

Showers Pass Crosspoint Knit Gloves

$45

Great for more than just cycling, these gloves are lightweight, breathable and waterproof. They’re made of 3 bonded layers: a wear resistant knit exterior that feels like a regular knit glove, a waterproof-breathable Artex membrane, and a Coolmax moisture-wicking antibacterial knit lining. Silicone print on the palm offers a better grip in wet conditions.


Heart Rate Zone Training for Cyclists

January 28, 2020 by Sarah Lauzé

Heart Rate Zone Training for CyclistsHeart rate zone training is one of the most effective ways to get to know your body and what you’re capable of. It’s easy to stop doing something when it’s hard, especially if you don’t have a tangible goal. Using your heart rate zones, you can push yourself further than you may think possible, while also ensuring you aren’t overtraining.

As a cyclist, you always want to be improving. Whether you’re aiming for a 100 mile race or want to keep up on group rides, making the most of your time in the saddle will get you there. Here are some sample training sessions, using heart rate zones, to increase your efficiency and get you flying up those hills.

If you are unfamiliar with the heart rate zones, please first go read this article on how to determine your perimeter beats per minutes and define your zones from there.

The long slow distance

3-4 hours in Zones 1-2

Breakdown: This one is pretty self explanatory. Plan out a long distance ride with moderate climbing, and be sure to stay in HR zones 1-2, even if this means getting into your climbing gear earlier than you usually would.

Everybody loves LSD! And no, I’m talking about the drug. The long slow distance ride is your entry into heart rate (HR) training, and the perhaps the most overlooked because let’s be real, it can seem slow and boring. It’s hard to be disciplined enough to stay in these lower zones, but it will pay off in the long run. It seems counterintuitive, but these relaxed rides build up your endurance and overall fitness, and will make your faster.

It may be a good idea to ride alone for these ones to avoid your more competitive side getting in the way. Sit back, enjoy the scenery, and spin those legs!

The high intensity intervals

40 minutes in zones 1-7

Breakdown: 10 minute warmup (zones 1-2)

3 sets of 4 x 30 second sprints (zone 5) with 40 second recovery (zone 1-2)

5 minute cool down (zone 1-2)

No pain no gain, right? This ride is short, but it will burn fat, improve endurance, and increase your overall fitness. Intervals may not be a whole lot of fun, but if you mentally prepare yourself, the pain really doesn’t last that long. Take it one interval at a time, and make the most of the rests in between!

A little bit of both

2 hours in zones 2-3 with zone 4 intervals

Breakdown: 50 minutes (zone 1-2)

10 minute sprint (zone 4)

40 minutes (zones 1-2)

10 minutes (zone 4)

10 minute cool down (zone 1-2)

Heart Rate Zone Training for Cyclists

It’s all about endurance. This ride will build both your strength and endurance over time, and the ten minute sprints are actually a whole lot of fun. Don’t cheat yourself, but stay focused and within the zones if possible. If you’re just starting out, try two hours in zone 3 instead, and work up to this ride.

Keep in mind, the more riding you do, the better you’re going to get. Even if you do the same ride twice, it may take you more effort to get into the different zones than it did before as your body becomes more efficient. Once you reach a certain level of fitness, many cyclists tend to plateau, but using HR zone training you can avoid this and keep pushing yourself each and every ride.

The Types of Knee Pain from Cycling

January 22, 2020 by Sarah Lauzé

The knee is one of the most complex joints in the body, so it makes sense that it is often the first place we experience pain. Although it’s not a muscle, stretches for cyclists are key to ensuring everything connected to the knee remains flexible and in place.

Many cyclists think knee pain means taking time away from the bike and resting up, but that’s not necessarily true. It could be caused by something as simple as a saddle adjustment or new cleats. So, if you’re experiencing knee pain, figure out what it may be stemming from and adjust your training accordingly.

The Types of Knee Pain from Cycling

Main Types of Knee Pain

Knee pain can show up in a variety of forms and for different reasons. These are some of the main types and common causes:

1. Anterior Knee Pain

Anterior knee pain is at the front of the knee, on and around the kneecap (patella). It is most commonly caused by overuse. The quads are attached to the shin via the kneecap so each time you pedal, forces are transmitted across the joint, essentially squishing it against the thigh bone. The part of the tendon attached to the kneecap can become inflamed and sore to the touch. Often referred to as ‘runner’s knee,’ it can happen to cyclists as well.

2. Posterior Knee Pain

The fair less common posterior knee pain shows up behind the knee and is usually a more simple diagnosis. Overextending the knee, with a saddle that is too high or too far back, causes posterior knee pain in most cases, so make sure your saddle is the proper height and adjustment for you.

3. Medial & Lateral Knee Pain

Pain located at the sides of knee in the collateral ligaments is most commonly caused by the feet. In cycling, this would come down to your cycling shoes or the position of the cleat. How far apart your feet are positioned can stress one of the collaterals, causing medial or lateral knee pain during or after a ride.

4. Iliotibial Band (IT Band) Syndrome

The IT band, running along the outside of the thigh from the pelvis to just below the knee, is a thick strap of tissue that can often become tight or inflamed. This is usually caused by over use, weakness of the gluteus medius muscle, or cleat placement. If the IT band has become inflamed, then rest and ice are in order. If it is tight and sore, then regular stretching and rolling will be your best course of action.

The Types of Knee Pain from Cycling

What can cause knee pain?

Although cycling is a low impact sport, too much of anything can lead to stress and strain on the body. Pedalling is a repetitive motion with the constant bending and extending motions flexing the knees and hips. Naturally, with overuse these are the most common sites of chronic-use injury.

Too much too soon

The number one cause of knee pain with cyclists is going too hard or far too soon. It is great to challenge yourself, but going further than your ligaments and muscles can handle will only hinder you progress. Endurance is something that is built up over time, conditioning your muscles over miles and hours. Ligaments take even longer to develop than muscles, with issues often arising from tightness or inflamation.

Improper bike fitThe Types of Knee Pain from Cycling

The little adjustments you can make to your bike can make all the difference when it comes to addressing or avoiding knee pain. The height and position of your saddle and the placement of cleats on the bottoms of your cycling shoes can cause or help avoid knee pain, depending on how well they are adjusted for you.

Not Enough Stretching and Rolling

Flexibility or lack of, is a cyclists nemesis. Eventually if you do not stretch or roll your muscles will tighten so much that you will have difficulty walking never mind riding. Make sure to do stretches that especially focus on the muscles surrounding the knee.

Knee pain can be disheartening when it comes to cycling, but most cases are not cause to give up on your training. However, if pain persists despite proper rest, stretching, or bike adjustments, then it may be a good idea to see a physiotherapist to see if there is an underlying issue that needs to be addressed.

Knee Rehab Program for Cyclists

Looking for a program that will help you address the muscle imbalance that is likely causing your knee pain? Dynamic Cyclist is an online training platform designed to help cyclists become stronger and faster while riding pain free for years to come. Complete your regimen with an all-inclusive program that addresses mobility, flexibility, strength and injury prevention, all for a fraction of the cost of one physiotherapy appointment. Try out their 6 Week Functional Rehab Program and experience the results for yourself. Click here to try 7 days free!

Cycling Intervals: The 2×20 Workout

January 16, 2020 by Aaron Robson

If you are looking for that killer workout that will take you to the next level in your biking, chances are, we have what you are looking for. Most training books will refer to this workout as 2x20s, but most cyclists tend to refer to it using some variation on the words ‘pain’, ‘torture’ and ‘excruciating’. Never fear though, you are made of tougher stuff than most, and a little pain goes a long way!

2x20 intervals - An Aerobic Power Workout

The Benefits of Interval Training

The benefits of interval training are numerous, which is why it has been a mainstay technique used by  fitness professionals throughout the world, in addition to a lot of cyclists.

Efficiency – Interval training is designed to get you the best results in the shortest amount of time, so you will find that you end up spending a lot less time on your workouts.

Fat Burning – The intense effort required in an interval training program means that you will burn a lot of fat much more quickly than you would with standard riding. You also boost your body’s repair cycle during interval training, which means that you will lose more calories and fat following the completion of the workout than you would after a standard ride.

No Equipment Needed – One of the main sticking points of going to the gym to build power is that you need to use equipment other than your bike. In doing so you aren’t improving your technique and you’re often spending money to get results. Interval training just needs you and your bike to get the job done.

Challenge – No workout is going to keep your attention for long if it doesn’t offer a challenge and, even worse, it will start to lose its effectiveness if you find you can do it easily. Interval training is never anything less than a challenge, especially because intervals can often be scaled up to become harder as your body improves.

2×20 Cycling Intervals

Here is what you will need:

  • Yourself
  • Your bike
  • A place where you can bike without having to stop for at least 20 minutes (I often use a 1-2 mile loop course for this)

The workout is fairly self-explanatory – you are going to ride two 20 minute efforts. In between is a 3-5 minute slow recovery pedal. You will want to pace your effort such that you maintain a steady pace throughout the first effort that leaves you feeling pretty tired, but knowing you held back a bit. For the second effort, you still want it to remain relatively even paced, but you should be about as close to falling over as you can push yourself. If you’ve done things right, your efforts should be about the same pace (or power level, if you happen to be using a power meter).

Why is this workout so beneficial? For starters, it is going to make you tough. The more times you do this, the harder you will be able to push yourself in that second leg, and that will translate directly to endurance at the end of a race.

Why It Works

To look at things a bit more technically, this workout targets what physiologists call your Functional Threshold Power, which refers to the maximum effort level you can maintain before lactic acid production begins to sharply increase. In simple terms, it is about the level you can maintain for an all-out 1 hour effort. Why is this so important? Well even if you don’t race in time trials very often, increasing your FTP means that any given aerobic effort will be easier. This allows you to recover faster after a hard surge in a race, or have more left in the tank for a final sprint after the pace ratchets up in the last few kms of a race. All of that sounds pretty damn good, doesn’t it? What are you waiting for?

Benefits of Indoor Trainer Workouts

January 7, 2020 by Dyani Herrera

One of the many joys of cycling is the youthful sense that you’re “playing” outdoors, as you ride and take yourself through the environment. However, at times life obligations or the environment can hinder your training plan forcing you to adapt your workouts. Bike trainers are a great way to fit in an effective workout, and there are several advantages of using a trainer that will enhance your skills as a cyclist.

Benefits of Trainer Workouts

Benefits of Indoor Trainer Workouts

Mental Endurance

Riding in place for over an hour or more can become incredibly monotonous; however, it obliges you to focus on the task at hand. In contrast to riding on the road, where you’re worrying about safety, taking in the scenery, or casually talking to your riding buddy throughout your workout. Spinning on a trainer compels you to think of your pedal stroke, breathing patterns, and pain. There are no distractions; hence you really need to rely on your sport psychology techniques to get you through your workouts. Additionally, you can listen to your breathing patterns and control them in order to reduce early fatigue. This can definitely come in handy during a race where extreme focus and endurance are required for an optimal performance.

Here a few ways to beat indoor trainer boredom with a few different games on the trainer.

Improved Bike Fitness

When riding on the road there are interruptions such as stop lights, making a U-turn, decelerating to avoid contact with the rear wheel of a fellow cyclist, or fighting a headwind just to name a few. Conversely, when riding on a trainer there are no gaps in your workout and you’re riding at a consistent effort throughout unless, you’re doing intervals.

If your workout contains intervals, then use a bike computer with a cadence monitor to alert you of your RPMs. By using this monitor you can do high cadence work intervals with low cadence rest intervals. Another benefit of a trainer is the ability to adjust the resistance felt while riding. After a few consecutive sessions on the trainer your legs will feel stronger when riding on the road, and you’ll notice an increase in speed.

Practicality

Probably the best aspect of using a trainer is how practical it is to use for one’s lifestyle. You can still fit in a great cycling workout despite snowy or rainy conditions. If environmental conditions are unsafe, then you can set up the trainer indoors at any time and cycle. Some people become creative with their workout space and place their trainers in the garage with no air conditioning and a big fan for added resistance to simulate road conditions. Additionally, if life commitments become more time consuming than usual you can still schedule a session in before dawn or late at night. It’s also an efficient tool to maintain the balance between family and training.

« Previous Page
Next Page »
  • Facebook
  • Tumblr
  • Twitter

Latest Articles

JOIN Cycling: A New Training Platform for Cyclists

May 27, 2024 By Eric Lister

cold exposure

The Benefits of Cold Exposure for Cycling & Life

June 13, 2023 By Eric Lister

hill climb

The Ultimate Hill Climb Training Guide

May 31, 2023 By Eric Lister

shoulder pain cycling

How to Treat & Avoid Shoulder Pain While Cycling

April 12, 2023 By Eric Lister

psoas stretch

The Importance of the Psoas Stretch for Cyclists

April 6, 2023 By Eric Lister

cycling neck pain

The Ultimate Guide to Cycling Neck Pain: Causes and Solutions

March 21, 2023 By Eric Lister

Useful Info

  • Contact
  • Finally, A Global Cycling Club That Is Focused On Community And Love Of Cycling!
  • Privacy Policy
  • Share Your Story!
  • Terms And Conditions Of Use
  • Welcome to I Love Bicycling
  • What Happened When I Stretched Every Day For a Month

Recent Posts

  • JOIN Cycling: A New Training Platform for Cyclists
  • How to Hang Bikes in Your Garage: 4 Inexpensive Options
  • Gravel Bike Vs. Road Bike: Which One Is Better For You?
  • The 6 Types of Mountain Bikes & How to Choose the Best One for You
  • What Is a Touring Bike Good For? 5 Benefits We Know You’ll Love

Search I Love Bicycling

Connect with Us

  • Facebook
  • RSS
  • Tumblr
  • Twitter

Copyright © 2025 · Magazine Pro Theme on Genesis Framework · WordPress · Log in