• Training
    • Injury Prevention
    • Training Tips
  • How To
    • Bike Fit
    • Gear
  • Nutrition
    • Nutrition Tips
    • Weight Loss
  • Repair
  • Reviews
  • Stories
    • Funny Stories
    • Jokes
    • Quotes
    • Videos
    • Funny Videos

I Love Bicycling

I Love Bicycling is a website that is geared towards cycling for beginners with road cycling tips, training articles, nutrition tips, weight loss, how to’s and bike repair articles.

Training Tips

  • Injury Prevention
  • Training Camps

Exercise Techniques to Maximize your Cycling Performance

October 8, 2015 by Guest Post

Exercise Techniques to Maximize your Cycling Performance
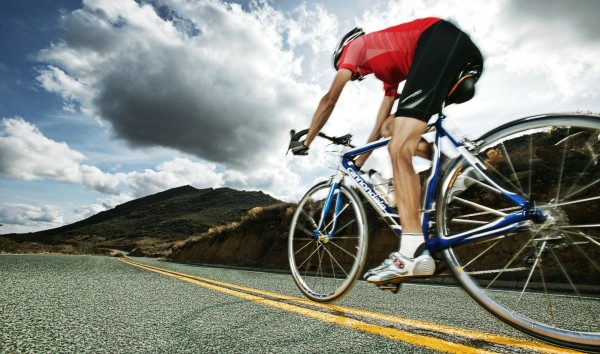
It’s no secret that cycling is an incredibly potent method of exercise, and it’s actually considered one of the most effective forms of cardio on the planet. Training your body to perform to its fullest potential is something that most competitive cyclists strive for, and just a few extra seconds of energy can spell the difference between a confident win, and losing out as your heart rate struggles to keep up with your pace!

What the Professionals Say

If you ask any experienced cyclist about maintaining energy, they’ll say that it’s all about pacing yourself. The human body is capable of extraordinary things, and with particular exercise techniques, it’s entirely possible to improve the way that your heart, lungs and blood pressure work. In standard terms, these techniques are referred to as cardio, but what you might not know is that other forms of exercise can be even more effective.

Training your Body with Tension Exercises

If you haven’t come across ‘tension exercises’ before, then you’ll be pleasantly surprised to read about their potential. Your arms and legs play a huge role in your balance, and although your thighs will often undergo extreme pressure before tiring, there is a technique that can help to promote their endurance and keep you pedaling for much longer.

If you flex your biceps, you’ll notice that the muscle stands out far more prominently. The same could be said for your thighs. As we flex, our muscles are triggered in to action, and it’s this action that stimulates growth. It’s less about lifting heavy weights with your legs, and more about training them to cope with high amounts of pressure for extended periods of time (endurance). Here’s a great exercise that you can try from home:

  1. Sit down comfortably, and place your legs slightly apart, with your feet flat against the floor
  2. Keep your back straight, and use a cushion if needed
  3. Tense/ flex your thigh muscles, so that your heels lift off of the ground and your feet enter a ‘tip-toe’ stance
  4. Keep your thighs flexed, and hold for 15 seconds – or for as long as you can manage
  5. Relax your thigh muscles for 5 seconds, and then repeat 3 more times

If performed correctly, your legs will ache almost immediately after exercising, and undertaking this routine just once per day for a week can provide endurance results. The same could be said of your arm muscles, and promoting their endurance will assist with a greater level of control and strength when riding your bicycle.

Enhancing your Cardiovascular Health

It may not be possible to strap a dumbbell to your lungs and build their muscle mass, but it is entirely plausible to encourage them to function at an enhanced rate. If you cycle, then your lungs may already be benefitting, but there’s nothing to say that you couldn’t further train your lungs. The best way to do this is to force the capacity of your lungs to expand over time.

Typical cardio exercises are recommended (running, swimming and cycling), but it’s been proven that deep-breathing techniques can further assist when it comes to expanding the volume of your lungs. So what sort of deep breathing techniques can you try at home? Well there’s always yoga, and this technique helps to expand your lungs, promote muscle growth, and improve your blood flow. There’s also Tai Chi which assists with physical balance, as well as general deep breathing exercises that involve holding your breath for just under a second, before exhaling.

The Benefits

Improved lung capacity results in a greater supply of oxygen. The more freely oxygen can flow around your body, the better your blood pressure will be – and this means an improved performance as far as physical activities go.

When practiced daily, each of these techniques can help to promote an increased rate of functionality, and in terms of cycling, which means an extra few minutes of performance – which can make or break a race result! Before a race, or even preceding a bit of local cycling – it’s always a good idea to prepare your body.

Performing a few simple stretches will help to elongate your muscles, and loosen them ready for the activities ahead. You can also try inhaling deeply 10 times, to encourage your lungs to stretch to their full capacity, and there’s nothing to say that you can’t continue this breathing while you cycle to keep your heart rate steady.


What are Clipless Pedals?

October 2, 2015 by Adam Farabaugh

What are Clipless Pedals?Clipless pedals are a pedal system that keeps your foot attached to the pedal of your bicycle with a spring-loaded system similar to that of a ski binding. Traditional pedals, those with flat sides that are ridden with everyday shoes, can allow your feet to slide around and even off the pedal resulting in a sore shin or potentially a crash. Clipless pedals are a three part system that not only keeps your foot from sliding off the pedal but also provides greater pedaling efficiency. The two types of clipless pedals can help improve your riding and make it more efficient and enjoyable.

What are Clipless Pedals

The three part system that makes up a clipless pedal starts with the pedal itself. This has a spindle just like a normal platform pedal but the plastic or metal platform is shaped in a way to allow the second part of the system, a matching cleat, to snap into it. A spring-loaded mechanism then secures the cleat in place so it doesn’t slide around nor pull out. The cleat is then attached to the final part of a clipless pedal system, the shoe. Shoes are made specifically for these cleats to be attached to the bottom of them via bolts. This three part system works in sync to keep your foot where it should be on the pedal as well as allowing you to pull up during the pedal stroke.

In this three part system, the cleats always come with the pedal as they are made to fit exclusively with each other. The shoes come in two styles, mentioned below, and can be used with their particular system, road or mountain.

How it Works

On the pedal there is a spring mechanism that holds the cleat to the pedal. To clip in, line the cleat up with the pedal and then push down, just like a ski binding. To release the shoe from the pedal, a simple twist of the heal outward releases the cleat. In the event of a fall, the pedal will release the cleat allowing your foot to come free from the bike.

Mountain/Touring System

A mountain setup, also referred to as a touring setup, consists of a pedal that can be clipped in easily on both sides. The cleat, which is attached with two bolts, is a smaller metal piece that is recessed into the shoe which is for mountain and touring only. The shoe has a walkable sole with a bit of tread on it to allow for easy and functional walking. This type of pedal is the only choice for mountain biking but also is a great choice if you are riding on the road but have frequent stops where you are walking around.

Road System

A road pedal set-up is made for road riding where walking is mostly avoided and efficiency is a high priority. Road pedals consist of a lightweight pedal that accepts a lightweight, typically plastic, cleat. The cleat is then attached to a “road” shoe with three bolts in a triangle pattern. This system creates a lighter and more aerodynamic pedal and shoe combo that is optimized for road riding.

Clipless pedals are a great way to improve your cycling and as you start to ride longer and farther it becomes a logical choice. A simple, non-high end, pedal and shoe system can actually be quite cheap and as your cycling progresses you can always upgrade. Cycling is full of technological advances and clipless pedals, although simple, provide an incredible advantage to both racers and recreational riders alike.

Group Ride Etiquette

September 27, 2015 by Wade Shaddy

You have the bike, and done the miles. You’re dressed in the right gear, understand the culture, and look like a cyclist. With all the cycling clubs, benefit and charity rides out there, there’s no reason to avoid group riding. Here are a few tips on group ride etiquette to boost your confidence to get out there and ride with a group.

biking in large groups, group ride etiquette
Two-by-two is common when traffic is light.

Just Like You

Not knowing what to expect can be intimidating, but cyclists are just like you. Homemakers, laborers, bookkeepers, students, old, young and everything in-between. Some fit, some — not so fit. There’s no need to be intimidated, it’s not a competition. Everyone’s out there for fun. Group riding is camaraderie, adventure, laughter, feeling fit, and being surrounded by people with like minds. Understanding what’s expected makes you feel welcome, and a part of the group.

Two-by-Two

On country roads, or highways with little traffic, casual group rides might consists of two lines, with riders two abreast (this is called a paceline). Your handlebars should be parallel with each other, bar to bar, with no more than about a 12-to-18 inch gap between your bars, but closer is better. If you’re comfortable with a few inches it’s best. Maintain the gap, even when cornering. It’s your responsibility to stay even with the rider beside you, even if they slow down. Never disrupt the flow, don’t surge ahead or attack, strive for consistency. If you’re on the dirt side, stay as close to the side of the road as you are comfortable with.

One-by-One

If you find yourself without a partner, and you’re riding two-abreast, center yourself behind the two riders in front of you, with your front wheel between the two rear wheels in front of you. If you’re on a busy highway with a marked shoulder, single-file is a must. Cars should pass on your left, with no less than 36 inches between you and the car. It’s the law in some States, and up to the driver of the vehicle to maintain the clearance.

Single-file is a must on roads with high-speed traffic. Biking in large groups, group ride etiquette.
Single-file is a must on roads with high-speed traffic.

No Sudden Movements

Never swerve, brake or accelerate suddenly. The key to safe group riding is to do things gradually and steadily, keeping together.

Hand Signal

If you see obstacles, someone ahead of you drops a water bottle, there’s a pothole or disruption ahead of you use hand signals. Drop your hand to the side, pointing at the obstacle, warning the riders behind you which direction to swerve if needed. Don’t point out insignificant things like cracks, or things that you can ride through, unnecessary swerving to avoid things can be risky.

Car Back

Never shout or yell in a group ride. It causes other cyclists to swerve. Cyclists recognize only two common vocal warnings. “Car back” means a vehicle is approaching from the rear. If you hear it, get over to the side if you’re not already there. If you detect a car coming up behind you, shout “car back” if riders ahead of you need to get over.

On Your Left

It’s never a good idea to pass cyclist on the right side. If you find yourself in a position to pass, always pass on the left, warning the rider in front of you vocally with,”on your left” as you  pass if needed.

Single-File

If you’re moving faster than about 15-16 mph, chances are you’ll get into a paceline, which is a series of riders single file. The lead rider absorbs the wind, creating a type of vacuum that pulls riders behind. When the lead rider begins to tire he peels off and goes to the back, allowing the next rider to take the lead. Its the most efficient form of cycling, and increases your speed while lowering effort.

Get on Board

If someone tells you to “get on board,” it means you’re welcome in the paceline. Feel free to take the position behind the last rider in the paceline. If you find yourself mid-pack or a paceline that forms around you — sweet! Hang on for the ride of your life. It’s like being part of a giant, human centipede. It’s a feeling you’ll never forget. Hold your spot and begin drafting.

Get Drafted

You probably heard of drafting, it’s the most efficient form of cycling. Position your front wheel within 3/4 of a wheel length or closer, to the wheel in front of you. But never get close enough to buzz the wheel in front of you. Focus on keeping the gap consistent, but don’t get mesmerized by it. Continue glancing two or three riders ahead to avoid possible sudden moves in the paceline.

Peel Off

If you find yourself leading the paceline, try to maintain an even speed for as long as you can. When you begin to get tired — it’s more work leading the pack — gradually peel off to the left, and let the pack pass on your right. Take the position at the back and it all starts over again.

Your Pre-Ride Checklist

September 19, 2015 by U.M.

your pre-ride checklistBefore you head out on your bike ride there are several things you’ll need to accomplish before you go, including checking that you have everything you may need. You’ll also want to do a quick maintenance check, especially if you haven’t done one in a while and your bike ride will be long or important such as a race. Here’s the base of a pre-ride checklist for cyclists

1. Maintenance

This should be done before a long bike ride or race. Such maintenance includes:

  • Inflate the tires to appropriate psi before each ride
  • Align brake pads with wheel rims and test braking power
  • Check the angle and height of the handlebars, make sure they’re secure
  • Spin pedals and crank arms for effortless rotation and security, make sure nothing is rubbing or catching
  • Clean and lubricate the chain
  • Adjust chain tension until snug
  • Check the angle of the saddle and height of saddle and secure
  • Set the limit screws and barrel adjusters of the derailleurs so the chain shifts across gears with precision
  • Pack extra tools for the road: two spare tubes, a pump, a tire lever, a key set, and a chain tool

2. Nutrition

While you may not ABSOLUTELY need to do the maintenance portion of the pre-ride checklist for cyclists with every ride you should always do the nutrition portion. Your nutrition checklist should include:

  • A breakfast sized correctly for your bike ride
  • Pack a powerbar, energy bar, or other good mid-ride snack, one for each hour you’re riding
  • Two water bottles (if you have room for them) one with water, one with sports drink
  • Bring additional money if you are going on a long ride so you can purchase more sports drinks or water

3. Safety Items

Having these items on a long bike ride will be very helpful should you crash or hurt yourself in some other way. Being able to patch yourself up quickly will keep you from having to call off future rides. They can also be good preventative measures as well. Such safety items include:

  • First aid kit with bandages, gauze, and antiseptic
  • Anti-inflammatory medication
  • Sunscreen
  • Wet wipes
  • Sunglasses
  • Lip balm with UV protection
  • Any prescription medications that are taken in an emergency health situation (inhalers, etc.)

These safety items obviously depend on the distance of the ride, but some are essential to a ride.

4. Miscellaneous

Just because it’s miscellaneous doesn’t mean it isn’t as equally important as other items in your bag. Having these items can help you in a variety of surprise situations which can crop up anywhere at any time regardless of how you handle yourself. Such good items to have are:

  • Laminated photo identification with name, address, and emergency contact
  • Insurance card
  • Some cash
  • Fully charged cell phone
  • Whistle or flare for off road cyclists who may become lost in the wilderness

Every time you go on a bike ride make sure you go through a checklist. A good pre-ride checklist for cyclists will match the type of bike ride you are taking to the items you pack. For example, riding on a path near your home may only require a phone, some id, and some water. An all-day ride requires much more. Simply be aware that you have to tailor your checklist to match your potential needs and you should find that you’ll have little, if any, problems you can’t overcome during your ride.

Top 10 Tips for New Female Cyclists

September 19, 2015 by U.M.

Getting into a new sport can be difficult both physically and mentally. Cycling is no exception to this and while there are plenty of tips that you can get for new cyclists, not all of them are specific or even helpful to women. For example, many new women cyclists can struggle with confidence in group riding or with understanding the intricacies of a good bike fit. Here’s the top 10 tips for new female cyclists.

1. Nutrition

Nutrition is a daily part of life but it is especially important when you begin cycling. Pro cyclist Tiffany Cromwell recommends that you eat healthy but that you don’t obsess about it either like many women are prone to do. If you focus too much on being healthy you’ll start to lose some of the enjoyment you get from cycling in the first place. Women cyclists should stick to green vegetables, carbs, protein, and water. Eat meals regularly and also eat when you’re on the bike to avoid hitting empty on your fuel supply.

2. Clothing

Many female cyclists will prefer a tighter fitting jersey and shorts that come to roughly the mid-thigh. A tighter jersey will prevent having loose fabric flapping in the wind as you ride and causing air drag. You’ll be more aerodynamic with a tighter jersey and therefore faster. A pair shorts that comes about mid-thigh are ideal. They give you the movement you need without forcing you to pull them down every five minutes should they ride up while you pedal.

3. Gears

You have a big chain ring, a small chain ring, and usually ten to eleven gears in the back. Don’t be afraid to cycle through all of the gears and work up a sweat when you ride. Using the big chain ring will require you to put out a lot more power and is a great way to burn off a lot of calories in not a lot of time. You won’t have an easy ride but you will have a great workout.

4. Saddle

The saddle is very important because it’s where you’ll get the most comfort. It’s also a very personal choice. Some people prefer softer saddles while others prefer a harder saddle. Many women will prefer a men’s saddle, usually with a cut out because of the perceived flexibility and ability to handle bumps in the road more effectively. Before you go to buy a new saddle see if there’s some cycling friends who will let you try theirs so that you can get an idea of what’s comfortable for you or try them at the local bike shop before you buy.

5. Bars

Female riders have a bit of a reputation for taking a bike as-is and often end up with bars that are too wide for them. A good bar width will be the width of your shoulders. Having bars that fit you will improve both your comfort and handling ability.

6. Bike Fit

The bike fit is equally as personal as the saddle because good bikes are molded to the rider, not the other way around. This is when you need to find a very good bike shop who knows how to help with bike fits. They’ll measure your limbs and body to give you a correct frame. Without a good bike fit you could have too long of a reach, too high or low seat post, or any other number of problems which make good form impossible.

7. Ride with the Guys

Riding with men will help you to improve your fitness levels much more effectively than if you ride alone. Men are great race partners and having a group of people (both men and women) you trust will make you feel safer when you ride. Furthermore, being able to keep up or beat the men at a friendly race will boost your confidence in your riding skills and abilities.

8. Confidence

If you aren’t very confident in road cycling, start with a quieter area first and work your up to paths that may take you through heavier traffic zones. Remember that drivers will give you space. They don’t want to hit you anymore than you want to be hit. When you cycle on the road you don’t want to be scared. This will make you hyper aware of your surroundings but will also prevent you from actually training because you may stop frequently, slow down, or simply cut out early. Give yourself time to get used to the idea of road cycling and build your confidence up.

9. Relax

Be relaxed on your bike. When you come down a hill for the first time, the last thing you want to do is to lock your elbows and tense up because you’re scared or uncertain. You want to maintain proper cycling form but you also want to be able to flow with the movements of your bike. Just take a deep breath and stop worrying. You’ll be fine.

10. Looking Good

Looking good is part of the battle especially when it comes to how other riders perceive you. If you’re having a bad day but your bike looks good and all of your cycling gear is properly maintained people (including yourself) will think it’s just a bad day and tomorrow will be better. You don’t have to look the part, but it sure helps!

These 10 tips for new female cyclists will keep you from making some of the common mistakes that many new cyclists make. You should be able to avoid much of the growing pains that come with cycling for beginners and ease your transition into the sport.

Cycling Secrets

September 18, 2015 by U.M.

cycling secrets - Some cycling secrets including the power of drafting, how to handle winds, and aerodynamic clothing and posture.
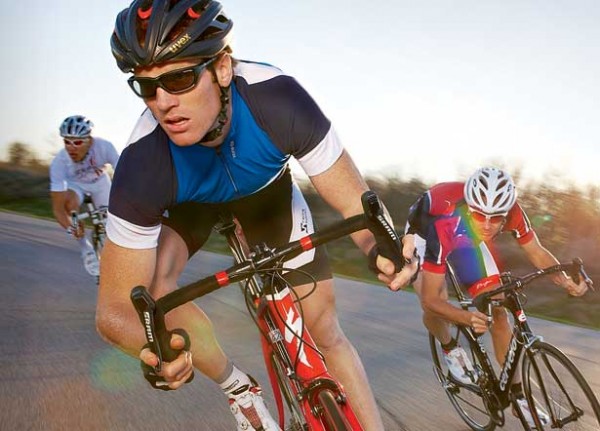
When you first start out as a biker there are several things you can only gain from experience. There are other things that feel like a well kept secret that once you know, makes riding so much easier on you. Here’s some of the top cycling secrets.

Drafting

There are multiple tactics you have to learn when it comes to group riding but one that may slip through the cracks is where to ride in the group so that you get the most distance for your energy. Slip-streaming or drafting is a common factor to group riding. It reduces the amount of wind resistance you get and can make your ride easier by reducing the amount of power you have to use by up to 30 percent. Furthermore, when someone drafts you, you get a 3 percent advantage as well. However, it’s not polite to continuously ride in someone else’s slipstream. The polite thing to do is rotate positions within the group so that everyone gets the advantage of easier riding.

The Winds

When the group is experiencing a head wind that is when you want to spend your time at the back and leave the strongest rider at the front to set the pace. You’ll have an easier time keeping up because of the drafting (unless you are the strongest rider in which case you should be at the front). However, if the winds change into a tailwind, that is the time to move from the back to the front and take your turn as leader. A cross wind means that your drafting power will look a little differently. This is when you’ll see riders form a diagonal line called an echelon in order to take advantage of the slipstream. This is something you’ll have to practice in order to know which position fits you best.

The Hill

When your group hits a hill you’ll want to move to the front. That way you can set the pace. Usually hills are where everyone slows down and the advantages of drafting are greatly reduced because of the gradient of the road. Everyone is pretty much pedaling under their own power and by being in the front you can determine a pace that fits your own fitness levels the best.

Aerodynamics

There’s a reason bikers wear tight clothes when they ride and it has nothing to do with how good they look in them. It’s about aerodynamics. Tight clothes provide less wind resistance because there’s nothing to flap about in the wind. Loose clothes basically work like the sails on a boat. They catch the wind and they pull you in the direction that wind is going. Often times this is backwards which slows you down dramatically.

Your posture and position on the bike also has aerodynamic consequences. The more body mass the wind is able to hit the more drag you’ll experience, slowing you down. You want as flat a torso as you can manage. To do so, put your hands on the drops of your bike handles and straighten your forearms so that they are parallel to the ground, elbows pointing straight back. Next, lower your head so that it’s in line with your body. This will allow the wind to slip over your back easily instead of the hitting you in the face and breaking up a good slipstream.

This position may not be very comfortable at first so make sure you practice it frequently. Have a riding partner keep an eye on it and let you know when to make adjustments. After all, another person can see your posture lines much better than you can.

Knowing and practicing these little cycling secrets will make you a better cyclist in the long run. You’ll know not only how to manipulate your environment for speed, but you’ll also know how to maximize your efficiency when riding in a group. Just make sure you share that efficiency with the other riders in order to avoid being known as the rude cyclist.

Tips For Biking In Large Groups

September 18, 2015 by U.M.

biking in large groups
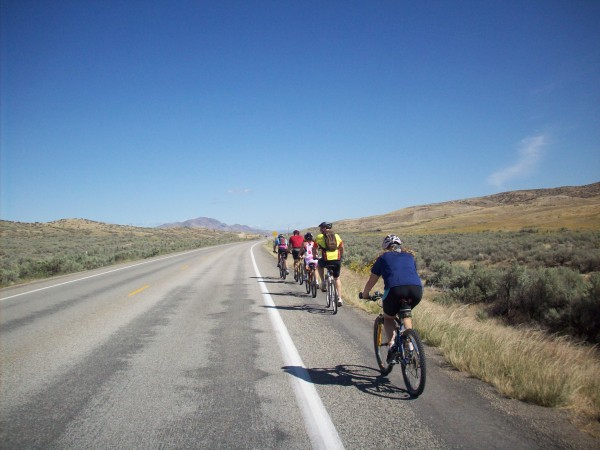
Biking alone is actually much easier than biking in a large group. The tips in this article will list some general rules for biking in large groups for fun and not as a race. Group rides and races are two separate events and require two sets of skills. Keeping that in mind, here are some tips for biking in large groups.

1. Do Not Start A Race

When you begin riding, do not try to muscle your way into a position. Group rides are not the time to strain your muscles and show your strength. You’ll more than likely cause a wreck or make someone upset. Here you are trying to create friends, not enemies.

2. Bar-To-Bar Alignment

The safest formation for a group ride is by pairs (also known as a double paceline). Each pair should line up their handlebars and maintain a speed that is comfortable for the both of them. Pairs that will not tire easily should stay in the front of the group.

3. Moving To A Back Position

If you or your partner start to feel tired, the best thing you can do is move to the back of the pack. This will keep you from slowing down the riders behind you and getting in their way. The best way to accomplish this movement is for the both of you to ease to the side. The riders behind you will ride forward in-between you. You and your partner should then slow your speed and come together again where there is ample room. If you think you’ll have to be careful to get into a space, assume the space is too cramped and dangerous to try to move into. Always err on the side of caution in order to avoid accidents.

4. Being Second Is Equally Important As First

If the front pair moves to the back you have to be prepared to lead the group. If you don’t think you can handle this physically, keep to the middle and back of the pack. You can maintain your position by letting others have the right of way and rejoin the group in front of you.

5. No Gaps!

Good riding formation does not allow for any gaps. Don’t ride tire to tire but don’t leave glaring holes either. If you spot a gap, ease up to fill it. Try not to change your pedaling speed too much as you can throw off the balance of the group.

6. No Sudden Movements

The worst thing you can do when biking in large groups is to make a sudden move or turn. Also, never suddenly change your speed or slam on your brakes. When moving positions, filling in gaps, or steering to avoid road damage and obstructions, always move gradually. This will give the person behind you time to notice and react to your movements.

This tip also requires that you pay close attention to what’s going on around you. Look ahead in the road, follow the movement of the person in front of you but look well ahead of them to see upcoming obstacles, and do not wear headphones in case you need to hear someone shouting a sudden warning.

7. How To Signal

Except in an emergency, group cycling etiquette calls for hand signals over verbal signals. This is because a shout can be easily missed but to someone paying attention, a hand signal is mostly unavoidable. Signals should be simple and agreed upon by all riders before the group starts out.

8. Obstacles

If you’re in the front, your primary responsibility is to spot trouble coming your way. As a rule, if you don’t think the obstacle can cause damage to the people and bikes behind you, don’t bother pointing it out. If the obstacle isn’t immediately in front and can’t be hit when people change positions, don’t bother with it either. Basically, keep an eye out but don’t be annoying.

Biking in large groups requires some practice. If you’re nervous, stick to the back of the pack and really watch the people around you and how they maneuver. Just keep going, keep calm, pay attention to your group and surroundings, and, most importantly, enjoy yourself!

Getting your Legs Ready for Cyclocross

September 17, 2015 by Adam Farabaugh

Getting your Legs Ready for Cyclocross
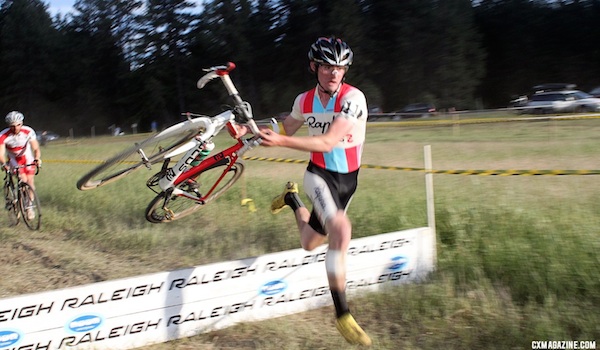
The endless number of accelerations, steep ride up’s and run up’s, barriers, as well as the intensity of cyclocross racing all add up to create a sport within cycling that is very demanding on your legs. Road or mountain bike fitness is great for coming into a season of cyclocross but adding in a variety of workouts will help you to better adapt to the racing as well as to set you up to do well. Cyclocross races are short so the training for it doesn’t have to be long either. You can do a variety of workouts which are hard and intense but also fun in a short amount of time a few times a week.

Accelerations

Cyclocross consists of a lot of turns which require you to slow and then reaccelerate out of each one of them. If you are only used to riding at a steady effort and accelerating a couple of times each ride, then after a few laps of a ‘cross race, your legs are going to ache. The best way to prepare for this is simply doing a lot of accelerations. If you are not yet on your ‘cross bike you can still do these on a road bike.

There are a number of intervalshttps://www.ilovebicycling.com/cyclocross-tips/ you could do but the easiest is to do 30 second intervals. Accelerate in the saddle for five to ten seconds alternating in and out of the saddle and then spinning easy for the remainder of the thirty seconds. Then when thirty seconds is up, do it again. Start with five minutes of this and build to twenty minutes. If you are on a ‘cross bike you can set up a mini-course that requires you to accelerate every thirty seconds.

Running

There is not a lot of running in ‘cross but the little bit that there is can really hurt you if your legs aren’t ready for it. The only real times that you’re running are when you have to get over barriers or up a steep hill, both of which put a lot of stress on your legs. The best way to start getting that stress is to do a short five to ten minute run where you run easily for thirty seconds and then walk for a minute. Build to one minute on, one minute off, and after about a week of doing this every day you can do the whole ten minutes. Once you can do this your legs are ready to practice the harder stuff.

Barriers

Assuming you already know how to dismount and mount your bike properly, set up two barriers about two meters apart and about 40cm high. Ride into it, dismount, run over it, remount and loop around and do it again. When you first start, do it slowly making sure your technique is good and then gradually increase your speed. Once you are up to speed, do five to ten of them with about thirty seconds between each one.

Run-Ups

Next are the dreaded run-ups where the hill is too steep and/or technical to ride up. Find a steep hill that is too steep to ride up and takes about ten to twenty seconds to run up. In most races you probably won’t encounter run-ups quite this long but simulating them longer will ensure your legs are ready. Ride into the hill, dismount, shoulder the bike, run up the hill as hard as you can and then remount your bike at the top. Ride around easy for a couple of minutes and then do it again. Build from three to eight.

Ride-Ups

Some steep sections that some run up can actually be ridden but doing so requires practice. Riding a super steep climb necessitates a lot of strength that needs to be built. Even if you can do it once your legs are going to feel it after during the rest of the race. Like the run-ups you want to get your legs used to doing the effort over and over again.

Find a steep climb that you can barely ride up but you can still ride it without having to unclip. Sprint into and up it. Technique along with power is going to be what gets you up it efficiently. You will need to practice a lot to be able to do it in a race but once you’re good it can save you a lot of time each lap. Like the run-ups, start with three and build to eight, riding around easy in between each.

Overall Fitness

Along with needing specific fitness for ‘cross, having a solid base of fitness is essential. Ideally you come into ‘cross season with a bit of road or mountain fitness. If not, build your riding into longer and longer rides incorporating some intensity and then do these workouts to get ‘cross specific fitness. When you do come into the ‘cross season from a road or mountain season, it’s important to take a little bit of rest before you dive right in.

You will be tempted to keep racing with your fitness but if you do, after a weekend or two you will burnout and not have the intensity and drive to continue the ‘cross season in most cases. Instead, take a week or two easy and recover. You will start the ‘cross season fresh with these workouts which will have you feeling good in your races and most importantly, lessen the likelihood of injury.

Making a Group Ride Hard

September 16, 2015 by Alison Jackson

Making a Group Ride Hard

Making a Group Ride Hard
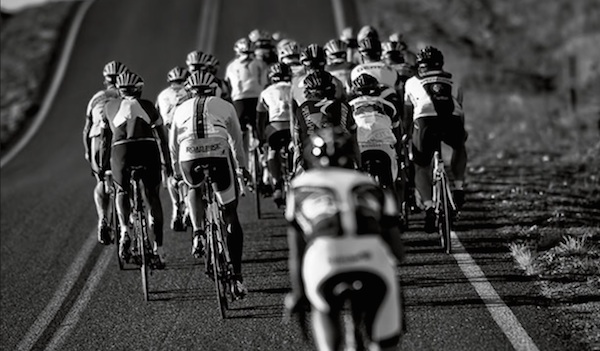
Have you been asked to go on a group ride that you know will be too easy for you?  You won’t have to find an excuse to get out of it and awkwardly meet the group on the road going opposite directions when using these quick tips on how to make an easy group ride hard.

Go to the Front

It takes more watts to be pulling the group than drafting at the back.  The group may not like you monopolizing the front of the group the entire ride but before you rotate through to the back set the pace with a longer stronger pull.

Spin Like a Squirrel

Another way to make an easy ride harder and a great way to work on leg speed is to shift up a couple of gears.  Riding with a high cadence raises the heart rate while maintaining a slower speed.  Keep shifting until you find a gear that suits the speed of the group and that you can sustain for the entire length of the ride.

Ride Longer

Training stress score (TSS) is a number system used to rate the effort of one’s ride by taking into account duration and intensity.  Longer rides get higher TSS scores as do hard intervals or race efforts.  A long easy ride will produce the same hurt as a short barf-bucket ride.  If you have the time, ride hard the hour before meeting up with the group and use the group ride as active recovery.

Stand Up

Challenge yourself to see how long you can spin while standing on your pedals.  Turn it into an interval ride where you stand up for 30-60sec then sit for 60-90sec, keep challenging yourself to stand longer and sit less often.  It is especially challenging to stand while descending because it forces your legs to spin faster to keep up with the speed.  When you don’t allow your butt to rest on the seat it makes the ride a lot harder.

Dust Off an Old Bike

Weight matters, so if you aren’t too concerned with looks or riding the best of the best, then dust off that old 6-speed in the garage that has a few extra pounds to it and take it out to the group ride.  If that old bike does indeed have 6 speeds your workout will feel different moving through fewer gears.  Add a bulkier wool jersey to go with it to increase negative drag and to impress the riders who will reminisce the old days while also impressing younger riders who love the retro get up.

Tell Stories, Whistle, or Breathe Through Your Nose

Training at altitude is harder because the air is thinner with less oxygen around to diffuse into your muscles.  Talking or whistling while riding has a similar effect as altitude by decreasing you oxygen intake.  You may be riding in an easy group ride but if you choose to tell stories, whistle or breathe through your nose you will be decreasing the regularity of breaths therefore less inhaled oxygen for your muscles.

It’s Only a Hill, Get Over It – Cycling Climbing Tips

August 19, 2015 by Wade Shaddy

Your heart is pounding, lungs screaming, guts churning, legs on Cycling Climbing Tipsfire. You’re going to make it — you feel awesome. You have the power, determination, ability and skill to own this hill.

Climbing Dynamics

Don’t be intimidated. Hill climbing is attitude. Fitness plays a part, but when you understand the dynamics of hill climbing, you’re already halfway there. Contemporary road bikes have gearing for hills whether your riding a compact double, or a low-geared triple. The advantage of a specific bike makes no significant difference unless you’re on a mountain bike. The challenge comes from the mind, body, and approach.

Mountain bikes are geared to climb. Road bikes are geared for speed. Cycling Climbing Tips.
Mountain bikes are geared to climb. Road bikes are geared for speed.

Let the Hill Come to You

Novice climbers attack too early in the climb, exhausting too much energy the first few minutes. Never attack a hill, the hill will win. Experienced climbers ignore hills, conserving energy until it  gets steep enough to deserve respect. In some instances, the hill never gets that tough because experienced climbers are not intimidated.

The Technique

Enter the climb riding normally in your big gear. Focus on keeping a steady pace as you begin to slow down, shifting in back as needed to keep an even cadence. It’s fine to lose speed, it’s expected. When you hit about 10 mph, shift down to your lower gear in front —  but don’t be afraid to shift early to balance your effort and aerobic system if needed. Spinning at a faster pace is better than mashing at a lower pace. If you begin to freewheel, or feel like you shifted down too soon, immediately shift to higher gears in back — one or two fast clicks should do it — to maintain the cadence you started with.

Find a pace you can maintain. Cycling Climbing Tips.
Find a pace you can maintain.

Keep it Steady

Continue riding as if you were cruising down a straight stretch. Ignore the hill. If you feel you’re running out of breath, or couldn’t carry on a conversation at this pace, shift down a click at a time in back until you can maintain an even pace. If you’re not already in the lowest gear in front, do it now. Take long, deep breaths. If you feel dizzy or faint, shift to your lowest gear immediately. If you feel stable, and your lungs aren’t burning, stay with the same gearing and cadence.

Gearing and Conditioning

The grade of the hill depicts when you reach the lowest gears in back. Don’t push big gears to show off. At this point speed is irrelevant. If you’re not swaying from side to side drastically, still climbing and moving faster than about 5 or 6 miles per hour you’re doing fine. Continue on.

Swaying back and forth is expected, if not too severe. Cycling Climbing Tips
Swaying back and forth is expected, if not too severe.

Stay in the Saddle

There comes a point when it’s OK to stand up, but not now. Stay in the saddle until you get within about 30 yards of the top — more on this later. Standing up on the bike makes your heart and lungs go anaerobic. You can’t maintain it for more than a brief period, and hitting the wall is imminent.

Stay in the saddle for efficiency. Cycling Climbing Tips.
Stay in the saddle for efficiency.

Distract Your Mind

You’ve established a pace you can maintain, probably in your lowest gear by now. If the hill is not that bad, save the lowest gear. Use it later when you can benefit from it. Continue spinning the pedals at an even pace. Don’t think about how hard your lungs and heart are pumping, even hurting. Distract yourself by thinking about something to consume your thoughts — sex is always a good mental distraction. Take long, deep breaths and keep spinning.

Body Position

Body position is important for leverage and breathing. Hands should be on the grips or brake hoods, chest and back straight to take in as much air as possible. If you feel you’re hunched forward, slide back in the saddle to position yourself over the bottom bracket. Correct body position is more efficient. Make a conscious effort to push the pedals all the way down, getting power through the full revolution from top to bottom.

Back straight, body over the crank. Cycling Climbing Tips.
Back straight, body over the crank.

Find Your Comfort Zone

Comfort precedes almost everything. Climb at your own pace. If something restricts your movement or intake of air, remedy it by changing your position slightly. If you’re nearing your red line, back off, breath deep and find a pace you can maintain.

Stand and Deliver

Get ready to stand if the summits in range. A simple trick can propel you at an amazing rate over the top, but you can’t launch it too soon. When you’re within a few yards of a steep hill, shift up one, two or even three gears in back, and stand up. Use your body weight to mash higher gears. Because you’re climbing, high gears offer a tremendous amount of resistance. You and your bike will shoot forward, owning the hill with enough force to propel you over the top.

« Previous Page
Next Page »
  • Facebook
  • Tumblr
  • Twitter

Latest Articles

JOIN Cycling: A New Training Platform for Cyclists

May 27, 2024 By Eric Lister

cold exposure

The Benefits of Cold Exposure for Cycling & Life

June 13, 2023 By Eric Lister

hill climb

The Ultimate Hill Climb Training Guide

May 31, 2023 By Eric Lister

shoulder pain cycling

How to Treat & Avoid Shoulder Pain While Cycling

April 12, 2023 By Eric Lister

psoas stretch

The Importance of the Psoas Stretch for Cyclists

April 6, 2023 By Eric Lister

cycling neck pain

The Ultimate Guide to Cycling Neck Pain: Causes and Solutions

March 21, 2023 By Eric Lister

Useful Info

  • Contact
  • Finally, A Global Cycling Club That Is Focused On Community And Love Of Cycling!
  • Privacy Policy
  • Share Your Story!
  • Terms And Conditions Of Use
  • Welcome to I Love Bicycling
  • What Happened When I Stretched Every Day For a Month

Recent Posts

  • JOIN Cycling: A New Training Platform for Cyclists
  • How to Hang Bikes in Your Garage: 4 Inexpensive Options
  • Gravel Bike Vs. Road Bike: Which One Is Better For You?
  • The 6 Types of Mountain Bikes & How to Choose the Best One for You
  • What Is a Touring Bike Good For? 5 Benefits We Know You’ll Love

Search I Love Bicycling

Connect with Us

  • Facebook
  • RSS
  • Tumblr
  • Twitter

Copyright © 2025 · Magazine Pro Theme on Genesis Framework · WordPress · Log in