• Training
    • Injury Prevention
    • Training Tips
  • How To
    • Bike Fit
    • Gear
  • Nutrition
    • Nutrition Tips
    • Weight Loss
  • Repair
  • Reviews
  • Stories
    • Funny Stories
    • Jokes
    • Quotes
    • Videos
    • Funny Videos

I Love Bicycling

I Love Bicycling is a website that is geared towards cycling for beginners with road cycling tips, training articles, nutrition tips, weight loss, how to’s and bike repair articles.

Pros and Cons of Tubeless Tires for Road Cyclists

May 14, 2018 by Sarah Lauzé

Tubeless tires have been a mainstay of the mountain biking world for years, and have inevitably made their way into road cycling as well. With mountain biking, tubeless tires allow riders to run their pressure much lower, providing enhanced surface area and grip without the risk of pinch flats. Road tires, however, are more efficient when run at a higher pressure, so what is the benefit of going tubeless?

Traditionally there have been two main options for road cycling tires: clincher and tubular. Clinchers are the best option for the majority of riders, as they are easy to use and fix by swapping out or repairing the inner tube. Tubular tires are lighter and are used by a lot of racers, but unless you have a support vehicle following you on every ride, then replacing a tire is a painfully long and technical process.

Now there is a third option with tubeless tires, but are they worth the leap?

Pros and Cons of Tubeless Tires for Road Cyclists

How do tubeless tires work?

Pros and Cons of Tubeless Tires for Road Cyclists

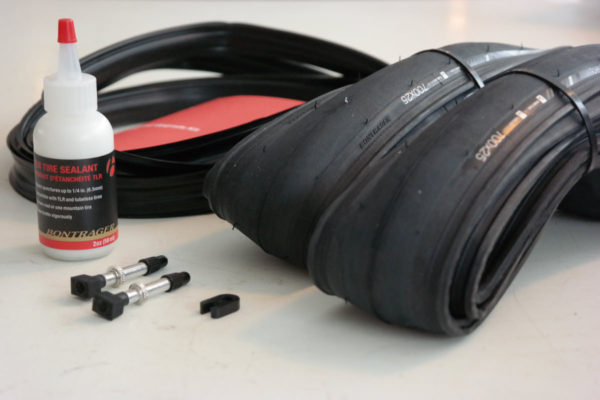
As the name suggests, tubeless tires do not have an inner tube, and are setup similar to a car tire. The open rubber tie sits firmly on the wheel’s rim, with the air sitting in the cavity between the rim and inside of the tire. In addition, a liquid sealant is used inside the tire to preemptively plug any small cuts in the tire without losing pressure at all.

Tubeless wheel setup

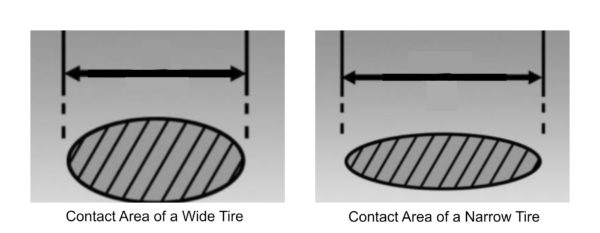
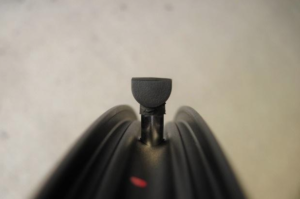
The nice thing about tubeless wheels is that they can be used with both a tubeless tire and the typical clincher (inner tube) setup. The shoulder in the inner rim will have a much more pronounced recess that the tire bead fits securely into (see diagram), rather than the traditional U-shaped rim bed on clincher wheels.

Tubeless tires themselves are designed with a tougher bead to provide an immediate seal with as perfect airtight fit. If you try to fit a tubeless tire on a clinched rim, it will come off as you add pressure.

Are tubeless tires worth it?

Pros

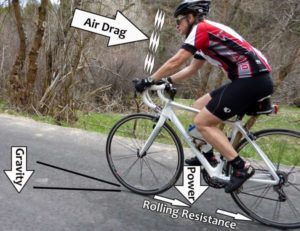
  • Speed – clincher tires have a level of friction between the tube and the tire that tubeless tires eliminate, lessening rolling resistance and making them faster.
  • Less flats – The tubeless setup rules out pinch flats completely, and dramatically lessens the danger of blowouts with the liquid sealant. This has a huge impact on the number of flats you’re likely to experience. Plus, if you do have a flat out on a ride that the sealant can’t handle, you can use a tube to get you home.
  • Comfort – Tubeless tires can be run at a lower pressure (dropping about 15-20 psi) without sacrificing performance. This can enhance your corner grip, traction, and overall comfort. You can even venture off road with the tires being a lot more forgiving than if they were running at full pressure.

Cons

  • Difficulty in fitting – As a system that depends on tight seals and high pressure, installing or removing the tire can be a difficult and frustrating job. So, while the likelihood of flats may be reduced, the process to fix it in the case of total failure can leave you swearing on the side of the road. You may even need an air compressor to get a proper seal.
  • Weight – Tubeless tires are largely heavier than a clincher setup, with thicker sidewalls that add weight.
  • Racers don’t use them – This may or may not matter to you, but racer’s do not use tubeless because of the added weight with minimal gain. However, for the recreational cyclist, the lower risk of flatting may be worth the sacrifice.

Tubeless tires are by no means taking over the roading cycling world (as they have with mountain biking), but as technology advances we may see them grow in popularity. Having tubeless-ready wheels is a great way to go, as it leaves the choice up to you whether you want to stick with clinchers or give tubeless a try.

Easy Tricks for Tubeless Mountain Bike Tires

February 20, 2018 by Ryan Taylor

There is no doubt that the emergence of tubeless mountain bike tires and rims have changed the industry for the better. Riding tubeless enables the rider to run less pressure, giving the rider more grip, better ride feel and also less weight. Adding a sealant to the system adds an extra measure of security as many small holes or cuts in the tire can be patched internally by the sealant. Should a cut happen that is too large for the sealant to do its magic, then the rider can install a tube as normal to get home!

Tubeless Mountain Bike Tires

Tubeless has come a long way since the emergence of UST (universal system tubeless) over 10 years ago by Mavic and Hutchinson (two french companies, hence the french abbreviation). Now most rims and tires on the market can be made tubeless very easily, BUT there are few hidden tricks that both shop and home mechanics can use to make the system easier and more affordable.

Editors note: Most Bontrager rims do not apply to these tricks!

Gorilla Tape:

Tubeless rim companies have developed their own tape to ‘tape’ over the spoke holes on the inside of the rim causing it to be sealed. The valve is then poked through the tape. When sealant is added, the combination of these things is what makes the system air tight.

This tape is on the expensive side as it is designed to work with the specific rims. Many professional  mechanics, from local shops to World Cup DH, tend to use ‘Gorilla Tape‘. This tape is basically duct tape on steroids and can be bought on the cheap at any local hardware store. Not only that, it comes in many widths to accommodate different rim widths and tends to be thicker than the proper tape. In some opinions, it can lead to a more solid tire seal.

One of the main benefits to Gorilla Tape is how easy it can be found. Being able to buy it at Wal-mart at 10:30pm the night before a race is handy when you break a spoke on the course pre-ride! The key to it working well is to make sure the rim surface is clean for proper adhesion.

Tubeless Valves:

Like tubeless tape, specific valves are recommended to go tubeless. The main benefit of the specific valves is that the rubber base (what hugs the rim) is built up. This works to prevent sealant from going into the valve, clogging it, and also preventing it from pulling through. If you are on a very tight budget or in a pinch, you can cut up an old presta tube. This valve is very similar and can work. If you have a couple of extra bucks you can buy the proper tubeless valve.

Patching Tires:

We have all been there. Installing a new tire and cutting it on the first ride. Tubeless tires don’t come cheap these days and it is very frustrating to cut one before you get your moneys worth! It is possible to patch tubeless tires, but it is very tricky. It’s recommended to buy patches in the automotive isle of the hardware store as they tend to be thicker, more stiff, and generally cheaper. Your DON’T want a flexible, thin, patch with some stretch to it.

Be sure to clean the inner part of the tire thoroughly with alcohol and scuff it up with sandpaper. Once clean, buy the best crazy glue you can find. A favorite is ‘KLEBFIX’ from Wurth brand. It is a fantastic glue and doesn’t corrode rubber. Be careful as it will bond ANYTHING in a matter of seconds. Traditional patch glue doesn’t work well. Keep in mind, this is to get the remaining life from your tires. If you are concerned about it holding up before the biggest race of the year, you should error on the side of caution and buy a new tire.

The Rim-Pop technique:

Lets face it: Tubeless is annoying to set up without a compressor. Thankfully Bontrager has come out with a pump that stores air inside of it causing a burst of quick air popping the tire into place. This is the definition of “Why didn’t someone think of this sooner?” type products.

However, there is another way! Once the tire, valve, tape, sealant are all installed, run your tire lever just under the bead of the tire, gently pulling it up onto the high spot of the rim (where it should sit when inflated). Run the lever all the way around the tire. You will feel it getting tighter and tighter as the lever approaches your starting point. From here, gently pull the lever out and do the same to the other side.

The goal here is to pre-set the tire on the high point of the rim so when you start pumping there are fewer places for the air to escape which aids in the force of the air ‘popping’ the tire into place so the sealant can do its magic.

You will almost always make a mess with this system, but it works. Once you get good at it, it usually works the first attempt. Again this is handy for those without a compressor or who happen to be at a race or on the road. Another good method is before you put the sealant in, install the tire with a tube and inflate it to seat the bead. Then carefully remove one side of of the tire to remove the tube, install the tubeless valve, and add sealant. Then do the above trick on the one side. Also wiping the bead of the tire with a warm, wet, soapy sponge will help the tire to seal.

The bicycle industry has come a long way from UST over the past 10 years. Tubeless tires are more accessible, more affordable, and much lighter compared to then. Is the ‘Stans’ system easier to use than UST? Depends who you ask, but these tips will help you out if you’re in a pinch.

Road Bike Tires and Rolling Resistance

December 18, 2017 by Sarah Lauzé

The ideal road bike tire would weigh nothing, have zero rolling resistance, never malfunction, and maybe even help you out near the top of a tough climb. Unfortunately, tire technology is not quite there yet. (Fingers crossed for future hover bikes).

What we can look at is what makes up a road bike tire. What makes a tire faster than others? What makes it more stable? And what role does air pressure play in all of this? Because, at the end of the day, it all comes down to where the rubber meets the road.

Rolling Resistance

Types of Tires

There are three types of tires available: clincher, tubular, and tubeless.

Clinchers are the most common, and you’re most likely familiar with how they work. They have a wire bead around the edge that both holds their shape and fits into a hook on the rim, with an entirely separate inner tube that you can repair or replace. Tubular tires have typically been the number one choice for racers, but are both tough and expensive to fix. They have an inner tube that is actually stitched inside, then the tire is glued to the rim. Tubeless tires have become increasingly popular for mountain bikers, but have crossed into road cycling as well. Like a car tire, the open rubber tie sits firmly on the wheel’s rim, with the air sitting in the cavity between the rim and inside of the tire. In addition, a liquid sealant is used inside the tire to preemptively plug any small cuts in the tire without losing pressure at all.

Rolling Resistance

Everyone knows about wind resistance as a force that works against cyclists. Headwinds can be brutal and unrelenting, and also make for a handy excuse when your times are a little slower. Although not nearly to the same effect, rolling resistance is the much less obvious factor at play here.

Rolling resistance is a principle of physics, and isn’t specific to cycling. It refers to the energy that is lost where a tire makes contact with the road. As a tire rolls along, the rubber and casing flex and unflex. The energy needed for the constant deformation is then absorbed and turned into heat. It’s much more obvious on your car, and is the reason your tires get warm as you drive.

There are a number of factors that contribute to rolling resistance:

Tire Width

For many years, narrow 23mm tires have been the standard width for road bike tires. Racers would go even narrower to 21mm, with the general thought that the narrower the surface area, the less rolling resistance. However, this has proved to be untrue. At the same pressure, narrow and wide tires will have the same contact area. Narrow tires will flatten onto a narrower but longer section of the tire where it contacts the road, whereas wider tires will flatten over its width. The narrower tire loses more of its shape, and so does not roll as well. Wider tires have less deformation from its round shape, and therefore roll faster.

Tread Pattern

Any tread actually increases rolling resistance as the shapes or patterns can squirm as they come in contact with the road. Therefore, a smooth, slick surface is the best option, but most companies seem to want some kind of tread on their tires, if only for marketing purposes.

Casing 

Tire casings are specified in TPI (threads per inch), and have multiple layers of threads holding things together. The higher the TPI, the thinner the threads, as they can be more crowded together. In most cases, a higher TPI delivers less rolling resistance and therefore a faster tire.

Tube Choice

Clincher tires will be slightly slower than their tubeless counterparts as the inner tube and the casing create friction and raise the rolling resistance. However, the difference is not enough to make the switch for most riders. Your tube choice will have more of an impact, as running a thinner, lighter, and more flexible tube will create less rolling resistance.

Tire Pressure

Overinflated tires will deform less, and so technically will reduce the rolling resistance, but it also forces movement. Your momentum is forced up instead of forward as you bounce over every little bump and rock in the road. In recent tests the rolling resistance between a tire inflated to 85 psi as opposed to a tire inflated to 110psi is negligible. Additionally, safety is significantly reduced with high tire pressures. If you try to take a sharp turn at speed around a moderately slippery corner with overinflated tires, it’s not going to be pretty.

Your choice of tire depends on what your specific needs are and the type of riding you do. It is often a toss up between speed, longevity, puncture resistance, ease of use, and your budget. Click here to read more about how to choose the right tires for racing, or the the right tire by type.

  • Facebook
  • Tumblr
  • Twitter

Latest Articles

JOIN Cycling: A New Training Platform for Cyclists

May 27, 2024 By Eric Lister

cold exposure

The Benefits of Cold Exposure for Cycling & Life

June 13, 2023 By Eric Lister

hill climb

The Ultimate Hill Climb Training Guide

May 31, 2023 By Eric Lister

shoulder pain cycling

How to Treat & Avoid Shoulder Pain While Cycling

April 12, 2023 By Eric Lister

psoas stretch

The Importance of the Psoas Stretch for Cyclists

April 6, 2023 By Eric Lister

cycling neck pain

The Ultimate Guide to Cycling Neck Pain: Causes and Solutions

March 21, 2023 By Eric Lister

Useful Info

  • Contact
  • Finally, A Global Cycling Club That Is Focused On Community And Love Of Cycling!
  • Privacy Policy
  • Share Your Story!
  • Terms And Conditions Of Use
  • Welcome to I Love Bicycling
  • What Happened When I Stretched Every Day For a Month

Recent Posts

  • JOIN Cycling: A New Training Platform for Cyclists
  • How to Hang Bikes in Your Garage: 4 Inexpensive Options
  • Gravel Bike Vs. Road Bike: Which One Is Better For You?
  • The 6 Types of Mountain Bikes & How to Choose the Best One for You
  • What Is a Touring Bike Good For? 5 Benefits We Know You’ll Love

Search I Love Bicycling

Connect with Us

  • Facebook
  • RSS
  • Tumblr
  • Twitter

Copyright © 2025 · Magazine Pro Theme on Genesis Framework · WordPress · Log in