• Training
    • Injury Prevention
    • Training Tips
  • How To
    • Bike Fit
    • Gear
  • Nutrition
    • Nutrition Tips
    • Weight Loss
  • Repair
  • Reviews
  • Stories
    • Funny Stories
    • Jokes
    • Quotes
    • Videos
    • Funny Videos

I Love Bicycling

I Love Bicycling is a website that is geared towards cycling for beginners with road cycling tips, training articles, nutrition tips, weight loss, how to’s and bike repair articles.

How To Adjust Road Bike Brakes

June 14, 2020 by Sarah Lauzé

It’s normal for brakes to start to squeak or get a little soft over time. This may mean it’s time to replace the pads (for calliper brakes) or that the cables need some adjusting. Here’s how to adjust road bike brakes, whether at home or in the shop.

No matter what kind of bike you have, the tension on your brakes is controlled by one of two things: a brake cable or hydraulic fluid. If you have hydraulic disc brakes, there’s not a lot that you can do to adjust them, other than bleeding them, which is generally a job best left for professional mechanics. However, if you have rim brakes or cable-actuated disc brakes, adjusting your brakes is pretty simple and should be something you can do at home.

What You’ll Need

  • Allen Key/ Hex Wrench Set
  • Brake Wrench

How To Adjust Road Bike Brakes

Small AdjustmentsAdjust Road Bike Brakes
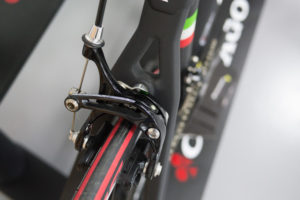
If you have a mountain bike, hybrid, or city bike, you’ll notice that there are screw-like adjusters on your levers where the brake cable housing meets the lever. If you have a road bike, you’ll notice a similar adjuster on the brake itself, again, where the cable housing meets the brake. These are called barrel adjusters, and they allow you to take up cable tension, which brings the brake arms closer to the rim of the bike (or the pads closer to the rotor in the case of disc brakes).

If your brakes are too loose, and you have to squeeze the levers all the way to the handlebar to get any kind of stopping power, you’ll want to loosen your barrel adjusters a few turns. This actually tightens the brake cables and therefore tightens the brakes. If your brakes are so tight that they don’t let your wheels turn, then you can tighten the barrel adjusters back down and make some room.

Bigger Adjustments

These small adjustments don’t require any tools, and you can even do them while you’re riding your bike if you have good enough bike handling skills (but it’s much better to do it while the bike is not in motion). If you’ve already turned a barrel adjuster all the way out or all the way back in, though, you’re going to need to grab either a five-millimeter hex wrench or a ten-millimeter box-end wrench (depending on your brakes).

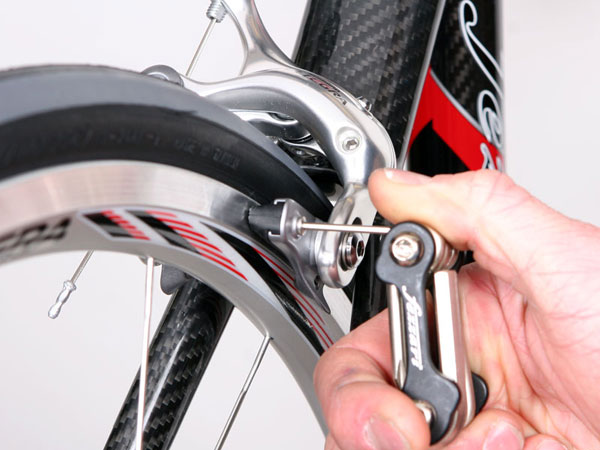
With your wrench, loosen the pinch bolt that holds the brake cable in place. Then roll your barrel adjuster about halfway out. Pull the cable tight and put enough tension on the brake that it lightly touches the rim. While you do this, tighten the pinch bolt down again. Then roll the barrel adjuster back in, and you should have a well-adjusted brake. If not, you can play with how far you roll the barrel adjuster out and/or how much tension you put on the cable as you tighten the pinch bolt back down. With a little bit of patience, you should be able to adjust your brakes without much trouble at all.

Good luck, and, as always, if you run into too much trouble, don’t hesitate to take your bike to your local bicycle shop for some professional care.
How to Fix Road Bike Brakes

January 11, 2016 by Lee Agur

how to fix road bike brakes

When you’re riding your road bike, and you pull the brake levers, what happens? Well, if you apply the rear brake, first, you should slow down, and applying the front brake should bring you to a full stop. However, if your brakes aren’t working properly, you’ll squeeze the levers all the way to the handlebar, and you’ll barely get any stopping power. Worse yet, while you do it, you might also hear a terrible, loud squealing noise. What can you do when you don’t know how to fix road bike brakes? Just follow these steps, and you’ll have your brakes fixed in no time.

How to Fix Road Bike Brakes – Locate the Pinch Bolt

The pinch bolt holds tension on the brake cable. It should be on the brake itself, not on the brake lever. Depending on how old your bike is and what kind of head the bolt has, you’ll most likely need either a five-millimeter hex wrench or a ten-millimeter box-end or open-end wrench to loosen the pinch bolt. Loosening this will take all tension off of the cable and allow the brake to open up to its widest point.

Roll Out the Barrel Adjuster

On road brakes, your barrel adjuster will be located at the cable stop on the brake. This takes up or lets out tension on the cable when the pinch bolt is tight. If it’s not already loosened, go ahead and loosen it until about half of its threads are showing.

Take Up Tension in the Cable and Tighten the Pinch Bolt

Now, with a cable puller or with your hands, pull the brake cable tight and pull the brake closed so that the pads lightly touch the rim. Then, while holding tension on everything, tighten the pinch bolt onto the brake cable with enough torque that it’s not going to slide through under heavy braking.

Once you’ve done that, you can just tighten the barrel adjuster back down. That will release some tension from the cable and let the brake out a little bit. Try squeezing the brake lever now. Feels better, right? If it’s not quite right, you can continue playing with the tension on the cable using the barrel adjuster and/or by adjusting where you clamp the pinch bolt down on the cable.

For Squeaky Brakes

Finally, if the brake pads are squeaking, you most likely have an alignment issue, but you may also have an issue with worn out pads. Take a look at your pads. If they’re still good and not excessively worn down, just roll the barrel adjuster out until the pads are lightly touching the rim. Then make sure that they are perfectly symmetrical and that the front end of the pad is toed in and touches the rim just a hair before the back of the pad. You can slip a business card in between the back of the pad and the rim while you tighten the bolt holding the brake pad in place. If your pads are worn out, just replace them and use the same technique to line them up.

That’s it! Now you should have everything you need to know to fix your brakes. Good luck!

  • Facebook
  • Tumblr
  • Twitter

Latest Articles

JOIN Cycling: A New Training Platform for Cyclists

May 27, 2024 By Eric Lister

cold exposure

The Benefits of Cold Exposure for Cycling & Life

June 13, 2023 By Eric Lister

hill climb

The Ultimate Hill Climb Training Guide

May 31, 2023 By Eric Lister

shoulder pain cycling

How to Treat & Avoid Shoulder Pain While Cycling

April 12, 2023 By Eric Lister

psoas stretch

The Importance of the Psoas Stretch for Cyclists

April 6, 2023 By Eric Lister

cycling neck pain

The Ultimate Guide to Cycling Neck Pain: Causes and Solutions

March 21, 2023 By Eric Lister

Useful Info

  • Contact
  • Finally, A Global Cycling Club That Is Focused On Community And Love Of Cycling!
  • Privacy Policy
  • Share Your Story!
  • Terms And Conditions Of Use
  • Welcome to I Love Bicycling
  • What Happened When I Stretched Every Day For a Month

Recent Posts

  • JOIN Cycling: A New Training Platform for Cyclists
  • How to Hang Bikes in Your Garage: 4 Inexpensive Options
  • Gravel Bike Vs. Road Bike: Which One Is Better For You?
  • The 6 Types of Mountain Bikes & How to Choose the Best One for You
  • What Is a Touring Bike Good For? 5 Benefits We Know You’ll Love

Search I Love Bicycling

Connect with Us

  • Facebook
  • RSS
  • Tumblr
  • Twitter

Copyright © 2025 · Magazine Pro Theme on Genesis Framework · WordPress · Log in