• Training
    • Injury Prevention
    • Training Tips
  • How To
    • Bike Fit
    • Gear
  • Nutrition
    • Nutrition Tips
    • Weight Loss
  • Repair
  • Reviews
  • Stories
    • Funny Stories
    • Jokes
    • Quotes
    • Videos
    • Funny Videos

I Love Bicycling

I Love Bicycling is a website that is geared towards cycling for beginners with road cycling tips, training articles, nutrition tips, weight loss, how to’s and bike repair articles.

The Best Mudguards to Get You Through Winter Riding

September 6, 2019 by Sarah Lauzé

Many cyclists think slapping mudguards on a carbon fiber bike is a little daft, but once you try them you will realize just how useful they can be. Unless it’s pouring rain, it’s the spray from the wheels that most often get you wet, so mudguards are your first line of defence. Not only do they keep spray from flying into your face and going up your back, but they are also a common courtesy on group rides.

Winter riding can be a ton of fun, but it also makes for some tough riding conditions. Between the sudden changes in weather and wet roads with muddy shoulders, mudguards can make all the difference. For commuters, fenders are a no brainer, but for cyclists heading out on training rides, they also have the advantage of keeping your feet and legs from getting soaked and chilled. That means you’ll be able to ride longer (also a no brainer).

Best Mudguards

Types of Mudguards

Full Length

Full length, bolted mudguards are most commonly seen on touring bikes. These obviously provide the best coverage and protect the rider behind you, but they do have limited clearance and won’t fit all bikes. Some have a large rubber flap on the end of the front of the mudguard as well. The longer the front mudguard, the better chance that you feet will stay dry as they are in the firing line for water kicked up from the front wheel. For a bike to accommodate full length mudguards, you’ll want to make sure you have enough clearance under the brakes and behind the seat tube. You also want to make sure it has mudguard mounts.

Plastic Clip-On Guards

Plastic clip-on guards will attach to most road bikes. Clip-on guards are great for bikes without mudguard eyelets, but they typically provide less coverage.

Mountain Bike Style

Mountain bike style mudguards attach to the downtube and seatpost. These will fit on almost any bike, and provide a ton of clearance, but provide the least amount of coverage.

The Best Mudguards

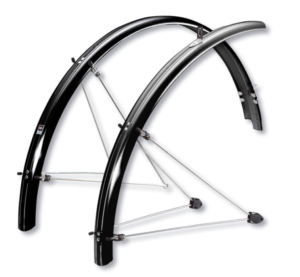
Full Length: Portland Design Works Full Metal Fenders

Price: $118

Made of anodized aluminum and adorned with laser graphics and an embossed alloy head badge, the Full Metal Fenders look great. They provide full-wrap coverage, even shielding your shoes and riders on your rear wheel thanks to sturdy rubber mudflaps. Safety release tabs ensure your wheels keep turning even if debris gets lodged between the fender and tire. The mounting system has a creative workaround for forks that do not have a center mounting hole through the use of zip ties. They have two sizes: “The Road” and “The City” that cater to road or commuter bikes.

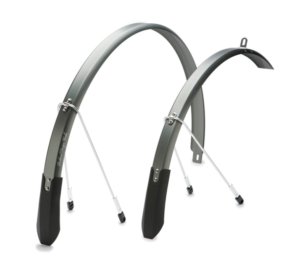
Full Length: SKS Chromoplastic

Price: $115

The SKS Chromoplastic are a great full length option that have stood the test of time. Made by sandwiching aluminum strips inside plastic housing, they are durable and provide great coverage. They feature stainless steel stays and hardware, with a front fork crown fitting and secu-clip to lock it in place. The Chromoplastic also include a mudflap on the front and a reflector on the rear. They’re available in a variety of sized to fit tires from 20 – 45mm.

Full Length: Velo Orange Hammered Alloy Fender
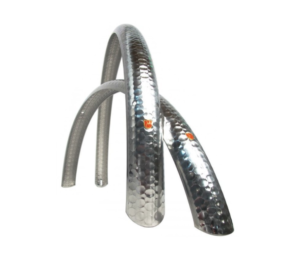
Price: $65

These fenders feature a classic hammered pattern and include a hardware kit to work with almost any type of mounting in the same finish as the fenders. Made from aluminum alloy for strength while staying lightweight, they come in a variety of sizes to ensure a good fit. They can be a pain to install, but they are built to last.

Clip On: SKS RaceBlade Pro XL 
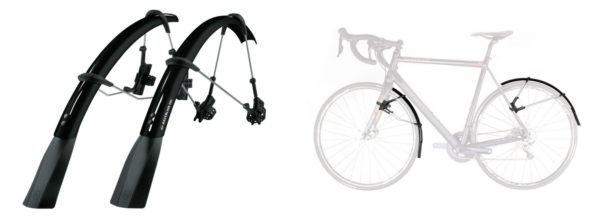
Price: $60

These easy to install clip on plastic mudguards are designed for 700c tires up to 32mm in width. They can adapt to the radius of the wheel by adjusting the length of the stays. Each mudguard consists of two parts that join together with steel brackets, held by the brake caliper bolt. They do a great job of keeping both your feet and your bottom dry, and protecting the rider behind you from getting sprayed in the face.

Mountain-Bike Style: Zefal Swan Road
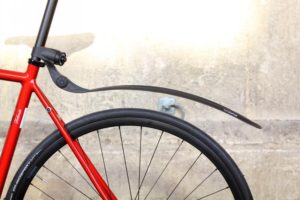
Price: $15

If you don’t have mudguard mounts and are looking for some protection from road spray from your rear wheel, then the Zefal Swam Road is a great option. It includes a simple but sturdy bracket that attaches to the seatpost, making it super easy to take on and off.

Mountain-Bike Style: Crud Catcher
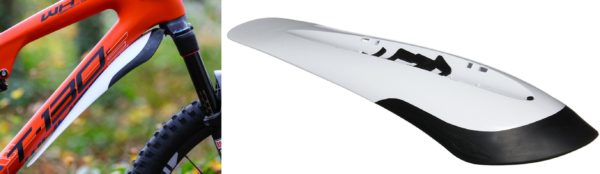
Price: $15

The Crud Catcher fits on your downtube to catch any loose mud being flicked up from your front wheel. Mostly used on mountain bikes, you can use it on your road bike as a means of keeping mud and spray out of your face. It’s easy to mount with the supplied fittings, and gets the job done with little fuss.

How to Dry Your Cycling Shoes Quickly

September 3, 2018 by Josh Friedman

You just got in from a ride in a surprise rain storm. Fortunately, your upper body is relatively dry because you packed your rain jacket, but your feet are totally soaked and you plan on riding tomorrow. What you need to know is how to dry your shoes quickly. You can just hope they dry in time but chances are that you’ll be slipping into cold, wet shoes which feels, oh so good. Additionally, if you are riding for performance, having wet shoes simply adds more rotational weight that you have to move around each pedal stroke.

First – Remove Everything You Can

If your shoes are so soaked that there are puddles in them, dump them out. Then take out the footbeds and set them aside to dry. They should dry out pretty quickly but just to be safe place them on newspaper in front of some sort of vent, whether it’s the heater, ac, or dehumidifier. Open up all of the buckles, straps, and tongues to expose as much of the shoe as possible.

Keep Some Old Newspapers Around

Old newspapers are great for drying out your shoes. You should have a bunch on hand because you will change the newspaper a few times. If you’re cheap and lazy you can dry out the newspapers and use them again. Once everything on the shoe is open, shove as much newspaper in as you can. It will soak up water very quickly. The first round of newspaper should only last twenty to thirty minutes. If the shoes are really wet, the newspaper will already have soaked through. After that, you can space out the fresh newspaper intervals. Try an hour, then two hours, then the overnight shift. By the time you wake up in the morning your shoes will be completely dry and ready to ride.

Accelerate the Drying

Do not keep your shoes in a moist basement or garage when they are drying. Bring them upstairs into a well ventilated and dryer area to maximize drying potential. If you have a fan, heat or AC vent, dehumidifier, or breezy window,  that is a bonus. Make sure you still place the newspapers in them however. You will get the drying benefits from the inside and out.

Clean Your Shoes

After a wet and sloppy ride, chances are your shoes got dirty with road grime. Be sure to clean them both for appearance and functionality. Do this in a sink while they are still wet with a scrub brush. It’s alright if you use a little water; they are already wet. All of that grime gets in the buckles and strap and can make them work poorly and not last as long. Then dry your shoes after they’re cleaned.

How to Dry Your Shoes Quickly

If you know how to dry your shoes quickly, it does not take a lot of effort. The only supplies you need are old newspapers that would go in the recycling anyway. You will run into adverse weather eventually, so it pays to prepare the equipment ahead of time as well as the knowledge to deal with it beforehand. Keep your feet dry and cozy!

5 Great Women’s Cycling Rain Jackets

June 18, 2016 by Adam Farabaugh

women's cycling rain jacket

A great cycling rain jacket is hard to come by especially for a descent price. Finding one specific for women can be even more of a challenge. Women’s cycling rain jackets are similar to that of men’s but are typically cut to better fit a woman and are typically colored or accented with a purple, pink, light green, or baby blue to some rider’s like and others dislike. Regardless, finding a good jacket is key for staying comfortable when the weather turns bad.

Changing Weather Conditions

If you are heading out in variable weather you should carry a women’s cycling rain jacket in your pocket. Variable weather covers not only rain moving in where you are now, but also elevation changes along with riding at dusk when the temperature drops quickly.

Riding in the mountains where temperature can fluctuate greatly and weather can move quickly requires a cycling rain jacket almost every day. Climb to the summit and you will be overheating but on the way down you are likely to get chilled to the bone because you are covered in sweat and not working very hard while coasting.

Heading out for a ride that will go past dusk is also a great time to have a cycling rain jacket. Once the sun moves below the horizon, expect temperature to drop, especially if you live somewhere that does not retain heat, like the desert or coast. You will be glad you packed it for the ride home.

A cycling rain jacket will also prove useful if you have to stop to change a flat or for some other unforeseen circumstance. Standing on the side of road and shivering is no way to quickly change a flat. Put on your jacket and you can stay comfortable until it’s changed or your ride arrives.

Necessary Features In A Women’s Cycling Rain Jacket

Needless to say, the most important feature of a women’s cycling rain jacket is that it is waterproof. If it is not waterproof, it is a mislabeled wind jacket. Read reviews and talk with people that are familiar with a specific cycling rain jacket to determine how waterproof it is. Many are water resistant which can get you by depending upon the severity of the rain and temperature drops you experience.

When riding in the rain and other low light conditions, it is nice to have extra visibility for drivers. A cycling rain jacket should have reflective patches to make you more visible to traffic. This does not replace having good lights but additional help is always a plus as if it’s raining, visibility is also reduced for drivers.

The rear of a cycling rain jacket should extend down past where a normal jacket would to cover your backside from road spray. You will still get wet because your bibs are not waterproof; the tail is there to protect you from direct spray from your rear wheel.

A quality zipper goes a long way to making your cycling rain jacket easy to use. When the rain comes pouring down or you are wearing full finger gloves, a good zipper will make it easier to get your jacket on quickly and easily.

Storing your cycling rain jacket in a jersey pocket is a must. The jacket has to compress down and be light enough that it is not cumbersome otherwise you won’t want to take it with you on a regular basis. Bonus points to the jacket if it is small enough to go in your pocket and still fit other essentials in the same pocket.

A Note On Breathability

Cycling is an energy intensive activity; ideally your cycling rain jacket will allow your sweat to evaporate so you can stay dry inside. It is a tough balance to strike. Your expectations are too high if you expect to be perfectly dry and cool inside your jacket while keeping the precipitation at bay. Claims of cycling rain jackets (or any rain jacket) being waterproof and breathable are usually overblown.

The bottom line is expect to get clammy inside your women’s cycling rain jacket, but remember that it will not be nearly as bad as if you were riding without a jacket at all.

5 Great Women’s Cycling Rain Jackets

Here are a range of 5 women’s cycling rain jackets that may work for your needs and budget.

GORE BIKE WEAR Power Lady Gore-Tex Active Jacket

Price: $113 to $357 depending on supply but mostly about $113

This Gore Bike Wear Active Jacket  is great for those days where it’s going to rain all day and be slightly chilly. It’s a little bit thicker so is one you wouldn’t want to try and stuff into a jersey pocket. It’s Gore-Tex material is both wind and waterproof yet the jacket is still breathable which is nice when riding harder, say up a climb.

Craft Women’s Active Bike Light Rain Jacket

Price: $95.35

The Craft Bike Light Rain Jacket doubles as both a wind and waterproof jacket. It has a flap over the zipper as well as fleece on the collar to keep you warmer as well. An intermediate jacket indeed with an intermediate price.

Louis Garneau X-Lite Jacket – Women’s

Price: $71.00

This jacket is incredibly versatile as well as small enough to fit into your jersey pocket. It can be used as a rain jacket or wind breaker without leaving you clammy underneath. It does this with high-tech fabric under the sleeves. It also has more of a race cut so it doesn’t flap in the wind.

Pactimo Women’s Ultra-Lite Breathable, Packable Cycling, Bike Rain Jacket

Price:$60-$70

This jacket covers it all for a descent price. It’s wind and water resistant and even though it’s not fully waterproof, it will do the job when you need it and it’s stuffed in your jersey pocket. It is also breathable and also has reflective accents to help keep you safe and visible.

Canari Women’s Microlyte Shell Jacket

Price: About $15. Depends on color and size.

This is your cheap, simple jacket that will keep the wind out and rain to a limited extent. The fabric is water-resistant, not water proof, but would be suitable as a jacket to carry with you if you think it might rain or get a little chilly. It’s a price you simply can’t beat despite not having some of the qualities of the higher end jackets.

Glasses Fogging Up? – Here’s How To Fix It

May 29, 2016 by Adam Farabaugh

glasses fogging up

You’re about a minute or two into a climb and you’re just starting to get uncomfortable. You unzip your jersey a bit to get a bit more air. Your glasses then start to fog up allowing you to see basically nothing. You’re focused on the effort and now you’re irritated with your glasses. You try wiping them with a finger and now you can’t see anything. With your glasses fogging up it can be irritating as well as dangerous. Keeping them from fogging up in the first place can save you a lot of hassle.

Reasons For Glasses Fogging Up

Glasses fog up because they are at a lower temperature than the heat emitted by your face. When the air from your face hits your glasses, the lower temperature causes the air to condensate, or in simpler terms, the moisture in the air turns to a liquid on your glasses. This is physics and the amount at which it occurs is determined by temperature differences and how much moisture is in the air which is also increased because of the moisture coming off your face as well.

Cold Outside

The colder the temperature outside, the easier it will be for your glasses to fog up. The large temperature difference can cause your glasses to fog up even if there is a lower amount of moisture in the air.

Humid Outside

A high humidity, such as when it’s foggy, causes droplets of water to form at lower temperature differences which is why your glasses almost always fog up in this scenario.

Raining

When it’s raining is similar to when it’s humid out. There is a lot of moisture in the air and the rain on the glasses themselves can also cool them down slightly upping the temperature difference.

Glasses Too Close To Your Face

In combination with all of the factors above, having your glasses too close to your face decreases the amount of air flowing through to dissipate the heat thus resulting in a higher likelihood of you glasses fogging up.

How To Stop Your Glasses From Fogging Up

Unfortunately with cycling you are always going to run the risk of fogging up your glasses. It’s simple physics but there are things you can do and use to lower the likelihood that they fog up.

Using Your Breath or Saliva and Wipe

The simplest and easiest way to lower the amount that your glasses fog up is to fog them up with your breath and then wipe them clean with a clean fabric such as your shirt. (Jersey material is often a poor choice but t-shirt material, cotton, works well.) If your glasses tend to fog up a lot you can take this one step further and spit on them, mainly the inside of the lenses. Wipe them with your finger to evenly disperse the saliva and then wipe them clean.

Anti-Fog Wipes or Spray

Another solution to glasses fogging up is to use anti-fog wipes  or spray. These use compounds that prevent the forming of water droplets on a surface. They are easy to use as long as you have them readily available. Chances are you won’t have them in your jersey pocket should you need them mid-ride.

Shaving Cream

A home remedy to glasses fogging up is to use shaving cream. Simply put a light dab on your finger and rub the lenses and then wipe clean with a clean fabric.

Positioning Them Further From Your Face

In addition to the above fogging solutions, you should also position the glasses so they sit a bit further away from your face. This will allow air to flow more easily between your lenses and skin to lower the heat difference. Some glasses are better for preventing fogging while some are worse. When looking for a pair of glasses, make sure they fit your face well and aren’t too close. A good option is to get a pair with an adjustable nose piece to position them where you want them.

Taking Them Off

In some conditions keeping your glasses from fogging simply isn’t going to happen. The best solution here is to simply take them off as they start to fog. This will keep them from completely fogging over as well as you wiping them to keep them clear which then leaves marks for you to look through the rest of the day. Then when you’re done with the climb, just put them back on.

Having glasses fogging up can be a real pain but with these solutions you should be riding with much better vision whether prescription glasses or just sunglasses.

  • Facebook
  • Tumblr
  • Twitter

Latest Articles

JOIN Cycling: A New Training Platform for Cyclists

May 27, 2024 By Eric Lister

cold exposure

The Benefits of Cold Exposure for Cycling & Life

June 13, 2023 By Eric Lister

hill climb

The Ultimate Hill Climb Training Guide

May 31, 2023 By Eric Lister

shoulder pain cycling

How to Treat & Avoid Shoulder Pain While Cycling

April 12, 2023 By Eric Lister

psoas stretch

The Importance of the Psoas Stretch for Cyclists

April 6, 2023 By Eric Lister

cycling neck pain

The Ultimate Guide to Cycling Neck Pain: Causes and Solutions

March 21, 2023 By Eric Lister

Useful Info

  • Contact
  • Finally, A Global Cycling Club That Is Focused On Community And Love Of Cycling!
  • Privacy Policy
  • Share Your Story!
  • Terms And Conditions Of Use
  • Welcome to I Love Bicycling
  • What Happened When I Stretched Every Day For a Month

Recent Posts

  • JOIN Cycling: A New Training Platform for Cyclists
  • How to Hang Bikes in Your Garage: 4 Inexpensive Options
  • Gravel Bike Vs. Road Bike: Which One Is Better For You?
  • The 6 Types of Mountain Bikes & How to Choose the Best One for You
  • What Is a Touring Bike Good For? 5 Benefits We Know You’ll Love

Search I Love Bicycling

Connect with Us

  • Facebook
  • RSS
  • Tumblr
  • Twitter

Copyright © 2025 · Magazine Pro Theme on Genesis Framework · WordPress · Log in