• Training
    • Injury Prevention
    • Training Tips
  • How To
    • Bike Fit
    • Gear
  • Nutrition
    • Nutrition Tips
    • Weight Loss
  • Repair
  • Reviews
  • Stories
    • Funny Stories
    • Jokes
    • Quotes
    • Videos
    • Funny Videos

I Love Bicycling

I Love Bicycling is a website that is geared towards cycling for beginners with road cycling tips, training articles, nutrition tips, weight loss, how to’s and bike repair articles.

Specific Situations For Gear Changes

June 3, 2015 by Dyani Herrera

Specific Situations For Gear Changes

change bike gears in specific situations
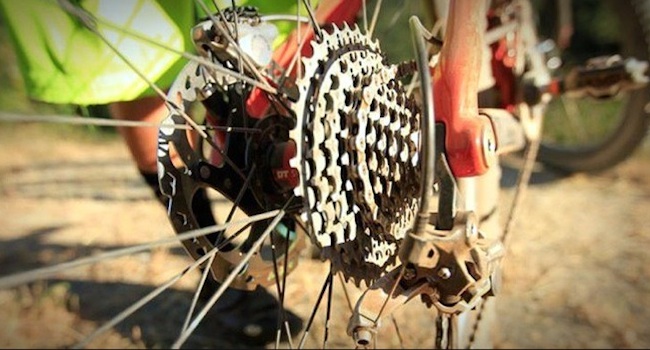
As a new cyclist the first step is learning how to clip in properly without toppling over. Once this skill is mastered the next step is knowing how to properly change gears. You could’ve purchased the most aerodynamic bike with amazing components, but if you don’t know how to properly utilize the shifters, you’re shortchanging yourself on speed as well as energy efficiency. Initially, it’s important to understand the anatomy of your bike gears in order to use them effectively. There are several, situations which require a change in gears for optimal performance.

Hills/Bridges

While cycling if you are approaching a steep hill or bridge it is wise to gear down, in other words create the least resistance possible while still maintaining stability on the bike. In approaching this situation you will already feel resistance going up the hill/bridge, therefore why add more resistance by riding in a big gear? However, if your goal in that particular ride session is to build strength in the hip flexors and gluteal muscles then gearing up (riding in a big gear) allows you to pedal off the saddle and strengthen these muscles. Conversely, while you’re going downhill momentum will create very little resistance and allow you to ride faster. In this instance, gearing up is suggested in order to maintain stability on the bike, steady pedal stroke, and regain speed lost going uphill.

Tailwind/Headwind

When going into a headwind you will automatically feel a drop in speed because of the resistance going against the wind. Unless you’re an experienced cyclist this situation can be challenging for most riders. In fighting a headwind it is effective to gear down (switch into a small gear) and increase your rpms. By riding in a smaller gear with high RPMS you’ll be able to battle the headwind at a good MPH average. Also, it won’t fatigue your quadriceps as much, and it’ll reduce lactic acid buildup that would occur if you were riding in a big gear into the headwind. However, once this battle has been fought we reap the benefits of the tailwind. In a tailwind, you are receiving an extra push and thus, our speed increases. In this instance, you must take full advantage and gear up in order to gain a bit of resistance needed for stability, and increasing your average MPH significantly.

Flats & Intervals

Depending on your particular workout, riding on flats offers the opportunity to gear up unless you’re fighting a headwind. The more you ride; you will discover which gear selection is ideal for you. Usually this gear selection allows you to have some resistance to maintain stability and increase speed, but not so much that it quickly fatigues you causing you to drop in speed over time. In contrast, if you are completing interval work, gear changing is vital in order to render the results offered by this type of training. If your goal is to increase overall cadence then gearing down is best in order to allow minimal resistance and a rapid pedal stroke. However, if your goal is to build strength and muscle endurance then gearing up during your work intervals is best. By riding in a big gear your legs will increase in strength and become accustomed to a higher gear. Lastly, if you are inserting some pickups pedaling off the saddle, then gearing up is important for stability. If you do not place your bike in a big gear, the bike will be hard to control pedaling off the saddle. Also, it will inhibit you from a proper pedal stroke. In this instance, you want to create enough resistance that you feel in control of the bike and are simulating a sort of “dancing” motion with your bike.

As a new cyclist, it takes some time to really understand your gears and when to switch them for your particular needs. This can be safely accomplished when riding on an unbroken bike path. Riding on a continuous bike path allows you to play with the gear shifting and find that ideal selection for you. It’s important to note that when you are shifting gears you should continue a slow and steady pedal stroke in order for the chain to catch fluidly on the ring. Lastly, never change a gear without pedaling because this could cause you to fall, the chain to become stuck, or have the chain fall completely.

The Perfect Pedaling Technique

October 19, 2013 by Lee Agur

Pedaling technique
Pedaling the bicycle is what cycling is all about! Why would you not want to be the most efficient at this one thing? It is what I have focused on the most this year! Testing what works and what does not work.

Quiet Upper Body

I believe one of the most important things (that is not stressed enough in the proper pedal stroke) is keeping a quiet upper body. You may have heard “keep a quiet upper body” but why?

Keeping a quiet upper body sets the rest of the pedal stroke up for success. I started by pedaling up a hill and as soon as I started to get sloppy (head moving back and forth – happened very quickly as explained in my previous post about hill climbing) I either turned around and went down or got out of the saddle to continue to climb. No sloppiness allowed!

After keeping a quiet upper body it all runs down from there…

Alignment

Have your hip, knee and ankle in a line, this is your most efficient and powerful position! Unfortunately, not all of us do this. It is a good idea to set yourself up on a trainer and either use a mirror or a spotter to watch your natural pedal stroke.

I think we have all seen the bow-legged cyclists heading down the highway; don’t let that person be you! This type of pedaling technique is inefficient and can even lead to knee injuries… trust me! (I used to be “that” guy!)

Pedal in a circle!

pedal stroke
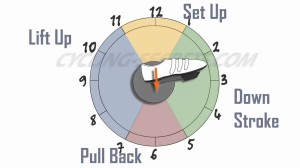
Doesn’t everyone pedal in a circle? No, they actually do not!

It is easier said than done! Your goal is to accomplish a smooth circle that applies force all around the pedal stroke. Let’s break it down…

Down stroke

Your down stroke happens between 1 and 5 o’clock, if we were comparing your pedal stroke to a clock.

This is where most of the power happens. Most of us do not struggle here, we all know how to push down. Your heel should be even to the ground or even slightly below your toe by as much as 20 degrees.

Pull Back

The pull back happens between 5 and 7 o’clock.

This motion should feel as if you are scraping mud off of your shoes. You will be engaging your calf here and pointing your toe down approximately 10 degrees.

Lift up

The lift up happens between 7 and 11 o’clock.

Your goal here is to lift the pedal up and start pulling toward the sky and later the bar top. Have your ankle at approximately 20 degrees. This is where your knee is going to want to push to the outside (bow legged). Do not let this happen, keep a strong core.

It feels as if you will be lifting the pedal up here and generating a lot more power than you actually are! What you actually are doing is lifting the weight of your leg and making it so your opposing leg is not lifting it up with the down stroke.

At a slower cadence you actually are generating power on the upstroke.

Set up

The set up happens between 11 and 1 o’clock.

Drive your foot forward. Your ankle should be transitioning from 20 degrees to 0 degrees here. It is a good idea to have someone film your natural pedaling technique.

Train Each Phase Then Integrate

Each of these phases mentioned above should be focused on separately and then integrated. It is very difficult to combine them all at once.

I have been focusing on perfecting my pedaling technique for an entire year and I am still not where I want to be. It is difficult! For me it is very quantifiable as I have a computrainer that rates me on efficiency. (If you do not know what this is do not worry I will explain it in a future post).

Improve Your Pedaling Technique

perfect pedaling techniqueThere are several ways to improve your pedaling technique.

  1. Spin on your way downhill – Try to achieve a high cadence in a small gear downhill without bouncing on your saddle. Again focus on a quiet upper body and a strong core.
  2. One leg drills – Pedal with one foot. This will force you to pedal all the way through and develop your “smooth pedal stroke” muscles.
  3. Rollers – When you feel like you have good balance try out some trainer rollers and this will do wonders for your pedaling technique. It will force you to pedal smoothly or you will fall! I do not suggest rollers for the beginner cyclist. They are difficult and frustrating and you should start on trainer.
  4. Fixed gear – Kid style! Fixed gear bikes force you to pedal in circles or you will get bounced around.

Focus

If you were to focus on one thing in the next few months this would be it! Your greatest efficiency gains are in your pedal stroke! In average human standings… I went from 0 to pretty awesome just by improving my pedaling technique.

I still focus on my cycling technique nearly every ride. When I began I could hold a good technique for 15 to 30 seconds before I started to get sloppy and my hip flexors were screaming. It takes time and focus to build up, but it is worth it! Your muscles develop faster than you would think and in no time you will be flying up hills and along the flats efficiently and with a quiet upper body.

Striving to achieve the perfect pedaling technique is worth the time and energy, I promise!

Subscription

If you liked this post subscribe to my newsletter at the top right of the page to receive more like it!

  • Facebook
  • Tumblr
  • Twitter

Latest Articles

JOIN Cycling: A New Training Platform for Cyclists

May 27, 2024 By Eric Lister

cold exposure

The Benefits of Cold Exposure for Cycling & Life

June 13, 2023 By Eric Lister

hill climb

The Ultimate Hill Climb Training Guide

May 31, 2023 By Eric Lister

shoulder pain cycling

How to Treat & Avoid Shoulder Pain While Cycling

April 12, 2023 By Eric Lister

psoas stretch

The Importance of the Psoas Stretch for Cyclists

April 6, 2023 By Eric Lister

cycling neck pain

The Ultimate Guide to Cycling Neck Pain: Causes and Solutions

March 21, 2023 By Eric Lister

Useful Info

  • Contact
  • Finally, A Global Cycling Club That Is Focused On Community And Love Of Cycling!
  • Privacy Policy
  • Share Your Story!
  • Terms And Conditions Of Use
  • Welcome to I Love Bicycling
  • What Happened When I Stretched Every Day For a Month

Recent Posts

  • JOIN Cycling: A New Training Platform for Cyclists
  • How to Hang Bikes in Your Garage: 4 Inexpensive Options
  • Gravel Bike Vs. Road Bike: Which One Is Better For You?
  • The 6 Types of Mountain Bikes & How to Choose the Best One for You
  • What Is a Touring Bike Good For? 5 Benefits We Know You’ll Love

Search I Love Bicycling

Connect with Us

  • Facebook
  • RSS
  • Tumblr
  • Twitter

Copyright © 2025 · Magazine Pro Theme on Genesis Framework · WordPress · Log in