• Training
    • Injury Prevention
    • Training Tips
  • How To
    • Bike Fit
    • Gear
  • Nutrition
    • Nutrition Tips
    • Weight Loss
  • Repair
  • Reviews
  • Stories
    • Funny Stories
    • Jokes
    • Quotes
    • Videos
    • Funny Videos

I Love Bicycling

I Love Bicycling is a website that is geared towards cycling for beginners with road cycling tips, training articles, nutrition tips, weight loss, how to’s and bike repair articles.

What Is Bike Geometry?

July 9, 2020 by Sarah Lauzé

Bike geometry is the collection of measurements (lengths and angles) that make up a bike frame. In short, everything on a bike can be changed, but the geometry cannot. Looking at geometry charts on manufacturer’s websites can be confusing, but all those numbers translate into very real and understandable concepts.

There is a lot to know about bike geometry, but understanding the basics can go a long way in ensuring you choose the right bike for your style of riding. Bike geometry can help you understand how a bike will handle, feel, and how comfortable it will be to you.

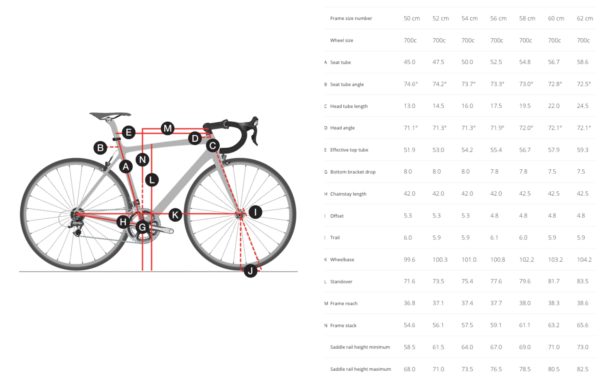
Most bike manufacturers provide bike geometry charts within the description of the bike, but what is included does vary. Most will include frame size, head and seat tube lengths, top tube length, wheelbase, and chainstay length. Others will also include stack and reach measurements, fork rake, bottom bracket drop, and trail.
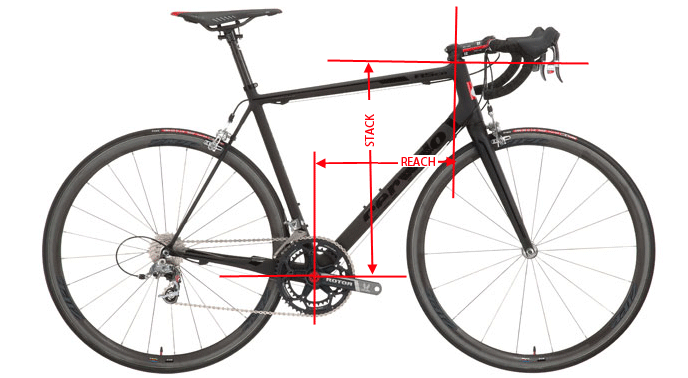
Stack and Reach

Stack and reach are the two fundamental elements that can help you determine right away if a bike will fit you. This is especially important because it helps standardize fit between size and manufacturer. Even if a bike is labelled as “medium” or 53cm, the actual fit can differ by up to 2 cm.

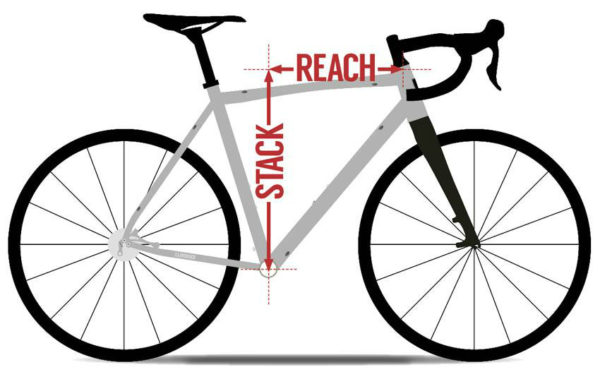
  • Stack is the vertical distance (in cm) from the center of the frame’s bottom bracket to the top of the head tube, where the fork passes through the frame. It gives an indication of how tall a frame is.
  • Reach is the horizontal distance from the center of the bottom bracket to the top-centre of the head tube. This gives an indication of how long a frame is excluding the stem.

Head Tube Angle, Fork Rake, and Trail
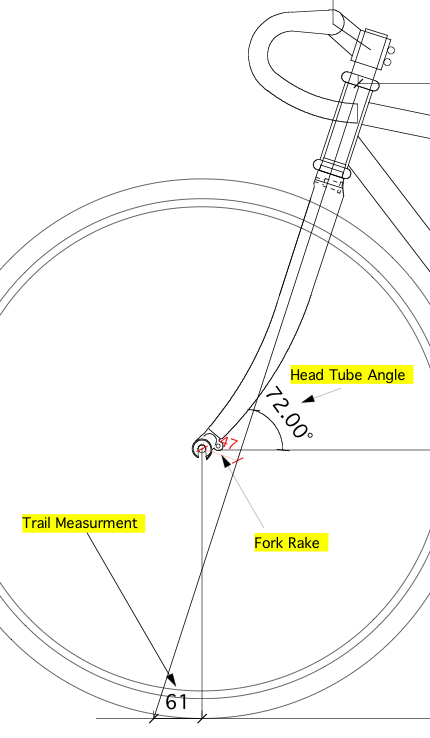
Head Tube

The head tube angle is the angle of the head tube in relation to the ground, with the angle being either ‘slack’ or ‘steep.’ The classic head tube angle for a road bike is 73 degrees, so a steeper angle (higher number) will mean less effort to steer making it better for high speeds. A more slack angle (lower number) may require more effort to steer, but perform much better at slow speeds.

Head tube length is just what is sounds like. Longer head tubes result in a more upright riding position. Short head tubes lower the front of the bike, putting you in a more aerodynamic position.
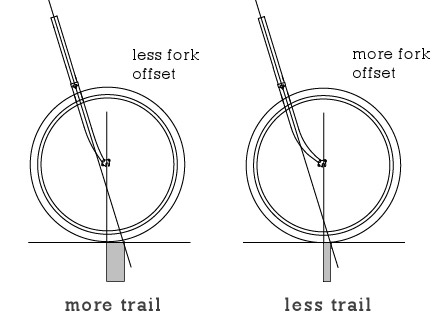
Fork Rake (Offset)

Fork rake or fork offset is the distance between the steering axis and the wheel center. Whether the fork is curved forward or is straight, but angles, if the offset is the same then it will handle the same. Generally speaking, less fork rake will increase the trail as the center of the wheel is moved back from the steering axis, and more fork rake means less trail.

Trail

Trail is a bit more complicated, and can be difficult to wrap your brain around. Think of it as the tire patch trailing behind the steering axis, determined by the head tube angle and the fork rake. The steeper the headtube angle, the less trail there will be.

Its impact on the feel of the bike is arguably more important and much simpler. A small amount of trail will result in a fast handling bike, meaning it will require less rider input and will handle well at high speeds. The downside is a certain amount of twitchiness, making for a rougher ride.  A large amount of trail will result in a slow handling bike, so it will take more work from the rider to steer at high speeds, but will feel more stable and smooth.


Bottom Bracket Drop

The bottom bracket drop is effectively how low you sit on the bike. It is measured by the vertical distance the center of the bottom bracket sits below the wheel axis.

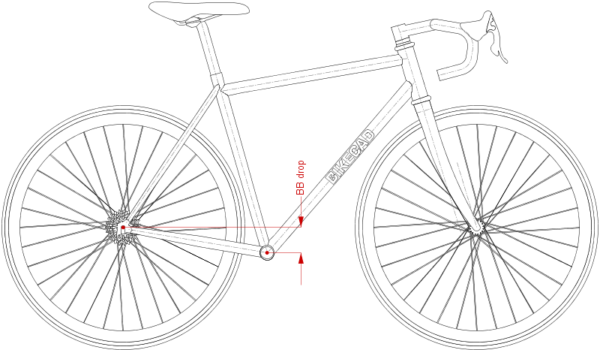
The lower (more) the bottom bracket drop, the better the bike will corner and the faster it will respond (as your center of gravity is lower). The issue is pedal clearance, because the bottom bracket can only be so low before the pedals will catch ground while leaning into a corner.

Less bottom bracket drop will feel more stable at slow speeds, but will be reluctant to corner. This means more input from you through the handlebars to corner.

Seat Tube Angle

The seat tube angle is the angle of the seat tube in relation to the ground. This angle will generally be between 71-74 degrees, and doesn’t vary as much as the head tube angle. You can effectively influence the seat tube angle by changing the saddle position to be more slack or steep.

Chainstay Length

Chainstay length is the horizontal distance from the center of the bottom bracket to the center of the rear axle.

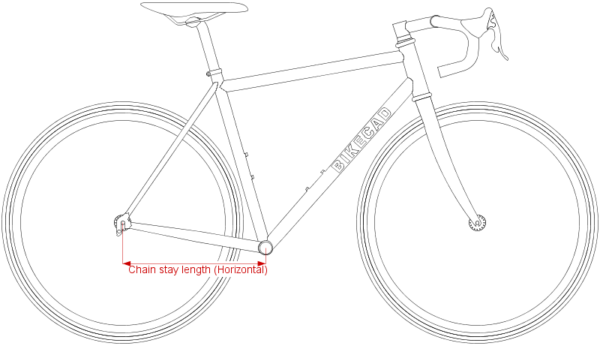
The chainstay length impacts the length of the wheelbase (distance between front and rear wheel axles) as well as the handling of the bike. Bikes with long chainstays will have more stability, as well as allowing room for panniers, making great touring and endurance bikes. Performance bikes, however, will have a shorter chainstay length for sharper handling.

Each measurement on its own can give you a snapshot into how a bike will fit and feel, but they all rely on each other. To get an idea, try looking at two bikes with very different geometry and then ride each one, paying attention to how it handles. You can then refer to those charts, picking out elements that worked and others that didn’t. For more information, getting a professional bike fit is always a great place to start in figuring out what will work best for you and your type of riding.

How to Make the Wrong Size Bike Fit

January 3, 2016 by Adam Farabaugh

How to Make the Wrong Size Bike Fit

In the ideal world you always get the exact size bike for your size and fit it properly. Unfortunately that doesn’t always happen as maybe a friend had a bike that they were getting rid of or the bike you have a deal on isn’t quite the right size.

It depends on how far off the size of the bike is if you can make the wrong size bike fit. If you should be on a large, 58cm road bike or 20 inch mountain bike, fitting a small 52 cm road bike or 15 inch mountain bike just isn’t going to happen and vice versa. If the bike is relatively close however, there are a number of changes that you might be able to make to get the bike to more closely fit you. If you can’t get the bike to your ideal position, it is not recommended to ride more than just around town as an improperly fitted bike can cause injury specifically to your knees and back but other areas as well.

Where Doesn’t the Wrong Size Bike Fit?

To determine what adjustments need to be made to the bike, you first need to get on it and see where everything falls. Consulting the article “How to Do a Proper Bike Fit” will help to show you where you should properly be positioned on the bike. In general, you will know right away if a bike is too short in the top tube or with the saddle height. Depending upon where your differences are, you may have to do one or all of the following if your bike is either too big or too small.

Too Small of a Bike

A wrong size bike that is too small can be easy to make fit if it only requires small changes but past that you may need different parts such as a stems or seat post. It is typically easier to fit a smaller bike than too large because simply it is easier to lengthen something on the bike as shortening something past the limits of the frame simply isn’t possible.

Longer Seat Post

The first thing that you should adjust on the bike is the height of the saddle. Seat posts typically have a fairly long length so can be extended quite far. On all seat posts, at least if it hasn’t worn off, there is a maximum extension mark. Never position the post past this point as there is not enough post in the frame to adequately support the weight. If you do, the frame can actually bend and break quite easily. The solution to raising the seat further is to get a longer seat post which can be found relatively easily at your well stocked local bike shop or online. A 350mm length post is about as long as you can easily find. Just make sure you get the right size diameter post as most bikes have different sizes.

Increased Saddle Set-Back

Having too small of a bike places you too far forward on the bike. Sliding your saddle back can help solve this. The first way to do this is to loosen the bolts on the rails of the saddle and slide it back as needed. If you find you can’t slide it back far enough, you can get a seat post that has increased set-back. Standard typically ranges from 10mm to 20mm. You can find however 30+mm setbacks but you’ll have to shop around. And if you find a post with the right set back but the diameter is too small you can use pre-made shims to make it fit properly.

Longer Stem

The next area of the bike that is probably going to be an issue is how close the handle bars are to your body. The solution to this is a longer stem which will push the bars further out in front of you. Depending upon how long the stem is now, you can get a stem around 140mm to 150mm in length. The thing to watch out for here however is with an increased stem length, the handling of the bike decreases because of how far the bars are from the pivot point, the steerer tube.

Raising the Bars

The last thing that you will probably have to do on a slightly small bike is to raise the bars. You can do this in two ways. The first is to make sure that the stem is placed at the very top of the steerer tube with no spacers above it. The second is to get a stem with a high angle which will raise your bars. Zero to seven degrees or so is typically average but you can find stems with angles above fifteen degrees.

Too Large of a Bike

A wrong size bike that is too large can be a challenge simply because you can’t lower a saddle past the frame along with the handle bars. If the bike’s not too small however these few techniques will get the position to where you need it.

Shorter Seat Post

The limit on how low the seat post can go is where the bend on the top of the seat post is. If you find that when you try and lower the post all the way to this point and it hits something, it’s typically the post bottoming out on the water bottle cage bolts. A simple solution to this is to cut the seat post shorter. Only cut off however the minimum that you need as if you raise it and don’t leave a corresponding amount of post in the frame, you can break the frame.

Sliding the Saddle Forward

Sliding a saddle forward on the bike can bring you forward enough to potentially fit the bike better. You can loosen the saddle bolts and slide the seat forward as far as it will go in the rails. Past this you will have to get a seat post that has a forward bend to it or a post that is designed to be able to flip around and still place the saddle at the correct angle.

Shorter Stem

A shorter stem can bring the bars closer to you. 50mm is about the shortest stem you can get. With excessively short stems, as with excessively long stems, the handling of the bike can be affected. Short stems give a bike more of a twitchy feel as the same degree of bar rotation turns the front wheel a greater degree than would a longer stem.

Lowering the Bars.

On a bike that’s too big you can lower the bars a fair amount by making sure the stem is at the lowest point on the steerer tube without any spacers underneath. If your bars are already at this point, the next way to lower the bars is to get a stem with a high angle such as 15 or so degrees. There are no negative angles as a stem can be placed right side up and right side down depending on the need. Just make sure you get the right size stem for the diameter of your bars.

As long as the wrong size bike isn’t too far off in size, it is relatively easy to make a bike fit with the right approaches. You may need a few different parts but the price of those parts is probably going to be much less than what you would otherwise spend on a bike that you don’t have a good deal on. The bike will ride different than a properly fitted bike but you can get used to it. Just make sure that the position isn’t too far off as if it is, you are only setting yourself up for injury and whatever savings you may have simply aren’t worth it. Take your time and past these suggestions don’t do anything extreme to make a bike fit as in general it probably isn’t going to be worth it.

  • Facebook
  • Tumblr
  • Twitter

Latest Articles

JOIN Cycling: A New Training Platform for Cyclists

May 27, 2024 By Eric Lister

cold exposure

The Benefits of Cold Exposure for Cycling & Life

June 13, 2023 By Eric Lister

hill climb

The Ultimate Hill Climb Training Guide

May 31, 2023 By Eric Lister

shoulder pain cycling

How to Treat & Avoid Shoulder Pain While Cycling

April 12, 2023 By Eric Lister

psoas stretch

The Importance of the Psoas Stretch for Cyclists

April 6, 2023 By Eric Lister

cycling neck pain

The Ultimate Guide to Cycling Neck Pain: Causes and Solutions

March 21, 2023 By Eric Lister

Useful Info

  • Contact
  • Finally, A Global Cycling Club That Is Focused On Community And Love Of Cycling!
  • Privacy Policy
  • Share Your Story!
  • Terms And Conditions Of Use
  • Welcome to I Love Bicycling
  • What Happened When I Stretched Every Day For a Month

Recent Posts

  • JOIN Cycling: A New Training Platform for Cyclists
  • How to Hang Bikes in Your Garage: 4 Inexpensive Options
  • Gravel Bike Vs. Road Bike: Which One Is Better For You?
  • The 6 Types of Mountain Bikes & How to Choose the Best One for You
  • What Is a Touring Bike Good For? 5 Benefits We Know You’ll Love

Search I Love Bicycling

Connect with Us

  • Facebook
  • RSS
  • Tumblr
  • Twitter

Copyright © 2025 · Magazine Pro Theme on Genesis Framework · WordPress · Log in