Chain sizing is one of the most misaligned topics of bicycle maintenance. It’s due in part because chains have about 400 individual moving parts depending on length. Even seasoned mechanics argue about bike chain length and it can be controversial.
Gear Accommodations
Changing or replacing the chain, chainrings, or altering the gears in back can result in a different bike chain length. But how do you know? Road bikes employ derailleurs with springs that tension the chain to accommodate gearing, so it’s difficult to determine just how long the chain should be.
Err on the Long Side
Most mechanics agree if you’ have to err, err on the long side. Specifically, you want the chain to be as long as possible without causing problems such as sagging.
No Shortening
In this day and age, when everything in the cycling world is measured in grams, it might be tempting to remove a few links to save weight. But again, most mechanics agree it’s never a good idea to shorten a chain in order to save weight or to run a chain that’s too short, even if it works. For one thing, it puts too much strain on the derailleur and it’s unwise to force the rear derailleur to work beyond its limits.
Derailleurs Have Needs Too
Understanding what’s expected from your derailleur is vital to proper chain length. Your rear derailleur shifts between gears on your cassette, obviously. But because the chain isn’t always wrapped around the same number of gear teeth, the derailleur must also manage the chain tension and capacity. The least amount of tension your chain requires is when it’s on the small gear in the front and the small gear in the back. The most tension the chain requires is in the big-to-big gear combination. The pivot and spring action of the rear derailleur is what makes it all possible, but it has it’s limits.
The Basic Setup – Bike Chain Length
Determining bike chain length is not rocket science. It basically means that if your bike shifts clean and the chain doesn’t rub on the upper pulley’s chain guard and the tension pulley is vertical or slightly behind the guide pulley, it should work.
By Observation
Generally speaking, the derailleur limit is reached when the lower pulley is directly below the upper. The lower or tension pulley should never be in front of the upper. If this is the case, the chain is too short.
Easy to Replace
Snapping a chain is just one of the reasons why you might be replacing a chain in the first place or you simply have worn out your chain. New chains are typically around $20 depending on the model and type and they’re easy to replace. But how much chain do you need? How long should it be? It would seem simple enough to just measure the old chain and get a new one based on the measurement — but it doesn’t work that way. For one thing, chains can be cut only at whole inch increments. Chains cannot be cut into fractions of an inch.
Measuring Won’t Work
You have probably heard of chain “stretch” as if the chain was made of rubber. But chains are metal and metal won’t stretch — this is not how chains get longer. Chain “stretch” is metal wearing away where the link pin rotates inside of the bushing. If you take apart a worn-out chain, you can see notches worn into pins by the inside edges of the bushings. It’s not much, but when you multiply it over and over again it adds up. Because of chain elongation, measuring a broken chain is not a viable option to get the length. The chain, if it has any wear on it, will always measure longer than it was originally.
Equations Can Work
Even though it’s possible to determine chain length from equations and then cut the chain before installing it on the bike, it’s not easy, and you run the risk of getting it wrong. There’s easier ways to go about it.
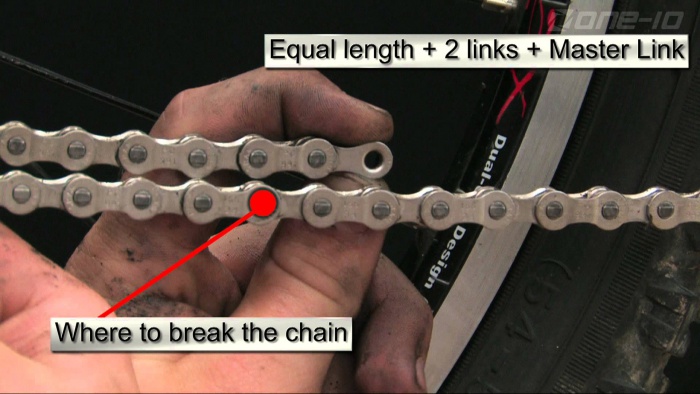
Counting Links
Cyclists have long relied on a simple, effective way to get a replacement bike chain length right — count the links. Take your old chain and count each and every link. Purchase a new chain with at least that many links and use your chain breaker to remove links as needed from the new chain until the count is the same on both chains. It’s important to note that new chains are always longer than necessary and always require links to be removed.
On the Bike Sizing
On the bike sizing is another method that most mechanics seem to agree on when replacing chains. There are other methods, but using them typically winds up requiring more work with the same results.
Thread On New Chain
Assuming that you have no chain on the bike, shift the front and rear derailleurs into the smallest gears. Take the new chain out of the package and thread it on the front derailleur. It’s typically recommended that the open end of the chain be facing the back tire.
Wrap and Snap
Wrap the chain around the small cog from the rear of the bike, and through the rear derailleur. If this is your first time, it’s smart to snap a photo of the rear derailleur before you remove the old chain. If you forgot to snap a photo, use a spare bike as a model. It’s possible to thread the chain through the derailleur the wrong way. Lots of cyclists have done it which results in a non-functioning derailleur.
Use Your Fingers
From here it’s a bit of trial and error and you will get accustomed to it as you work with it. Begin by pulling down on the left half of the chain with your fingers, pulling the bottom pulley with it. When the chain clears everything, the length is adequate. This should allow the chain to operate without rubbing the derailleur in this combination — but with enough slack to operate — even if you’ve absent-mindedly cross-chained the bike.
Match the Ends
Bring the two ends together and mark the link that needs removed. This method should leave you with access to all of your gears – and without too much tension on your derailleur. Trim the length with a chain tool, and join the two ends of the chain with the master link or link pin. Note that there are no fractions in bike chain length calculations, rounding up one link is the typically accepted method.