 Cycling for beginners can be a scary thing. This guide will give you beginner cycling tips on everything you will need to know to get started. We will cover pedaling, stopping, position, corners, climbing, changing a flat tire, road bikes for beginners, cycling tips for beginners, training, nutrition, injury prevention, bike fit and training plans for beginners!
Pedaling Your Bike
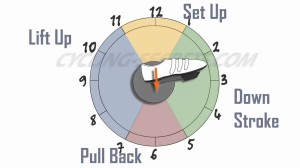
The first thing you are going to need to learn his how to pedal your bike! Pedaling the bicycle is what cycling is all about! Why would you not want to be the most efficient at this one thing?
Most novices “mash” the pedals, meaning that they apply all the force on the down stroke. It sounds ridiculous, but you really need to focus on pedaling in a circle and applying pressure through the entire stroke. You can accomplish this by pushing down, pulling back, lifting up and then pushing forward. That is one entire stroke.
If you find your quads are really sore after a ride it may be due to the fact that you are mashing the pedals.
If you find you are struggling with your pedal stroke visit: The Perfect Pedaling Technique for more detail.
Stopping Your Bike
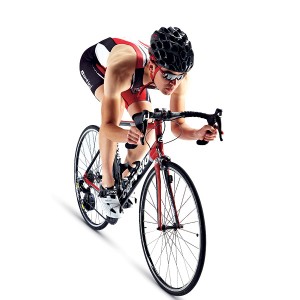 Stopping your bike is likely the most important thing you can learn. Clearly, if you squeeze the brakes you are going to slow down and eventually stop, but there are different techniques involved.
Need to slow down or stop slowly. Sitting upright with you hands on the hoods and gently squeezing the brakes will be all that you need to do.
Need to stop more safely and quicker. Put your hands in the drops where you have more leverage and are able to squeeze the brakes harder but you also lower your centre of gravity allowing you to stop more quickly.
Need to stop immediately. Emergency stopping should be practiced. Have your hands in the drops squeeze hard but at the same time drop your bum off the back of the seat and lower your bum as low as you can to your back tire. This is the fastest way you can stop on a bike.
For more details on how to stop your bike go to All you need to know about stopping your bike.
Position On the Bike
There are three different riding positions on a bike: Neutral, drops and standing.
Neutral
The neutral position is the most common position and it involves sitting on the seat with your hands on the hoods “covering” the brakes (this means your hands are over the brakes ready to stop). If your bike fits properly then your arms should be at a 90 degree angle in relation to your torso. At first this may seem like you are leaning too far forward, but as you adapt from a beginner cyclist to a seasoned pro it will feel as natural as sitting in a chair.
Drops
Being in the drops is when your hands are in the C-shaped bottom portion of your handlebars. You are commonly in this position if you are trying to get more aero and go faster or when you are descending. It is safer to be in the drops while you are descending as it gives you more leverage on the brakes allowing you to brake harder, in addition to lowering your centre of gravity allowing you to stop faster.
Standing
Primarily used for climbing, standing is a position that uses a little more energy as you have to support more of your body weight with your arms and legs. In order to stand, start in the neutral position and then slide your weight forward as you begin to stand. Remember to keep pedaling! As you continue to pedal, slowly rock the bike side to side with your arms in unison with your pedal stroke essentially making it easier to pedal.
Taking Corners on a Bike
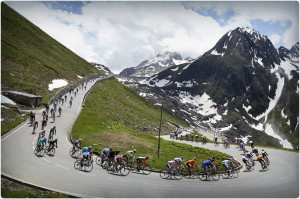 Most beginner cyclists assume they need to turn the handlebars in order to take a corner; while this is the case at very slow speeds it is usually not practiced while taking most corners at speed. Rather you will lean the bike frame the direction you want to turn and adjust your weight accordingly.
When riding you should always stay relaxed, but it is even more important around a corner as it will allow you to adjust your body weight properly.
Look Where You Want to Go
Your body likes to follow your eyes, so look where you want to go, not where you don’t. A common mistake is continuing to look at what you are trying to avoid; this generally results in a collision with that same object. Let your peripheral vision do the work, it can see that object and you will not hit it.
Look far in to the corner, not right in front of you. Your hips turn the same direction you are looking and your hips determine where the bike is going to steer. Beginners are guilty of looking directly in front of themselves quite frequently, especially when the turns come hard and fast. Depending on your speed and the angle of the corner determines how far in to the corner you look. In sharp corners look as far ahead as possible. Play with it and you will notice significant improvements immediately.
Brake Before the Corner
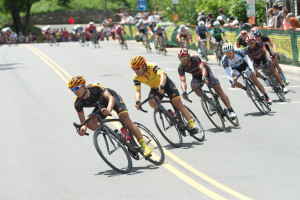 You should be going the speed you want to go around the corner at the beginning of the turn. Braking in the turn actually makes the bike want to stand up on itself and straighten out, two things you are trying not to do. You end up fighting the bike and shedding more speed than necessary to make the turn safely.
Generally, you only want to be doing one of the following things at any given time: braking, cornering, or pedaling. Combining these things can lead to disaster.
Find the Line
Approach the corner as wide as possible, cut through the apex and finish wide. This is the straightest line through the turn, allowing you to carry more speed and reducing the angle of the turn making it less scary. Many people cut to the apex too early which results in excessive braking near the end of the turn and exiting slowly.
Don’t Pedal in a Corner Pedal out of a Corner
Pedaling in a corner can cause you to strike your inside pedal on the ground and send you flying. If this happens try not to panic and over correct. Over correcting will certainly cause a crash.
Once you have completed the turn and the bike is in a more upright position it is safe to hammer on the pedals again. Hopefully you remembered to shift down to an easier gear before you entered the turn so it is not too difficult to pedal out of it.
How to Steer Your Bike
There are three different ways to steer the bike: Upright steering, leaning and countersteering.
Upright Steering
Upright steering is when you turn your handle bars and keep your body and the bike as upright as possible. This is best reserved for slow speeds and dangerous conditions i.e. wet and slippery conditions. If your tried this at a high speed you would fly off your bike. Been there, done that… don’t recommend it.
Leaning
This is the most common method of steering and involves leaning your bike and body over to make the turn. Lean over more to turn sharper and make sure that you have your outside pedal at the 6 o’clock position pushing your weight through that pedal to keep traction with your tires and not causing a pedal strike.
Countersteering
The next level of steering. In order to test it out, go down a straight road, pick up some speed then push your right hand down… what happens? Initially your front wheel turns right, but as the bike starts to lean over you turn left. The sharper the turn and less consistent the turn (more bends) the more important countersteering becomes.
Position While Countersteering
Initially, you press with your opposite hand, but as you being to turn you want your inside arm straight and applying a bit of pressure to continue to turn the direction you want to go.
Lean your body over, but then lean your bike over even harder. This is not like the leaning technique where the angle of your bike and the angle of your body are the same in relation to the ground. In countersteering you lean the bike over more and your body is more upright in order to keep traction.
Try to keep your weight back and low and remember to push hard on your outside pedal that is located at the 6 o’clock position.
If you learn how to countersteer you will not regret it, it is safer and faster as it allows you to make adjustments through out the turn much quicker.
Ok! Now that we are done with the essential cycling tips for beginners we can move on to more exciting bike skills like climbing hills!
Climbing Hills
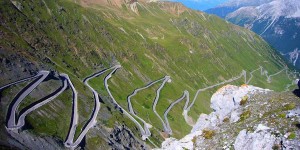 The most important aspect of hill climbing is maintaining a steady effort from the bottom all the way to the top. This is a difficult thing to achieve. If you have a heart rate monitor there is a lag of approximately thirty seconds to one minute – keep this in mind. If you are going off of perceived effort – the beginning of the hill is perceptively easy and top seems incredibly difficult at the same effort. Power meters are the only way of receiving instantaneous feedback of your actual effort.
Not everyone wants a power meter, so the best advice is:
- Start out slower than you think at the bottom of the hill
- Be familiar with the course or ride so you know how long the hill is and what type of effort is required
- Practice the hill and see what pace works for you
Cadence
You can mash or you can spin. Everyone is different, but for most people it is more efficient to spin up a hill (maintaining a cadence of 80 to 105). Maintaining this high of a cadence may be difficult in the beginning but as your fitness improves it will become more natural.
What happens if you are in the easiest gear and you are unable to maintain a cadence of at least 80? It is likely that you need to get a compact or triple crankset. Beginners road bikes can come with a triple crankset up front and it is likely you should take that option. Mashing just burns you out faster.
Position
While climbing you should:
- Sit upright in order to open your lungs for more oxygen intake to engage larger muscle groups.
- Have a relaxed grip so you do not waste energy with a death grip and cause tension to limit your oxygen intake.
- Have a quiet upper body (don’t bob your head back and forth – it wastes energy and is usually caused by mashing on the pedals instead of spinning)
- Mostly remain seated:
Standing vs. Sitting.
It is more efficient to stay seated during a hill climb than to stand; however, you can produce more power while standing.
When you stand your core does more work because your pelvis is not anchored to the saddle so your core and back muscles have to pull up on an unweighted pedal resulting in a higher energy expenditure. You also engage your arms to pull down on the bars and support yourself.
When is it beneficial to stand?
- On long climbs it is beneficial to stand to engage different muscles groups and let the other ones have a rest. Try to save this for the steep sections of the climb.
- When your cadence slows down and it is difficult to continue “spinning”.
- When cresting over top a summit to transition into a flat or descent. It can give your muscles a feeling of relief.
- When you need to go as fast as possible as it engages more muscle groups, but be careful as it expends more energy.
Mental Attitude
Mental attitude towards hills makes a big difference on how you perform. You have to stay in a positive space no matter how much you are hurting and believe you can do it. Use little mind tricks as simple as envisioning rockets on your bike and then literally say, “rockets engage!” embarrassing, but effective. Never be mentally defeated and always finish a climb no matter how slow you have to go… even if you have to walk!
Shifting Gears Properly
Gear shifting comes with experience. Shift to an easy gear too soon and lose your momentum, shift too late and you run the risk of not being able to shift at all.
When you shift down to an easier gear there is more strain on the chain and sometimes it will not shift if there is too much pressure, ease up on the pedal stroke for a brief moment to allow the shift to happen. Shifting gears becomes a “feel” thing, over time you will instinctively know how much pressure your chain can take and how brief of a moment you have to stop pedaling for.
Additionally, when you change from a seated position to a standing position you should shift up at least one, if not two gears when your foot is at the two o’clock position because when you stand your cadence slows down. You do not want to lose momentum or have the person behind you run into you.
Changing a Flat Tire
A flat tire is the most common bike repair that you are going to have to perform. Find out how to change a flat bike tire by watching this short video:
What are Good Road Bikes for Beginners?
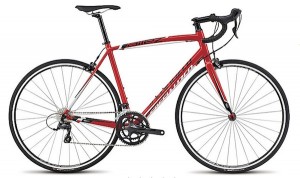
The best beginner road bike is the one you are most comfortable on! For a great list of entry level road bikes click on the link. My top pick: The specialized allez.
The specialized allez sports comfortable yet fast geometry combined with its great handling makes it the best bike under $1000. To get the most bang for your buck you want something comfortable enough to ride on but stiff enough to go fast. The specialized allez sport is the best combination of these two qualities.
Cycling Tips For Beginners
One article is far too little to scratch the surface of all the cycling tips for beginners. Below is a list of additional articles that I highly recommend you read when you have time! There is a lot to learn as a beginner!
How To Breathe While Cycling – I bet you don’t do it properly.
Finding Your Ideal Cadence – The proper cadence can make you more efficient.
Perfect Pedaling Technique – This is difficult to master but it is worth your attention.
Cycling Aerodynamics – How much does it really help?
Should I Buy a Bike Online? – If you are getting a beginner road bike and have not bought a bike before, buy one from your local bike shop! If you know exactly what you want and have tried it before maybe there is some savings online.
How to Bike Safely on Wet Roads – As a newbie this can be particularly scary, make sure you give yourself ample time to slow down as it takes much longer.
How to Stay Cool While Cycling – Overheating while you are out road biking?
The Perfect Sprinting Technique – Want to start beating people to the line?
Climbing Steep Hills – So you have nailed climbing hills, but need a few extra tips to get you up the steep ones!
Top 10 Best Cycling Books – This list of books provides cycling tips for beginners, cycling training programs for beginners, amusing reads and more.
Descending on a Bike – Trying to descend on a bike safely and quickly is an art.
Road Bike Tire Pressure – Find the correct road bike tire pressure for you.
Beginner Cycling Training
When you start out as a newbie, cycling training can seem difficult. Firstly you need to learn the Basic Goals of Training, once you know what you are attempting to accomplish then you will have a better idea of how to get there!
 Interval Training – What it is and how it works.
2×20 Interval Training Workout – This is the best workout for aerobic fitness there is. If you are training for a race longer than 10 minutes this should be your go to workout.
Beat Indoor Cycling Boredom – Find you are getting bored with training on an indoor trainer? Spice it up with these ideas.
The Benefits of a Proper Warm Up – You should always warm up before you add any sort of intensity in to your ride.
Aerobic Energy vs Anaerobic Energy – It is surprising how much more energy you use anaerobically rather than aerobically.
Cycling 100 Miles or a Century – Looking to complete your first 100 mile race?
Bonking – It is almost guaranteed that you are going to “bonk” (run out of energy and feel terrible) if you are a beginner cyclist because you will not have your nutrition needs figured out yet, nor will you have the efficiency to properly utilize that energy. Check out how to avoid bonking.
Nutrition for the Beginner Cyclist
When you start cycling, taking in the proper nutrition before, during and after a ride is likely your most important and difficult task.
 What to Eat on a Long Ride – Here is a general guideline of how much you should be eating per hour of cycling.
Ten Foods to Eat After a Long Ride – Recovery is every bit as important as the actual ride for training. Make sure you allow your body to recover properly by feeding it the appropriate foods!
Nutrition and Fueling for Cycling – An overall look at nutrition and fueling for cycling written by Canadian National Road Race Champion Scott Price.
Best Way to Lose Weight Cycling – Most of the studies and suggestions are wrong. This common sense approach to losing more weight while cycling just makes sense.
How Many Calories do You Burn When Cycling – Do you know approximately how many calories you burn while you are cycling? Here is a rough guideline to follow.
ABC’s to Fats, Proteins and Carbs – Understand what your body needs and when it needs it.
Hydration Tips – Hydrating properly is such a variable, depending on the weather conditions, effort and individual. Get a rough guideline on how to determine how much water you need during your ride.
Is the Paleo Diet for Cyclists – Want to know if the paleo diet is beneficial or harmful to you becoming the best cyclist you can be?
What you need on a long bike ride – Don’t forget the essentials!
Cycling to Lose Weight Tips – A few quick tips that will help you achieve your goals that much easier.
Cycling for Beginners – Injury Prevention
There is nothing worse than finding a new passion and then immediately being sidelined by an injury, especially if it could have been prevented!
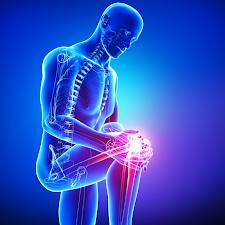
Knee Pain – This is one of the most common injuries as biking is a repetitive motion. If you are having knee pain and/or want to prevent it read this article.
Lower Back Pain – What causes lower back pain and how to solve the problems.
Stretching Exercises for Cyclists – Almost all cyclists are guilty of not enough stretching, it doesn’t matter if you are a seasoned pro or a new cyclist stretching is a great injury prevention measure that is not utilized enough.
Foot Pain – Are you getting foot pain?
Exercises to Strengthen Core – You need a strong core to be a great cyclist. Try these exercises to improve your core strength.
Post Ride Massage – The benefits of a post ride massage and how to do it yourself.
Cycling For Beginners- Bike fit
How to do a Basic Bike Fit – Learn how to do a basic bike fit so you can ride comfortably.
How to Find the Proper Saddle Height – A few centimetres too low and you will use a lot of extra energy and bring on knee pain, too high and you will sway back and forth reaching for your pedals.
Proper Cleat Position – Proper cleat position can help with alignment and endurance. Make sure to get it right.
Fore and Aft Saddle Position – Where your saddle is positioned in terms of how far forward or back it is in relation to your cranks is important for proper position and comfort.
Saddle Tilt – Important parts going numb? It could have something to do with the tilt of the saddle.
Beginner Cycling Training Plan

You know what the best cycling training for a beginner is? Just getting out there and doing it! Whatever makes it more fun! Find groups to ride with, track your rides on strava. Whatever it takes to get you out riding!
I Love Bicycling will be coming out with some beginner cycling training plans soon. Subscribe to our newsletter below to stay in the loop.
