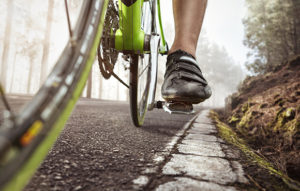
The fear of clipping in on your bike is a real thing when you’re just starting out. However, it’s not just a right of passage as you move from beginner to intermediate, but it also has some clear advantages. Riding clipless pedals allows you to ride further, faster, and over more technical terrain while giving you a smoother, more comfortable pedal stroke. The fear is well worth working through, and with these tips you can be clipping in and out like a pro in no time.

The Clipless System
First things first, what are clipless pedals? The name may seem counter intuitive, but it stems from the time when toe-clips (with a cage and strap that secured your toe to the pedal) were popular, so the term clipless was born as a way of differentiating the system.
The three part system that makes up a clipless pedal starts with the pedal itself. This has a spindle just like a normal platform pedal, but the plastic or metal platform is shaped in a way to allow the second part of the system, a matching cleat, to snap into it. A spring-loaded mechanism then secures the cleat in place so it doesn’t slide around or pull out. The cleat is then attached to the final part of a clipless pedal system, the shoe. Shoes are made specifically for these cleats to be attached to the bottom of them via bolts. This three part system works in sync to keep your foot where it should be on the pedal as well as allowing you to pull up during the pedal stroke. In this three part system, the cleats always come with the pedal as they are made to fit exclusively with each other.
Why should you clip in?
You may have heard stories of the classic slow motion tip over that happens when cyclists are getting used to being clipped in. It’s fair to say that most have experienced this somewhat embarrassing turn of events, but don’t let it deter you from taking the leap. Some of the advantages are:
- Clipping in allows you to recruit more muscles to increase pedaling efficiency. It’s not necessarily about being able to pull up as well as push down, but about creating forward momentum as you pull through the bottom of the pedal stroke.
- When you have your pedals and cleats set up properly for you, being clipped in will keep you in the optimum riding position.
- Your feet won’t slide around like they do on flat pedals.
Pedal Systems
As mentioned above, there are three variable in the clipless pedal system: the pedals, the shoes, and the cleats. There are two main types within this definition.
-
Mountain/Touring System
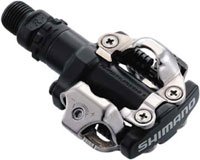
A mountain setup, also referred to as a touring setup, consists of a pedal that can be clipped in easily on both sides. The cleat, which is attached with two bolts, is a smaller metal piece that is recessed into the shoe which is for mountain and touring only. The shoe has a walkable sole with a bit of tread on it to allow for easy and functional walking. This type of pedal is the only choice for mountain biking but also is a great choice if you are riding on the road, but have frequent stops where you are walking around.
-
Road System
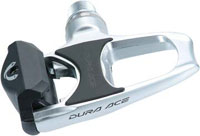
A road pedal set-up is made for road riding where walking is mostly avoided and efficiency is a high priority. Road pedals consist of a lightweight pedal that accepts a lightweight, typically plastic, cleat. The cleat is then attached to a “road” shoe with three bolts in a triangle pattern. This system creates a lighter and more aerodynamic pedal and shoe combo that is optimized for road riding.
Clipless pedals are a great way to improve your cycling and as you start to ride longer and farther it becomes a logical choice. A simple, non-high end, pedal and shoe system can actually be quite cheap and as your cycling progresses you can always upgrade. Cycling is full of technological advances and clipless pedals, although simple, provide an incredible advantage to both racers and recreational riders alike.
Getting Started Clipping In
At Home
Once you’re comfortable on your bike and have been set up with your first set of clipless pedals and shoes, it’s time start practicing. Before hitting the road (and those inevitable red lights), you’ll want practice clipping in and out. Sit on your seat and lean against something like a countertop or a wall so you can stay in place while spinning the pedals backwards.
To clip in, most systems work by first engaging the front part of the cleat, then pressing the back part down into the pedal. Once clipping in, try spinning your legs backwards and getting a feel for being clipped in. Next you’ll want to practice getting out the pedals. Try twisting your heel out, disengaging the pedal from the cleat. This should be fairly easy, so if you find you are really having to put in all your effort to unclip, then you will need to find the tension adjustment and back it off a little.
On the Road
Starting out, find a flat to slightly downhill stretch to get rolling on. With one foot still on the ground, clip the other into the pedal and bring it to the top of the pedal stroke. Then push off with the foot that is on the ground and give a big push of the pedal with the foot that’s already clipped in. Now you will have some momentum and can now clip in your other foot. Make sure this is on a safe stretch of road or area as you won’t be paying attention to traffic, but can focus on your feet.
Now that you have both feet clipped in and have taken a couple of pedal strokes, it’s time to unclip. While coasting put one foot down to the bottom of the pedal stroke and unclip (twisting your heel out). Now you can come to a stop and put your foot on the ground.
Now do the above again, and again, and again. You want to be comfortable finding your pedals and getting clipped in quickly as well as unclipping. During your first few rides you will have to focus on clipping in and out, but once you do it enough it will become a habit and you’ll find you will think about it less and less.