Installing a bike chain is routine maintenance for road and mountain bikes. Chains travel countless times over sharp gears, often under a heavy load. Chains have hundreds of parts that wear out because of dirt, gunk and attrition. Some manufacture’s recommend a chain replacement every 1,000 miles or once a year. Others say 2,000 miles is adequate. It’s a simple task that any cyclist can accomplish on their own with the right tools and know-how.
Bad Chains
If you ride hard, ride in dust, mud or water, you may need to replace your chain frequently. In some cases, there’s a warp or bulge you can’t see, and the chain eats away at the teeth of your rings, gears and derailleur. Keep an eye on your chain for any of these issues. If you’ve recently repaired a chain, plan on replacing it the first chance you get.
Check for Bulges
When working with any chain, new or old, bear in mind that the majority of chain failure is because one of the pins was improperly installed whether it be the manufacturer or when the chain was installed on the bike. Contemporary chains are very narrow and even the slightest misalignment can cause the chain to fail under load. Check all the links by examining each and every pin for bulging at the side plates just as a precaution.
Chain Anatomy
Chains are made up of a series of inner plates, rollers or bushings, a rivet (also call a “pin”) and outer plates. The pin or rivet presses into both outer plates, but the rivet slides freely through the inner plates and roller. Chains should have a small amount of play at each link — even when brand new. As you ride your bike, the chain wears down the rivets, and the free-play at each link increases.
Stretch Versus Play
Chain elongation is sometimes mistakenly referred to as “stretch,” although the plates do not literally become longer. Stretch is nothing more than tiny, accumulative increments of wear that have added up. A worn, elongated chain will not engage the cogs correctly, and will eventually slip over the cog teeth when pressure is applied, this is known as “skip.”
Chain Measuring Tool
Use a chain measuring tool to check chain wear. This is routine in all bike shops. If the measurement is less than 1/8-inch, you might get by with using it a while longer. If it’s more than that, it needs replaced to prevent premature wear on your drivetrain. Another way to measure “chain stretch” is to measure exactly one foot. The center of the pins should line up on the zero and twelve inch mark. If the twelve inch mark falls more than an 1/8 of an inch past, it’s time to replace your chain. If the chain is excessively long, you may have to replace the cassette as well and in rare cases, the chain-rings.
Installing a Bike Chain – Measure Up
Remove the old chain from your bike. If it’s broken already, skip this step. Remove the new chain from its packaging, and stretch both chains parallel to each other on the floor or a worktable.
Don’t Measure Up
You will likely notice that the links on both chains at the far end don’t line up exactly — it’s because the old chain is worn and has elongated. Match the chains so your new chain has as many links as the old one. Do a double check and count the links on the old chain before “breaking the chain” to the length you need. Both chains should have the same number of links. If you don’t have the old chain to compare to, put the chain around the big chain ring in the front and the largest cog in the back on the cassette. The derailleur should be swung nearly as far forward as it can go. Mark which link lines this up and that’s how long you want your chain. Another way to test this is to put the chain in the little ring upfront and the smallest cog in the back. The chain should still have tension on it when you line up the chain with the link you just marked. If it’s excessively slack, you’ll need to take an additional link out.
Installing a Bike Chain – Think About It
Now consider how the ends of the new chain must fit together. Depending on what type of master link you’re using, you may need two inner links, or an inner link matched with an outer link. Generally speaking, you don’t want two inner links facing other, nor two outer links — you want an outer link on one end, and an inner link on the other. Take your time, examine your master link, and what you need to match up to get the chain joined the right way.
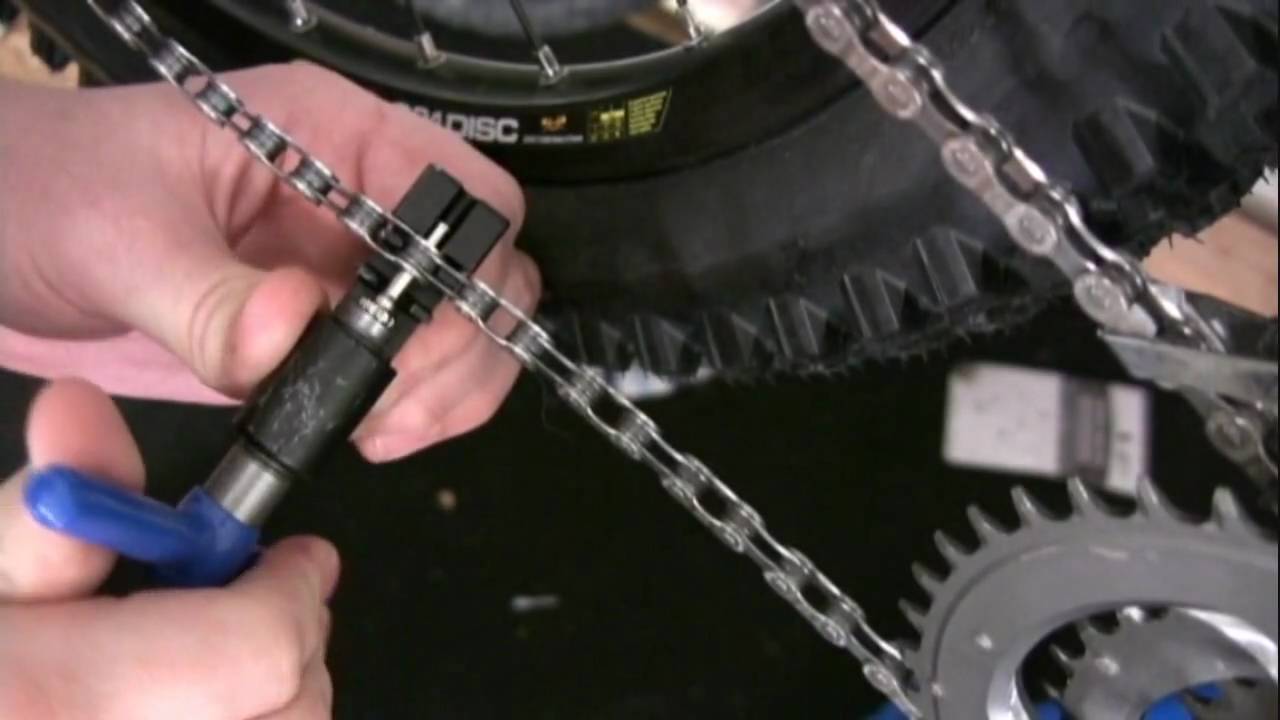
Break the Chain
Once you’ve got everything figured out, and have marked the length of the chain, break the new chain at the desired link using a chain breaker tool. Place the chain breaker on the chain and push the pin through the hole and all the way out the other side.
Connecting Pin Versus Master Link
There are two ways that chains can be connected. The first is a master link that attaches over two inner links and snaps into place. The second method is using an extend pin that you push through the link holes. These have a recessed point that’s designed for you to break off when the pin is pushed through to the center of the link.
Installing a Bike Chain – Thread on The New Chain
Shift the bike into it’s smallest gears on the front and back. Prop the bike against a wall, or place it in a bike stand. You can also place the bike upside down if need be for improvised working. If you can’t remember how the chain threads through the derailleur, use another bike as a model. It’s advisable, if you haven’t removed the old chain yet, to snap a picture and use it for reference.
Installing a Bike Chain – Chain Routing
Route the new chain through the derailleurs and over the smallest gear in the back while just letting the chain fall to the inside of the front gears to keep tension at a minimum. Pass the chain on top of, then in front of the upper pulley, then straight down to the bottom pulley. The chain passes behind the bottom pulley, then forward under it. After you’re sure the chain runs through the derailleurs properly, line up the links to attach them together either with a connecting pin or master link. If using a connecting pin, a pro-tip is to install it from the back side (from the wheel side). You insert the smaller diameter side first which pushes through the link and out the other side. This piece is then broken off which can leave a slight edge but if it’s on the outside of the cassette, it won’t catch on the gears to the inside. If you push the pin through too far, simply break off the outer pin and push the pin back in a little from the other side.
Slightly Stiff
Note that the newly joined link will likely be slightly stiff, that’s fine and to be expected. Work the repaired link up and down, and side-to-side until it bends freely. After the chain is properly installed, shift it through the gears and make sure the stiff link is worked out and that the connecting pin, if used, is properly aligned without any of the sides sticking out of the chain. Working with chains is for some reason, particularly fun and rewarding. Don’t be intimidated. Get an old chain and practice breaking it with a chain breaker before you install your new chain if you’re unsure — you’ll get the hang of it.