• Training
    • Injury Prevention
    • Training Tips
  • How To
    • Bike Fit
    • Gear
  • Nutrition
    • Nutrition Tips
    • Weight Loss
  • Repair
  • Reviews
  • Stories
    • Funny Stories
    • Jokes
    • Quotes
    • Videos
    • Funny Videos

I Love Bicycling

I Love Bicycling is a website that is geared towards cycling for beginners with road cycling tips, training articles, nutrition tips, weight loss, how to’s and bike repair articles.

How To

  • Bike Fit
  • Gear

What To Do If Your Bike Is Stolen

July 21, 2019 by Sarah Lauzé

Picture this: you come out of your house, the coffee shop, or work to find your beloved bike is missing. You’ll most likely stare in disbelief, willing it to reappear before your eyes as that sinking feeling settles into your stomach. Having your bike stolen is a terrible feeling, but unfortunately it’s a common one for cyclists around the world. Once you’ve accepted the fact that this has really happened, then it’s time to take action. No time to despair about the condition of humanity or reminisce about all those good times you had with your trusty ride. There may just be some hope at the end of the tunnel– here’s what to do if your bike is stolen.

What To Do If Your Bike Is Stolen

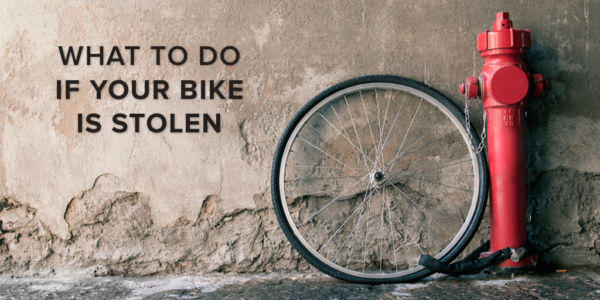
What to do if your bike is stolen

Step 1: File a Police Report

You need to gather as much information as you can and either have an officer come take down the report, or head to the nearest station and do it yourself. You’ll need the make, model, and colour of your bike, as well as the serial number. If you don’t know your serial number, go take a look right now! Take a photo of it, write it down, and make sure you never lose it. If your bike has been stolen and you don’t have the serial number it will be much harder to track your bike down with absolute certainty. You should also include some photos of the bike with any distinguishing features with the report. Check the area for any security cameras that may have a view of where the theft took place, and see if you or the police can gain access to them.

Step 2: Register the Bike Online

The internet is a wonderful tool that needs to be used to your advantage at this time! See if there are any local registries available to you, and also put your bike up on Bike Index or SafeBikes.org. You’ll want to include the same info you included in the police report, being as detailed as possible. These databases can be used by police, and individuals to keep an eye out for your bike. Before you buy a secondhand bike, it is always a good idea to check online databases to ensure the bike was not stolen.

Step 3: Search Local Ads

This can be a full time job, but it can pay off big time. Keep an eye on Craigslist, local buy and sell groups, and any other platforms that a thief may use to try and sell your bike. Check out local flea markets and pawn shops. If you happen across your bike, don’t accuse the seller! Try to get as much information (address, phone number, etc) from the seller before handing it over to the police.

Step 4: Get Social

Spread the news about your stolen bike on all your social channels. The more people who are aware and can keep an eye out, the better chance you have of recovering your bike. Share a photo of you and your bike and get your friends to share it. These things can really pick up momentum, making it difficult for the thief to get away with selling the bike online.

Follow these steps and you may just be reunited with your bike. If not, it is a major setback, but don’t let it taint your love for the sport. Check out some of the things you can do to prevent your bike from being stolen, and always remember to write down your serial number!

Preventative Steps

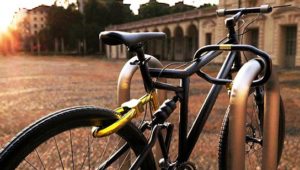
Step 1: Use a quality bike lock

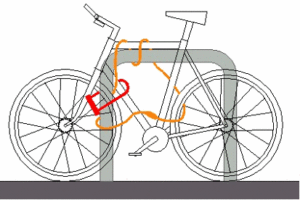
When you’re buying your bike, helmet, and everything else, a bike lock can be low on the priority list. Don’t be tempted by cheap bike locks! You’ll suffer a much larger loss if your bike is stolen, so do your research on some of the best bike locks out there. You typically want to stay away from thin cable locks.

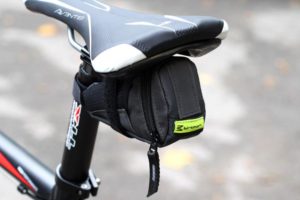
Step 2: Always secure your bike before you leave

It’s tempting to just lean your bike up outside the store if you’re running in for some milk, but it only takes a couple seconds to steal a bike. Always lock your bike up, or better yet bring it inside with you whenever possible. As for at your home or apartment, always keep your bike either inside a shed or a bike lock up. Using a bike cover can also help your bike keep a low profile should bike thieves be scoping the area.

Step 3: Strava safety

If you are a Strava user, use the settings to create a privacy perimeter around your home or work place. You don’t want these places showing up on your ride maps as your start and finish points, as that can be an easy target for bike thieves. If you commute to work everyday, switch up where you leave your bike so it is less likely to be noticed and targeted.

How To Choose Bike Stem Length

June 24, 2019 by Sarah Lauzé

When viewed in the context of an entire bike, stem length is one of the more minor adjustments you can make. That being said, it can affect the overall feel and handling of your bike in some not-so-minor ways.

Historically, stems were not adjustable or interchangeable. It wasn’t until the late 19th century when Marshall Taylor invented an adjustable stem, using a sliding clamp to move the handlebars towards or away from the rider. Now bike stem length can vary from 50mm all the way up to 150mm and beyond.

Every part of a bike is connected. So, swapping out the stem on a wrong sized bike can be a quick fix, but you have to take into account that it will effect the bike’s overall feel and handling.

Bike Stem Length

What should decide bike stem length?

The first thing you need to look at is not your bike, but your own priorities when it comes to:

  • Comfort
  • Performance
  • Steering and handling

Generally speaking, race bikes that place the rider in a low, aerodynamic position will need to have a longer stem. This also works to get more weight out in front of the wheel. In contrast, touring bikes will have shorter stems to keep the rider in a more upright position and provide responsive steering at slower speeds.

When choosing bike stem length consider:

1. Weight Distribution

Stem length dictates how much weight is placed on the front wheel . The longer the stem, the more weight will be pushing forward on the bars, making the bike more stable at high speeds. This can, however, make for a less responsive feel.

Bike Stem Length

2. Steering

The steering of a bike is dictated by the head angle and trail, but the length of the stem can enhance or dull these effects. Short stems steer more like a steering wheel, providing immediate response, but can cause a twitchy feel. The longer the stem, the slower the handling can be, making it more difficult to steer at slow speeds, but more stable at high speeds.

Reversing the Stem

Reversing the stem is one of the most effective ways to make your bike more comfortable as it raises your handlebars to a more comfortable position. The majority of stems can be flipped as they are angled for two handlebar heights.

One position is aggressive and flat, the other is angled upward for a more upright torso which can alleviate stress on the lower back as well as the amount of weight on the hands. Take a look at your stem. If it has a high degree of tilt in either direction, it can typically be reversed depending on what you need to get comfortable.

The Long and Short of It

Bike Stem Length

Getting the right bike stem length can make a huge difference to how you feel on your bike. You may be surprised at the difference even 10mm can make! If you have persistent numbing in your wrists or hands, it could be that the stem is too short. In contrast, if you are too stretched out, it can cause injury to your back.

Stem length needs to be looked at in relation to the bike size and geometry, and there is no definite answer of what would be best for you. It is a very individualized thing, and you have to look at your priorities before deciding to switch out your stem. Before experimenting with it too much, visit your local bike shop or try getting a profession bike fit to ensure everything is adjusted just right for you and your riding style.

What is Drafting in Cycling?

June 22, 2019 by Sarah Lauzé

Drafting in cycling is one of the many benefits to riding in a group. You can go faster than you would otherwise on your own with much less effort. You get the rush from the speed as well as the motivation from all the other riders around you.

Some riders do nothing but group rides where they consistently get to draft, while other riders ride on their own. In terms of what’s more fun; that’s your personal preference. However, getting to experience both can go a long way in making you a better cyclist.

Drafting in Cycling

What is Drafting in Cycling?

A group of cyclists will ride in a close line one behind the other, taking turns riding up front (pulling) before peeling off and latching onto the back. When you draft like this, by tucking in close behind another rider, you expend less energy, with up to 27 percent less wind resistance.

The Physical Benefits

You may think that all sitting on a wheel does for you is to allow you to pedal easier. While this is true under certain circumstances, such as sitting on a wheel for an endurance or easy ride, you can also ride much harder while drafting when the group is going full-tilt. You will have more periods of time where you are soft pedaling or coasting, but that will then be followed with pedaling harder than you otherwise would.

If you have a power meter, your power profile will look like your heart beat profile; spiky up followed by spiky down. If you have been riding on your own a lot and then hit up a local group ride or race, you will be able to tell that your legs aren’t used to the high/low effort. In addition to the spiky profile, you will also most likely be spinning at a higher cadence.

The more you ride in a group the more your muscles are going to get used to this type of riding. In addition to getting used to it, you are also going to generate more speed in your legs. You legs will simply be used to pedaling faster. When riding on your own, this translates to faster speeds. Your muscles adapt to the load that they’re placed under. If you ride at a steady effort all day, then your legs will get really good at that but when you try and go harder, your legs aren’t used to the effort and can’t do it again and again. Building the muscle fibers to be able to handle the up and down efforts will help your cycling all around.

The Psychological Benefits

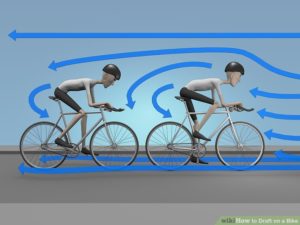
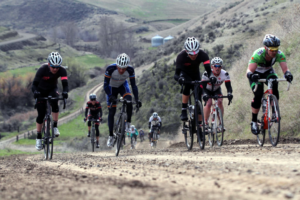
Drafting in cycling on group rides or in races also plays tricks on your mind. Have you ever gone out and ridden on your own, perhaps to a group ride, and felt like you couldn’t push yourself? And then when you get on a group ride, you feel like superman or superwoman? This is because 90% of riding is
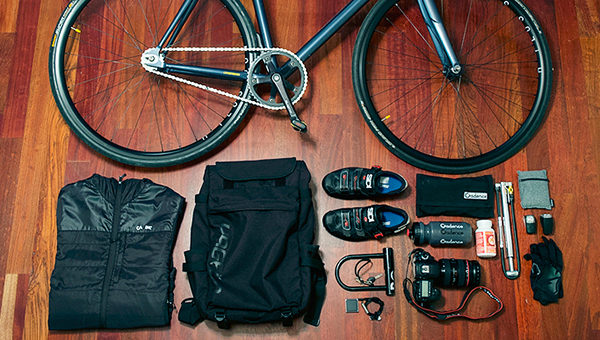
 mental.

Your brain tells your body what to do and your brain tells you how your legs feel. The other people in the group, along with the speed and rush, gives your brain an added jolt of adrenaline and epinephrine which gives you an extra edge along with feeling good mentally. This psychological switch when you’re riding in a group is very difficult to simulate on your own. Up-beat music can get you part way but riding with others will always bring out your best performance.

Should You Include Drafting in Cycling Training?

Because drafting in cycling has such a large psychological and psychological affect on your body, it is recommended that you incorporate it into your riding at least once a week and up to three times a week if you are really looking to excel in group rides and races. If you are training more seriously and doing intervals, they have an important place, but in-conjunction with group rides. You are going to push yourself harder and go deeper than you ever would be able to on your own during intervals regardless of how mentally tough you are. Simply when you start to get tired your body no longer wants to push as hard as it’s capable of but on a group ride you will make yourself go cross-eyed even when you’re past being kaput.

While riding on your own can improve metal toughness and the ability to push through on your own, riding in a group brings out what you never knew was there. Riding around other people in such close proximity at high, adrenaline inducing speeds, allows you to push harder than you ever thought possible. Taking advantage of training on your own while in conjunction with group rides at the right times, even if your particular event is done solo, can bring additional benefits to your training.

The Essential Cycling Accessories

June 18, 2019 by Sarah Lauzé

Cycling can be an intimidating sport to get into, especially when you walk into a bike shop with no idea where to start. You may see a ton of kitted out riders with all the bells and whistles, but you really don’t need much to get started. The essential cycling accessories can not only be affordable, but can last you years to come.

Essential Cycling Accessories

What you need:

1. A Bike

Okay, this one is pretty self explanatory. Check out this article on “How to Choose Your First Road Bike” for more information.

2. A Helmet

The second most important piece of equipment after your bike should be a helmet. Whether you’re doing a five minute commute to work or heading out for a couple hours, never get on your bike without a helmet. There is not doubt a helmet can save your life, so ensure you get one that is a proper fit. On a side note, don’t be tempted by the UFO-looking aero helmets, unless you are a professional, you really don’t need it!

Core Accessories

These items may not be absolutely necessary, but they can definitely make cycling more enjoyable, especially when you’re just starting out.

A Bike Lock

Unless you plan on only riding from your house, and never stopping out on the road for a coffee or snack, then you’re going to need a bike lock. You may think the bigger the better, but the size of the lock is less important than the functionality. There are dozens of different bike locks on the market, so be sure to invest in one that can give you peace of mind when you have to leave your bike.

Cycling Clothing

Obviously you don’t need to go all in with the lycra to go on your first ride, but a couple staple items will make the experience a lot more comfortable. First is a waterproof jacket or shell that can keep you dry and warm even if the weather takes a turn for the worse. The second a solid pair of cycling shorts with a good chamois. These will feel awkward at first (kind of like wearing a diaper), but they allow you to feel more comfortable, powerful, and in control while on the bike. Cycling shorts will also allow you to ride for longer periods of time without discomfort or risk of saddle sores.

Many cyclists claim that you have to go with clipless pedals and cycling shoes to ensure efficient riding. True, this system does help you with power transfer, and can be a big step in improving your cycling, but you don’t necessarily need to start with them. Besides, the idea of being clipped into the bike can be daunting for a lot of beginners, so take you time and grow into the idea as you become more confident in your cycling skills.

Pump, Spares, Tools

You won’t want to have to end your ride and take your bike into the shop every time you get a flat. You’ll need both the tools and the know-how to take care of some of the most common bike fixes. A good tire pump, multi tool and spare tubes (if you have clincher tires) will go a long way to keep you out on the road. For some basic maintenance and repair, check out “101 Best Bike Repair and Maintenance Tips.”

A Water Bottle

Staying hydrated on your bike is key to both how you’ll feel and can affect your overall health. Ensure you always have water with you when you head out on a ride, whether in the water bottle and cage system, or a hydration pack.

A Saddle Bag

If something goes wrong on a ride and you’re stuck without tools and supplies, you’re walking or calling for help. It’s not so much having a tool for each and every issue, it’s about having the right tools and supplies to get you back on the road again. A saddle bag is the easiest way to carry all the essentials to keep you rolling.

Cycling Cap

A cycling cap is for both function and style. It keeps the sun out of your eyes as well as sweat and rain, and winter caps can keep you warm on a chilly day. Also, if you use your bike for commuting around town and are worried about having hemet-hair, a cycling cap can be a great lightweight fix.

Cycling Glasses

You may have a pair on sunglasses you’ll wear on those bright, summer days, but wearing glasses while on your bike can do more than shield from the sun. Glasses help break the wind when you’re riding, preventing eye irritation. They also work wonders to keep bugs, rain, and other debris from smacking you in the eyeball (which is not a pleasant experience). Many cycling glasses will come with interchangeable lenses, so you can wear the same pair no matter what the weather.

Wide Cycling Shoes: Finding the Best Fit

June 3, 2019 by Sarah Lauzé

If you have wide feet, you know the feeling. A numbing pain and screaming pinky toes that have had enough of being crushed into the side of an ill-fitting cycling shoe. The good news it: you’re not alone. There are specifically made wide cycling shoes to cater to your aching toes.

Clipless pedals are a must when it comes to efficient pedalling on a bike, but their coinciding cycling shoes can be a little unforgiving. Unlike regular shoes, cycling shoes are rigid, most often made from materials that do not stretch out over time. So, if you’re feet measure somewhere in between hobbit feet and flippers, then here are some of the best options out there.

Wide Cycling Shoes

Before You Buy New Shoes

Wide Cycling Shoes

Getting a pair of specific wide cycling shoes, or at least a brand that has a bit more breathing room, is going to be your best option. However, before you make the investment, make sure you’ve tried everything to make your current shoes work.

  • Try ultra-thin socks – Assuming it’s not below freezing where you’re riding, trying a super thin pair of socks could help create enough space in your shoes to make them work. Check out Castelli’s line of thin cycling socks, or Swiftkick Aspire. Even if they don’t fix the shoe problem, they are great cycling socks to have.
  • Get a bike fit – Make sure the problem really is being caused by shoes that are too tight, and not an improper bike fit. If your cleats are not in the right spot, or if your saddle isn’t adjusted properly, it can cause pain in your feet. It’s worth a visit to your local bike shop for a bike anyways if you haven’t had one.

Finding The Right Fit

If you’re buying shoes in a store, you can actually take the insole out and measure it against your foot if you’re not sure how the shoe should feel. Your heel should be right at the back of the insole, and there should be 3-5mm from the end of your toes the top of the insole.

If you’re buying online, you will need to measure your foot. Get a regular piece of paper and put it on the floor, right up against a wall. Place your foot on the paper, with your heel pushed against the wall. Draw a line at the end of your big toe. Measure the length in cm, and add 5mm to the number to establish the length of shoe you need. You will also want to measure the circumference of the widest part of your foot. You can then reference these numbers with sizing charts from the manufacturer you choose to buy your shoes from.

Wide Cycling Shoes

It can be tempting to just go a size bigger when you’re purchasing cycling shoes for some extra room, but this can actually cause even more problems. The extra length may feel good on your toes while you’re in the store, but it will cause your feet to slip within the shoe when you’re clipped in. Not only will this feel awful, but it can cause your cleat to be placed too far forward, taking a toll on your power and efficiency.

That being said, there are shoes made specifically for wide feet that will ensure your toes are nice and comfy, but keep your foot is locked into the correct position. See the following for some of the best options out there.

Shimano Men’s RP3

Wide Cycling Shoes

$109

Shimano has the most options when it comes to the wider fit, offering regular and wide sizes on most of their shoes. The Shimano RP3 cycling shoes are a great entry level shoe, with a fiberglass reinforced nylon sole and three adjustment points for the perfect fit.

Lake CX 237 Wide Road Shoe

Wide Cycling Shoes

$289

Exactly the same as the CX237 shoe, the wide version gives an additional 15mm wiggle room compared to the regular width. With a carbon sole, and two micro-adjustable Boa dials, you have the ability to make adjustments to the fit of the heel and forefoot so you get a secure fit without sacrificing your circulation.

Bont: Riot or Vaypor

Wide Cycling Shoes

Riot: $99

Vaypor: $199+

They may be harder to find, but Bont Cycling has a few heat-molding shoe options that make them popular for those with wide feet. The Riot and Vaypor models both offer a custom fit through heat-molding that can be repeated until you are happy with the result.

Shimano R321

Wide Cycling Shoes

$299

The Shimano R321 was released in 2016 with heat moldable Custom-Fit technology applied through to the upper, insole, and heel cup. This does not, however, allow for a widening of the shoe in general, so they have a wide version available in each size. The sole construction itself gives an extra 11mm of adjustment range, so you can find the ideal shoe-pedal connection.

A Guide to Bike Tire Sizes

March 16, 2019 by Sarah Lauzé

When you’re looking to replace a tube or tire, it’s important to understand tire sizing. You’d think the markings on tires would make this simple, but all those numbers can be confusing. It doesn’t help that in the early days of cycling, there was no standard system for marking the sizes. Here’s what you need to know about bike tire sizes.

Bike Tire Sizes

A Guide to Bike Tire Sizes

Traditional Sizing Systems

The traditional sizing systems were based on the measurement of the outside of diameter of the tire, so it would be listed as diameter x width. However, the evolution of tires and rims has made these measures inaccurate when it comes to compatibility. Each manufacturer had their own set of sizing standards that only applied to their bikes, so it was hard to buy tires, tubes, and wheels from different manufacturers with confidence that they would be compatible.

The ISO

To remove the headache that was trying to decipher manufacturer’s varied measurements, the International Organization for Standardization (ISO) created a system to regulate tire measurement. Most new tires will now show the ISO measurement of: width x diameter.

Tire Diameter

The most important measurement of the tire is the diameter, then the width. The actual outer diameter of the tire may vary based on the tread pattern, so the BDS (bead seat diameter) is the measurement of the inner diameter of the tire. You can find this measurement on the side wall, where you should see two numbers separated by an x (ie: 700×23 or 26×2.10). The BDS is the larger of the two numbers, listed in either inches (700) or mm (26).

Tire Width

The second, smaller number is the tire’s width. As the width increases, the tire will have more contact surface with the road, making it more stable and comfortable. As the width decreases, there is less rolling resistance or friction, and therefore is faster. Road bike tires generally come in three widths: 23c, 25c, and 28c (their width in mm). The letter at the end of a tire size is a throwback to an old French system when the letters a, b and c designated different inner tire diameters – it DOES NOT stand for cm.

When it comes to choosing width, there are two major factors at play. First is what will fit your bike and wheels, and second is what best fits your riding style for comfort and speed. Generally speaking, a width of 25mm will work for most riders. They are widely recognized as the best compromise between comfort, weight and performance. Racers will opt for a smaller width, or if you’re tackling rougher roads, going up to 28mm may be the best option.

In most cases, if you’re replacing a tire you can just look at the numbers on the old one and match them. However, this can become an issue if the old tire isn’t available, or if you’re not sure which number to go off.

For more on bike tire sizing and ensuring you choose the right one, check out the video below.


A Guide To Spring Cycling Clothing

February 28, 2019 by Sarah Lauzé

It’s an exciting time when the snow starts to melt off the roads and the look of bare pavement has you dusting off your bike. Spring riding can be some of the best of the season, but the unpredictable weather can present a bit of a challenge. When it goes from sun to rain to snow within the span of a couple hours, dressing for the elements takes some planning. Your spring cycling clothing list will look a little different than any other time of year as it needs to be adaptable.

As with most things, there’s no ‘one-size-fits-all’ solution. It depends on your type of riding, how long you’re going for, and how hot or cold you typically are when on your bike. Layering is the best way to ensure you can stay warm enough, but also won’t overheat if the temperature rises while you’re out. If you do get too warm, you can simply peal off a layer and continue on.

Main Articles of Spring Cycling Clothing

Base Layer

If you’ve been rocking a long sleeved base layer all winter, it may be time to switch it out for a short sleeved. Combined with a jersey and arm warmers, a light base layer can be just enough to keep your core warm. It also serves to wick moisture away from your skin to avoid getting chilled when you hit a descent.  Try choose a base layer made from polypropylene or merino wool, like the Castelli Seamless Base Layer.

Long Sleeved Jersey /Lightweight Shell

Depending on your preference, you’ll likely switch out the thick winter coat for either a lightweight shell or a long sleeved jersey. A long sleeved jersey is a great option for those warmer days as it offers much more breathability. There are also options in material that include a wind breaking fabric. Most will offer a full zipper down the front, making it easy to take on or off, and three pockets in the back to stash your snacks. A light weight shell can be worn over a regular cycling jersey, and rolled up into a pocket when not needed.

Arm and leg warmers

These simple Lycra accessories are great if you’re cold when heading out, but know you will be heating up quickly. They are easy to take on and off, and roll up small for easy storage in a jersey pocket. You’ll want to try them out before hand and make sure the fit properly. They need to loose enough to be comfortable, but tight enough to stay in place (especially important for leg warmers).

Gloves

Time to ditch the winter gloves and opt for a lightweight pair that won’t have your hands sweating 10 minutes into your ride. A lightweight, breathable pair of gloves are just enough to keep your fingers warm on that chilly morning commute.

Cycling Cap

A cycling cap is for both function and style. During spring riding, it can keep your head warm and help keep rain out of your eyes. Click here for some of the best cycling caps out there for every type of rider.

Ensuring you are prepared both technically and physically with the right clothing will have you jumping into the cycling season in no time. Spring riding can be some of the best rides, so don’t let the conditions deter you from getting out there!

What is a Gravel Grinder?

January 10, 2019 by Sarah Lauzé

It can be easy to get stuck in a cycling rut, riding the same routes over and over. Some consistency can be nice. It helps you get into a routine, but it never hurts to try something new. This year could be the year you take the rougher roads and check out some new scenery. Riding dirt and gravel roads expands your horizons, and can be a lot more fun than you think. You may have heard the term “gravel grinder” being thrown around – here’s what you need to know before jumping in wheel first.

Gravel Grinder

What is a Gravel Grinder?

First things first, what is a gravel grinder? A gravel grinder is a race or ride that typically combines riding on a variety of surfaces including asphalt, gravel, dirt, and even some single track. As this niche has become increasingly popular over the last couple years, there are a ton of events to choose from. Distances vary from 50 – 150+ miles, and the routes themselves from hard packed dirt roads to rocky and rough terrain. Think of it as the bridge between mountain biking and road biking. It gets you off main roads, into the wilderness (in most cases), but doesn’t require a ton of commitment in the form of equipment.

Step 1: The Gear

Although there are a ton of gravel specific bikes available, you don’t necessarily have to get one to give gravel a try. These bikes are similar to cyclocross bikes, but with geometry similar to touring and mountain bikes. Think less twitch and more stability to get you over those rough patches.

If you already own a cyclocross bike, then that will be the closest thing to a gravel bike. However, you can make a road or mountain bike work as well. The compromise with a road or cyclocross bike will be related to tire selection. With mountain bikes it will be the aerodynamic drag. That being said, having a bike you’re used to riding and are comfortable with can make your ride a whole lot easier. Lots of riders do gravel grinders on mountain or even fat bikes, although doing so will most likely take you out of the running from a race standpoint.

Step 2: Be Prepared

Flats

Your choice of tire will depend on the event or ride that you’re hoping to do. For most gravel grinders you’ll find a 700×38 or 700×42 semi-slick tubeless tire will be best. Regardless of the condition of the dirt road you must be prepared to flat. The best preventative is riding tubeless where there’s no risk of pinch flatting and the sealant inside the tire quickly fills any small punctures. And then if you flat you simply install a traditional tube. If you are running a tube, make sure you put an extra five or so psi in the tire to help prevent pinch flats, but this will make for a rougher ride. With riding gravel you should also bring a couple spare tubes as well as a patch kit.

Water Bottle Cage

One thing that is not often thought about when riding gravel is that it is much more likely for your water bottles to eject from your cages. If you haven’t planned ahead, take a big swig out of both bottles so they are not full as well as leaving the pop-up top open. This will cause the bottle to become slightly less rigid and have a lower chance of flying out. If you plan on riding dirt on a regular basis, invest in a few water bottles that are softer and easier to squeeze. The cheap, hard bottles are easily ejected. If you have standard metal cages you should bend them in slightly. You will have to pull a bit harder to get the bottle out when you want a drink but it will keep your bottles firmly secure.

Clothing

You’ll want to dress in a way that you can adapt to ever-changing conditions. If the race is in the spring or fall, then you definitely need to layer up so you can take whatever comes in stride. Depending on the length of the race, you’ll also need adequate food and water. You could carry this in a backpack, but the weight on your back could get tiresome 80 miles in. A frame bag could be a great investment to carry those must-have supplies.

Step 3: Train

Long Rides

Training for a gravel grinder event is more often about becoming accustomed to long distances and riding rough roads then it is about speed or pure fitness. The most important thing here is that you are comfortable on your bike. The appeal of these events is the adventure of it, so start preparing mentally for a variety of terrains. Some will be a ton of fun, others…not so much. It will also take you much longer to cover certain distances on gravel then it would on pavement. If you’ve never ridden gravel before, then you’ll want to put in some serious miles on rougher roads to get a feel for the handling of the bike and to hone in your technique.

Hill Work

Climbs are tough enough on pavement, so add in the element of loose gravel and your muscles will need to be ready to make it through. Do plenty of hill work in your training rides to build up those climbing muscles. That way you’ll have plenty of power when it comes to the race.

Navigation

Navigation can be an aspect of gravel grinders that will intimidate first-timers, but it’s not that hard once you have a system down. Most race organizers use cue sheets to navigate riders, which you have to carry with you and, more importantly, understand before you head out. These cues are organized by mileage, so you’ll need an accurate cycling computer or GPS to stay on track.

Riding gravel can be one of the best ways to have fun on the bike, but you can also get stuck starting at the road for miles on end as you’re trying to avoid other riders and obstacles on the road. As you get more comfortable, remember to lift your head up, look around, and enjoy the ride!

When to Shift Gears on a Bike

December 28, 2018 by Sarah Lauzé

If you don’t know when to shift gears on a bike, it can cause a whole lot of frustration. Those unpleasant clunks or grinding noises at the wrong moment mark that you’re struggling when you don’t need to be! You don’t just need to know how to shift your gears (although that is important), but also when. Learning to use your gears efficiently can make all the difference in your cycling progress.

Not only will knowing when to shift gears on a bike make you a faster rider, but it can also prolong the life of your chain. Here’s what you need to know about finding that perfect gear for every terrain.

when to shift gears on a bike

What are bike gears?

Bike gears are the aspect of the drivetrain that determine the speed (cadence) at which you’re pedaling and the rate at which the drive wheel turns. Some bikes are fixed gear, so there is only one gear. However, the most common combination is three chainrings with nine gears in the back, for a total of 27 gears. These gears determine how hard (or easy) it is to pedal, and therefore dictate your speed.

How to use your gears

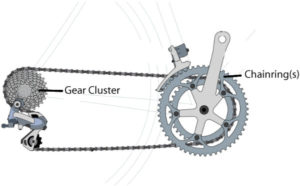
If you are totally new to cycling and aren’t sure how to physically change the gears, check out our article on “How to shift gears on a bike.” This will walk you through different types of shifters, and how each system works.

The left-hand shifter or lever will control the front derailleur, guiding the chain over the chainring by your pedals. On this front end, the bigger the chainring, to more resistance you’ll have. You want to use these sparingly, keeping them for major changes in terrain.

The right-hand shifter or lever controls your rear derailleur, guiding the chain over the back gears or cogs. On these back gears, the bigger the cassette, the less resistance you’ll have. These are your fine-tuning gears that you will be using a lot more.

Using bike gears efficiently

The most common mistake beginners make is to grind away in too hard of a gear. This is not an efficient use of energy, and you’re legs will tire a lot more quickly.  The general rule is to keep a steady pedal stroke that isn’t either too slow and hard, nor too easy and fast. Finding the right gear for what you’re comfortable with along with the type of terrain your riding will come with practice.

3 Benchmark Gears

  1. Low Gear – Also referred to as your climbing gear, low gear is the easiest the gears can be on your bike. This means your front gear is on the small chairing, and your back gear is on the largest sprocket.
  2. Middle Gear – This is your everyday gear for rolling terrain. There is enough resistance so you can cruise at a modest speed, but not too much as to slow down your cadence too much. This means being on the small chainring on a double or a compact, and the middle chainring on a triple. The back gear will be hovering around the middle sprockets, adjusted according to any changes in terrain.
  3. High Gear – This is for the fun parts. This will keep your legs spinning and the bike accelerating as you descend, or for pushing yourself as fast as you can on flats. The front gear will be on the big chainring, and the back will be on the smallest sprocket.

Don’t Cross the Chain

Avoid using the large front chainring simultaneously as the largest rear sprocket as this can cause your chain to slip or not shift properly. This is referred to as “crossing the chain.” Try running through the majority of your rear gears before touching your front chainrings.

The first step towards using your gears efficiently is to take a look at your cadence. Once you get a feel for what a proper cadence range feels like, you will start to pick gears that will keep you within that. Keep your eyes ahead on the road so you have plenty of time to shift down before you hit a hill. If you don’t, you may not be able to shift gears in time and you’ll end up having to walk your bike.

Learning how and when to shift gears on a bike is one of those things that you learn when starting to ride and as you ride more, you will get good at it. Just make sure to practice in a safe area, say an empty parking lot or driveway, as your focus will be on the shifting, not and traffic or other hazards that may be around.

The Best Cycling Podcasts

December 20, 2018 by Sarah Lauzé

How do you stay motivated and stoked to get out and ride? Podcasts can be a great resource because you can listen to them anytime, anywhere. If you haven’t already jumped on the podcast train, it may be time. There are a ton of cycling specific programs that can help you learn more about the sport, your bike and how to best train. Rather than getting sucked into the popular world of true crime podcasts, join the cycling community instead! It’s the perfect thing to listen to on your commute or while cleaning, cooking, doing maintenance, lazing around and pretty much anything else. Here are some of the best cycling podcasts to get you started.

Best Cycling Podcasts

4 Of the Best Cycling Podcasts

The Cycling Podcast

Okay, The Cycling Podcast seems obvious. The name may be a little on the nose, but the production and quality of their content is one of the highest in the game. Sponsored by Rapha, each 30 minute weekly episode features authors and journalists Richard Moore, Lionel Birnie and Daniel Friebe. UK based, The Cycling Podcast cover the world of professional cycling with race reports, speculation and cycling news.

The Slow Ride Podcast

Another show about racing, but with a comic slant. The Slow Ride Podcast gets funny sarcastic, and a little weird sometimes, but it’s a ton of fun to listen to. So, if you want to take a breather from the seriousness that can be the cycling world, this show is a great breath of fresh air.

Velocast

As one of the longest running cycling podcasts, Velocast is just two guys who took their passion for watching and talking about cycling and made it into a show. A pro-level commentary on all things cycling, it’s the perfect blend between facts, knowledge and banter. You have the option of limited free shows, or you can subscribe to gain access to a ton of material.

The Paceline Cycling Podcast

The Paceline is a cycling podcast aimed at roadies, mountain bikers, commuters, cyclocross enthusiasts , those who grind gravel—indeed anyone who claims cycling for their own. The bicycle is more than a thing, discusses the bike’s place in society. The hosts love bike gear so expect some banter about what works and what does not on the road and trail. The show is backed by the Fatcyclist and Red Kite Prayer.


« Previous Page
Next Page »
  • Facebook
  • Tumblr
  • Twitter

Latest Articles

JOIN Cycling: A New Training Platform for Cyclists

May 27, 2024 By Eric Lister

cold exposure

The Benefits of Cold Exposure for Cycling & Life

June 13, 2023 By Eric Lister

hill climb

The Ultimate Hill Climb Training Guide

May 31, 2023 By Eric Lister

shoulder pain cycling

How to Treat & Avoid Shoulder Pain While Cycling

April 12, 2023 By Eric Lister

psoas stretch

The Importance of the Psoas Stretch for Cyclists

April 6, 2023 By Eric Lister

cycling neck pain

The Ultimate Guide to Cycling Neck Pain: Causes and Solutions

March 21, 2023 By Eric Lister

Useful Info

  • Contact
  • Finally, A Global Cycling Club That Is Focused On Community And Love Of Cycling!
  • Privacy Policy
  • Share Your Story!
  • Terms And Conditions Of Use
  • Welcome to I Love Bicycling
  • What Happened When I Stretched Every Day For a Month

Recent Posts

  • JOIN Cycling: A New Training Platform for Cyclists
  • How to Hang Bikes in Your Garage: 4 Inexpensive Options
  • Gravel Bike Vs. Road Bike: Which One Is Better For You?
  • The 6 Types of Mountain Bikes & How to Choose the Best One for You
  • What Is a Touring Bike Good For? 5 Benefits We Know You’ll Love

Search I Love Bicycling

Connect with Us

  • Facebook
  • RSS
  • Tumblr
  • Twitter

Copyright © 2026 · Magazine Pro Theme on Genesis Framework · WordPress · Log in