• Training
    • Injury Prevention
    • Training Tips
  • How To
    • Bike Fit
    • Gear
  • Nutrition
    • Nutrition Tips
    • Weight Loss
  • Repair
  • Reviews
  • Stories
    • Funny Stories
    • Jokes
    • Quotes
    • Videos
    • Funny Videos

I Love Bicycling

I Love Bicycling is a website that is geared towards cycling for beginners with road cycling tips, training articles, nutrition tips, weight loss, how to’s and bike repair articles.

How To

  • Bike Fit
  • Gear

How To Adjust Road Bike Brakes

June 14, 2020 by Sarah Lauzé

It’s normal for brakes to start to squeak or get a little soft over time. This may mean it’s time to replace the pads (for calliper brakes) or that the cables need some adjusting. Here’s how to adjust road bike brakes, whether at home or in the shop.

No matter what kind of bike you have, the tension on your brakes is controlled by one of two things: a brake cable or hydraulic fluid. If you have hydraulic disc brakes, there’s not a lot that you can do to adjust them, other than bleeding them, which is generally a job best left for professional mechanics. However, if you have rim brakes or cable-actuated disc brakes, adjusting your brakes is pretty simple and should be something you can do at home.

What You’ll Need

  • Allen Key/ Hex Wrench Set
  • Brake Wrench

How To Adjust Road Bike Brakes

Small AdjustmentsAdjust Road Bike Brakes

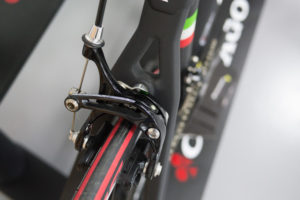
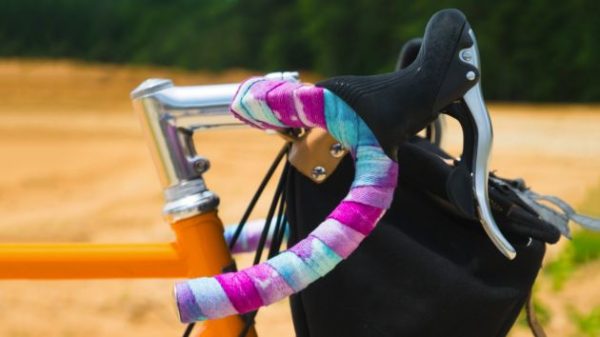
If you have a mountain bike, hybrid, or city bike, you’ll notice that there are screw-like adjusters on your levers where the brake cable housing meets the lever. If you have a road bike, you’ll notice a similar adjuster on the brake itself, again, where the cable housing meets the brake. These are called barrel adjusters, and they allow you to take up cable tension, which brings the brake arms closer to the rim of the bike (or the pads closer to the rotor in the case of disc brakes).

If your brakes are too loose, and you have to squeeze the levers all the way to the handlebar to get any kind of stopping power, you’ll want to loosen your barrel adjusters a few turns. This actually tightens the brake cables and therefore tightens the brakes. If your brakes are so tight that they don’t let your wheels turn, then you can tighten the barrel adjusters back down and make some room.

Bigger Adjustments

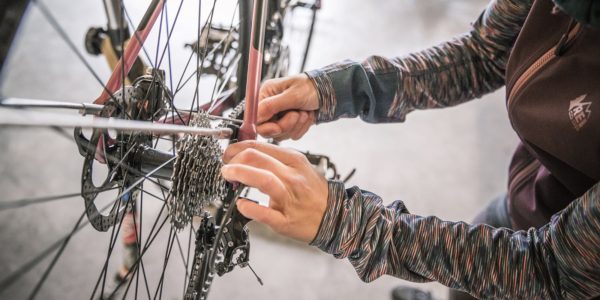
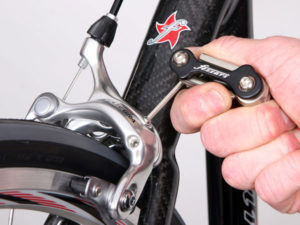
These small adjustments don’t require any tools, and you can even do them while you’re riding your bike if you have good enough bike handling skills (but it’s much better to do it while the bike is not in motion). If you’ve already turned a barrel adjuster all the way out or all the way back in, though, you’re going to need to grab either a five-millimeter hex wrench or a ten-millimeter box-end wrench (depending on your brakes).

With your wrench, loosen the pinch bolt that holds the brake cable in place. Then roll your barrel adjuster about halfway out. Pull the cable tight and put enough tension on the brake that it lightly touches the rim. While you do this, tighten the pinch bolt down again. Then roll the barrel adjuster back in, and you should have a well-adjusted brake. If not, you can play with how far you roll the barrel adjuster out and/or how much tension you put on the cable as you tighten the pinch bolt back down. With a little bit of patience, you should be able to adjust your brakes without much trouble at all.

Good luck, and, as always, if you run into too much trouble, don’t hesitate to take your bike to your local bicycle shop for some professional care.

A Beginner’s Guide to Handlebar Tape

June 5, 2020 by Sarah Lauzé

Handlebar tape is an often overlooked aspect of your bike, but it effects both how your bike looks and feels. It covers the essential contact point between you and and your bike, so it’s the easiest way to make your bike feel like new. The tape will work to absorb some of the bumps in the road, as well as provide grip for your hands. Historically, handlebars were wrapped in simple white cloth tape, but now there are a ton of options when it comes to material and colour. So, if you’re looking for a way to spend some quality time with your bike, changing your handlebar tape can be a great way to do it.

How often should you replace handlebar tape?

Cyclists know that certain items, tires, chains, and gears should be replaced at regular intervals, but how often should you replace your bar tape? This will be dependent on how much you ride, but it should be done at least a once a year. Think of how much your hands sweat out on a hot ride, or the dirt and dust from the road making it’s way to your handlebars. It can get pretty nasty looking, especially if it’s white, so you’ll want to make a habit of changing it out.

What to look for in handlebar tape

Grip

Handlebar tape does more than just make your bike look good, it serves as your main point of contact. So, it’s important to choose tape that provides adequate grip for the handling of your bike. Look for something with a tacky finish to ensure you get grip even in wet conditions. This is especially important if you are riding without gloves.

Padding

Handlebar tape provides a nice bit of cushioning for your hands, reducing the vibrations that travel from the road up into your arms. Choose tape that provides the right amount of padding for you and the type of riding you do. Many cyclists choose to double wrap their bars for a little extra cushion, especially when riding on rougher roads.

Looks

There are all sorts of unspoken rules out there. Some say your bar tape should match your saddle, or your kit, or your head tube…the list goes on. The truth of it is, you should chose whatever tape feels the best in a colour that catches your eye.

Types of Handlebar Tape

Bar tape is prone to wear and tear, but luckily most is relatively inexpensive. There are plenty of options to explore too, and new tape will always rejuvenate a tired-looking bike. It’s worth experiencing the subtle differences in comfort, feel, and performance offered by different brands and materials.

Cotton Bar Tape

Cotton is old-school. Any bike built before about 1985 probably has cotton bar tape. Cotton tape is very cheap but it’s not widely available, and your best bet may be to go shopping online for it. Cotton tape comes in a roll with an adhesive backing that is easy to apply to a clean set of bars. Cycling purists like to give cotton tape several coats of shellac to protect the material and prevent it from unwrapping. That’s why some older bikes seem to have shiny handlebars.

Cork/Synthetic Bar Tape

By 1987, cork tape had for the most part replaced cotton as the tape of choice. Contemporary cork tape is actually a synthetic blend of cork and ethylene vinyl acetate. Cork/synthetic tape is more expensive than cotton, but typically also comes with a with a small strip of adhesive backing. Cork/synthetic tape needs to be stretched carefully when wrapping the bars, otherwise it looks untidy and is prone to unravelling. Take care with cork blends, stretch them too tight and they will break. Cork tape is typically too thick for designs such as the harlequin or other pattern making. The main advantage of cork is that it absorbs shock and sweat like nothing else.

High-Tech Bar Tape

Most contemporary bar tapes are made from a lightweight and durable synthetics, in combination with a foam or gel core for cushioning. Materials such as polyurethane, synthetic nylon or silicone are strong, lightweight and durable and often have a tacky  texture that aids grip and contributes to a positive feel to your hands. Some have a perforated surface, others a ‘microfiber’ smooth feel, while others have a textured surface. Some look like faux leather or faux carbon. These newer formulas add good vibration dampening, without the bulkiness that can come from old-school tapes like cork.

Leather Bar Tape

If you’ve ever heard of the Brooks saddle you won’t be surprised that leather bar tape is at the top of the heap. Leather tape just feels good in your hands. Expect to pay around $100 for leather handlebar tape. You can also expect it to last forever. Some cyclists claim that it improves with age, just like a Brooks saddle. If you’re into changing the tape every year as suggested, leather probably isn’t the best choice. The downside to leather is that it doesn’t provide a vibration dampening effect like cork or gel.

How To Change Your Handlebar Tape

Bar tape can last for years, and it typically comes already installed on a new bike. It might seem easy enough; wrapping tape around bars. But it’s not that simple. Not all cyclists know how to wrap a bar and make it last. In fact, it’s one of the most common things done wrong on bicycles.

What You’ll Need

  • Electrical tape
  • Scissors
  • Clean hands or gloves
  • New handlebar tape

1. Remove Old Handlebar Tape

Do whatever it takes to remove the old bar tape. It might just unravel when you remove the plugs, or you can use tweezers or pliers to grip it an pull it off delicately.

2. Clean the Bars

Use a bike specific cleaner or anything that will remove tacky substances. Make sure it’s dry and without any residue to ensure a good bond with your handlebars.

3. Make Adjustments & Secure Cables

If you’re replace existing tape, the hoods should already be in the right position, but this is your chance to move them if you desire. Make the adjustments, and tighten the hoods to the handlebars. It’s typically done with a 5mm hex wrench. The bolt is usually on the outside of the lever under the hood. Its a good idea to ride the bike before applying the tape, to ensure the hoods are where you want them, because after wrapping the bars, they’re difficult to move without disturbing the tape.

Use black electrical tape to secure the brake cables to the bars if applicable. Some bars have holes in them for this purpose, and you can skip the electrical tape. It typically takes 3 or 4 strips of electrical tape to secure the brake line to drop bars.

4. Wrap It

The jury is still out on the direction, and whether to wind clockwise or counterclockwise is up to you. Some prefer to start in the center, on either side of the handlebars. Some prefer to anchor the tape with the plugs, and work toward the handlebars. Because the procedure varies wildly due to your choice of designs, the procedure can also vary.

In general, the most popular technique is to start at the end of the bars leaving about a half-inch overhanging the end of the bars. This is so you stuff it inside the bars when you insert the bar-end plug to secure it. Then start wrapping the bar tape leaving about 1/4 of an inch to a half overlapping the previous. Make sure you keep it snug as you go. When you get to the hoods there are a few ways to do it, but in general, you want to make sure that no metal on the bars is showing. Then continue toward the stem stopping two to three inches from the stem. Cut the tape so it forms a straight edge and wrap a few layers of electrical tape around the end to secure it. Then the nice tape that generally comes with new bar tape can be wrapped over the electrical tape giving it a sleek look.

Cycling Foot Pain, Tingling, and Numbness

June 4, 2020 by Sarah Lauzé

It’s common for cyclists to experience tingling or numbness in their hands, but what does it mean when it shows up in your toes and feet? Foot numbness usually occurs when the nerves between the bones under the ball of the foot become compressed. Besides numbness, symptoms can show up as cycling foot pain, tingling, bruising, or even a burning sensation. Here’s what you need to know about the common causes, and what you can do to treat it.

Cycling Foot Pain

The Common Causes of Cycling Foot Pain

Shoe Fit

The first thing to look at is the fit of your cycling shoes. A pair of shoes that fit you correctly will feel as though they are not there, you should forget about your shoes while riding. Getting fit for the right shoes goes a long way towards comfort. Take your time when trying shoes, feeling out any potential pressure points. If you have wider than average feet, then make sure you get shoes that are wide enough.

If your shoes are too tight, it can cause inflammation between the joints as it decreases blood circulation, as well as constrict the ball of the foot. This can cause numbness, as well as a tingling sensation during and even after a ride.

Cleat Position 

Correct cleat placement, just like the correct shoe, will let you forget that they are even there. Placing the cleats poorly can lead to uncomfortable foot position and can cause pain in nerves from pressure points or strain from improper twisting of the foot. Particularly if the cleat is too far forward it can cause numbness, as it places pressure on the ball of your foot. Take the time to dial in your cleat placement whether on your own, or with a professional bike fit.

Socks

Socks may be the most overlooked element of the foot pain complex. You want a sock that does not bunch up or is too bulky so that it creates pressure points in an otherwise fine shoe. They should keep your feet at the right temperature too. If they are too hot, it could lead to more swelling, exacerbated pressure points and chafing. Feet that are too cold start to hurt from the lack of blood flow or frostbite.

Technique

Climbing without proper pedaling technique or too slow of a cadence can put too much pressure on the balls of your feet and make them go numb. Ensure you are keeping your cadence within the proper range, and as consistent as possible.

Treatment and Prevention

Exercises on the Bike

While out on a ride, pay attention to your feet before the problems show up. If you’re going for a long ride, then try unclip and lift your foot up into the air at the top of the pedal stroke a few times to get your blood flowing. When you’re sitting at red lights, or stopping for a break, then flex your toes or do some circles with your ankles. You can even get off and walk a few paces if need be (although this can be awkward with cycling shoes).

Shoe Modifications

If you find your feet are painful, or going numb during rides, then try invest in some custom arch supports. These can help distribute your weight more evenly and decrease the pressure placed on the ball of your foot and on your toes.

Stretching & Rolling

There are some exercises and stretches you can do off the bike, especially before a ride, to help treat and prevent foot pain. The first is to sit with one leg up on your other knee, fingers locking into your toes. Then rotate your foot around with your hand, stretching out the ankle joint and getting the blood flowing.

Second, you can use a tennis ball or a roller to apply pressureto the bottom of your foot. This can be painful, so don’t apply too much pressure if it’s too uncomfortable. Simply place the ball or roller under your foot, then roll front to back.

If your feet are comfortable while you ride, then it’s going to be a whole lot more fun. Never look at foot pain as an inevitable side effect of cycling, and make sure you do what you can to prevent it.

The Best Balance Bike for Your Child

June 3, 2020 by Sarah Lauzé

Teaching your child to ride a bike is one of the most exciting experiences as a parent, and luckily training wheels are no longer the only option. Over the past few years balance bikes have become a popular option to get kids riding younger, and even skip the training wheels altogether.

If you don’t know what we’re talking about, balance bikes are two wheelers with no pedals and no training wheels, so the child uses their feet to propel themselves along.

Balance Bike vs Training Wheels

When your child first sees their new bike, the first thing they’re going to want to do is hop on. Training wheels do have the advantage here because the child can easily sit on the bike. However, their movement is limited and a lot of times pedals can be too much for them. On the other hand, balance bikes teach your child to balance on the bike (obviously), while at the same time using motor skills they have already learned with walking. It’s an added comfort for them to keep their feet close to the ground while learning, without having the pedals get in the way.

How to Teach Your Child To Ride a Balance Bike

Step 1: Stand and walk.

Step 2: Sit and walk.

Step 3: Sit, run, and balance.

Step 4: Sit, run, glide and explore!

Balance Bikes Make for an Easy Transition

There’s a bit of a trade off here, as with training wheels your child will have the pedaling motion down, but will have no concept of balance. This can be a tough transition because they will have to learn to keep the bike upright as well as deal with the inevitable falls.

If your child is transitioning from a balance bike to a pedal bike they will fall much less. They will have the natural instinct to save themselves with their feet when they begin to tip over.

The Best Balance Bike for Your Child

Most balance bikes are made for children ages 2-4, although they can start even younger than that- if they can walk they can ride! When choosing a balance bike, there are few things you’ll want to be looking out for. First are they tires, as direct and reliable feedback from the bikes steering will help your child feel more comfortable and in control. Avoid any hard plastic wheels unless the bike is only going to be used inside. The best choice would be rubber tires with pneumatic tubes, which offer the most traction and control on a variety of surfaces.

Next, there are the brakes. The original balance bikes did not have a brake, but some contemporary models now include a hand-operated rear brake. This can be a great option for added control, and learning how to use a brake, but isn’t necessary as many kids will still inevidiably choose to use their feet to slow down and stop rather than a brake.

Here are some of the best options when it comes to a balance bike for your child.

Woom 1

Image result for woom 1 balance bike

Price: $199


The woom 1 is great for kids anywhere from 18 months to 3 years old. It features air tires, a hand brake, a natural upright body position and added turning limiter. The woom 1 is also one of the lightest balance bikes on the market, making it easier for you child to use on their own.

Strider Sport

Image result for strider sport balance bike

Price: $99

The Strider Sport fits kids 18 months to 4 years, making it a great bike for your child to grow into. It has foam tires, making them maintenance free, but does not give the child as much cushioning or traction as rubber tires.

SE Bikes Micro Ripper

Image result for se bikes micro ripper

Price: $179

Not only does this balance bike look awesome, it was designed by former X-Games star Todd Lyons when he became a father. It has a traditional BMX stem and 16 spoke wheels, making it heavy, but great for kids who tend to be a little rough on their toys.

GOMO

Image result for gomo balance bike

Price: $49

Another budget friendly option with foam tires, the GOMO balance bike is great for kids age 2-4. It features a tucked away footrest, adjustable handlebars, and extended wheelbase that gives more room for the rider to move around.

Bixe 16

Image result for Bixe 16

Price: $69

If you have a child who is too old for the traditional balance bike (age 4-6), but is still struggling to learn to ride a bike, the Bixie 16 is a great option. With larger wheels, a larger frame, and air tires, it can be a great way to get your kid confident enough on two wheels before adding pedals.

5 Cycling Tips to Master Hill Climbing

June 1, 2020 by Sarah Lauzé

Love them or hate them, hill climbing is an inevitable part of cycling (unless you somehow map out perfectly flat routes). So, when you’re sitting at the bottom of a daunting climb what is your go-to game plan? When you’re pushing your muscles to the edge of their ability, you can only tell them to “shut up” so many times – no matter how tough you are they are going to win that conversation.

The best thing you can do mentally is to learn to love climbing. If that’s a little too drastic, then at least go in with the tools needed to feel your best as you grind up the hills. There’s nothing more satisfying than conquering a tough climb–and we want to get you there!

Tips to Master Hill Climbing

Pace Yourself (and use your gears)

Attacking the hill may work if it is small climb with the crest in view from the bottom. However, if you go in too aggressively, sure you’ll feel strong at the bottom, but once you hit a certain point it’s easy to hit a wall. You overexert your muscles and skyrocket your heart rate rather than pacing yourself for the long game. If you find yourself often slowing to a crawl halfway through a climb, think about gearing down earlier and keep those legs spinning. You will then have the energy to “attack the hill” when you reach the final push over the top.

Stand Up Strategically

Should you sit or stand while climbing? It might seem like you’re more power standing by using your upper body weight, but it also requires 10 to 12 percent more energy. The net effect is more energy used and an increase in your oxygen uptake. However, it is good to get out of the saddle to stretch it out a bit and to incorporate different muscles, just save it for the steeper parts– and even then use it sparingly.

Focus

It may seem counterintuitive to try and find your inner peace while your lungs and legs are screaming at you, but the mental game is most of the battle. As you approach the hill, be your own cheerleader, and convince yourself that you love the climb. Focus on your steady cadence. Relax your body from the top down, starting with your eyes, face, neck, and moving all the way down to your toes. If you have a mantra, now is the time to start visualizing it!

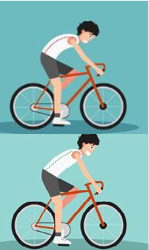
Find Your Power Position

If you’re tackling hills with a tense upper body, you’re going to burn out a lot faster. The natural tendency as we get tired is to round the back and slump the shoulders forward, but to allow for efficient breathing, keep your back straight and your chest open. Position your hands on the brake hoods and relax your arms so your elbows sit slightly wider than your hips. Try keep your body free of tension, all the while tightening your core to stabilize your movements.

Practice Hill Repeats

Practice makes perfect. You’re not going to get better at anything by wishing it into reality. Climbing is tough, and it’s never going to get easier, but the more you challenge yourself the stronger you’ll get. Find a hill and spend some time going up and down. Half the battle is finding your rhythm with climbing. Once you do, you may find yourself even looking forward to the hills!

This Cyclist Stretched Every Day For a Month – Here’s What Happened

May 18, 2020 by Guest Post

Let’s be honest, most cyclists are not known for their flexibility. Not saying I thought it was a waste of time, but I’d rather be out riding than sitting around at home in downward dog.

I’ve been an endurance athlete for most of my life, and with that has come both the joys and the pains of pushing my body to its limits. It also meant that I had no problem crushing a 100 mile ride, but I couldn’t bend over and touch my toes. My limited range of motion had never been a problem for me, so I didn’t pay it much attention.

About a year ago I started having hip pain that eventually turned into knee pain, and I found myself forced off my bike. After sitting around in self pity for a few weeks, I decided to take matters into my own hands. I called up a local sports physiotherapist and set up an appointment. His prescription? Twenty minutes of targeted mobility movements and stretches a day.

In my case the pain may have reared its head in the hip and knee, but the underlying cause is something most cyclists deal with. Dr. Ackerman explained that,

Most people have muscle imbalances, especially in today’s office chair culture, but the issue is taken one step further with cyclists. Hours on the bike is just more time in a bent over position that will inevitably lead to tight hamstrings, weak hip flexors, rounded shoulders, and a pelvic tilt.

The moral of the story? We sit too much, don’t move enough, and as cyclists we spent a lot of time in one position with repetitive movement. Don’t get me wrong, cycling is great for your health, but we’re not engaging our bodies in different types of movements, which in turn leads to imbalance.

Top: Excessive Lumbar Flexion with rounded shoulders. Bottom: A neutral spine in proper cycling position.

This all made sense to me, but it wasn’t until I started paying attention to my posture that I realized just how bad my muscle imbalances had progressed. On the bike my spine would naturally round as my shoulders were pulled forward by tight lats, and tension would gather in my low back. As pictured, tight hamstrings and a weak core accentuated the poor posture.

Now that the problem had been made clear, it was time for some solutions. Along with some specific movements and poses, Dr. Ackerman recommended I try out Dynamic Cyclist, which provides daily stretching videos for cyclists. I was skeptical at first, but on day one as I moved through the poses it felt like my pain points were being pulled apart- in a good way.

After the first routine I decided I would stretch everyday for a month and see how my body adapted. It was totally worth it. Within a couple weeks I could feel my posture improving, I became more aware of how my muscles and joints were feeling day to day and, most importantly, my knee pain was gone.

With my new found mobility, when I finally hopped back on my bike it was no problem maintaining proper posture with a neutral spine and relaxed shoulders. As I tackled my first climb I could feel new found power from my glutes and I was breaking PRs all over my regular route. I felt like I was ten years younger and couldn’t wipe the smile off my face as I rode.

I know it may seem like a stretch, but getting mobilized really has changed my body for the better. If you want to give it a try for yourself, check out Dynamic Cyclist and start your 7 day free trial.

Steps to Master Clipping In On Your Bike

May 8, 2020 by Sarah Lauzé

The fear of clipping in on your bike is a real thing when you’re just starting out. However, it’s not just a right of passage as you move from beginner to intermediate, but it also has some clear advantages. Riding clipless pedals allows you to ride further, faster, and over more technical terrain while giving you a smoother, more comfortable pedal stroke.  The fear is well worth working through, and with these tips you can be clipping in and out like a pro in no time.

The Clipless System

First things first, what are clipless pedals? The name may seem counter intuitive, but it stems from the time when toe-clips (with a cage and strap that secured your toe to the pedal) were popular, so the term clipless was born as a way of differentiating the system.

The three part system that makes up a clipless pedal starts with the pedal itself. This has a spindle just like a normal platform pedal, but the plastic or metal platform is shaped in a way to allow the second part of the system, a matching cleat, to snap into it. A spring-loaded mechanism then secures the cleat in place so it doesn’t slide around or pull out. The cleat is then attached to the final part of a clipless pedal system, the shoe. Shoes are made specifically for these cleats to be attached to the bottom of them via bolts. This three part system works in sync to keep your foot where it should be on the pedal as well as allowing you to pull up during the pedal stroke. In this three part system, the cleats always come with the pedal as they are made to fit exclusively with each other.

Why should you clip in?

You may have heard stories of the classic slow motion tip over that happens when cyclists are getting used to being clipped in. It’s fair to say that most have experienced this somewhat embarrassing turn of events, but don’t let it deter you from taking the leap. Some of the advantages are:

  • Clipping in allows you to recruit more muscles to increase pedaling efficiency. It’s not necessarily about being able to pull up as well as push down, but about creating forward momentum as you pull through the bottom of the pedal stroke.
  • When you have your pedals and cleats set up properly for you, being clipped in will keep you in the optimum riding position.
  • Your feet won’t slide around like they do on flat pedals.

Pedal Systems

As mentioned above, there are three variable in the clipless pedal system: the pedals, the shoes, and the cleats. There are two main types within this definition.

  • Mountain/Touring System

A mountain setup, also referred to as a touring setup, consists of a pedal that can be clipped in easily on both sides. The cleat, which is attached with two bolts, is a smaller metal piece that is recessed into the shoe which is for mountain and touring only. The shoe has a walkable sole with a bit of tread on it to allow for easy and functional walking. This type of pedal is the only choice for mountain biking but also is a great choice if you are riding on the road, but have frequent stops where you are walking around.

  • Road System

A road pedal set-up is made for road riding where walking is mostly avoided and efficiency is a high priority. Road pedals consist of a lightweight pedal that accepts a lightweight, typically plastic, cleat. The cleat is then attached to a “road” shoe with three bolts in a triangle pattern. This system creates a lighter and more aerodynamic pedal and shoe combo that is optimized for road riding.

Clipless pedals are a great way to improve your cycling and as you start to ride longer and farther it becomes a logical choice. A simple, non-high end, pedal and shoe system can actually be quite cheap and as your cycling progresses you can always upgrade. Cycling is full of technological advances and clipless pedals, although simple, provide an incredible advantage to both racers and recreational riders alike.

Getting Started Clipping In

At Home

Once you’re comfortable on your bike and have been set up with your first set of clipless pedals and shoes, it’s time start practicing. Before hitting the road (and those inevitable red lights), you’ll want practice clipping in and out. Sit on your seat and lean against something like a countertop or a wall so you can stay in place while spinning the pedals backwards.

To clip in, most systems work by first engaging the front part of the cleat, then pressing the back part down into the pedal. Once clipping in, try spinning your legs backwards and getting a feel for being clipped in. Next you’ll want to practice getting out the pedals. Try twisting your heel out, disengaging the pedal from the cleat. This should be fairly easy, so if you find you are really having to put in all your effort to unclip, then you will need to find the tension adjustment and back it off a little.

On the Road

Starting out, find a flat to slightly downhill stretch to get rolling on.  With one foot still on the ground, clip the other into the pedal and bring it to the top of the pedal stroke.  Then push off with the foot that is on the ground and give a big push of the pedal with the foot that’s already clipped in.  Now you will have some momentum and can now clip in your other foot. Make sure this is on a safe stretch of road or area as you won’t be paying attention to traffic, but can focus on your feet.

Now that you have both feet clipped in and have taken a couple of pedal strokes, it’s time to unclip.  While coasting put one foot down to the bottom of the pedal stroke and unclip (twisting your heel out).  Now you can come to a stop and put your foot on the ground.

Now do the above again, and again, and again.  You want to be comfortable finding your pedals and getting clipped in quickly as well as unclipping. During your first few rides you will have to focus on clipping in and out, but once you do it enough it will become a habit and you’ll find you will think about it less and less.

Routine Bike Maintenance: Make your bike last longer

April 29, 2020 by Sarah Lauzé

We all want our bikes to last us a lifetime, but we do have to give them a little love and attention to prolong their lifespan. Staring at your bike lovingly or tucking it into your bed at night may be tempting, but it won’t do much in making it last longer. Routine bike maintenance is the easiest way to ensure the financial and emotional investment you’ve put into your bike doesn’t go to waste.

Routine bike maintenance isn’t complicated, but it can take some dedication. When you’ve finished a long ride, you may want to just lean up your bike and go have a nap, but it’s better if you establish a post-ride routine that includes a little bit of TLC.

Routine Bike Maintenance

1. Keep it clean

It’s simple, but so important. Keeping your bike clean ensures your bike not only looks great, but also keeps all it’s part working flawlessly. Obviously you aren’t going to clean your bike meticulously after every ride, make sure you do whenever you ride in the rain or mud.

In addition to that, but put your bike on a regular cleaning schedule. At the very least clean it once per month. It obviously depends on how often you ride, but if you want to keep your bike in smooth working condition, once a month is a bare minimum. For some tips on how to clean your bike, check out “How To Clean Your Bike in 5 Minutes or Less.”

2. Lubrication and Grease

Make sure your bike is lubricated properly as it protects moving parts from excessive wear and tear (choose an appropriate lube for the riding conditions you’re in). On the other hand, make sure not to go nuts as too much lubrication will attract dirt and cause just as much damage. Allow the lube to soak in and then wipe any excess off with a clean rag.

Most importantly you want to lube the chain, but also all the other moving parts including brake and derailleur levers, and cables. You’ll also want to grease any threaded bolts such as the stem, derailleurs, and pedals. If you have any bearings apart, make they are all well greased.

3. Regularly Replace the Chain

Chains travel countless times over sharp gears, often under a heavy load. They wear out and stretch over time because of dirt, gunk and attrition. A little bit of chain stretch over time is ok and will always occur. The problem becomes when it stretches too far and the teeth on the cassette begin to wear out as well. Before long you will not only have to replace the chain but the cassette as well.

You’ll want to replace your chain every 1,000 – 2,000 miles, once a year, or whenever the chain is starting to show signs of wear. It’s a simple task that any cyclist can accomplish on their own with the right tools and know-how.

4. Inspect Your Bike

Inspect the frame for cracks or serious dents that are more than just cosmetic. Specific areas to look at are the joints particularly around the head tube and bottom bracket. If there are any cracks, even if it looks like it’s just paint, take the bike to your local bike shop to be looked at by an expert. For this reason (and a lot of others) it’s a good idea to take you bike in for a yearly tune up and checkover at your LBS.

5. Ride Clean Roads

Okay, that may not be possible, but riding in the rain and mud is going to wear out your bike and components more quickly. If you can be strategic with your route to avoid areas with a lot of mud and gravel it can go a long way. That being said, this is why many cyclists have a more budget friendly bike to ride in such conditions, and keep their more expensive bike out of the elements.

6. Cover it up or keep it inside.

Leaving your bike open to the elements will speed up the aging process. The sun, water and dirt will end up causing damage to your bike and cost you in repairs. If you’re in a humid climate, rust on certain metal components can also develop quicker. If possible, keep your bike inside. However, if you live in an apartment building or do not have adequate space, you will want to at least keep it covered.

How To Brake Efficiently on a Road Bike

April 10, 2020 by Sarah Lauzé

When you’re starting out cycling, the first thing you need to do is master the basics. You may watch pro riders that make everything look effortless, but unfortunately there’s a lot more to it than may meet the eye. Once you’ve got the basics down, then it’s time to start getting specific. Although your fitness level will remain your most powerful weapon, don’t underestimate the gains from focusing and developing aspects of your bike handling skills. Learning how to brake efficiently on a road bike can not only make you faster, but it will make you feel more comfortable and confident on your bike.

Brake Efficiently

How To Brake Efficiently on a Road Bike

Step 1: Beware of the Front Brake!

Tip: Don’t do this.

You’re front brake may be there to stop you, but your back brake is there to shave off speed. Roughly 70% of your stopping power comes from the front, which is why you never want to slam on just the front brake (pitching you over the handlebars). The best way to get the hang of how much to use each break is to go to a quiet section of road and practice. If you are skidding out, then you are putting too much pressure on the back brake. However, if you’re back wheel is lifting off the ground altogether, then you need to ease of that front brake.

Step 2: Get the Timing Right

When you’re wanting to come to a stop on your bike, you want to start slowing you speed by pulling the back brake. Look up at the spot you want to stop at rather than your front wheel. Slowly start to ease the front brake to further reduce your speed. Keep your shoulders relaxed and arms slightly bend, while focusing on that same stopping spot. Release the front break once you’re going slow enough and use the back brake to bring yourself to a complete stop.

Step 3: Master the Weight Shift

One of the most common beginner mistakes is distributing body weight incorrectly. This will not only effect your braking efficiency, but also your bike response and handling. If you’re on the drops, your center of gravity will be lower than if you’re on the hoods. The hoods feel safer, as you can brake harder with your weight shifting towards the rear of the back.

Being able to pedal through corners may be the most efficient, but it will also take some time and practice to master. You want to do all of you slowing down BEFORE the corner, and you should be able to to leave your brakes untouched through the corner. If you find yourself skidding, shift your weight as far back on the bike as you can.

Step 4: Adapt to the Road Conditions

If the roads are wet and slick, you’ll want to reduce the amount of pressure you put on the breaks. Your technique should be a lot softer then it is on dry roads, and you need to remain especially aware of obstacles. Road markings and manhole covers become very slippery, and you won’t be able to stop as quickly.

Step 5: Give Your Brakes a Little Love

Before heading out on a ride, make sure your brakes are clean, dry and well adjusted. If your brakes are too loose, and you have to squeeze the levers all the way to the handlebar to get any kind of stopping power, you’ll want to loosen your barrel adjusters a few turns. This actually tightens the brake cables and therefore tightens the brakes. If your brakes are so tight that they don’t let your wheels turn, then you can tighten the barrel adjusters back down and make some room.

Step 6: Practice, Practice, Practice

Mastering certain techniques will take time, and braking is no different. Find a quiet area or section of road that you can use to practice your braking technique. Start by building up speed, then stop yourself with the brakes. See how long it takes you to stop, and pay attention to the feedback from the tires. Are they skidding? Are you loosing grip? You will have to experiment to find what works best for you, and to get a feel for how your bike handles when braking.

Why Strength Training is Important for Cyclists

April 5, 2020 by Sarah Lauzé

You may think strength training is meant for bodybuilders and gym buffs, but it is now almost universally accepted as a vital training component for all athletes. Not only that, but as we age, resistance training becomes increasingly important for overall health and quality of life. So why do so many cyclists avoid it? It may be the thought of spending time at the gym when you could be out on your bike. Here’s why strength training for cyclists is important.


Why Strength Training is Important for Cyclists

We all know that leading an active life is the best thing you can do for your long-term health. As cyclists, we may be more active than most, but it is a mistake to just focus on cardiovascular exercise and exclude everything else. Cycling is a low impact activity, which means it’s great for your joints, but not so great for supporting your bone density and postural deficits. Strength training can help fill the gaps left by pure cardio exercise and build stronger bones, improve coordination, prevent injury, and give you more power on the bike.

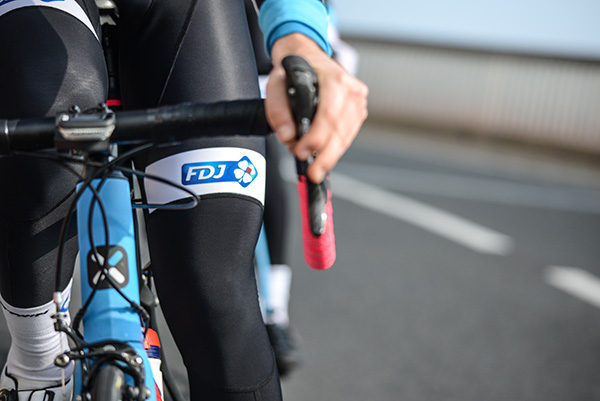
Retain Muscle Mass & Correct Imbalances

Depending on where you live, you may have to take a few months off cycling during the dead of winter. Whether you take your training indoors or not, this is a great time to incorporate a strength training circuit into your routine. You don’t have to lose the muscle mass you’ve working so hard for over the cycling season, and you can work opposing muscle groups to bring muscle balance. Cycling is a repetitive motion, often overdeveloping the quads and glutes while the hamstrings and hip flexors lag behind. A good strength training program will take this into account and work on creating muscle balance.

Enhance Balance & Coordination

There is no doubt that cycling itself requires coordination and balance, but through the years it can become so second nature that it no longer challenges our intramuscular systems. Strength training with things like free weights, bosu balls, and resistance bands can help improve your balance and coordination. Again, this is particularly important as we age as it keeps the connections within the nervous system strong.

Improve Bone Density

As mentioned previously, this one is especially important for cyclists. Past studies have shown that the bone density of some competitive riders is lower than their sedentary controls. Unlike running or walking, cycling is a non-weight bearing activity, which is why it is so great for people with orthopedic injuries. However, this means you have to be doing something else, like strength training, to maintain healthy bone density and combat things like osteoporosis.

More Power on the Bike

Who doesn’t want more power on the bike? This is a bit of a no brainer, as the stronger your muscles are, the more power you’ll be able to exert within the cycling motion. It can be a difficult thing to develop on your bike, so using strength training is actually one of the best ways to become a stronger climber and overall rider.

Injury Prevention

Some of the most common injuries for cyclists include ITB syndrome, neck pain, low back pain, and knee pain. Some of these may be unavoidable, but most are caused by muscle imbalances. A combination of strength training and routine stretching can  strengthen your muscles and connective tissues to help prevent these injuries.

Although strength training my not make your faster in a direct sense, there are plenty of reasons to get into a strength training plan, whether it be in a gym or your living room. Check out “4 Of The Best Strength Training Exercises for Cyclists” for some exercises to get you started.

« Previous Page
Next Page »
  • Facebook
  • Tumblr
  • Twitter

Latest Articles

JOIN Cycling: A New Training Platform for Cyclists

May 27, 2024 By Eric Lister

cold exposure

The Benefits of Cold Exposure for Cycling & Life

June 13, 2023 By Eric Lister

hill climb

The Ultimate Hill Climb Training Guide

May 31, 2023 By Eric Lister

shoulder pain cycling

How to Treat & Avoid Shoulder Pain While Cycling

April 12, 2023 By Eric Lister

psoas stretch

The Importance of the Psoas Stretch for Cyclists

April 6, 2023 By Eric Lister

cycling neck pain

The Ultimate Guide to Cycling Neck Pain: Causes and Solutions

March 21, 2023 By Eric Lister

Useful Info

  • Contact
  • Finally, A Global Cycling Club That Is Focused On Community And Love Of Cycling!
  • Privacy Policy
  • Share Your Story!
  • Terms And Conditions Of Use
  • Welcome to I Love Bicycling
  • What Happened When I Stretched Every Day For a Month

Recent Posts

  • JOIN Cycling: A New Training Platform for Cyclists
  • How to Hang Bikes in Your Garage: 4 Inexpensive Options
  • Gravel Bike Vs. Road Bike: Which One Is Better For You?
  • The 6 Types of Mountain Bikes & How to Choose the Best One for You
  • What Is a Touring Bike Good For? 5 Benefits We Know You’ll Love

Search I Love Bicycling

Connect with Us

  • Facebook
  • RSS
  • Tumblr
  • Twitter

Copyright © 2026 · Magazine Pro Theme on Genesis Framework · WordPress · Log in