• Training
    • Injury Prevention
    • Training Tips
  • How To
    • Bike Fit
    • Gear
  • Nutrition
    • Nutrition Tips
    • Weight Loss
  • Repair
  • Reviews
  • Stories
    • Funny Stories
    • Jokes
    • Quotes
    • Videos
    • Funny Videos

I Love Bicycling

I Love Bicycling is a website that is geared towards cycling for beginners with road cycling tips, training articles, nutrition tips, weight loss, how to’s and bike repair articles.

Bike Fit

  • Gear

How To Change a Bike Pedal

October 28, 2017 by Sarah Lauzé

Changing the pedals on your bike can be a lot trickier than you may think. I’ll admit, I still get confused every time with the unusual pedal threading. That being said, there’s no need to take your bike into a mechanic every time you want to switch over your bike pedal.

Whether you’re travelling with your bike and need to dismantle it, or you’ve invested in some new pedals, armed with the proper tools and instruction you can have them switched over in no time.
How to change a bike pedal

What You’ll Need

How To Change a Bike Pedal

  • Pedal wrench – A pedal wrench has a long handle, and is much thinner than a regular wrench. You may also be able to use a regular 15mm wrench for some pedals, but a specific pedal wrench does make the job a whole lot easier.
  • Waterproof bike grease – Before putting pedals back on, you will want to put a thin layer of bike grease on the thread to keep them from tightening too much and seizing. How To Change a Bike Pedal
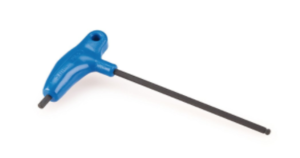
  • Hex wrench – A 6-8mm hex (Allen) wrench is only necessary if your pedal does not have the flat surface on the axle.

What type of pedals do you have?

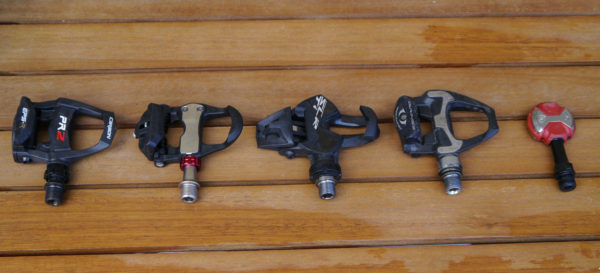
Have a quick look at your pedal for flat spots on the axle, near the crank arm, that your pedal wrench can grab onto. If there are no flat spots on the bike pedal axle, then you will likely need to use a hex wrench inserted into the end of the pedal axle, on the inside of the crank arm.

How To Change a Bike Pedal

Removing a Bike Pedal

Try to have your bike upright on the ground, rather than flipping it upside down. Make sure you have the chain on the largest chainring so if your hand slips you’re not hitting the sharp chainring.

Removing the right pedal

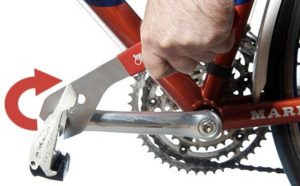
The right pedal is like a traditional nut that you turn counterclockwise (lefty-loosey). Face the drivetrain side of the bike, rotating the crank arm to the 3 o’clock position. Place the pedal wrench on the flat spot between the pedal and the crank arm at the 9 o’clock position and push the wrench downward. Continue turning the wrench until the pedal is loose enough to turn the rest of the way with your fingers.

Removing the left pedal
How To Change a Bike Pedal

The left pedal is the opposite of a tradition nut, loosening clockwise. Face the non-drive side of the bike and rotate the crank arm so it is at the 9 o’clock position. Place the pedal wrench on the flat spot between the pedal and the crank arm at the 3 o’clock position and push the wrench downward. Continue turning the wrench until the pedal is loose enough to turn the rest of the way with your fingers.

What to do if a bike pedal is stuck – If the pedal is old and rusted, or has been over-tightened, then you may need to apply a penetrating oil on the section attached to the crank arm. Wait for it to soak in, for most this is around 10 minutes, but you’ll want to check the manufacturer’s guidelines. If it is still not loosening at all, make sure you are turning the wrench the right direction!
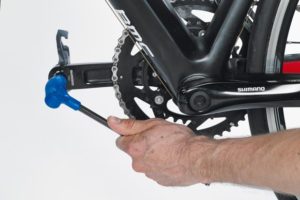
How To Change a Bike Pedal

Removing pedals with a hex wrench

Removing pedals with a hex wrench is essentially the same process, but you will be fitting the end of the wrench into the back side of the pedal thread. The pedal thread direction is the same, but keep in mind the appearance of the wrench turning clockwise or counterclockwise can look different as you are seeing it from the inside of the pedal.

Installing New Pedals

Before installing new pedals, use a cloth to clean any dirt from both the crank and pedal threads. Apply a thin layer of grease to the pedal threads, as this will make the pedals easier to remove next time, and will keep them from seizing.

Look on the flat surface for a “L” for left and a “R” for right to see which pedal is which.How To Change a Bike Pedal Begin threading the new pedals on with your fingers, making sure you’re turning the right way. If it’s resisting don’t force it, as the pedal should go on smoothly with very little resistance. Turn the right pedal clockwise to tighten, and the left counterclockwise.
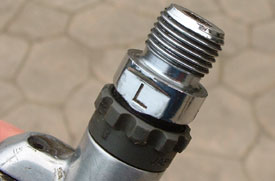
Once you have it as tight as possible with your fingers, only then use your pedal or hex wrench.

You want the pedal to be tight, but you also want to be able to take it off again, so don’t tighten too much!
Crank Arm Length – How to Choose ?

August 11, 2017 by Gareth Eckley


Crank arm length is the second most important factor in a comfortable and efficient bike fit. I check it right after saddle height…an expert bike fitter.

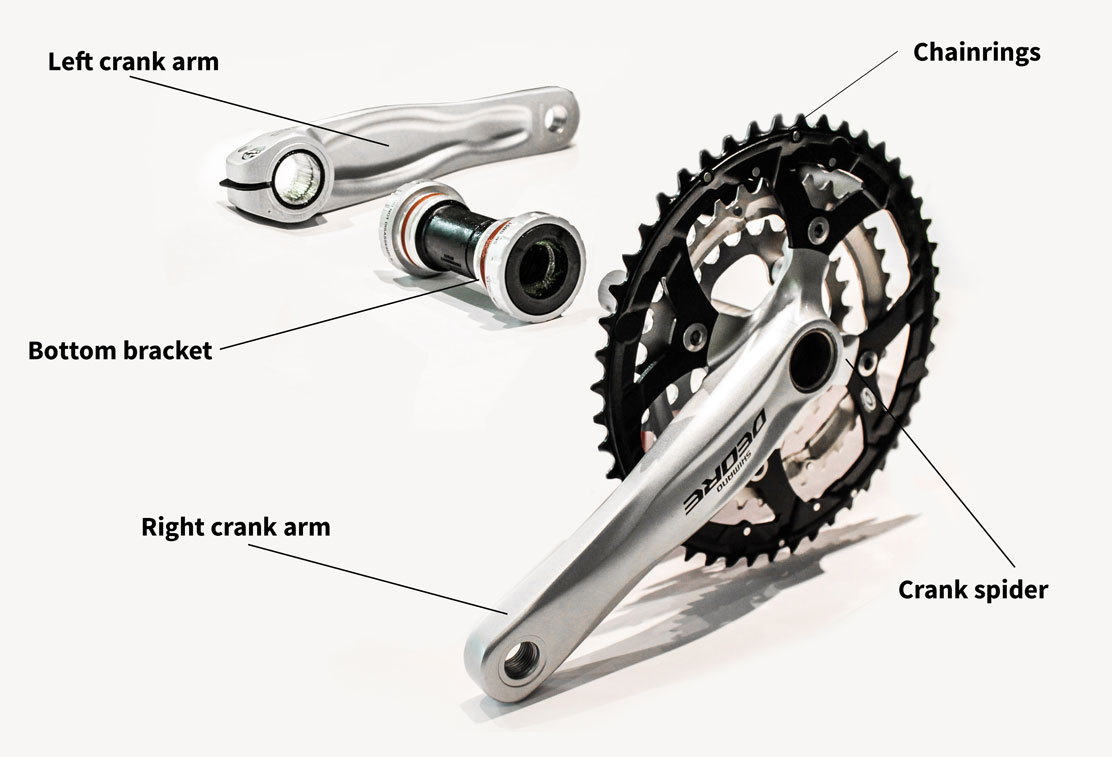
crankset explainedCranks are the arms that pedals attach to, usually made from aluminium, or carbon for more expensive bikes. When you buy a bike it will already be set up with a set of cranks.
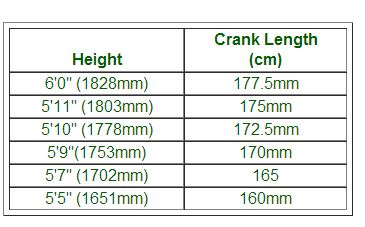
The crank arm length will be the standard size that the manufacturer recommends for that frame size. This is worked out using industry averages that may not be optimal for your body.

crank length tableThe perfect length crank for you will give these 7 benefits:
  1. A smoother pedal stroke – more efficiency
  2. Help maintain a  higher cadence
  3. May help you keep a lower position on the bike – more aerodynamic and fast
  4. Reduce stress on the knee and hip – Anterior Knee Pain
  5. A solution for less flexible cyclists – tight hamstrings can be helped by a shorter crank
  6. A shorter crank can allow you to use a bigger gear for the same effort, making you faster.
  7. Help reduce the “dead spot” on the top of the pedal stroke (this is from 11 o’clock to 2 o’clock). The distance of travel is less on a shorter crank.

How to choose the correct crank length

Expert Tip: Get a bike fit in-store before buying a new bike, as they will replace your cranks with your ideal size free of charge. If you leave the bike fit until after you buy your bike, you will have to buy a new set of cranks. If the store does not offer a bike fit, then get fitted elsewhere so you know your appropriate crank arm length.

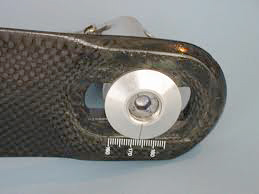
Some bike fitters will have an adjustable crank, so the pedal can be moved to simulate crank lengths from 155 – 185mm. You can try this during a bike fitting. A good bike fitter will help you find the best crank arm length for you.

If you are changing the cranks on an existing bike. Get a bike fit and then buy a cheap crank or borrow a crank with a different length. Go for a few rides and see what length is best. When you know what size you need. Go ahead and buy the crank you want.

Is a longer crank more powerful?

There is a common myth among cyclists that a longer crank gives you a more powerful pedal stroke. Common sense may make you feel this true, as a longer lever allows you to use less force to generate more power than a shorter one, right? So the longest crank would be the best choice?

Not so fast. It is harder to keep a higher cadence with a long crank as your feet have to move further to complete the pedal stroke. Gaining speed by spinning up from a standing start can take longer. Too long a crank can create stress on the knees at the top of the stroke.

Signs that your cranks are too long

  1. You prefer a low cadence – below 75 rpm
  2. Your knees are close to your chest when in the drops.
  3. You are often the first to stand up on your pedals when climbing.
  4. You have hip, knee or lower back pain.
  5. Your pedal stroke feels uneven.

Benefits of a shorter crank

A shorter crank makes it easier to spin at a higher cadence. The reduction of force can be eliminated by selecting a bigger gear on the rear cassette. Studies have shown a small benefit, around 3% less oxygen used, during sustained effort.

Smaller cranks can allow you to get into a more aerodynamic position. This is because your saddle height is lower with a shorter crank, allowing you to bend more at the waist when you reach for the handlebars. This position can reduce your drag, especially if you are using aero bars.

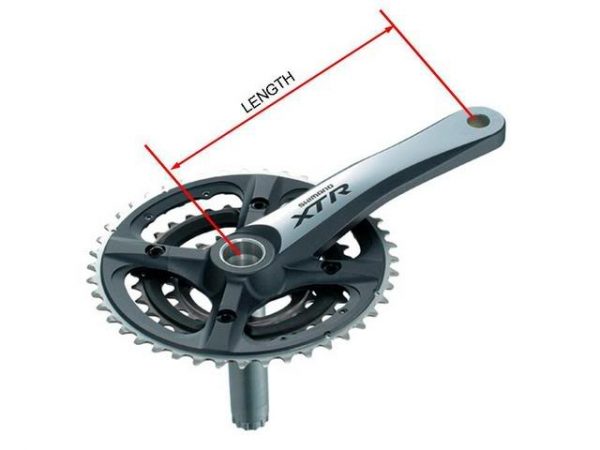
How do I Measure a Crank?measure crank length

Crank arm length is measured from the middle of the crank thread to the middle of the pedal thread.

An adjustable crank

What Length Crank Should I Choose?

The correct crank length puts your knee in the correct position at the top of the pedal stroke, and still leaves space between your knees and your stomach. Your height, the length of your legs and the length of your femur and lower leg are all important factors.

A quick guide is that shorter riders need a shorter crank and taller riders need a longer crank, but there are benefits in going shorter than longer for most cyclists.

  1. Triathletes and time trial riders will use a shorter crank. Two reasons are: to get a more aerodynamic position and to use less oxygen (around 3% less) during the event.
  2. Older or less flexible riders also benefit from a shorter crank.
  3. Longer cranks are better at slow to moderate speeds and for climbing out of the saddle (unless you run a bigger gear to compensate).
  4. Shorter cranks are easy to spin up, best at high speed, for steady tempo rides and are probably faster overall for the average flat or moderately hilly ride.
  5. Some riders just feel happier with a powerful, lower cadence pedal stroke. They will prefer a longer crank.

Advice from an expert bike fitter

Deep Dive – A detailed look at the science

If you’re interested in learning more, check out this great resource featuring the research work of Jim Martin and Steve Elemer on the pedalling rate, crank length, pedalling technique and non-round chainrings.

Another excellent resource is this guide from Bike Dynamics, bike fitters in Leamington Spa, Warwickshire, UK.

What Size Bike Should I Ride?

August 6, 2016 by Corey Davis

what size bike

Determining what size bike you need is one of the first steps of purchasing a new bike and will play a tremendous role in how much you enjoy and ride the new bike. The type of riding you plan to do will first determine the type of bike and then what size bike you should be riding. First you need to decide if you plan to ride on the road, off road, or a combination of both, this will determine what size bike you need. General hybrid bikes for instance may be marked simply as small, medium and large while other more serious road bikes are sized in centimeters, such as 52cm or 54cm. This article will describe why the correct bike size maters and how to determine what size bike you need.

What Size Bike is Most Comfortable?

General comfort is the first part of determining what size bike fits you. Some people have longer legs while other people may have longer torsos, which directly affect the size of the bike needed. An older rider for instance may want a more upright position to be more comfortable which may require a smaller frame size and an adjustable handlebar/stem. A rider looking to be faster and positioned lower on the bike can ride a size bigger or have a longer stem to stretch out their body and arms more. Online charts can give you recommend sizes based on a persons height, but physically sitting on the bike in your local bike shop will give you a better judgement. Some local bike shops will even let you demo the bike for several hours to see how the bike feels underneath you.

What Size Bike to Prevent Injury?

An incorrect size of bike could potentially cause an injury; this improper size can lead to severe ligament and tendon damage. A bike that is too big is likely to cause damage to your achilles tendons or put a strain on your neck and back. To small of a bike and there’s risk of developing patella tendonitis. These are just a few common injuries people develop for an incorrect size bike, but many more injuries are possible. A rider will also decrease their handling ability on the bike if it is the wrong size as well, which could result in a more serious accident or crash. Cycling will strengthen your cardiovascular and muscular systems, but if riding is causing damage to other parts of your body, you could be doing more long-term damage than good.

What size bike is the Most Efficient?

A proper fitting bike is also going to make sure you are getting the most out of the ride. When the legs are being over or under extended it is resulting in a loss of power being applied to the pedals. With less power being applied to the pedals you are going to ride slower and your legs will begin to fatigue more quickly. There are many things to consider when finding the most efficient position on the bike. Saddle height and horizontal position over the bottom bracket are two of the most common parts to adjust, but handlebar width, angle, and length are equally as important to a proper fitting bike. To get the most efficient position on your bike it is best to have a professional fit done by a certified bike fitter.

What type of professional fit to get?

There are many types of professional fits to determine what size bike to ride and “how” to ride it. Ranging from a complementary fit after purchasing a bike at a local shop to a fit that costs hundreds of dollars, it may be difficult to choose. For someone just getting into cycling up to an avid cyclist, a local bike shop employee should be able to perform a proper fit and setup. This type of fit is normally complementary with a new bike purchase or may be relatively inexpensive. A more experienced rider or a rider that is racing competitively should consider a more specific fit. This is going to be a much more expensive fit but will pay off in efficiency and aerodynamics. There are “schools” that certify individuals in bike fitting. Companies such as BG Fit and Retul Fit have specialized in creating a bike fitting experience that takes every detail of an individual’s ergonomics into affect.

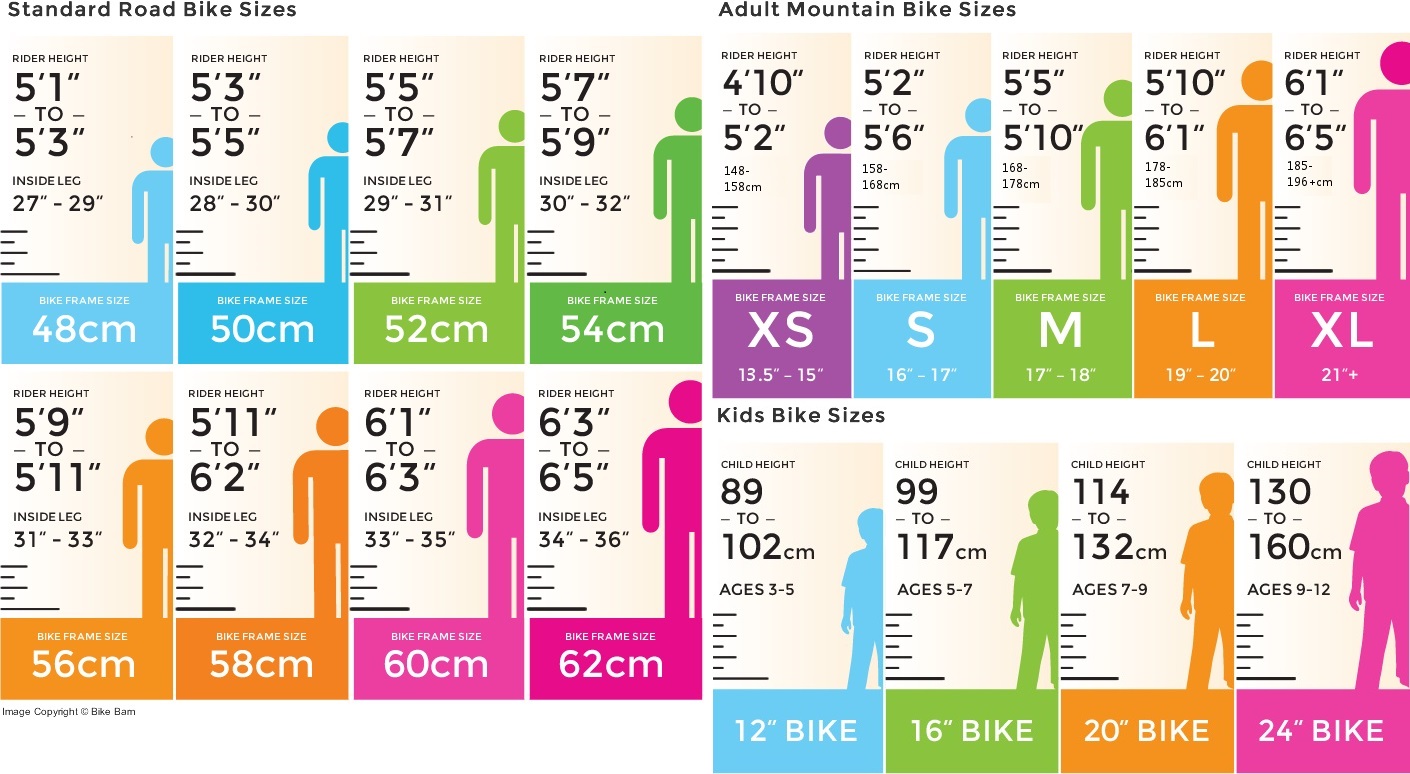
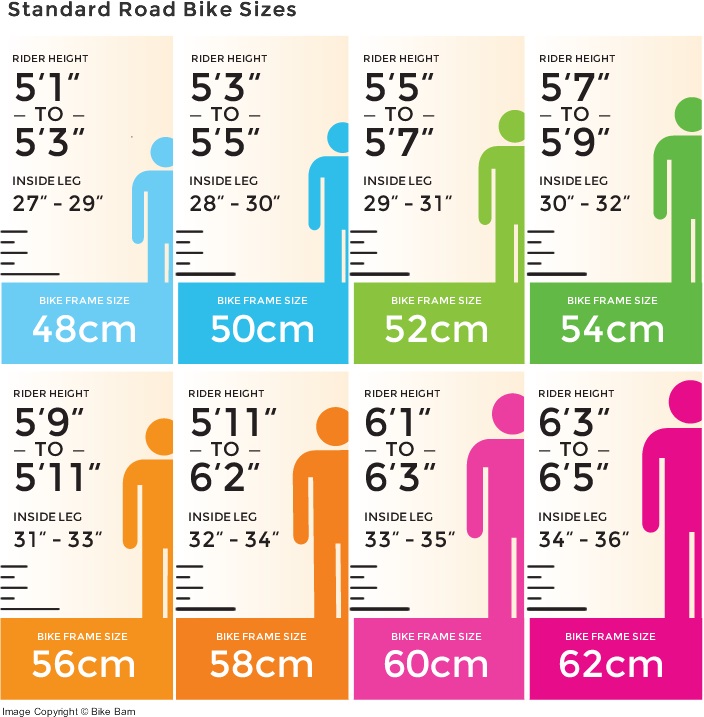
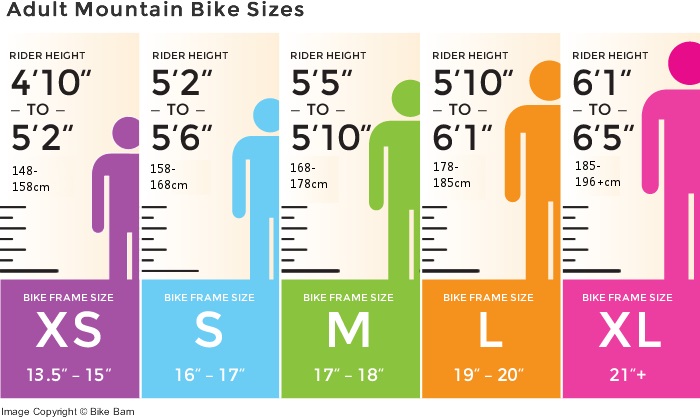
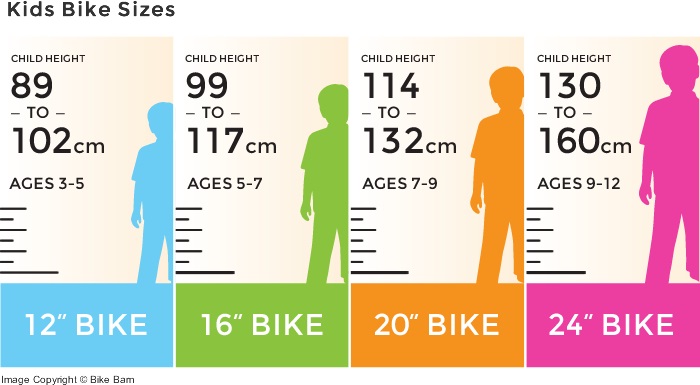
In conclusion, going to your local bike shop and physically sitting on the bicycle you want is going to give you the best idea of what size bike you need. Remember the importance of a correct fitting bike so you can be comfortable, injury free, and fast! The charts below can be used as a guide to help get an idea of the correct size you may need.

bike size

adultMTBsizes

bike-sizes-kids
Full article on sizing a kids bike can be found here.

Why Do You Get A Sore Butt Biking?

May 31, 2016 by Adam Farabaugh


You went out for your first ride in quite awhile this past weekend. It was great. You enjoyed the ride and the places you went except for one thing; you had a sore butt while you were riding and then after as well.

sore butt

Getting a sore butt while riding can be a barrier that keeps you from riding more. Beginner cyclists all the way to experienced riders will get a sore butt from time to time. There are a few different factors that contribute to it and with the right know how, you can be riding without your butt hurting at all before you know it.

Why You Get A Sore Butt When You First Start Riding

When you first start anything new that is physical, your body takes some time to adapt to it and before it’s fully adapted, you might be a little sore in areas. The same premise applies to riding and sitting on a bike seat. Your butt wasn’t made to sit exclusively on a bike seat but the human body is pretty adept at adapting to things.

Getting Your Muscles And Tendons Used To A Bike Seat

When you first start riding and sitting on a bike seat, your muscles and tendons within your butt won’t be used to the pressure. This will happen regardless of if you have the right fitting seat or not. This can even happen if you have been a regular rider in the past but took some time off. Everything will take a ride or two to tighten up and get used to the demands of supporting your body weight on a bike seat.

Why Your Butt Hurts Cycling Even After You Have Been Riding

After a few rides, if your butt is still hurting, you likely have something wrong with the bike seat. It would be wise to make sure these things are correct before you suffer through a few rides to see if your butt will just adapt to the seat.

Saddle Width

When you sit on a bike seat your sit bones are what supports you. These are the two bony knobs that you can feel on the bottom of your rump. You want these to be firmly positioned on the saddle so they can support your weight. Some people have sit bones that are narrower together while some have wider sit bones, particularly women. If the sit bones are off the sides of the saddle, you are going to have a very uncomfortable ride as your sensitive area between your sit bones will be taking all of your weight. You need to find the width of your sit bones and find a correlating saddle. Your local bike shop will likely have an assortment to try.

Saddle Softness

In addition to having the right width saddle, you will also want a saddle with the correct hardness. It is a bit contrary to what you might think, but a super soft saddle is going to be uncomfortable. This is because your sit bones press down into the foam allowing the sensitive area between your sit bones to receive a lot more pressure. You want a saddle that is soft enough for your sit bones to be comfortable when absorbing your weight but not too soft that they press down into the saddle displacing your weight to other more sensitive areas.

Saddle Shape

The shape of your saddle can also influence how sore your butt gets while riding. Some are longer and thinner while others are shorter and fatter. Typically, the wider your sit bones, the more you will want to go with the latter. In addition, saddles can come with cut outs that relieve even more pressure off your sensitive areas. Some people like these and can’t ride anything else while some riders prefer not to use them. Try them out and see what works best for you.

Saddle Position

Another factor that can contribute to a sore butt while cycling is how your saddle is positioned. If it’s too far forward or backwards, you might be sitting on the wrong part of the saddle. You should be sitting on it where your sit bones firmly come into contact with it. Getting a bike fit can be a good idea to ensure this if you are riding long distances. Additionally, if your saddle is tilted to far forward or back, you can experience a sore butt. Typically you want to start with a level seat and see how it is. If you need to, you can adjust it a degree or two up or down but ideally you shouldn’t have to.

How To Prevent A Sore Butt Biking

So now that you know what causes a sore butt, how do you prevent getting one? For the first few rides after not riding for awhile, you will probably have one. But after that you should make sure you don’t so you can keep riding ’till your hearts content.

The Right Saddle

Getting the right saddle for you, as outlined above, is the most important part of not getting a sore butt while biking. If you don’t have the right saddle for you, you simply are never going to be comfortable on the bike and aren’t going to fully enjoy the ride.

Cycling Shorts

If you are riding longer distances, you should most definitely have a pair of cycling shorts. These are skin tight shorts that have a chamois, or padded material, in them to give you a softer, more comfortable ride.

Chamois Cream

If you experience chaffing, using chamois cream will help alleviate as well as prevent your discomfort. If it’s super hot out and you are going to be sweaty or if it’s raining, chamois cream is a very good option.

Standing Frequently

Regardless of if you’re riding around town or out for a long ride, you should stand and take some pressure off your butt every now and again. This will help ensure that there’s a constant blood flow and that your butt muscles don’t get too tight. Any time the road goes uphill is a good time to get out of the saddle. If you live in a flat area, you will have to make a conscious effort to get out of the saddle on a regular basis.

Kids Bike Sizing – How To Get The Right One

May 26, 2016 by Josh Friedman

kids bike sizing

A well-fitting bike for a kid is critical for them to enjoy the ride. The right bike will let them pedal easy, start and stop effectively, control the bike, and be confident putting their feet down. Just like a bike for adults, the bike should be an extension of the kid where riding becomes second nature. But kids bike sizing can be tricky – there are so many sizes. Here is a breakdown.

Kids Bike Sizing

If you have not started your kid on a balance bike, read this. It covers balance bikes and how you should set them up. Once your kid is ready for a bike with pedals, this is what is available in kids bike sizing:

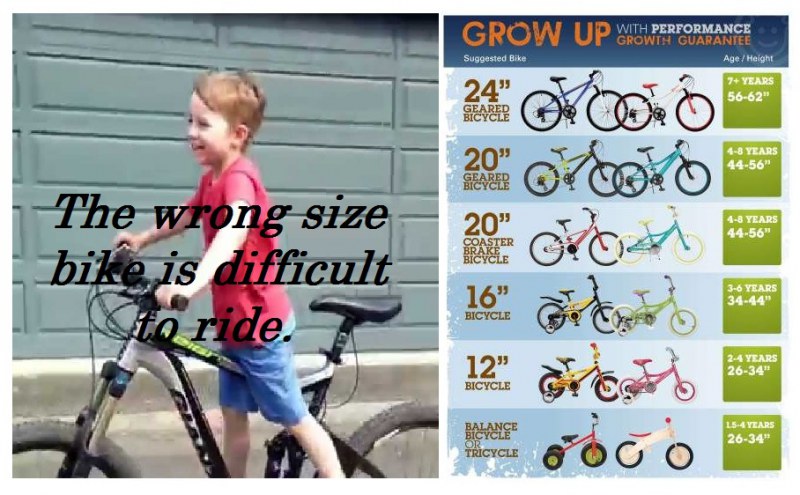
Bike Size Age Height
12 inch 2-4 26-34 inches
16 inch 3-6 34-44 inches
20 inch 4-8 44-56 inches
24 inch 7+ 56-62 inches

The measurement refers to the diameter of the wheel as opposed to the size of the frame with adult bikes. Generally, frames are similarly sized within a wheel size, but there is no standardization. This range will cover your kid’s growth and is available from nearly every major brand. There are bikes that exist outside of those sizes, say fourteen and eighteen inch, but they are uncommon. It is best to avoid them because of the difficulty you may find trying to get a spare tube or tire.

Age Ranges

The age ranges are approximate. The best way to get kids bike sizing right is to get them on the bike. Their confidence and ability are more important factors than their chronological age. For a novice rider, choosing a slightly smaller bike will benefit them more than going to the next size up because it will allow them to have more control over the bike and give them the security of putting their feet on the ground easily. For a more experienced rider, you can get a bike that is slightly larger as they will have the skills to ride it.

Kids Grow Quickly!

If you are a parent reading this, you already know how quickly kids grow. They will grow out of their bikes quickly – even as quickly as once per year with some. If you have a few kids, it is easy to pass down the bikes. Getting a new bike for each size can turn into an expensive proposition especially if you factor in the years of use and then the resale value after they are all done. Another great avenue is to get a used bike. It is very rare that a kid will ride a bike into the ground so used bikes are often great deals.

Bike Shop Bikes

It is worth it to get a brand name bike that was originally sold in a bike shop. It will be of higher quality and designed by a person that understands human dimensions, making it easier for your kid to ride. While wheel sizes might be the same, the difference between a bike shop bike and a department store bike can be staggering. The bike shop bike will have a frame that is appropriately sized to the wheels while the department store bike will have whatever was the cheapest way to get the bike out for sale, even it does not appropriately fit anyone. In addition, things can and will break on any kids bike but they will be sure to happen much quicker on a department store bike.

Gears or No Gears For a Kids Bike

Smaller kids bike will come with one gear as kids need to be more focused just on the riding and not yet have to worry about shifting. On 20-inch bikes you will start to find gears, often with a grip-shift. If a kid is just learning to ride while on a 20-inch bike, make sure the bike is in a good, easy gear and don’t have them shift. Once they are comfortable riding, then teach them how to shift.

When To Graduate From Coaster Brakes

Smaller kids bikes will come with coaster brakes which is where you pedal backwards to stop. This is used because of the simplicity for kids and the difficulty in pulling a brake lever with smaller hands. As you get to 20-inch bikes, they will switch to standard hand brakes as kids hands will be of sufficient size to safely operate a brake.

Doing the Best for Kids

Give them the bike that will allow them to control the bike like a natural. It will increase their love of riding and increase their skills and confidence. Kids bike sizing is relatively simple when you realize there are only four sizes and that you need to get them on the one they can control the best.

Finding The Best Road Bike Saddle For You

February 8, 2016 by Wade Shaddy

best road bike saddle

The majority of cycling articles focusing on bike fit don’t fully address saddle fitting. Fitting a road bike saddle works best when you start with the right size bike, or at a minimum, a bicycle that is close enough to your correct size to be comfortable and efficient.  Finding the best road bike saddle should focus primarily on the contact points between the cyclist and the saddle assuming that your bike fits you.

Don’t Compromise When Searching For Your Best Road Bike Saddle

Bicycles are symmetrical. The human body is not. A saddle that is not right for your body and butt can compromise your position on the bike as well as your comfort. One saddle may be great for one rider while being the worst option for the next. A general rule of thumb for saddles is that it fits when it disappears, meaning that you’ve forgotten all about your saddle and don’t even know it’s there.The only thing on your mind is the ride and the scenery.

One Exception

An exception to this general rule of thumb is if you have been in the saddle all day for miles and miles. At this point, you’ll likely take note of your saddle. The thing is, if it didn’t fit, you wouldn’t have ridden this far.

The Finger Test

Changing a saddle can take up to 15 minutes per seat when choosing and testing saddles.  This means that many cyclists skip the hassle and make a seat choice by pressing a finger into it, testing it’s firmness or lack of softness.

Widely Advertised

Another option widely employed is simply choosing a saddle based on the one that is most advertised. This might actually work for the majority of cyclists, as most high-end saddles are tested and proven to be comfortable for the wide majority of riders. This is more down to chance however. You get what you pay for, both in time spent deciding and money.

Gender or Not

Keep an open mind as you search for the best road bike saddle. Most bike shops start you out by indicating saddles that are specifically designed for men and women with most women’s saddles being wider towards the rear. But some men find that women specific saddles are actually really comfortable and ideal for them. At the same time, some women realize that a men’s saddle is the better choice for themselves also. Gender specific is worth taking a look at, but choose the saddle that’s the most comfortable for you.

The Cutout

A popular design for bike saddles includes a cutout in the center of the saddle to relieve unwanted pressure in sensitive areas. A good-fitting saddle may not need a cut out if the support is in the ideal area for you. It varies from person to person but in general, male or female, it means not too much pressure in the front or in the center of the saddle. A cutout design may prove the most comfortable but at the same time, don’t discount saddles without a cutout before trying them first. You might be surprised as to which feels best.

Saddle Width

Saddle width has been a source of controversy for many years. A comprehensive study sums saddle width up like this:”Stresses within the perineum are reduced when saddles are sufficiently wide to support both ischial tuberosities”. (Your sit bones). You should find a saddle that is wide enough for your sit bones by measuring them and choosing the right width.

Back in the Saddle

With all that information fresh in your head, here are a few options for your best road bike saddle starting off with narrow and ranging toward wide.

Selle SMP 

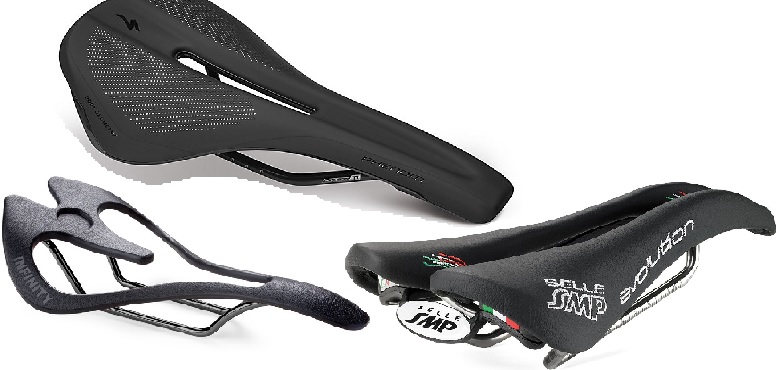
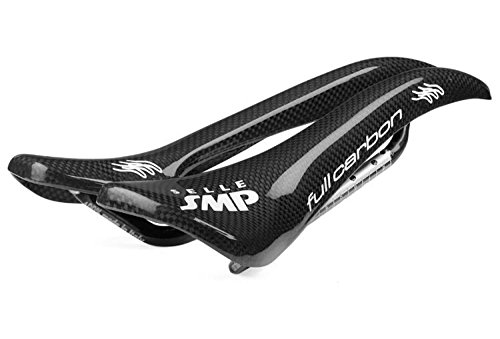
This full carbon model is at the top of the list. It’s designed for cyclists looking for the lightest weight possible. It sports a completely free central channel, eagle-beak nose and raised design that gives these models an aerodynamic touch. They are suited for smaller sized people with narrow pelvises.

Selle SMP Evolution 

A good saddle for racing, and cycling in your free time. It’s a   composite model with minimal padding. It relies on foamed elastomer padding where the ischial tuberosities (sit bones) and rear rest. The minimal padding also makes it particularly suited for thinner cyclists with narrow pelvises.

Specialized Phenom Expert 

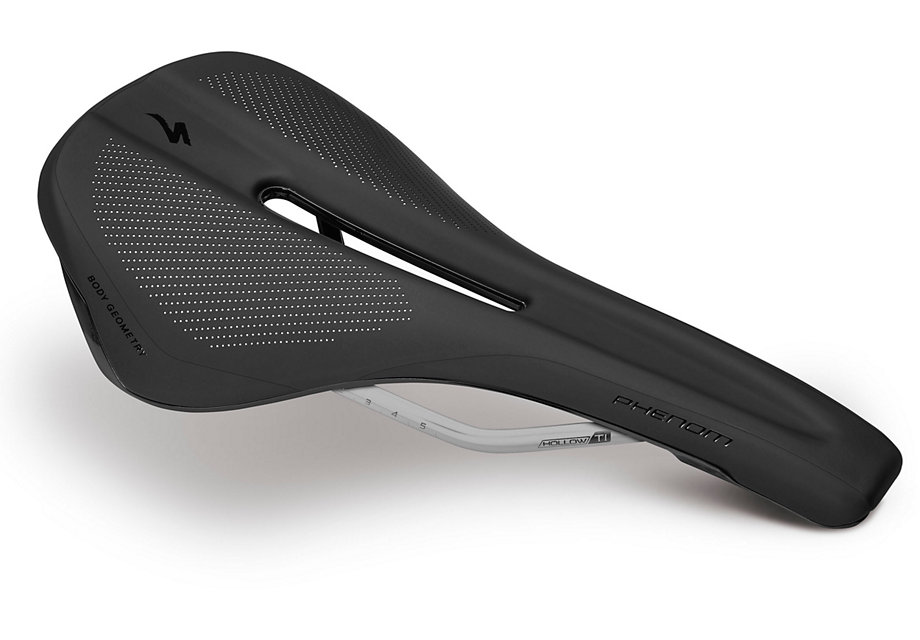
The Phenom Expert is designed with ‘adaptive edge’ construction. It allows the outer edge to conform to your body for a custom fit. Lightweight, stiff and efficient, this saddle features hollow titanium rails and the perfect amount of padding for those long grinds in the mountains.

fi’zi:k Road Arione R5 K:IUM
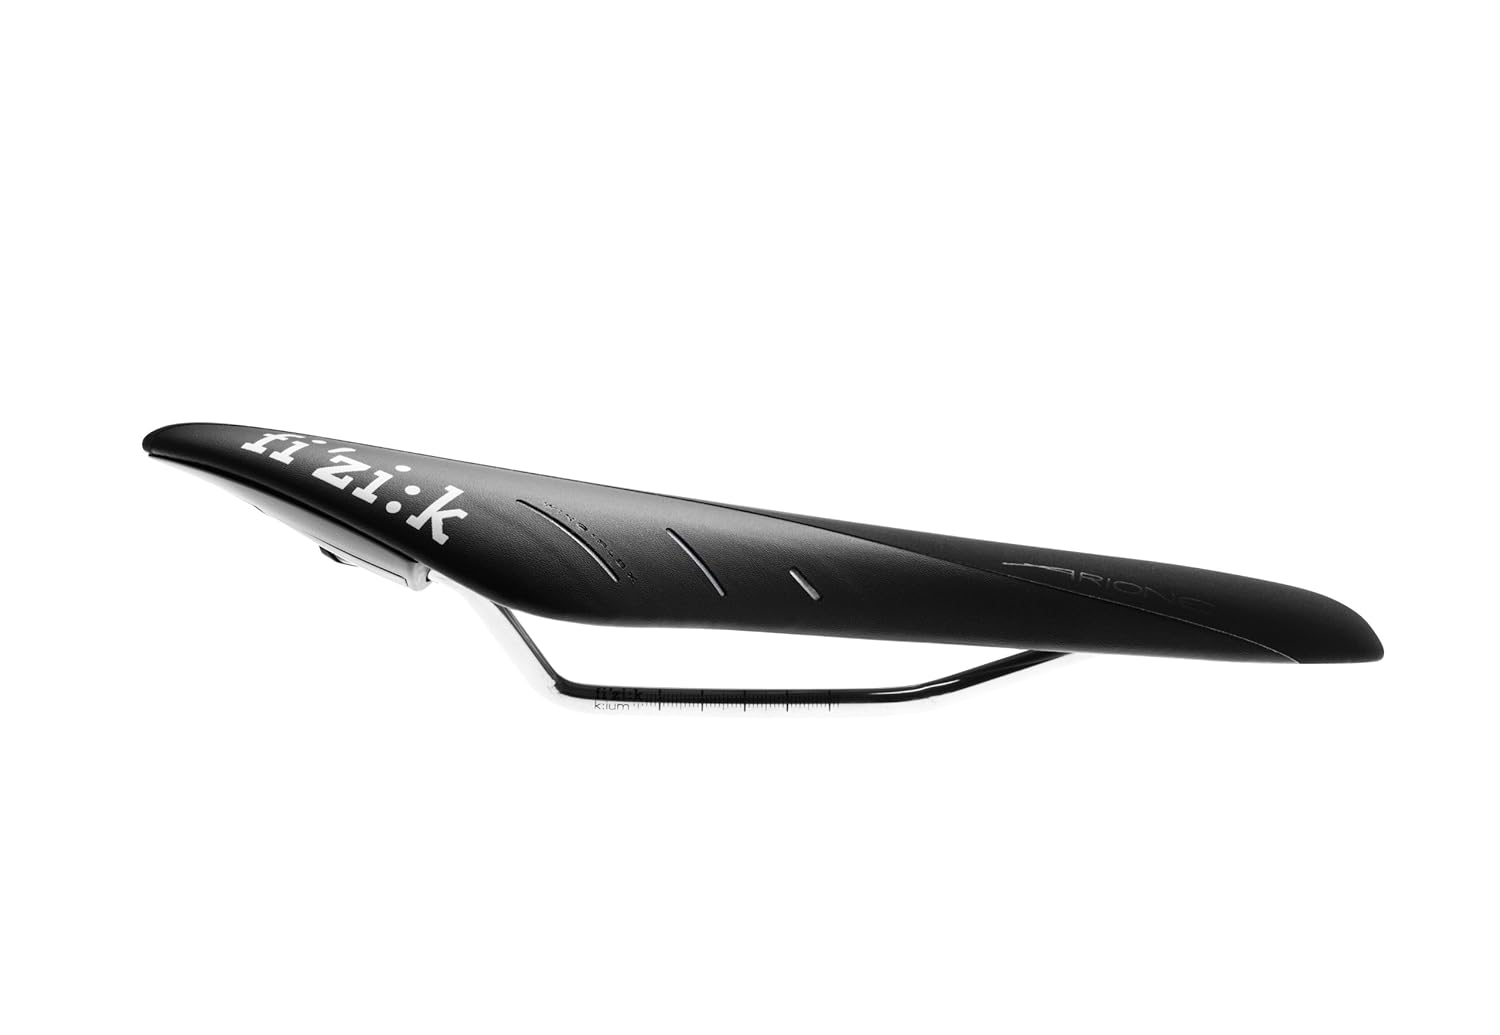
The Arione R5 features a Carbon Reinforced Nylon base and Wing Flex technology. This saddle is made for competition. It aids in high-performance because it takes into account that cyclists have varying degrees of flexibility, and human flexibility is in direct relation to riding behavior when cycling. Popular with pros such as Sir Bradley Wiggins and Geraint Thomas, this saddle has no cutout, and they like it.
Infinity N-Series Infinity N-Series Bike Seat
Bare bones saddle — it looks like a skeleton — this saddle is perfect for the cyclist who wants all the performance with none of the frills. One of the lightest saddles on the market, weighing in at just 210 grams, the N-Series Seat is made of injection-molded nylon. Its has two purposes: Comfort and Performance. Don’t let the odd look of the saddle deter you; it’s built to withstand the rigors of even the longest rides.

10 Ways to Improve Bike Comfort

January 21, 2016 by Wade Shaddy

bike comfort

There are a lot of variables to improve bike comfort; saddle, saddle height and position, reach to the handlebar, handlebar height, the shape of the handlebar, crank length, stem, tires, the list goes on. If you’ve grown accustomed to your bike, it might just be that you’ve adapted to things that weren’t right in the first place. It pays to take a good hard look at your bike and not only improve your bike comfort but also to make your riding more efficient. Here are ten ways to improve bike comfort.

One: Bike Fit

First and foremost, get a bike fit from a professional. Taking your bike to a professional rules out most issues. For example: If your bike simply doesn’t fit you, a bike fit will determine that you might need an entirely different bike. Secondly, a bike fitter can diagnose individual issues specific to you and correct for them vastly improving bike comfort.

Why it Works

You may have a longer torso with shorter legs or vice versa. A bike fitter can tell you without wasting time or money on the wrong size bike or trying to extensively modify components to make the wrong size bike to fit you. A bike fit is probably the best investment you can make as even if your existing bike is the right one, the fitter will improve your position making it more comfortable and more efficient which will also lesson the likelihood of overuse injuries from occurring.

Two: Tires

The most common road bike tire is 23mm. The old-school thinking was that the skinnier the tire, the less rolling resistance. Because it is so skinny, it also requires high pressure to prevent pinch flats. Engineers in the cycling industry are trending toward the wider, 25mm tire as it has less rolling resistance and is more aerodynamic with a wider rim, not to mention that it has less of a likelihood of flatting. The majority of riders in the pro peloton are on 25mm tires rather than 23’s for most road stages these days.

Why it Works

A wider tire has more air in it which allows the tire to flex more thus soaking up vibration and increasing the amount of cushioning you get from the tire. Also, with the larger diameter, you can lower the air pressure in the tire giving even more of a supple ride.

Three: Stem

Reversing the stem is one of the most effective ways to make your bike more comfortable as it raises your handlebars to a more comfortable position. The majority of stems can be flipped as they are angled for two handlebar heights. One position is aggressive and flat, the other is angled upward for a more upright torso which can alleviate stress on the lower back as well as the amount of weight on the hands. Take a look at your stem. If it has a high degree of tilt in either direction, it can typically be reversed depending on what you need to get comfortable.

Stem Swap

Stems are also made in a variety of lengths which are often swapped out when getting a new bike or being fitted. If your reach is too far, get a shorter stem. If you have persistent numbing in your wrists or hands, it could be that the stem is too short. Get a longer one.

Four: Handlebars

Handlebars are easy to take for granted but they play a critical role in your ride quality and comfort. Thanks to constant innovation and evolving shapes and sizes, handlebar comfort has never been easier to achieve. The proper handlebar puts your hands in the right position to support your upper body without putting excessive strain on your wrists, shoulders, and neck. Handlebars should balance your weight between the front and back wheels for the best handling. New shapes, like compact bends, offer improved ergonomics and control.

Why They Work

Traditional drop bars might be over-sized for smaller riders or women. Compact bars are designed with a very short reach and shallow drop. Replacing your traditional drop bars for compact bars can reduce your reach. Ergonomic bars have a flat spot on the curve, replacing the sharp curve in drop bars. The flat spot feels better on your hands. Take it a step further, if you want to spend the money, and add carbon-fiber handlebars. They reduce road vibration, and offer a flat surface on top for resting your palms when cruising in an upright position. The downside with carbon bars is that if you crash you need to replace them as it’s very difficult to tell if they’ve been damaged.

Five: Bar Wrap

One of the easiest and most effective ways of making your bike more comfortable is by changing or modifying the padding on your handlebars. Some types of bar tape contain gel integrated into the fabric to make it even more forgiving. If regular tape or gel tape doesn’t provide enough comfort, other effective improvements can be made by inserting strips of padding under the tape and hoods. You can also put two layers of tape on your bars for even added thickness.

Six: Saddle

Having an uncomfortable saddle is one of the biggest bike comfort problems riders face. Saddles are very personal so you have to try a few. The first step is finding the right size. It might be tempting to go with a wider saddle that has a lot of padding; don’t fall for it. Wider saddles can place pressure in the wrong places and cause chaffing.

Why More Padding Doesn’t Work

If you’re choosing a seat for longer rides, don’t choose a saddle with lots of padding. Saddles that absorb your weight, instead of supporting your weight, are counterproductive on longer rides. Long distance cyclists know that highly padded seats become terribly uncomfortable the longer you ride because the padding puts more pressure on your crotch, right where you don’t want it. You want the weight placed on your sit-bones which is why getting the right size saddle is so important.

Adjustments to Make Your Bike More Comfortable

It’s one thing to just swap out components on your bike to make it more comfortable, but certain adjustments are just as critical and should be included on any bike comfort list.

Seven: Brake/Shifter Levers

It’s surprising how many cyclists simply accept that their brake/shifter levers are positioned correctly on the handlebars. They may be positioned at an unnatural angle, or otherwise don’t fit you. You should be able to comfortably reach the levers from the hoods or drops. A simple adjustment is typically all that’s necessary to give you better control, and more comfort. Also, on many newer models the levers can be adjusted inward for smaller hands. Take advantage of this if you need it. It can make a big difference.

Eight: Cleats

Have your shoe cleats professionally adjusted if possible. If the cleats on your shoes are set up incorrectly, you loose power and in some cases, risk causing muscle strain and injury. If you choose to adjust on your own, the basic idea is to set the rotation of the cleat so that it correlates with the way your foot is naturally positioned. An easy way to do this is in your bare-feet, jump, and then look and see what position your feet are in when you land. Are they toed in? Straight? Or pointed outward? Line up your cleats to replicate this angle. (See “Cleat Position” in this article for a full rundown.)

Nine: New Cables and Housing

Dirty,old, sticky cables make shifting sluggish and troublesome and in some cases a pain in your wrist, literally, from having to push so hard to shift.  Smooth, clean cables reduce shifting effort and improve precision making the ride much more enjoyable. Replace your cables and housings on a regular basis and also keep your derailleurs clean and properly lubed with a light oil on the pivots.

Ten: Wash Your Bike for Improved Bike Comfort

As with new cables and housing, washing your bike may not seem like it will directly improve bike comfort. However, part of comfort is ease of riding and washing your bike and having it well maintained ensures that it shifts smoothly, brakes easily, and is just all and all dialed in and ready to ride.  Riding a clean bike just feels great so improves overall bike comfort.

How to Make the Wrong Size Bike Fit

January 3, 2016 by Adam Farabaugh

How to Make the Wrong Size Bike Fit

In the ideal world you always get the exact size bike for your size and fit it properly. Unfortunately that doesn’t always happen as maybe a friend had a bike that they were getting rid of or the bike you have a deal on isn’t quite the right size.

It depends on how far off the size of the bike is if you can make the wrong size bike fit. If you should be on a large, 58cm road bike or 20 inch mountain bike, fitting a small 52 cm road bike or 15 inch mountain bike just isn’t going to happen and vice versa. If the bike is relatively close however, there are a number of changes that you might be able to make to get the bike to more closely fit you. If you can’t get the bike to your ideal position, it is not recommended to ride more than just around town as an improperly fitted bike can cause injury specifically to your knees and back but other areas as well.

Where Doesn’t the Wrong Size Bike Fit?

To determine what adjustments need to be made to the bike, you first need to get on it and see where everything falls. Consulting the article “How to Do a Proper Bike Fit” will help to show you where you should properly be positioned on the bike. In general, you will know right away if a bike is too short in the top tube or with the saddle height. Depending upon where your differences are, you may have to do one or all of the following if your bike is either too big or too small.

Too Small of a Bike

A wrong size bike that is too small can be easy to make fit if it only requires small changes but past that you may need different parts such as a stems or seat post. It is typically easier to fit a smaller bike than too large because simply it is easier to lengthen something on the bike as shortening something past the limits of the frame simply isn’t possible.

Longer Seat Post

The first thing that you should adjust on the bike is the height of the saddle. Seat posts typically have a fairly long length so can be extended quite far. On all seat posts, at least if it hasn’t worn off, there is a maximum extension mark. Never position the post past this point as there is not enough post in the frame to adequately support the weight. If you do, the frame can actually bend and break quite easily. The solution to raising the seat further is to get a longer seat post which can be found relatively easily at your well stocked local bike shop or online. A 350mm length post is about as long as you can easily find. Just make sure you get the right size diameter post as most bikes have different sizes.

Increased Saddle Set-Back

Having too small of a bike places you too far forward on the bike. Sliding your saddle back can help solve this. The first way to do this is to loosen the bolts on the rails of the saddle and slide it back as needed. If you find you can’t slide it back far enough, you can get a seat post that has increased set-back. Standard typically ranges from 10mm to 20mm. You can find however 30+mm setbacks but you’ll have to shop around. And if you find a post with the right set back but the diameter is too small you can use pre-made shims to make it fit properly.

Longer Stem

The next area of the bike that is probably going to be an issue is how close the handle bars are to your body. The solution to this is a longer stem which will push the bars further out in front of you. Depending upon how long the stem is now, you can get a stem around 140mm to 150mm in length. The thing to watch out for here however is with an increased stem length, the handling of the bike decreases because of how far the bars are from the pivot point, the steerer tube.

Raising the Bars

The last thing that you will probably have to do on a slightly small bike is to raise the bars. You can do this in two ways. The first is to make sure that the stem is placed at the very top of the steerer tube with no spacers above it. The second is to get a stem with a high angle which will raise your bars. Zero to seven degrees or so is typically average but you can find stems with angles above fifteen degrees.

Too Large of a Bike

A wrong size bike that is too large can be a challenge simply because you can’t lower a saddle past the frame along with the handle bars. If the bike’s not too small however these few techniques will get the position to where you need it.

Shorter Seat Post

The limit on how low the seat post can go is where the bend on the top of the seat post is. If you find that when you try and lower the post all the way to this point and it hits something, it’s typically the post bottoming out on the water bottle cage bolts. A simple solution to this is to cut the seat post shorter. Only cut off however the minimum that you need as if you raise it and don’t leave a corresponding amount of post in the frame, you can break the frame.

Sliding the Saddle Forward

Sliding a saddle forward on the bike can bring you forward enough to potentially fit the bike better. You can loosen the saddle bolts and slide the seat forward as far as it will go in the rails. Past this you will have to get a seat post that has a forward bend to it or a post that is designed to be able to flip around and still place the saddle at the correct angle.

Shorter Stem

A shorter stem can bring the bars closer to you. 50mm is about the shortest stem you can get. With excessively short stems, as with excessively long stems, the handling of the bike can be affected. Short stems give a bike more of a twitchy feel as the same degree of bar rotation turns the front wheel a greater degree than would a longer stem.

Lowering the Bars.

On a bike that’s too big you can lower the bars a fair amount by making sure the stem is at the lowest point on the steerer tube without any spacers underneath. If your bars are already at this point, the next way to lower the bars is to get a stem with a high angle such as 15 or so degrees. There are no negative angles as a stem can be placed right side up and right side down depending on the need. Just make sure you get the right size stem for the diameter of your bars.

As long as the wrong size bike isn’t too far off in size, it is relatively easy to make a bike fit with the right approaches. You may need a few different parts but the price of those parts is probably going to be much less than what you would otherwise spend on a bike that you don’t have a good deal on. The bike will ride different than a properly fitted bike but you can get used to it. Just make sure that the position isn’t too far off as if it is, you are only setting yourself up for injury and whatever savings you may have simply aren’t worth it. Take your time and past these suggestions don’t do anything extreme to make a bike fit as in general it probably isn’t going to be worth it.

Women’s Specific Bikes Explained

December 15, 2015 by Adam Farabaugh

Womens specific bikes

Women’s specific bikes have recently become more and more popular with the majority of bike manufacturer’s now offering bikes specifically made for women. In the past, bikes were just bikes, and to accommodate women’s shorter torso length and generally smaller body size, parts were changed and adjusted to try and get a bike as close as possible to a good fit. Some bikes had better geometry than others that made this possible but it was still a challenge and no one wants to change half the stuff on their bike before they can ride it. There are a number of modifications that can be done but the biggest and most desirable is the women’s specific frame which now comes in road, mountain bike, and even a few time trial/triathlon bikes.

Differences in Frame Design

The biggest difference between men’s body geometries and women’s is torso length. Regular men’s frames generally leave women too stretched out on the bike reaching for the handlebars. A smaller frame could be chosen but that leaves the seat tube at too short of a length as their legs make up the majority of their height particularly with longer femurs.

Women’s specific bike frames are made to have a shorter top tube length which brings the bars closer to the body. This however can create a few problems. The first is toe overlap with the front wheel. The second is that with a shorter top tube handling can be compromised. To accommodate for these issues, the head tube angle is relaxed which pushes the front wheel further out to the front. The length of the head tube is also generally lengthened which more easily brings the handlebars up which if left too low can be harder to reach which can put a lot of strain on the back. Also, a slightly steeper seat tube angle is used to more easily reduce top tube length.

These combinations lead to a bike that is sized well for the average women and handles as a bike should. Also on mountain bikes, in addition to the above, a lower top tube is generally used to allow more clearance when standing over the bike with both feet on the ground.

Modifications to Parts

Before women’s specific bikes, changes to parts were made to better accommodate them. With a women’s specific bike these changes are already made making the bike ready to roll as soon as you get it.

Stem

On standard men’s bikes, shorter stems were used to bring the bars in closer to the body. A shorter stem will probably still be used a bit to allow for a good fit specific to you as well as stable steering. Also, a stem with a higher tilt to it could be used to bring the bars up further if needed.

Handlebars

Women’s shoulders are generally narrower and so normal men’s road bars are too wide. A bar width of 38cm to 40cm is common and allows the hands to be positioned squarely in front of the shoulders which not only is more comfortable but also aids in handling.

Saddle

Women generally have wider sit bones so a wider saddle generally comes stock on a women’s specific bike. In addition to a wider saddle, a lot of women find that a cut out in the center of the saddle along with a bit more padding is preferred so that also generally comes stock. Finding more details on how to fit a saddle for you can be found in “Bike Saddle Fitting“.

Crank Arm Length

The length of the crank arms are generally proportional to height and with the average height of women being smaller, crank arms of around 170mm to 168.5 are generally used. The shorter crank arms aren’t necessary for all women however because despite a shorter overall height, the legs are still of sufficient length for a standard 172.5 crank arm length. This is also dependent upon rider preference as a shorter crank arm length allows more spinning while a longer crank arm is generally used with lower cadences, particularly in mountain biking.

Compact Crankset – Sometimes

A compact crankset has gears of 50×34 as opposed to the normal 53×39. This allows for the use of smaller gears and an increased ease of spinning over climbs, particularly steeper ones. Crankset is largely proportional to a rider’s strength, both male and female, as well as terrain. If you happen to find yourself struggling up climbs or have a cadence below 70 up a climb it is likely that a compact crankset or a triple crankset is beneficial.

Other Differences in Women’s Specific Bikes

One other site-ly difference, colors. This largely depends on manufacturer, but a lot of women’s specific bikes will be colored with pink, light blue, and purple tones, while some women gravitate to it, it seems there are nearly an equal number that dislike the colors. Also the bar tape as well as saddle color may be different to highlight that it’s a women’s bike. This can sometimes be hard to get around but a number of bike manufacturers do make neutral colored women’s bikes.

If you’re a woman, buying a women’s specific bike is largely the way to go. The only real exception is if your body geometry is more suited to a men’s frame; namely your torso isn’t as short. If you do go that route, still make sure the rest of the parts are geared toward a woman as you don’t want to be stuck changing everything mentioned above on your own. The differences in frame design are where a lot of the advantages occur. Ride one and talk to someone who knows specifically about fitting a bike for a woman and you’ll be riding comfortably on a bike before you know it.

Bike Fitting Cost

December 7, 2015 by Adam Farabaugh

Bike Fitting Cost

Getting a bike fit is an investment in yourself and your riding. It allows you to be in the optimal position on the bike for your anatomy as well as physique. How you value it though can depend, as raising the saddle a little and adjusting your bars ever so slightly might not seem like it should cost much. When you can’t ride because of an overuse injury and have to spend even more money on rehabilitation, that fit suddenly becomes much more worth it.

Valuing something is always dependent on how much you need it and what your opportunity costs are. Bike fits get placed in a category of “yeah it would be nice but is it really worth all that money?” Their value is always increased retrospectively when riders realize that they should have gotten a fit after all. They can vary in cost but getting it right is always worth it.

Levels of Bike Fits

There are varying levels of bike fits that depend upon the fitters experience and expertise level. Each level will go up in cost but also will have increasing value. Finding the right level of fit for your riding needs is key.

MyVeloFit: At Home Bike Fit

MyVeloFit is a revolutionary new app that combines the powers of computer vision and artificial intelligence to help you do your very own bike fitting at home in a matter of minutes. Whether you’re an individual or a business that specializes in bike fitting, they have a subscription model that works for you. Everything from free to a fraction of the cost of an in-person fitting!

Local Shop

Your local bike shop is going to be your biggest fitting resource as they are likely to have the personnel who have been around bikes enough to know how to position someone on a bike. They can adjust, with a bit of margin for error in the general sense, the height of your saddle, how far back it should be, and the height and reach of your handlebars. Most shops will include this general fit with the purchase of a new bike. On its own they will charge around $50 for this service as it does take a bit of time and know how. This is your best option if you are looking to ride for fun and aren’t doing long rides or racing as this puts higher demands on, well everything.

General Coach/Fit Enthusiast

The next level of bike fitters are going to be the ones who can more accurately assess what a local shop can tell you as well as other areas of specificities such as knee and hip angles as well as where your foot should be positioned on the pedal. Typically they have been around cycling long enough and are in a position of trying to achieve optimal performance so they know the ideal positions to produce the most power as well as endurance.

Depending on experience level, they may be able to do some of the stuff a fit specialist can do so if you can find a good coach who knows what they’re doing they can be a great valued option. Typically when working with a coach or other similar individual they will give you a discount on their fitting services since you are already paying for coaching. If not they will typically charge $100 to $200 because they have enough experience to know the ins and outs but may be lacking some of the higher end tools.

Fitting Specialist

At this level of fitting on a bike the fitter either has decades of experience or has taken classes to know the ins and outs of body anatomy and how to find the correct position for each cyclist they fit. They are going to be able to do what a local shop and coach or fit enthusiast can do but to an even higher degree of accuracy. Furthermore, they are going to be able to asses you for flexibility and other potential discrepancies that can affect your pedal stroke. This includes correcting things like leg length discrepancies, knee tracking issues which can be corrected with shims under the cleat, and other specific issues that aren’t going to be properly corrected for with anyone without the proper know-how. A fitting specialist is going to cost roughly from $150 to $300 because of their expertise and larger tool kit that can get your position pretty well dialed on the bike. The range in price is going to depend largely on the fitters experience level.

Fit Guru

A bike fit guru is someone who not only has taken classes on becoming an expert bike fitter but also has years of experience dealing with all sorts of fit related issues. A solid fit guru can assess a rider and know where they are potentially having problems and how they will be placed on the bike before a pedal is turned. Once the rider is on the bike they can see intricate details to how and why something is doing what it’s doing, say a knee diving in toward the top tube. Fit gurus also will have one of the latest fit tools such as the Retul Fit System or Guru Dynamic Fit Unit which are high tech tools using computer software and exact measuring devices to measure your position on the bike as well as your bikes exact measurements. Furthermore, they will most likely have lasers that can project a straight line that can determine knee tracking as well as foot, knee, and hip alignment. This level of expertise does come at a price however typically starting at around $300 and ranging up toward $500.

Personal Value

The cost of a bike fit can seem expensive at any level but when you compare it to what you’re getting out of it as well as what you’re saving, you’re actually getting a lot.

Value of Comfort

It’s hard to put a monetary value on being comfortable on a bike but riding and being uncomfortable is only going to lead to riding less to not at all because it’s not enjoyable. A good fit will have you as comfortable as if you were walking down the street.

Correcting Injuries

This is where the real value in getting a proper fit comes in to play as if you can’t ride due to an overuse injury it is likely going to take a while to bounce back from. On top of not being able to ride, you could potentially need treatment such as physical therapy to revamp a bad tendon or other strained body part. Depending upon the injury, this can easily cost as much as a fit and on top of it you still need a fit to correct the misalignment in the first place. If you just get back on the bike after you have recovered  you are just going to re-injure it.

Monetary Gains from Performance

This is an area that is more reserved for the racing cyclist who is at a high enough level to make prize money. Simply, a good fit is not only going to put you in the ideal position to pedal but also to be the fastest on the bike. This added power and efficiency can contribute to increased performance and thus results, which can have bigger payouts.

Additional Bike Fitting Costs

One additional note to costs in a bike fit to be aware of is the added costs on top of the original fit fee to make any changes on your bike. Things like a different length stem or cleat shims or wedges are going to cost more as the bike fit covers exactly that, the fit on the bike, not the additions needed for your bike. Typically a fitter has access to well-priced equipment that you can purchase to get your position dialed.

A bike fit is a costly investment whether using a local bike shop or a fit guru, but its benefits are going to be well worth it in the long run. Just make sure that when you get a fit you write down all of the exact measurements of your bike and that you keep them in a safe place so you can refer back to them in the future when needed. Bike fits are something you should do early in your riding days at the lower end of the scale and as your riding improves or if you have specific anatomic differences you should seek out a higher end bike fitter. They all will help improve your position on the bike to make your riding more comfortable and enjoyable.

« Previous Page
Next Page »
  • Facebook
  • Tumblr
  • Twitter

Latest Articles

JOIN Cycling: A New Training Platform for Cyclists

May 27, 2024 By Eric Lister

cold exposure

The Benefits of Cold Exposure for Cycling & Life

June 13, 2023 By Eric Lister

hill climb

The Ultimate Hill Climb Training Guide

May 31, 2023 By Eric Lister

shoulder pain cycling

How to Treat & Avoid Shoulder Pain While Cycling

April 12, 2023 By Eric Lister

psoas stretch

The Importance of the Psoas Stretch for Cyclists

April 6, 2023 By Eric Lister

cycling neck pain

The Ultimate Guide to Cycling Neck Pain: Causes and Solutions

March 21, 2023 By Eric Lister

Useful Info

  • Contact
  • Finally, A Global Cycling Club That Is Focused On Community And Love Of Cycling!
  • Privacy Policy
  • Share Your Story!
  • Terms And Conditions Of Use
  • Welcome to I Love Bicycling
  • What Happened When I Stretched Every Day For a Month

Recent Posts

  • JOIN Cycling: A New Training Platform for Cyclists
  • How to Hang Bikes in Your Garage: 4 Inexpensive Options
  • Gravel Bike Vs. Road Bike: Which One Is Better For You?
  • The 6 Types of Mountain Bikes & How to Choose the Best One for You
  • What Is a Touring Bike Good For? 5 Benefits We Know You’ll Love

Search I Love Bicycling

Connect with Us

  • Facebook
  • RSS
  • Tumblr
  • Twitter

Copyright © 2025 · Magazine Pro Theme on Genesis Framework · WordPress · Log in