• Training
    • Injury Prevention
    • Training Tips
  • How To
    • Bike Fit
    • Gear
  • Nutrition
    • Nutrition Tips
    • Weight Loss
  • Repair
  • Reviews
  • Stories
    • Funny Stories
    • Jokes
    • Quotes
    • Videos
    • Funny Videos

I Love Bicycling

I Love Bicycling is a website that is geared towards cycling for beginners with road cycling tips, training articles, nutrition tips, weight loss, how to’s and bike repair articles.

Bike Fit

  • Gear

How to Correctly Adjust Bike Seat Height (And Why)

January 12, 2023 by Eric Lister

Having a proper bike seat height on your rig is one of the most important parts of your bike fit overall. You risk discomfort, pain and the eventual likelihood of injury if you decide to overlook it, and may even attribute such problems to other facets of your training and lifestyle; missing the source of them altogether.

A number of factors are going to be at play including your specific upper/lower limb proportions, the mobility of your tissues, and your functional operating output in general. It might sound like a bunch of fancy nonsense, but it really all just boils down to the unique composite and capacity of your human body.
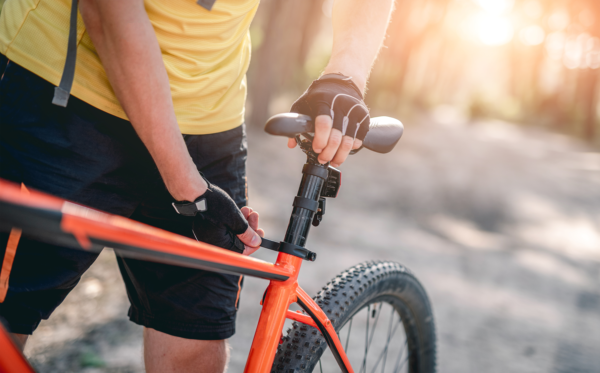
man adjusting bike seat height

levgen Skrypko/Adobe Stock

Here is what’s going to happen, we’re going to give you some simple tips and guidelines to adjust your bike seat height the correct way. Then, we’re going to hash out the problems that come with adjusting your saddle improperly. This will, for some of you (we hope), provide answers to pains that have been recurrent or chronic throughout your cycling career.

Arming yourself with the knowledge to address problems when they arise allows you to confidently push yourself in your training and competitions. Ride long enough and you’ll get hurt, you’ll feel pain, that’s just the way it is. Better to know where you can start looking, and be self-sufficient in your recovery, than to pedal away in ignorance and be at the mercy of countless practitioners because you have nowhere else to turn.

Proper Bike Seat Height

There are a couple of handy indicators that you can easily test and look for to tell if your saddle is the right height for your body. These signs should be looked for with a partner while you’re sitting on the bike while it (the bike) is in an upright position, using a support (such as a wall) to anchor yourself, and squeezing the front brakes to remain stationary.

Slight Knee Bend 

When you’re at the bottom of your pedal stroke (6 o’clock position) there should be a slight bend in the knee, approximately 25°-30° for most people. Any more, and you’re going to place excessive loads on the anterior part of the knee. Any less, and you’ll start to overextend the leg and heighten the injury risk to the back of the knee and hip extensor muscles.

1-2 cm Heel Drop

Again, at the 6 o’clock position, but this time with your knee locked out, your heel should drop 1-2 cm below the pedal. If you can’t fully straighten your leg, you’ll have to raise the seat. If you lock out your leg but are still struggling to reach the pedal, or your heel sits even with/above the pedal, the seat will have to be lowered.

Heel Pedal Test

Put your heels on the pedals and go through a full pedal stroke. If your saddle height is properly adjusted, your knee will lock out when going through the bottom position, and your heels will stay in contact with the pedal. If your knee bends at the bottom, the saddle should be raised, and if your heels lose contact at the bottom, the saddle should be lowered.


These are a few great ways to find your saddle height with the help of a friend or by using your phone to record yourself riding. More comprehensive methods are available, but these are by far the most economical. Let’s take a look at what can happen if saddle height is ignored or just improperly aligned, and the effect it can have on a person’s body.


Ljupko Smokovski/Adobe Stock

Improper Bike Seat Height

Having your saddle too low or too high is going to place excessive loads on different parts of your body. One of the reasons a bike fit is so important is because the bike is not a natural mechanism in and of itself. It’s man-made, but we are not bike-made. These are odd positions for us to be in in the first place, so doing it in the most optimal and efficient way is important due to the prolonged and repetitive nature of our sport.

Saddle Too Low

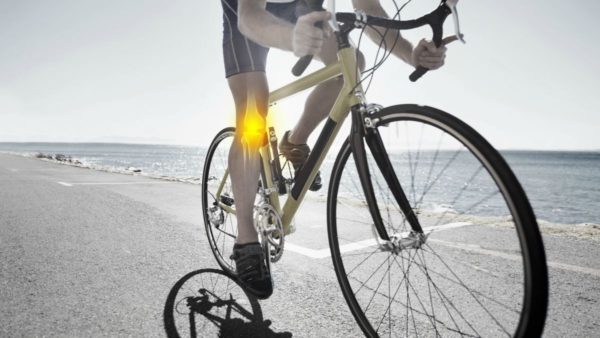
Knee pain is one of the most common problems amongst cyclists, and having a saddle that’s too low can be a significant contributor to it. When your bike seat height is too low it shortens the range of motion of your knees, and forces you to initiate your pedal stroke from a less than optimal position that places excessive load on your patella (knee cap). This can lead to irritation and pain in the patellar and quadriceps tendons (on, below and above the front of the knee). 

A low saddle will also compress your hips and shorten the rectus femoris and psoas muscles which make up the majority of your hip flexors. This leads to chronic tightness and fatigue and can actually pull your pelvis forward into what’s called anterior pelvic tilt, often a key player in the low back pain commonly experienced by cyclists. 

The structures on your lower leg are also going to suffer significantly from a lower than optimal bike seat. Because your knee won’t be able to extend properly, the body will naturally look for more room in the ankle joint. At the bottom of your pedal stroke, the ankle will remain in an excessively dorsiflexed (toes pulled up towards the shin) position. This shortens a large muscle on the front of your shin called the tibialis anterior, and can lead to the shin pain often described as “shin splints”.

Your upper body can also be compromised, because having a seat that is too low or too far back will have you reaching inefficiently for the handlebars. The body will resort to rounding the back and shoulders to optimally balance its weight over the bike, and can be a wonderful recipe for a weak, painful back, tight chest, inefficient breathing patterns and terrible posture.

Saddle Too High

While having the saddle too low can really affect the front of your knee, having it too high can injure the back just as well. If you’re reaching for the pedals and then weight bearing with a completely locked out or even hyperextended knee, you’re putting a huge load on the internal ligaments of the knee, particularly the ACL and PCL. The hamstring tendons and upper part of the calf can also be overstretched and affected by these locked out and loaded positions.

The hips will tend to rock back and forth if your saddle height is too high, and is a common sign to look out for. The reason being is because you will rotate, tilt and sway the pelvis to try and reach the pedal on every stroke. This can contribute to lower back pain and hip pain in any cyclist who doesn’t address it promptly.

Because you won’t be able to optimally generate power through your upper leg with a high saddle, the lower leg may try to compensate, which will result in fatigue and overuse of the gastrocnemius (calf), soleus (deeper calf muscle) and tibialis anterior (shin muscle). The achilles tendon will take the brunt of all these contractions, and can eventually develop its own tendinopathy.

Having the saddle too high might also make you lean forward more than you should be while riding. This can place excessive stress on the handlebars, and lead to things like “cyclist’s palsy” (ulnar nerve compression, weakness/numbness in the outer part of the hand). This position also shortens the hip flexors, and increases the likelihood of anterior pelvic tilt which can lead to back pain.


Beaunitta Van Wyk/Adobe Stock

Bike Fit At Home

MyVeloFit is a revolutionary new app that combines the powers of computer vision and artificial intelligence to help you do your very own bike fitting at home in a matter of minutes. Whether you’re an individual or a business that specializes in bike fitting, they have a subscription model that works for you. Everything from free to a fraction of the cost of an in-person fitting! Check them out today to start feeling better on your rides!

What size bike do I need?

October 4, 2020 by Sarah Lauzé

People come in all shapes and sizes, so it makes sense that bikes do to. It’s not impossible to make the wrong sized bike work for you, but it’s definitely easier to purchase a bike that is your size from the get-go.

When you’re first getting into cycling, it’s tempting to go with a second hand bike that’s the right price rather than the right fit. However, as great as it is to get discounted bikes, the problems begin when you actually start riding. From overall comfort and enjoyment to your own safety, having the right size bike can make all the difference.

If you’re looking to get into cycling, or don’t think your current bike is right for you, this guide will help you find the perfect fit.

What size bike do I need?

Decide what kind of bike you want

When it comes to buying a new bike, it can be overwhelming with all the options out there. First thing, you need to decide what type of bike you want. Are you going to be riding on trails, road, or a little bit of both? Generally speaking, there are two main types of bikes: road bikes and mountain bikes. However, within those types there is a wide range, as well as cross bikes that bridge the gap between the two. Sizing can differ dependent on the type of bike.

Why does bike size matter?

If you’re a casual rider and aren’t going out on long distance rides, bike size and a proper fit may not be a huge deal. But as the kilometers start to fly by the more you get into cycling, the millimeters of a bike frame start to matter. Why? There are three main reasons:

  1. Comfort – If you are uncomfortable on your bike, then you’re not going to want to ride it – sometimes it’s that simple. Feeling comfortable on a bike is your first step towards ensuring it is the right size for you.
  2. Injury prevention – If a bike frame is too big or too small for you, there are many issues that can come up. For example, if the bike is too big for you, your torso will be overextended, causing a rocking in the lower back that can lead to pain and serious injury. Cycling is one of the best types of exercise for you body, but if you don’t have the right bike, it cause more harm than good in the long run.
  3. Maximize efficiency – Who doesn’t want to go faster with less effort? Ensuring you are in the correct position on the right size bike helps you make the most of every rotation, as you won’t be wasting any energy.

How are bikes measured?

What size bike do I need?

There are two basic measurement systems: by size (small, medium, large) and by measurement (in centimetres). Both systems are based on the metal frame of the bike, as the added components (handlebars, saddles, etc) are interchangeable.

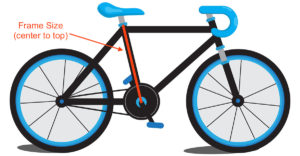
Generally, frames are measured by the distance from the centre of the bottom bracket to the top of the seat tube (see diagram below). However, the method of measurement can vary between manufacturers as they each have their own approach to bike design.

Bike sizing vs. bike fitting

They may sound like the same thing, but bike sizing and fitting are actually two entirely different things. For the sake of this article, we are focusing on bike sizing, which is fitting you, as a rider, to the bike.

An in-depth bike fitting is a great idea, but only once you have the base of your bike size. From there you can further adjust all the little things like handle bars, saddle, and pedal position – essentially fitting the bike to you.

How to determine your frame size

There are a ton of online calculators that can help you get an idea of your frame size, but won’t necessarily give you the whole picture. Two people can be the same height, while having different length legs and torso.

Bike size is determined by three main measurements:What size bike do I need?

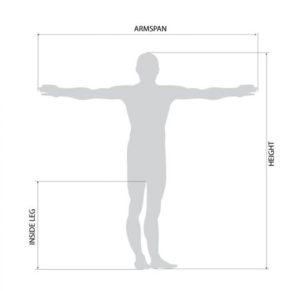
  1. Your height – This is not the time to round up your 5”11 to 6”0, so be sure to get an accurate measure of your standing height.
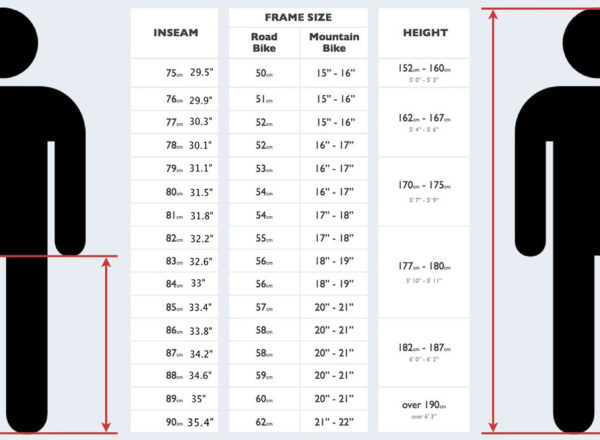
  2. Inseam length – This refers to the distance from your crotch to the end of your pant leg and determines your standover height (so you can comfortably stand over the crossbar). You’ll need about 1-3 inches of wiggle room between the crossbar and your crotch.
  3. Your reach – Measured by the “Ape index,” your reach is your arm span compared to your height. It is calculated by subtracting your height from your arm span (measured from fingertip to fingertip).  If a positive number, your arm span is greater than your height (and perhaps you should pick up rock climbing). If a negative number, your height is greater than your arm span.

A general sizing guide

The following chart shows a general guide to bike sizing in regards to your height and inseam length.

What size bike do I need?

If you go into your local bike shop, they should help you with all these measurements and get you onto the appropriately sized bike, but it’s not a bad idea to go in with an idea of what will work for you. It’s not worth impulse buying the wrong size bike because it’s on sale or catches your eye! Make sure you take the time to try out a bike before buying when possible, and a thorough bike fitting is always a good idea.

Symptoms of Bad Bike Fit

September 8, 2020 by Sarah Lauzé

We talk a lot about the importance of a proper bike fit, but paying for a professional fit can seem daunting. It’s not exactly rocket science, but there are a lot of little adjustments that can make a huge difference. It’s hard to put a monetary value on being comfortable on a bike, but riding and being uncomfortable is only going to lead to riding less to not at all. Here are some symptoms of a bad bike fit, and how you can go about fixing them.

Bowed Knees

When pedalling, if your knees are pointing outwards, you may not feel any pain, but you look funny and you’re wasting energy. If your thighs feel the burn a little too much when your climbing, it could be a sign your saddle is too low. The solution? Raise your saddle height in small increments until your legs remain parallel to the frame through each revolution.

Aching Hands

If you’ve ever been twenty minutes into a ride only to have your hands start aching no matter how you position them on the bars, then you know how distracting it can be. Another symptom of a bad bike fit can be hand and wrist pain. If your saddle is too high (or tilted too far forward), your handlebars too low, or your either too cramped or too stretched it can result in putting too much of your weight through the front of the bike and onto your hands.

Neck Pain

Neck pain often goes hand in hand with cycling, especially for beginners, and the problem may not be entirely bike fit. Holding your head up to keep your eyes on the road for extended periods of time is tough, especially if you have a weak core. However, neck pain can also be inked to having a high seat post in relation to your bars.

When the seat post is too high it can place you in an aggressive position, which your body may not be ready for. It’s a better tactic to gradually increase the aero position as you get used to cycling. Additionally, if your road or aero bars are too far away causing you to overreach you can place unnecessary strain on these muscles. The solution would be to place the bars closer in relation to your body so you’re in a “tucked” position when riding.

Wobbly Hips and Lower Back Fatigue

Lower back pain is more often a result of a weak core, but if your hips are rocking side to side as you pedal your seat is too high, which can result in lower back fatigue. Lower the seat gradually, riding a flat circuit in between until you’ve found the perfect saddle height. When you do find it, be sure to mark it somehow so you can easily find it again.

Knee strain

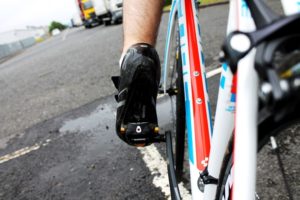
Knee pain in the back or sides of the knee is likely a saddle that is too high, but could also be your cleat position. On your downstroke, your foot shouldn’t be pointed down. Instead, you should be pushing the pedal down through the heel.

Foot Numbness or Tingling

Foot numbness usually occurs when the nerves between the bones under the ball of the foot become compressed. The likely culprit here is shoe fit, cleat position or socks. Particularly if the cleat is too far forward it can cause numbness, as it places pressure on the ball of your foot.

Fit Your Bike From The Comfort Of Your Own Home

MyVeloFit is a revolutionary new app that combines the powers of computer vision and artificial intelligence to help you do your very own bike fitting at home in a matter of minutes. Whether you’re an individual or a business that specializes in bike fitting, they have a subscription model that works for you. Everything from free to a fraction of the cost of an in-person fitting! Check them out today to start feeling better on your rides!
How To Fix Sloppy Bike Steering

August 31, 2020 by Sarah Lauzé

You may have noticed a clunking noise in your front end. You might feel a bit of play in your steering. You might notice more vibration than you think is normal. All of these symptoms are typical of loose bike headsets. Bike steering adjustments are routine, and nothing you can’t handle yourself.
Bike Steering

Bike Steering

Bike steering is made possible by your headset. The headset is a rotating joint at the bottom of the stem. It allows the steering column (tube) and front wheel to rotate and turn. The headset is your focus for bike steering issues. All you need to fix it is your multi-tool, or alternatively a 4-mm, 5-mm or 6-mm hex wrench, depending on model of bike. Tightening your headset is one of the most basic of all bike maintenance procedures.

Quick Test For a Loose Headset

If you’re not sure about bike steering or your headset, a quick test will help you decide if it needs attention, here’s how to do it: Apply pressure to your front brake by squeezing the lever. Place your other hand on the front of the stem, just above the fork. Rock the bike forward and back. If you feel a slight knocking your headset is loose. If you look close, you may even be able to see a slight separation (very slight) between the steering tube and the bushing when you rock the bike. A loose headset may also produce a more dramatic clunking sound when you bounce the front tire, or if you hit a bump when riding. That sharp clunk when you pass over railroad tracks is a perfect example.

Step One: Loosen the Pinch Bolts

Your bike should have two pinch bolts (some people call them stem clamp bolts) located on the vertical part of the stem facing the seat.  The bolts are horizontal and perpendicular to the top tube, and a critical part of bike steering. Note that one bolt typically enters the stem from the left, and the other from the right. Loosen them just enough so that the stem goes slack, or that you can move the handlebars without turning the wheel. Start with the 5-mm hex wrench, if it doesn’t fit, use the 4-mm or the 6-mm.

Step Two: Tighten the Headset

Tighten the large, vertical bolt (aka pre-load bolt) on the top cap of the stem using the 5 or 6-mm hex wrench. This is important: tighten it only enough to take the play out of the headset. The tightening motion squeezes the parts together (bearing tension) inside the headset, if you get them too tight, your bike steering will be stiff, and it will wear out the headset. In most cases, you won’t need to tighten the bolt more than about 1/4-to-1/2-turn. If you think you’ve over-tightened it, back it off a 1/4-turn.

Step Three: Test It

Grasp the front brake, and rock the bike forward and back. If you hear a clunking it’s not tight enough. If you’re not sure, do the test with your hand on the front of the stem. When you’re satisfied, go to Step four.

Step Four: Align The Handlebars

Your bike steering is still loose at this point. Stand over the bike and do a visual straightening of the handlebars. One way is to center the drop-outs (the ends of the axle on the front tire) with the center of the stem. Or you can just use the tire. This can be tricky, but easy to adjust later if you’ve tweaked it the wrong way. When you’re satisfied that the handlebars are straight, tighten the pinch bolts. These bolts need to be tight, they’re the only thing securing your stem to the steering tube.

Torque and Carbon

Something should be said about over-tightening bolts on bikes, especially carbon-fiber bikes. Even a slight miscalculation in torque can be a very expensive mistake on a carbon fiber frame. That sickening crunch can literally cost you thousands. Here’s how to avoid it: Invest in a bicycle specific torque wrench. A majority of carbon fiber bikes require a setting of 5nM. (newton meters) Using the torque wrench won’t allow you to ruin your carbon fiber frame, because you’ve set it according to manufacture’s instructions. (Don’t use the torque wrench to tighten the top cap bolt on your headset though, that’s a feel thing — unless specified to do so by your bike’s manufacterer).

Check With A Mechanic

If you’re not sure about any of your bolts torque requirements, or  how your bike steering mechanism (headset), works, check with your bike’s manufacturer or local mechanic. For extra help, check out the video below!

What Is Bike Geometry?

July 9, 2020 by Sarah Lauzé

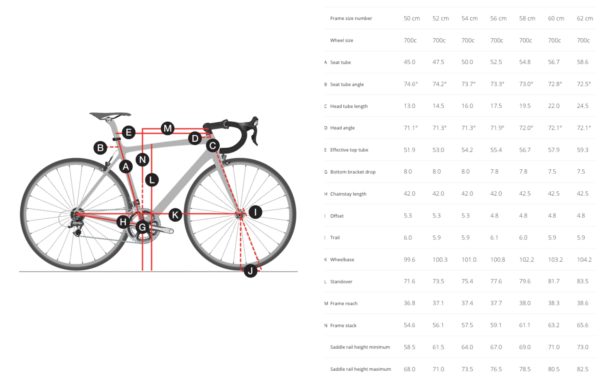
Bike geometry is the collection of measurements (lengths and angles) that make up a bike frame. In short, everything on a bike can be changed, but the geometry cannot. Looking at geometry charts on manufacturer’s websites can be confusing, but all those numbers translate into very real and understandable concepts.

There is a lot to know about bike geometry, but understanding the basics can go a long way in ensuring you choose the right bike for your style of riding. Bike geometry can help you understand how a bike will handle, feel, and how comfortable it will be to you.

Most bike manufacturers provide bike geometry charts within the description of the bike, but what is included does vary. Most will include frame size, head and seat tube lengths, top tube length, wheelbase, and chainstay length. Others will also include stack and reach measurements, fork rake, bottom bracket drop, and trail.

Stack and Reach

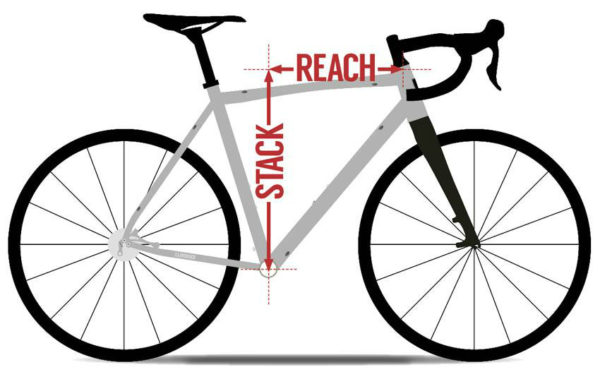
Stack and reach are the two fundamental elements that can help you determine right away if a bike will fit you. This is especially important because it helps standardize fit between size and manufacturer. Even if a bike is labelled as “medium” or 53cm, the actual fit can differ by up to 2 cm.

  • Stack is the vertical distance (in cm) from the center of the frame’s bottom bracket to the top of the head tube, where the fork passes through the frame. It gives an indication of how tall a frame is.
  • Reach is the horizontal distance from the center of the bottom bracket to the top-centre of the head tube. This gives an indication of how long a frame is excluding the stem.

Head Tube Angle, Fork Rake, and Trail

Head Tube

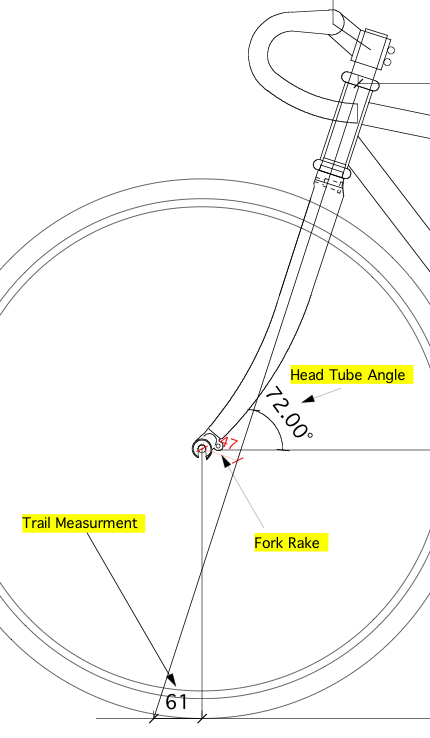
The head tube angle is the angle of the head tube in relation to the ground, with the angle being either ‘slack’ or ‘steep.’ The classic head tube angle for a road bike is 73 degrees, so a steeper angle (higher number) will mean less effort to steer making it better for high speeds. A more slack angle (lower number) may require more effort to steer, but perform much better at slow speeds.

Head tube length is just what is sounds like. Longer head tubes result in a more upright riding position. Short head tubes lower the front of the bike, putting you in a more aerodynamic position.

Fork Rake (Offset)

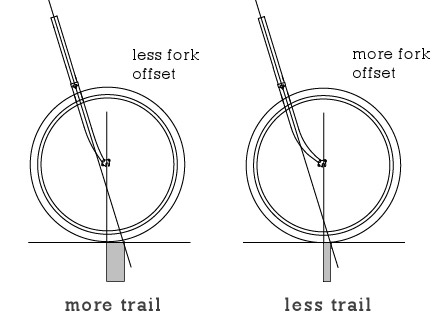
Fork rake or fork offset is the distance between the steering axis and the wheel center. Whether the fork is curved forward or is straight, but angles, if the offset is the same then it will handle the same. Generally speaking, less fork rake will increase the trail as the center of the wheel is moved back from the steering axis, and more fork rake means less trail.

Trail

Trail is a bit more complicated, and can be difficult to wrap your brain around. Think of it as the tire patch trailing behind the steering axis, determined by the head tube angle and the fork rake. The steeper the headtube angle, the less trail there will be.

Its impact on the feel of the bike is arguably more important and much simpler. A small amount of trail will result in a fast handling bike, meaning it will require less rider input and will handle well at high speeds. The downside is a certain amount of twitchiness, making for a rougher ride.  A large amount of trail will result in a slow handling bike, so it will take more work from the rider to steer at high speeds, but will feel more stable and smooth.


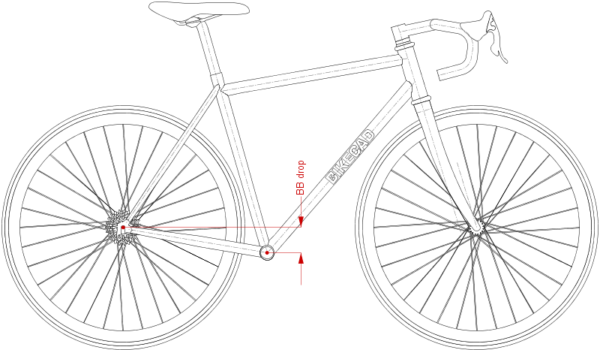
Bottom Bracket Drop

The bottom bracket drop is effectively how low you sit on the bike. It is measured by the vertical distance the center of the bottom bracket sits below the wheel axis.

The lower (more) the bottom bracket drop, the better the bike will corner and the faster it will respond (as your center of gravity is lower). The issue is pedal clearance, because the bottom bracket can only be so low before the pedals will catch ground while leaning into a corner.

Less bottom bracket drop will feel more stable at slow speeds, but will be reluctant to corner. This means more input from you through the handlebars to corner.

Seat Tube Angle

The seat tube angle is the angle of the seat tube in relation to the ground. This angle will generally be between 71-74 degrees, and doesn’t vary as much as the head tube angle. You can effectively influence the seat tube angle by changing the saddle position to be more slack or steep.

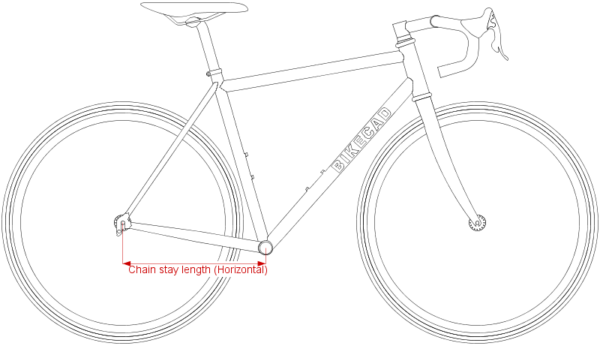
Chainstay Length

Chainstay length is the horizontal distance from the center of the bottom bracket to the center of the rear axle.

The chainstay length impacts the length of the wheelbase (distance between front and rear wheel axles) as well as the handling of the bike. Bikes with long chainstays will have more stability, as well as allowing room for panniers, making great touring and endurance bikes. Performance bikes, however, will have a shorter chainstay length for sharper handling.

Each measurement on its own can give you a snapshot into how a bike will fit and feel, but they all rely on each other. To get an idea, try looking at two bikes with very different geometry and then ride each one, paying attention to how it handles. You can then refer to those charts, picking out elements that worked and others that didn’t. For more information, getting a professional bike fit is always a great place to start in figuring out what will work best for you and your type of riding.

Bike Saddle Height: Too High, Too Low, or Just Right

June 30, 2020 by Sarah Lauzé

Finding the right bike saddle height can be a bit of a process, but it’s the foundation of a good bike fit. Just imagine you’re Goldilocks, and have to go through the process of having it too hight, too low, and then just right. Once you find the perfect spot, you’ll want to mark it somehow. That way if it gets readjusted somehow (like your kid borrows your bike), then you can easily find the sweet spot again.

Bike Saddle Height

Why Bike Saddle Height Matters

Bike Saddle Height

Ensuring that your seat is at the right height will make a difference when it comes to how much power you transfer to the pedals, and how much energy you use to move forward. It also effects how comfortable you are on your bike, which simply results in being able to spend more time in the saddle. You’ll be able to ride longer and push yourself harder. Riding with the wrong bike saddle height will most likely result in pain and injury in the knees, lumbar vertebrae, and the ankles.

How to tell if your bike saddle height is too low

Riding with your seat too low is a common mistake for beginners, as it can be easier to get on and off that way. A saddle too low or too far forward can cause tendonitis of the patella or quadriceps, which will both show up as pain in the front of the knee. So, if you have pain in your kneecap after riding, you will want to try adjusting your saddle height and position.

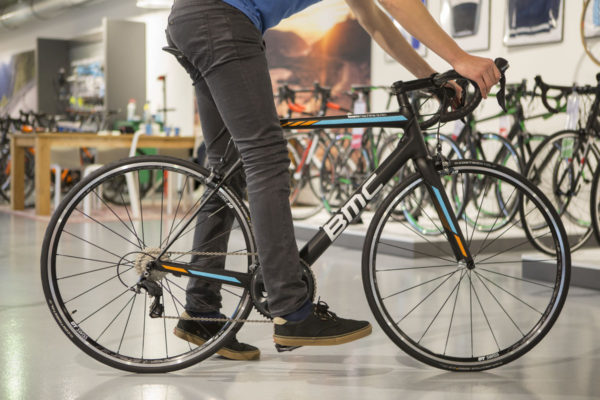
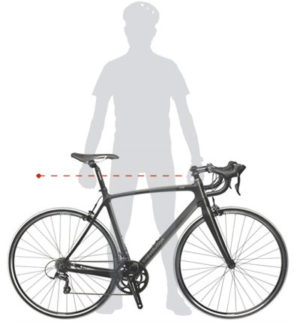
Get someone to hold you steady on your bike, or balance yourself in a doorway. Hop on and get into pedalling position, while letting your legs dangle straight down. Pedal backwards until one leg is at it’s lowest point. Your heel should barely be able to touch at the bottom when your leg is fully extended. If you can easily reach make your saddle height higher.

With your heel on the pedal, your leg should be fully extended, but still touching the pedal.

How to tell if your bike saddle height is too high

A saddle that is too high will cause the hips to rock back and forth. Not only does this detract from pedalling efficiency, but it can also be extremely uncomfortable. Discomfort can show up in your lower back or as knee pain (especially in the back of the knee).

Have someone watch you ride from behind, whether out on the road or on a stationary trainer. The hip wobble should be easy for them to see, and you’ll want to bring your seat down a little. Or, if you bring your foot to the bottom of the pedal stroke, your heel should barely be able to touch at the bottom when your leg is fully extended (see photo above). If you can’t touch the pedal at all, then lower the seat.

When you get a new saddle

Generally speaking, most beginner cyclists set their bike seat position initially and then adapt to it, but that’s not the best option. This is particularly true when changing from one saddle to another. The differences in padding thickness and design can throw off your bike seat position drastically. Changing saddles should always include taking a good hard look at seatpost height.

If your new saddle is making you uncomfortable, don’t adapt to it before adjusting the seatpost to get your actual position exactly the same as the old one. Knowing how your seatpost is integrated with your saddle will allow you to change your position or saddle as needed to keep you the most comfortable on the bike.

Cycling Foot Pain, Tingling, and Numbness

June 4, 2020 by Sarah Lauzé

It’s common for cyclists to experience tingling or numbness in their hands, but what does it mean when it shows up in your toes and feet? Foot numbness usually occurs when the nerves between the bones under the ball of the foot become compressed. Besides numbness, symptoms can show up as cycling foot pain, tingling, bruising, or even a burning sensation. Here’s what you need to know about the common causes, and what you can do to treat it.

Cycling Foot Pain

The Common Causes of Cycling Foot Pain

Shoe Fit

The first thing to look at is the fit of your cycling shoes. A pair of shoes that fit you correctly will feel as though they are not there, you should forget about your shoes while riding. Getting fit for the right shoes goes a long way towards comfort. Take your time when trying shoes, feeling out any potential pressure points. If you have wider than average feet, then make sure you get shoes that are wide enough.

If your shoes are too tight, it can cause inflammation between the joints as it decreases blood circulation, as well as constrict the ball of the foot. This can cause numbness, as well as a tingling sensation during and even after a ride.

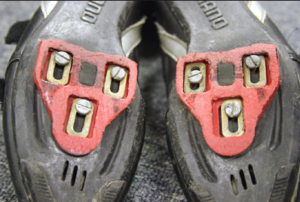
Cleat Position 

Correct cleat placement, just like the correct shoe, will let you forget that they are even there. Placing the cleats poorly can lead to uncomfortable foot position and can cause pain in nerves from pressure points or strain from improper twisting of the foot. Particularly if the cleat is too far forward it can cause numbness, as it places pressure on the ball of your foot. Take the time to dial in your cleat placement whether on your own, or with a professional bike fit.

Socks

Socks may be the most overlooked element of the foot pain complex. You want a sock that does not bunch up or is too bulky so that it creates pressure points in an otherwise fine shoe. They should keep your feet at the right temperature too. If they are too hot, it could lead to more swelling, exacerbated pressure points and chafing. Feet that are too cold start to hurt from the lack of blood flow or frostbite.

Technique

Climbing without proper pedaling technique or too slow of a cadence can put too much pressure on the balls of your feet and make them go numb. Ensure you are keeping your cadence within the proper range, and as consistent as possible.

Treatment and Prevention

Exercises on the Bike

While out on a ride, pay attention to your feet before the problems show up. If you’re going for a long ride, then try unclip and lift your foot up into the air at the top of the pedal stroke a few times to get your blood flowing. When you’re sitting at red lights, or stopping for a break, then flex your toes or do some circles with your ankles. You can even get off and walk a few paces if need be (although this can be awkward with cycling shoes).

Shoe Modifications

If you find your feet are painful, or going numb during rides, then try invest in some custom arch supports. These can help distribute your weight more evenly and decrease the pressure placed on the ball of your foot and on your toes.

Stretching & Rolling

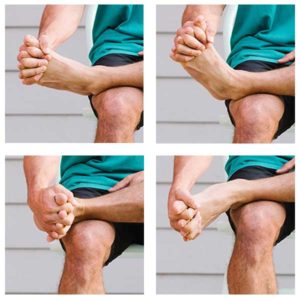
There are some exercises and stretches you can do off the bike, especially before a ride, to help treat and prevent foot pain. The first is to sit with one leg up on your other knee, fingers locking into your toes. Then rotate your foot around with your hand, stretching out the ankle joint and getting the blood flowing.

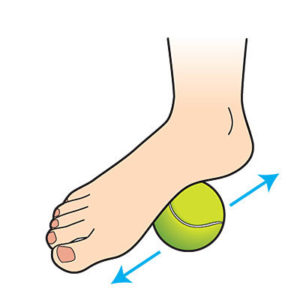
Second, you can use a tennis ball or a roller to apply pressureto the bottom of your foot. This can be painful, so don’t apply too much pressure if it’s too uncomfortable. Simply place the ball or roller under your foot, then roll front to back.

If your feet are comfortable while you ride, then it’s going to be a whole lot more fun. Never look at foot pain as an inevitable side effect of cycling, and make sure you do what you can to prevent it.

How To Find the Best Bike Saddle For You

March 11, 2020 by Sarah Lauzé

An uncomfortable bike saddle can quickly turn your bike from an instrument of joy to one of torture. Not only can it be extremely painful, but it can also lead to long term injuries or saddle sores as you contort your position on the bike trying to lessen the discomfort. There are a number of factors that contribute to how  comfortable bike saddle is, but the most important one is you.

We are all built differently, so there is no “one size fits all” when it comes to a perch for your unique bottom. What feels comfortable to one person, will feel like torture to another. So, we will outline some things to look into before starting the search for you dream saddle, but keep in mind that it will likely come down to trial and error.

Saddle Features

Width

You may think that the wider the saddle, the more comfortable it would be, but this is not the case. Neither are narrow saddles the be all end all when it comes to finding the best fit. The first step towards finding the most comfortable bike saddle is to measure the distance between your sit bones. This can be done with an “Assometer” at your local bike shop, or at home with a piece of paper and a pencil. Once you know the distance between your sit bones you will want to add 2 cm, 1 cm past the sit bones on each side.

If a saddle is too wide, the nose of it can start to rub on the inside of your quads. If it is too narrow then you sit bones will not be your main point of support for your weight. The pressure will then come down onto soft tissue, which can be extremely painful over any amount of time or distance.

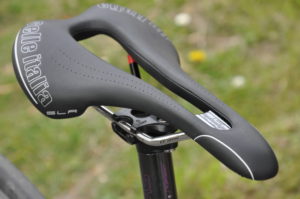
Cut outs

The popularity of cut outs largely came from a 1997 study. It claimed that reduced blood flow caused by saddle pressure could potentially lead to erectile dysfunction and permanent reproductive failure in men. Although this has since been disproved, the concern is still there. It comes down to personal preference and what feels most comfortable to you.

A test to see if you might benefit from a center cut-out is to sit on a hard wooden chair or bench and lean forward without arching your back to where you can rest your elbows on your knees. Sit like this for a few minutes and if you find that there is adverse pressure and discomfort on the soft tissue being pressured then you will most likely benefit from a cut-out in your saddle.

Softness / Firmness

It’s easy to think that the more padding a saddle has the more comfortable it will be, but it actually puts more pressure on sensitive areas. It can pinch and chafe rather than support your sit bones. The ideal firmness will put enough weight on your sit bones, while still providing enough padding to be comfortable. Some riders prefer no padding at all as it puts the pressure exactly where they want it, but that isn’t the case for everyone.

Shape

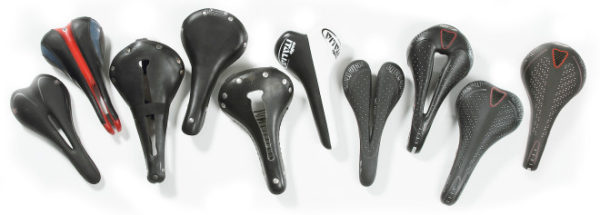
There are two general shapes for saddles when viewed from above: T-shaped and pear-shaped. If you have issue with chafing or your quads rubbing together, then T-shaped will be the better option for you. A pear-shaped saddle can be good fit if you shift your position a lot while riding, as there will be more evenly dispersed support.

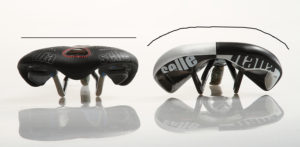
The second aspect of saddle shape if how flat or rounded the surface it. When viewed from the back, how much curvature does the saddle have? You want it to be slightly curved to keep you centered on the saddle, but not so curved that there is pressure on the central areas between your sit bones.

Gender Specific

Looking at saddles designed specifically for men or women may be a good place to start, but don’t let it dictate your decision. Women typically have wider set sit bones, and therefore require slightly wider saddles. That being said, many women find mens saddles that work perfect for them, just as many men ride on womens saddles.

Comfortable Bike Saddles

Touring Saddles

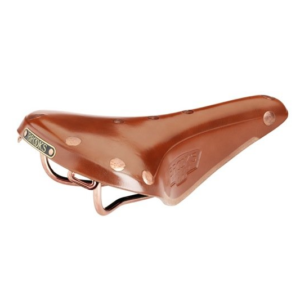
Brooks B17

$120

The B17 design was first introduce in 1910, so it may seem odd to be highlighting it here. However, the fact that this saddle has changed very little over the past century speaks to “if it’s not broke, don’t fix it.” It was made for those long distance tours, with a wider shape and a slim, short nose making it ideal for a more upright position on the bike. Handmade in Birmingham, this leather saddle molds to your bottom over time, giving you the ultimate personalized support.

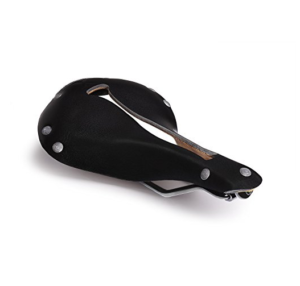
Selle Anatomica X Series

$150

Unlike the Brook saddle, the X series has no break in period, and is quite comfortable for most riders right from the start. The leather top is supported by a stiffer laminate layer glues to the underside, striking the balance between comfort and durability. The slot shape is meant to eliminate perineal pressure, sit bone pain, and saddle sores.

All-Rounder Saddles

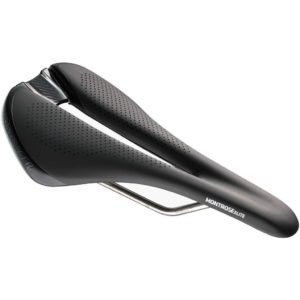
Bontrager Montrose Elite Saddle

$130

Intended to be one of the more all-purpose saddles on the market, the Bontrager Montrose Saddle has been perfected year after year. It uses something called inForm BioDynamics to optimize your natural movement on the bike. This helps eliminate any restrictions on your legs or power output, whether racing or heading out for a group ride.

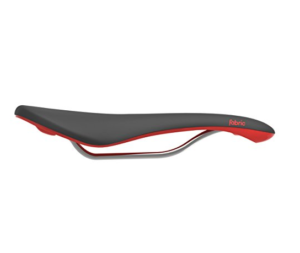
Fabric Scoop Pro Saddle

$170

It may not look like much, but this simple design is one of the more popular in recent years. Available in three shapes to suit your position on the bike, you can find a specific fit to your riding style. It brings together the perfect combination of comfort, performance, and unique construction. Plus, with the waterproof microfiber, the Fabric Scoop is durable and will stand up to years of use.

Racing Saddles

Selle San Marco Mantra

$214

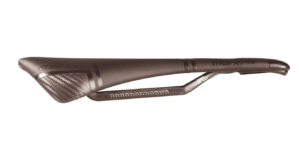
Weighing in at just 122.1g, this saddle is for racers who are worried about adding any weight to their bike. The stiff design allows for an efficient transfer of power, and is made for those who ride in an aggressive position.

Ritchey WCS Carbon Streem

$144

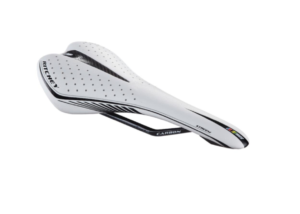
This light (155g), low-profile design and narrow carbon fibre injected shell is built for the faster riders who prize long-term support. The comfort comes from the shock-absorbing ‘Vector Wing’ rather than padding, so the flat profile will suit hardened racers, but can seem harsh for casual riders.

It is extremely important to find a saddle that not only fits your contour, but is also comfortable. Your saddle is the most important comfort piece on the bike as it holds the majority of your weight, so don’t rush into it. Even with the right size saddle, flat-ness, firmness, and cut-out preference, you may have to adjust your saddle further through minor tilt adjustments.

How to Choose Your First Road Bike

February 11, 2020 by Sarah Lauzé

Are you ready to take the leap and buy your first road bike? You won’t regret it. Cycling is not just a sport, but a lifestyle as well. However, the idea of getting a bike, finding all the right gear, and riding for the first time can be intimidating. With the rise of cycling has come endless options when it comes to manufacturers and components, making it overwhelming the first time you walk into a bike shop.

Don’t be discouraged! Having a ton of options is actually a great thing, as it increases your chances of finding just the right bike for you. You just have to know a little about what you’re looking for.

How to Choose Your First Road Bike


Where to start

Rather than walking into a bike shop with no idea what you’re looking for, let’s start with you. Sit down and make a list beforehand: What features are important to you? What type of riding will you be doing most? Are you looking for a commuter bike? Could you use this bike for a race one day? Are you interested in bike touring? What is your price range?

It’s important to get the right bike as it has the potential to determine whether your fall in love with cycling, or deter you from it altogether. That being said, you also need to be honest with yourself. You may regret investing thousands into a bike that you only ride once a week, so map out how many miles you think you’ll be putting in, and also what your destination is at the end of those miles.

The Bike Frame

Material

The frame should be the first part of the bike you look at. There are four main materials from which frames are constructed: carbon fiber, aluminum, steel, or titanium. For a beginner bike, aluminum is the best bang for your buck because of its lightness as well as durability without the fragility and added cost of carbon fiber.

Steel bikes can give a good ride, as they’re not too stiff, but they can be heavy and are a bit dated. Carbon bikes are becoming much cheaper, but for a beginner bike they are a bit overkill as you don’t need the performance advantages of weight nor the detailed feel of how it rides. It’s easy to spot which frame types are which with a little practice and if you don’t know, ask.

Frame Size

How to Choose Your First Road Bike

Just because you are a certain height does not mean you can look at a chart and determine your ideal frame size. There are a lot of variables when selecting the proper frame, the most important being your reach which is affected by the length of the top tube. Your reach can only be adjusted slightly by different stem lengths so there is generally only a few centimetres of adjustability, whereas there is several inches of adjustability in the seat height or seat tube. For more information, check out “What size bike do I need.”

Components

After finding the frame that suits you, you will want to look at the components it comes with.

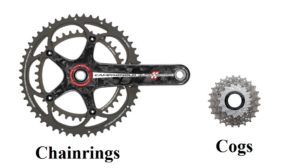
Chainrings and Cogs

How to Choose Your First Road BikeThere are two sets of sprockets on a bike, one at the front and one at the back. The front sprockets are called chainrings, and they’re located at the front on the crankset (the part that the pedals attach to). Typically, an entry level road bike will have a triple crankset (three chainrings), but some may have a double (two chainrings).
The sprockets at the rear of the bike are called cogs individually, or a cassette when referring to the whole cluster of gears. Most bikes will have 8-10 gears.

Now, don’t let the numbers scare you, but the key thing is to understand how gearing works. Chainrings and cogs are referred to by the number of teeth they have, which you can either count or look for the manufacturer’s number. For chain rings, the higher the number the easier it will be to pedal, but for cogs it’s just the opposite – the larger the number the easier it will be to pedal. So, for example, a 30/42/52 triple crankset and a 12-30 cassette will offer an easier gear than a 39/53 double crankset with a 12-23 cassette. Starting out you will want those easier climbing gears to build up strength and endurance.

The Best Brands

The two main brands of components that are descent, even at their lower end, are Shimano and Sram. Both of these then have upgrade capabilities which gives you a variety of options down the line. The best way to see how each level feels is to test ride them and then compare them to a model both up and down from it.

Wheels

With a beginner road bike, the wheels that come with the bike are typically going to be what you take home as it’s difficult to swap out wheelsets at a shop or on an online distributor. Things to look for are the spoke count in both the front and back, as well as the weight of the wheel. Depending on your weight and your use of the bike, the wheels will most likely have a spoke count of 32. They may be a little heavier than racing wheel, but they are also a lot more durable.

TiresHow to Choose Your First Road Bike

There are three main types of road bike tire setups: clincher, tubular, or tubeless. The most practical choice will be the classic clincher tire setup for its simplicity and ease of use. This does make you susceptible to pinch flats, but changing out a tube on the road is simple once you’ve done it a few times, it can even be done without tools!

This is just the base of what you’ll need to think about before buying your first road bike, and you will also have to consider the essentials (other than the bike) that you will need. For more information, check out our “Complete Guide to Cycling for Beginners.”

The Types of Knee Pain from Cycling

January 22, 2020 by Sarah Lauzé

The knee is one of the most complex joints in the body, so it makes sense that it is often the first place we experience pain. Although it’s not a muscle, stretches for cyclists are key to ensuring everything connected to the knee remains flexible and in place.

Many cyclists think knee pain means taking time away from the bike and resting up, but that’s not necessarily true. It could be caused by something as simple as a saddle adjustment or new cleats. So, if you’re experiencing knee pain, figure out what it may be stemming from and adjust your training accordingly.

The Types of Knee Pain from Cycling

Main Types of Knee Pain

Knee pain can show up in a variety of forms and for different reasons. These are some of the main types and common causes:

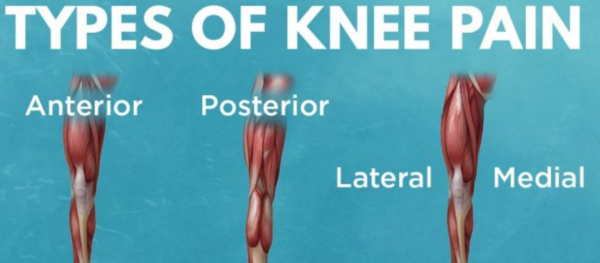
1. Anterior Knee Pain

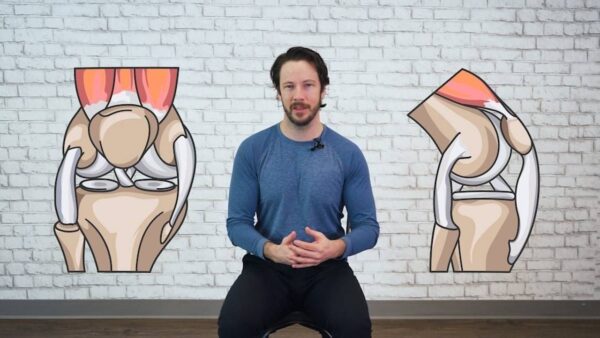
Anterior knee pain is at the front of the knee, on and around the kneecap (patella). It is most commonly caused by overuse. The quads are attached to the shin via the kneecap so each time you pedal, forces are transmitted across the joint, essentially squishing it against the thigh bone. The part of the tendon attached to the kneecap can become inflamed and sore to the touch. Often referred to as ‘runner’s knee,’ it can happen to cyclists as well.

2. Posterior Knee Pain

The fair less common posterior knee pain shows up behind the knee and is usually a more simple diagnosis. Overextending the knee, with a saddle that is too high or too far back, causes posterior knee pain in most cases, so make sure your saddle is the proper height and adjustment for you.

3. Medial & Lateral Knee Pain

Pain located at the sides of knee in the collateral ligaments is most commonly caused by the feet. In cycling, this would come down to your cycling shoes or the position of the cleat. How far apart your feet are positioned can stress one of the collaterals, causing medial or lateral knee pain during or after a ride.

4. Iliotibial Band (IT Band) Syndrome

The IT band, running along the outside of the thigh from the pelvis to just below the knee, is a thick strap of tissue that can often become tight or inflamed. This is usually caused by over use, weakness of the gluteus medius muscle, or cleat placement. If the IT band has become inflamed, then rest and ice are in order. If it is tight and sore, then regular stretching and rolling will be your best course of action.

The Types of Knee Pain from Cycling

What can cause knee pain?

Although cycling is a low impact sport, too much of anything can lead to stress and strain on the body. Pedalling is a repetitive motion with the constant bending and extending motions flexing the knees and hips. Naturally, with overuse these are the most common sites of chronic-use injury.

Too much too soon

The number one cause of knee pain with cyclists is going too hard or far too soon. It is great to challenge yourself, but going further than your ligaments and muscles can handle will only hinder you progress. Endurance is something that is built up over time, conditioning your muscles over miles and hours. Ligaments take even longer to develop than muscles, with issues often arising from tightness or inflamation.

Improper bike fitThe Types of Knee Pain from Cycling

The little adjustments you can make to your bike can make all the difference when it comes to addressing or avoiding knee pain. The height and position of your saddle and the placement of cleats on the bottoms of your cycling shoes can cause or help avoid knee pain, depending on how well they are adjusted for you.

Not Enough Stretching and Rolling

Flexibility or lack of, is a cyclists nemesis. Eventually if you do not stretch or roll your muscles will tighten so much that you will have difficulty walking never mind riding. Make sure to do stretches that especially focus on the muscles surrounding the knee.

Knee pain can be disheartening when it comes to cycling, but most cases are not cause to give up on your training. However, if pain persists despite proper rest, stretching, or bike adjustments, then it may be a good idea to see a physiotherapist to see if there is an underlying issue that needs to be addressed.

Knee Rehab Program for Cyclists

Looking for a program that will help you address the muscle imbalance that is likely causing your knee pain? Dynamic Cyclist is an online training platform designed to help cyclists become stronger and faster while riding pain free for years to come. Complete your regimen with an all-inclusive program that addresses mobility, flexibility, strength and injury prevention, all for a fraction of the cost of one physiotherapy appointment. Try out their 6 Week Functional Rehab Program and experience the results for yourself. Click here to try 7 days free!

Next Page »
  • Facebook
  • Tumblr
  • Twitter

Latest Articles

JOIN Cycling: A New Training Platform for Cyclists

May 27, 2024 By Eric Lister

cold exposure

The Benefits of Cold Exposure for Cycling & Life

June 13, 2023 By Eric Lister

hill climb

The Ultimate Hill Climb Training Guide

May 31, 2023 By Eric Lister

shoulder pain cycling

How to Treat & Avoid Shoulder Pain While Cycling

April 12, 2023 By Eric Lister

psoas stretch

The Importance of the Psoas Stretch for Cyclists

April 6, 2023 By Eric Lister

cycling neck pain

The Ultimate Guide to Cycling Neck Pain: Causes and Solutions

March 21, 2023 By Eric Lister

Useful Info

  • Contact
  • Finally, A Global Cycling Club That Is Focused On Community And Love Of Cycling!
  • Privacy Policy
  • Share Your Story!
  • Terms And Conditions Of Use
  • Welcome to I Love Bicycling
  • What Happened When I Stretched Every Day For a Month

Recent Posts

  • JOIN Cycling: A New Training Platform for Cyclists
  • How to Hang Bikes in Your Garage: 4 Inexpensive Options
  • Gravel Bike Vs. Road Bike: Which One Is Better For You?
  • The 6 Types of Mountain Bikes & How to Choose the Best One for You
  • What Is a Touring Bike Good For? 5 Benefits We Know You’ll Love

Search I Love Bicycling

Connect with Us

  • Facebook
  • RSS
  • Tumblr
  • Twitter

Copyright © 2025 · Magazine Pro Theme on Genesis Framework · WordPress · Log in